Nov 12, 2018 by Hwee-Boon Yar
If you accept One-time password (OTP) via SMS/text in your app, there's a nice goodie in UITextInputTraits (which is inherited by UIKeyInput which is in turn inherited by UITextInput) which is adopted by UITextField and UITextView.
In short, you can do:
let textField = UITextField()
textField.textContentType = .oneTimeCode
or
let textView = UITextView()
textView.textContentType = .oneTimeCode
and when you receive the OTP via SMS/text, iOS will automatically show the OTP code in the QuickType bar for a few minutes letting you tap on it to automatically fill it into the textField/textView for you.
This is available since iOS 12. There's a few more types available in UITextContentType such as .password, .newPassword that is quite useful.
Like this post? Follow me @hboon on Twitter.
Nov 03, 2018 by Hwee-Boon Yar
Arrays are a common data structure in Swift:
let l = ["alice", "bob", "charlie"]
dump(l[2])
But array subscripting is unchecked, so this will crash at runtime:
dump(l[3])
Here's an extension to add a checked subscripting operator:
extension Array {
    subscript(checked index: UInt) -> Element? {
        if index < count {
            return self[Index(index)]
        } else {
            return nil
        }
    }
}
So you can do:
dump(l[checked: 2])
dump(l[checked: 3])
Since it returns an Optional, you can do:
if let element = l[checked: 2] {
    NSLog("Value: \(element)")
}
Note that the argument is UInt instead of Int or Index so the compiler can check when you pass in a negative index like this:
dump(l[checked: -1])
Like this post? Follow me @hboon on Twitter.
Related
Sep 22, 2018
iOS Dev Nugget 310 Weak Reference Wrapper ClassSep 07, 2018
iOS Dev Nugget 308 Careful with early return statements in functions that return voidAug 30, 2018
iOS Dev Nugget 307 Array Out of BoundsAug 23, 2018
iOS Dev Nugget 306 Underscores in Numeric LiteralsAug 02, 2018
iOS Dev Nugget 303 Use Enums for StatesJul 21, 2018
iOS Dev Nugget 301 Print App Document Path IIJul 16, 2018
iOS Dev Nugget 300 Pipe OperatorMay 18, 2018
iOS Dev Nugget 292 for-whereMay 12, 2018
iOS Dev Nugget 291 Implicit Member ExpressionsApr 11, 2018
iOS Dev Nugget 287 Modifying a Property Which is a Struct Triggers didSetNov 02, 2017
iOS Dev Nugget 265 value type cannot have a stored property that recursively contains itSep 13, 2017
iOS Dev Nugget 257 AssertsAug 02, 2017
iOS Dev Nugget 251 Retrieving the Current View ControllerJun 28, 2017
iOS Dev Nugget 246 Mapping Swift and Obj-C Method NamesJun 14, 2017
iOS Dev Nugget 244 IteratorProtocolMay 24, 2017
iOS Dev Nugget 241 Swift Enums with LabelsMay 17, 2017
iOS Dev Nugget 240 Print an Object's Unique IdentifierApr 05, 2017
iOS Dev Nugget 234 #available and @availableNov 23, 2016
iOS Dev Nugget 215 dump Instead of print for Swift StructsOct 25, 2016
iOS Dev Nugget 211 Higher Order Functions: map, filter, reduceOct 12, 2016
iOS Dev Nugget 209 Swift DeferSep 28, 2016
iOS Dev Nugget 207 Swift Nil-Coalescing OperatorSep 22, 2016
iOS Dev Nugget 206 Date doesRelativeDateFormattingSep 11, 2016
iOS Dev Nugget 205 The Never Return Type in SwiftSep 07, 2016
iOS Dev Nugget 204 Swift @autoclosureSep 02, 2016
iOS Dev Nugget 203 Swift MeasurementAug 24, 2016
iOS Dev Nugget 202 Swift Enumerations to Encode StatesAug 17, 2016
iOS Dev Nugget 201 Swift Pattern MatchingAug 10, 2016
iOS Dev Nugget 200 Swift flatMapAug 05, 2016
iOS Dev Nugget 199 Swift Talk Video SeriesJul 26, 2016
iOS Dev Nugget 198 KZPlaygroundJul 20, 2016
iOS Dev Nugget 197 App Initialization CodeJul 09, 2016
iOS Dev Nugget 196 Rename Refactoring for Swift CodeJun 24, 2016
iOS Dev Nugget 193 Result EnumerationMay 20, 2016
iOS Dev Nugget 188 SwiftLintMay 10, 2016
iOS Dev Nugget 187 Creating a Singleton Class in SwiftMay 06, 2016
iOS Dev Nugget 186 Injection for XcodeApr 02, 2016
iOS Dev Nugget 182 Tracking the swift-evolution Git RepositoryMar 26, 2016
iOS Dev Nugget 181 Swift SelectorsMar 21, 2016
iOS Dev Nugget 180 Low Power ModeJan 27, 2016
iOS Dev Nugget 172 Print App Document PathDec 30, 2015
iOS Dev Nugget 168 Using Blocks to Manage ContextsOct 20, 2015
iOS Dev Nugget 158 Checking if Newer APIs Are Available In Older iOS Versions (II)Aug 17, 2015
iOS Dev Nugget 149 Timepiece, a Swift Library for Handling DatesJul 05, 2015
iOS Dev Nugget 143 Don't Forget SQLiteJul 01, 2015
iOS Dev Nugget 142 Grand Central DispatchJun 22, 2015
iOS Dev Nugget 141 Great Swift Standard Library Examples Covered in Playground (Swift 2.0)Jun 01, 2015
iOS Dev Nugget 138 Interoperability: Using Enumerations Defined In Objective-C from SwiftMay 27, 2015
iOS Dev Nugget 137 Named Tuple ElementsMay 19, 2015
iOS Dev Nugget 136 Auto Layout with CartographyMay 13, 2015
iOS Dev Nugget 135 CAShapeLayer, Animated Views and XCPShowView()Apr 29, 2015
iOS Dev Nugget 133 Dollar.swiftApr 22, 2015
iOS Dev Nugget 132 XCPCaptureValue in Swift PlaygroundsApr 14, 2015
iOS Dev Nugget 131 Running Asynchronous Code in Swift PlaygroundsApr 03, 2015
iOS Dev Nugget 129 Browsing the Swift Standard LibraryFeb 27, 2015
iOS Dev Nugget 124 performSelector:withObject:afterDelay: in SwiftFeb 20, 2015
iOS Dev Nugget 123 Using dynamicType in SwiftJan 02, 2015
iOS Dev Nugget 116 method() is unavailable: use object construction Class()
Oct 26, 2018 by Hwee-Boon Yar
Sometimes it's handy to put content into UITableView and want it to stretch the full height so that all the content is displayed without scrolling. Especially if you display the UITableView in a vertical UIStackView.
class ViewController: UIViewController {
    private let tableView = UITableView(frame: .zero, style: .plain)
    private var tableViewContentSizeObserver: NSKeyValueObservation?
    lazy private var tableViewHeightConstraint = tableView.heightAnchor.constraint(equalToConstant: 0)

    func init() {
        super.init(nibName: nil, bundle: nil)
        NSLayoutConstraint.activate([
            tableViewHeightConstraint
        ])
        tableView.isScrollEnabled = false
    }

    func foo() {
        tableView.reloadData()
        tableViewContentSizeObserver = tableView.observe(\UITableView.contentSize, options: [.new]) { [weak self] (_, change) in
            guard let strongSelf = self else { return }
            guard let newSize = change.newValue else { return }
            strongSelf.tableViewHeightConstraint.constant = newSize.height
        }
    }
}
That's it. The trick is to set isScrollEnabled to false, and observe the contentSize and use the height to update the constraint.
Like this post? Follow me @hboon on Twitter.
Oct 06, 2018 by Hwee-Boon Yar
Do you notice that if the call-in-progress or personal hotspot indicator bar is shown when you launch an app on a iPhone without a notch (i.e. iPhone 8, 8 Plus and earlier as of writing), the launch screen tends to be distorted? I've found that an easy fix is just to disable the status bar at launch with this in your Info.plist:
<key>UIStatusBarHidden</key>
<true/>
Then enable it immediately in your app delegate:
application.isStatusBarHidden = false
Let me know if you know of any other trick to do this.
Like this post? Follow me @hboon on Twitter.
Related
Sep 22, 2018
iOS Dev Nugget 310 Weak Reference Wrapper ClassSep 15, 2018
iOS Dev Nugget 309 Rule of Thumb Regarding self.Aug 02, 2018
iOS Dev Nugget 303 Use Enums for StatesJul 08, 2018
iOS Dev Nugget 299 CurryingJun 24, 2018
iOS Dev Nugget 297 Defensive Checks for Asynchronous CallsApr 27, 2018
iOS Dev Nugget 289 Set Background Color for UIWebView to Match App While Still Loading DocumentsApr 22, 2018
iOS Dev Nugget 288 Use the .custom UIButton type to Fix Flashing when Title is ChangedApr 07, 2018
iOS Dev Nugget 286 Use Auto Layout for Bottom BarMar 22, 2018
iOS Dev Nugget 284 Use Shell Aliases for Git commandsMar 08, 2018
iOS Dev Nugget 282 Update to My Git no-commit Pre-commit HookJan 24, 2018
iOS Dev Nugget 276 Adding an Indent Default Parameter When Logging Calls in Object HierarchiesJan 18, 2018
iOS Dev Nugget 275 Implementing UIView draw(_:)Dec 28, 2017
iOS Dev Nugget 272 Namespacing using EnumsDec 14, 2017
iOS Dev Nugget 270 Using lazy properties to workaround initializing dependent non-optional propertiesNov 30, 2017
iOS Dev Nugget 268 Using Blocks for Delegate MethodsNov 02, 2017
iOS Dev Nugget 265 value type cannot have a stored property that recursively contains itNov 01, 2017
iOS Dev Nugget 264 Track how long a function takes to run and report progressSep 27, 2017
iOS Dev Nugget 259 CAShapeLayer, UIBezierPath and UIRectCornerAug 30, 2017
iOS Dev Nugget 255 Symbolic Breakpoint to watch for View Controller DeallocationAug 10, 2017
iOS Dev Nugget 252 A Little Trick to Write Loosely Coupled View ControllersJul 11, 2017
iOS Dev Nugget 248 In-app Native RoutingJun 14, 2017
iOS Dev Nugget 244 IteratorProtocolMay 03, 2017
iOS Dev Nugget 238 Keep Code in Method at the Same Level of AbstractionMar 29, 2017
iOS Dev Nugget 233 Separating View Controllers and Their ViewsJan 12, 2017
iOS Dev Nugget 222 Uniquely Identifying User Devices
Sep 28, 2018 by Hwee-Boon Yar
As I've done on a few occasions, I also like to drop little nuggets about external tools that aren't specifically for iOS app development, but which can be incredibly useful for.
Check out jq which in the author's own words:
jq is like sed for JSON data - you can use it to slice and filter and map and transform structured data with the same ease that sed, awk, grep and friends let you play with text.
It lets you filter and transform JSON.
An example from the tutorial:
$ curl 'https://api.github.com/repos/stedolan/jq/commits?per_page=5' | jq '.[] | {message: .commit.message, name: .commit.committer.name}'
The relevant part is:
jq '.[] | {message: .commit.message, name: .commit.committer.name}'
.[] returns each element of the array and pipe them to {message: .commit.message, name: .commit.committer.name}'.
You can count, for example with:
$ curl 'https://api.github.com/repos/stedolan/jq/commits?per_page=5' | jq '. | length'
Install it with:
brew install jq
Have fun!
Edit 20181007: Fix typo for getting length with the help of @dev_jac.
Like this post? Follow me @hboon on Twitter.
Related
Jul 08, 2018
iOS Dev Nugget 299 CurryingJun 01, 2018
iOS Dev Nugget 294 Core Data EditorMar 22, 2018
iOS Dev Nugget 284 Use Shell Aliases for Git commandsDec 20, 2017
iOS Dev Nugget 271 Zhi — Live Reloading Auto Layout Constraints and moreOct 18, 2017
iOS Dev Nugget 262 Apple Device Names APIAug 23, 2017
iOS Dev Nugget 254 Paw, for Working with APIsApr 26, 2017
iOS Dev Nugget 237 mas-cliApr 19, 2017
iOS Dev Nugget 236 Look up Error CodesFeb 09, 2017
iOS Dev Nugget 226 React NativeJul 09, 2016
iOS Dev Nugget 196 Rename Refactoring for Swift CodeJul 06, 2016
iOS Dev Nugget 195 Tools of the TradeMay 06, 2016
iOS Dev Nugget 186 Injection for XcodeFeb 03, 2016
iOS Dev Nugget 173 Xcode Package Manager, AlcatrazJan 11, 2016
iOS Dev Nugget 170 HomebrewJan 05, 2016
iOS Dev Nugget 169 fastlane: deliverSep 07, 2015
iOS Dev Nugget 152 Lossy PNG CompressionAug 07, 2015
iOS Dev Nugget 147 NSRegularExpression and NSDataDetectorMar 06, 2015
iOS Dev Nugget 125 View Debugging in XcodeFeb 13, 2015
iOS Dev Nugget 122 Importing Many Test Photos into iOS Simulator IINov 28, 2014
iOS Dev Nugget 111 iOS Support MatrixOct 24, 2014
iOS Dev Nugget 106 Command Line Access to Developer PortalOct 17, 2014
iOS Dev Nugget 105 Try FLEXSep 12, 2014
iOS Dev Nugget 100 Try RevealSep 05, 2014
iOS Dev Nugget 99 Try PaintCodeAug 15, 2014
iOS Dev Nugget 96 Jack, A Native App For iTunes ConnectJul 04, 2014
iOS Dev Nugget 90 Full-Text Searchable WWDC Video Text TranscriptsApr 04, 2014
iOS Dev Nugget 77 RubyMotion Tutorial For Objective C DevelopersJan 17, 2014
iOS Dev Nugget 66 JBChartView for ChartingJan 04, 2014
iOS Dev Nugget 64 Placeholder Views Using PAPlaceholderDec 27, 2013
iOS Dev Nugget 63 Update Your iOS Development ToolboxOct 18, 2013
iOS Dev Nugget 53 Try Kaleidoscope, File Comparison for MacOct 11, 2013
iOS Dev Nugget 52 Set Up Crashlytics For Ad Hoc and App Store Builds OnlyJun 21, 2013
iOS Dev Nugget 36 Use TestFlight for Ad Hoc BuildsMay 11, 2013
iOS Dev Nugget 31 3rd Party Documentation ViewersMar 10, 2013
iOS Dev Nugget 22 Try AppCodeJan 05, 2013
iOS Dev Nugget 14 Charles Web Debugging Proxy
Sep 22, 2018 by Hwee-Boon Yar
Sometimes it's useful to keep a list of weak references to objects, especially to reduce the maintenance work needed to track when they are destroyed if you had kept a strong reference to them instead.
class C {}
This wouldn't work since they keep a strong reference:
class Watcher {
    var objects = [C]()
}
So you can define a WeakRef wrapper class:
class WeakRef<T: AnyObject> {
    weak var object: T?
    init(object: T) {
        self.object = object
    }
}
And this will work as expected:
class Watcher {
    var objects = [WeakRef<C>]()
}
Have fun with it!
Like this post? Follow me @hboon on Twitter.
Related
Nov 03, 2018
iOS Dev Nugget 314 Checked Array SubscriptingOct 06, 2018
iOS Dev Nugget 312 Fix Distorted Launch Screens with Hotspot BarSep 15, 2018
iOS Dev Nugget 309 Rule of Thumb Regarding self.Sep 07, 2018
iOS Dev Nugget 308 Careful with early return statements in functions that return voidAug 30, 2018
iOS Dev Nugget 307 Array Out of BoundsAug 23, 2018
iOS Dev Nugget 306 Underscores in Numeric LiteralsAug 02, 2018
iOS Dev Nugget 303 Use Enums for StatesJul 21, 2018
iOS Dev Nugget 301 Print App Document Path IIJul 16, 2018
iOS Dev Nugget 300 Pipe OperatorJul 08, 2018
iOS Dev Nugget 299 CurryingJun 24, 2018
iOS Dev Nugget 297 Defensive Checks for Asynchronous CallsMay 18, 2018
iOS Dev Nugget 292 for-whereMay 12, 2018
iOS Dev Nugget 291 Implicit Member ExpressionsApr 27, 2018
iOS Dev Nugget 289 Set Background Color for UIWebView to Match App While Still Loading DocumentsApr 22, 2018
iOS Dev Nugget 288 Use the .custom UIButton type to Fix Flashing when Title is ChangedApr 11, 2018
iOS Dev Nugget 287 Modifying a Property Which is a Struct Triggers didSetApr 07, 2018
iOS Dev Nugget 286 Use Auto Layout for Bottom BarMar 22, 2018
iOS Dev Nugget 284 Use Shell Aliases for Git commandsMar 08, 2018
iOS Dev Nugget 282 Update to My Git no-commit Pre-commit HookJan 24, 2018
iOS Dev Nugget 276 Adding an Indent Default Parameter When Logging Calls in Object HierarchiesJan 18, 2018
iOS Dev Nugget 275 Implementing UIView draw(_:)Dec 28, 2017
iOS Dev Nugget 272 Namespacing using EnumsDec 14, 2017
iOS Dev Nugget 270 Using lazy properties to workaround initializing dependent non-optional propertiesNov 30, 2017
iOS Dev Nugget 268 Using Blocks for Delegate MethodsNov 02, 2017
iOS Dev Nugget 265 value type cannot have a stored property that recursively contains itNov 01, 2017
iOS Dev Nugget 264 Track how long a function takes to run and report progressSep 27, 2017
iOS Dev Nugget 259 CAShapeLayer, UIBezierPath and UIRectCornerSep 13, 2017
iOS Dev Nugget 257 AssertsAug 30, 2017
iOS Dev Nugget 255 Symbolic Breakpoint to watch for View Controller DeallocationAug 10, 2017
iOS Dev Nugget 252 A Little Trick to Write Loosely Coupled View ControllersAug 02, 2017
iOS Dev Nugget 251 Retrieving the Current View ControllerJul 11, 2017
iOS Dev Nugget 248 In-app Native RoutingJun 28, 2017
iOS Dev Nugget 246 Mapping Swift and Obj-C Method NamesJun 14, 2017
iOS Dev Nugget 244 IteratorProtocolMay 24, 2017
iOS Dev Nugget 241 Swift Enums with LabelsMay 17, 2017
iOS Dev Nugget 240 Print an Object's Unique IdentifierMay 03, 2017
iOS Dev Nugget 238 Keep Code in Method at the Same Level of AbstractionApr 05, 2017
iOS Dev Nugget 234 #available and @availableMar 29, 2017
iOS Dev Nugget 233 Separating View Controllers and Their ViewsJan 12, 2017
iOS Dev Nugget 222 Uniquely Identifying User DevicesNov 23, 2016
iOS Dev Nugget 215 dump Instead of print for Swift StructsOct 25, 2016
iOS Dev Nugget 211 Higher Order Functions: map, filter, reduceOct 12, 2016
iOS Dev Nugget 209 Swift DeferSep 28, 2016
iOS Dev Nugget 207 Swift Nil-Coalescing OperatorSep 22, 2016
iOS Dev Nugget 206 Date doesRelativeDateFormattingSep 11, 2016
iOS Dev Nugget 205 The Never Return Type in SwiftSep 07, 2016
iOS Dev Nugget 204 Swift @autoclosureSep 02, 2016
iOS Dev Nugget 203 Swift MeasurementAug 24, 2016
iOS Dev Nugget 202 Swift Enumerations to Encode StatesAug 17, 2016
iOS Dev Nugget 201 Swift Pattern MatchingAug 10, 2016
iOS Dev Nugget 200 Swift flatMapAug 05, 2016
iOS Dev Nugget 199 Swift Talk Video SeriesJul 26, 2016
iOS Dev Nugget 198 KZPlaygroundJul 20, 2016
iOS Dev Nugget 197 App Initialization CodeJul 09, 2016
iOS Dev Nugget 196 Rename Refactoring for Swift CodeJun 24, 2016
iOS Dev Nugget 193 Result EnumerationMay 20, 2016
iOS Dev Nugget 188 SwiftLintMay 10, 2016
iOS Dev Nugget 187 Creating a Singleton Class in SwiftMay 06, 2016
iOS Dev Nugget 186 Injection for XcodeApr 02, 2016
iOS Dev Nugget 182 Tracking the swift-evolution Git RepositoryMar 26, 2016
iOS Dev Nugget 181 Swift SelectorsMar 21, 2016
iOS Dev Nugget 180 Low Power ModeJan 27, 2016
iOS Dev Nugget 172 Print App Document PathDec 30, 2015
iOS Dev Nugget 168 Using Blocks to Manage ContextsOct 20, 2015
iOS Dev Nugget 158 Checking if Newer APIs Are Available In Older iOS Versions (II)Aug 17, 2015
iOS Dev Nugget 149 Timepiece, a Swift Library for Handling DatesJul 05, 2015
iOS Dev Nugget 143 Don't Forget SQLiteJul 01, 2015
iOS Dev Nugget 142 Grand Central DispatchJun 22, 2015
iOS Dev Nugget 141 Great Swift Standard Library Examples Covered in Playground (Swift 2.0)Jun 01, 2015
iOS Dev Nugget 138 Interoperability: Using Enumerations Defined In Objective-C from SwiftMay 27, 2015
iOS Dev Nugget 137 Named Tuple ElementsMay 19, 2015
iOS Dev Nugget 136 Auto Layout with CartographyMay 13, 2015
iOS Dev Nugget 135 CAShapeLayer, Animated Views and XCPShowView()Apr 29, 2015
iOS Dev Nugget 133 Dollar.swiftApr 22, 2015
iOS Dev Nugget 132 XCPCaptureValue in Swift PlaygroundsApr 14, 2015
iOS Dev Nugget 131 Running Asynchronous Code in Swift PlaygroundsApr 03, 2015
iOS Dev Nugget 129 Browsing the Swift Standard LibraryFeb 27, 2015
iOS Dev Nugget 124 performSelector:withObject:afterDelay: in SwiftFeb 20, 2015
iOS Dev Nugget 123 Using dynamicType in SwiftJan 02, 2015
iOS Dev Nugget 116 method() is unavailable: use object construction Class()
Sep 15, 2018 by Hwee-Boon Yar
I have some guidelines I apply to myself to help reduce cyclic references caused by closures capturing self.
- I never explicitly refer to
self (as in self.someProperty or self.someFunc()) unless I absolutely have to.
- I have a simple rule of thumb, if I see a
self. in a closure, I double check to make sure it is necessary. This is because self. in a closure means the closure captures self and holds a strong reference to self. Most of the time, this can lead to cyclic references either now or later. I try my best to avoid them.
Because of (1) above, self. will only appear:
- in
init() and its variations
- when I need to assign to a new local variable in a function and the new local variable has the same name as a function or a property
- when closure captures
self.
This means I can run grep -R "self\." . and do a quick scan when I suspect a memory leak.
Like this post? Follow me @hboon on Twitter.
Related
Oct 06, 2018
iOS Dev Nugget 312 Fix Distorted Launch Screens with Hotspot BarSep 22, 2018
iOS Dev Nugget 310 Weak Reference Wrapper ClassAug 02, 2018
iOS Dev Nugget 303 Use Enums for StatesJul 08, 2018
iOS Dev Nugget 299 CurryingJun 24, 2018
iOS Dev Nugget 297 Defensive Checks for Asynchronous CallsApr 27, 2018
iOS Dev Nugget 289 Set Background Color for UIWebView to Match App While Still Loading DocumentsApr 22, 2018
iOS Dev Nugget 288 Use the .custom UIButton type to Fix Flashing when Title is ChangedApr 07, 2018
iOS Dev Nugget 286 Use Auto Layout for Bottom BarMar 22, 2018
iOS Dev Nugget 284 Use Shell Aliases for Git commandsMar 08, 2018
iOS Dev Nugget 282 Update to My Git no-commit Pre-commit HookJan 24, 2018
iOS Dev Nugget 276 Adding an Indent Default Parameter When Logging Calls in Object HierarchiesJan 18, 2018
iOS Dev Nugget 275 Implementing UIView draw(_:)Dec 28, 2017
iOS Dev Nugget 272 Namespacing using EnumsDec 14, 2017
iOS Dev Nugget 270 Using lazy properties to workaround initializing dependent non-optional propertiesNov 30, 2017
iOS Dev Nugget 268 Using Blocks for Delegate MethodsNov 02, 2017
iOS Dev Nugget 265 value type cannot have a stored property that recursively contains itNov 01, 2017
iOS Dev Nugget 264 Track how long a function takes to run and report progressSep 27, 2017
iOS Dev Nugget 259 CAShapeLayer, UIBezierPath and UIRectCornerAug 30, 2017
iOS Dev Nugget 255 Symbolic Breakpoint to watch for View Controller DeallocationAug 10, 2017
iOS Dev Nugget 252 A Little Trick to Write Loosely Coupled View ControllersJul 11, 2017
iOS Dev Nugget 248 In-app Native RoutingJun 14, 2017
iOS Dev Nugget 244 IteratorProtocolMay 03, 2017
iOS Dev Nugget 238 Keep Code in Method at the Same Level of AbstractionMar 29, 2017
iOS Dev Nugget 233 Separating View Controllers and Their ViewsJan 12, 2017
iOS Dev Nugget 222 Uniquely Identifying User Devices
Sep 07, 2018 by Hwee-Boon Yar
Suppose you have code like this:
func foo() {
    print("foo called")
}

func bar() {
    print("bar called")

    foo()
    //Some more code here.
}

bar()
The output is:
bar called
foo called
All good. Now, during debugging, you want to skip running foo() and all the other code in bar(), so you might add an early return statement like this:
func bar() {
    print("bar called")

    return

    foo()
    //Some more code here.
}
Do you see the problem?
It'll still execute foo() because it will consider return foo() to be a single statement and then skip the rest of the code in bar(). The way to prevent this is to use return; (i.e. end it with a semi-colon) or just comment out the rest of the code.
This is easy to miss and I was bitten by this recently.
PS: The compiler issues a warning for this, but it's easy to miss while debugging and making all sorts of code changes quickly to figure out the problem at hand.
Like this post? Follow me @hboon on Twitter.
Related
Nov 03, 2018
iOS Dev Nugget 314 Checked Array SubscriptingSep 22, 2018
iOS Dev Nugget 310 Weak Reference Wrapper ClassAug 30, 2018
iOS Dev Nugget 307 Array Out of BoundsAug 23, 2018
iOS Dev Nugget 306 Underscores in Numeric LiteralsAug 02, 2018
iOS Dev Nugget 303 Use Enums for StatesJul 21, 2018
iOS Dev Nugget 301 Print App Document Path IIJul 16, 2018
iOS Dev Nugget 300 Pipe OperatorMay 18, 2018
iOS Dev Nugget 292 for-whereMay 12, 2018
iOS Dev Nugget 291 Implicit Member ExpressionsApr 11, 2018
iOS Dev Nugget 287 Modifying a Property Which is a Struct Triggers didSetNov 02, 2017
iOS Dev Nugget 265 value type cannot have a stored property that recursively contains itSep 13, 2017
iOS Dev Nugget 257 AssertsAug 02, 2017
iOS Dev Nugget 251 Retrieving the Current View ControllerJun 28, 2017
iOS Dev Nugget 246 Mapping Swift and Obj-C Method NamesJun 14, 2017
iOS Dev Nugget 244 IteratorProtocolMay 24, 2017
iOS Dev Nugget 241 Swift Enums with LabelsMay 17, 2017
iOS Dev Nugget 240 Print an Object's Unique IdentifierApr 05, 2017
iOS Dev Nugget 234 #available and @availableNov 23, 2016
iOS Dev Nugget 215 dump Instead of print for Swift StructsOct 25, 2016
iOS Dev Nugget 211 Higher Order Functions: map, filter, reduceOct 12, 2016
iOS Dev Nugget 209 Swift DeferSep 28, 2016
iOS Dev Nugget 207 Swift Nil-Coalescing OperatorSep 22, 2016
iOS Dev Nugget 206 Date doesRelativeDateFormattingSep 11, 2016
iOS Dev Nugget 205 The Never Return Type in SwiftSep 07, 2016
iOS Dev Nugget 204 Swift @autoclosureSep 02, 2016
iOS Dev Nugget 203 Swift MeasurementAug 24, 2016
iOS Dev Nugget 202 Swift Enumerations to Encode StatesAug 17, 2016
iOS Dev Nugget 201 Swift Pattern MatchingAug 10, 2016
iOS Dev Nugget 200 Swift flatMapAug 05, 2016
iOS Dev Nugget 199 Swift Talk Video SeriesJul 26, 2016
iOS Dev Nugget 198 KZPlaygroundJul 20, 2016
iOS Dev Nugget 197 App Initialization CodeJul 09, 2016
iOS Dev Nugget 196 Rename Refactoring for Swift CodeJun 24, 2016
iOS Dev Nugget 193 Result EnumerationMay 20, 2016
iOS Dev Nugget 188 SwiftLintMay 10, 2016
iOS Dev Nugget 187 Creating a Singleton Class in SwiftMay 06, 2016
iOS Dev Nugget 186 Injection for XcodeApr 02, 2016
iOS Dev Nugget 182 Tracking the swift-evolution Git RepositoryMar 26, 2016
iOS Dev Nugget 181 Swift SelectorsMar 21, 2016
iOS Dev Nugget 180 Low Power ModeJan 27, 2016
iOS Dev Nugget 172 Print App Document PathDec 30, 2015
iOS Dev Nugget 168 Using Blocks to Manage ContextsOct 20, 2015
iOS Dev Nugget 158 Checking if Newer APIs Are Available In Older iOS Versions (II)Aug 17, 2015
iOS Dev Nugget 149 Timepiece, a Swift Library for Handling DatesJul 05, 2015
iOS Dev Nugget 143 Don't Forget SQLiteJul 01, 2015
iOS Dev Nugget 142 Grand Central DispatchJun 22, 2015
iOS Dev Nugget 141 Great Swift Standard Library Examples Covered in Playground (Swift 2.0)Jun 01, 2015
iOS Dev Nugget 138 Interoperability: Using Enumerations Defined In Objective-C from SwiftMay 27, 2015
iOS Dev Nugget 137 Named Tuple ElementsMay 19, 2015
iOS Dev Nugget 136 Auto Layout with CartographyMay 13, 2015
iOS Dev Nugget 135 CAShapeLayer, Animated Views and XCPShowView()Apr 29, 2015
iOS Dev Nugget 133 Dollar.swiftApr 22, 2015
iOS Dev Nugget 132 XCPCaptureValue in Swift PlaygroundsApr 14, 2015
iOS Dev Nugget 131 Running Asynchronous Code in Swift PlaygroundsApr 03, 2015
iOS Dev Nugget 129 Browsing the Swift Standard LibraryFeb 27, 2015
iOS Dev Nugget 124 performSelector:withObject:afterDelay: in SwiftFeb 20, 2015
iOS Dev Nugget 123 Using dynamicType in SwiftJan 02, 2015
iOS Dev Nugget 116 method() is unavailable: use object construction Class()
Aug 30, 2018 by Hwee-Boon Yar
Swift has strong type checking. Generally, I've found that if you write your Swift apps without using force unwraps, and not deliberately stepping out of Swift's type checking, you end up with an app that hardly crashes. There is 1 exception though. Array random access via index is unchecked:
let a = [1, 2, 3]
print(a[100])
This will crash with:
Fatal error: Index out of range
In this case, Swift code that compiles may still crash. So, either check before accessing (explicitly, or by implementing and using your own checked subscript operator) unless you are sure.
Like this post? Follow me @hboon on Twitter.
Related
Nov 03, 2018
iOS Dev Nugget 314 Checked Array SubscriptingSep 22, 2018
iOS Dev Nugget 310 Weak Reference Wrapper ClassSep 07, 2018
iOS Dev Nugget 308 Careful with early return statements in functions that return voidAug 23, 2018
iOS Dev Nugget 306 Underscores in Numeric LiteralsAug 02, 2018
iOS Dev Nugget 303 Use Enums for StatesJul 21, 2018
iOS Dev Nugget 301 Print App Document Path IIJul 16, 2018
iOS Dev Nugget 300 Pipe OperatorMay 18, 2018
iOS Dev Nugget 292 for-whereMay 12, 2018
iOS Dev Nugget 291 Implicit Member ExpressionsApr 11, 2018
iOS Dev Nugget 287 Modifying a Property Which is a Struct Triggers didSetNov 02, 2017
iOS Dev Nugget 265 value type cannot have a stored property that recursively contains itSep 13, 2017
iOS Dev Nugget 257 AssertsAug 02, 2017
iOS Dev Nugget 251 Retrieving the Current View ControllerJun 28, 2017
iOS Dev Nugget 246 Mapping Swift and Obj-C Method NamesJun 14, 2017
iOS Dev Nugget 244 IteratorProtocolMay 24, 2017
iOS Dev Nugget 241 Swift Enums with LabelsMay 17, 2017
iOS Dev Nugget 240 Print an Object's Unique IdentifierApr 05, 2017
iOS Dev Nugget 234 #available and @availableNov 23, 2016
iOS Dev Nugget 215 dump Instead of print for Swift StructsOct 25, 2016
iOS Dev Nugget 211 Higher Order Functions: map, filter, reduceOct 12, 2016
iOS Dev Nugget 209 Swift DeferSep 28, 2016
iOS Dev Nugget 207 Swift Nil-Coalescing OperatorSep 22, 2016
iOS Dev Nugget 206 Date doesRelativeDateFormattingSep 11, 2016
iOS Dev Nugget 205 The Never Return Type in SwiftSep 07, 2016
iOS Dev Nugget 204 Swift @autoclosureSep 02, 2016
iOS Dev Nugget 203 Swift MeasurementAug 24, 2016
iOS Dev Nugget 202 Swift Enumerations to Encode StatesAug 17, 2016
iOS Dev Nugget 201 Swift Pattern MatchingAug 10, 2016
iOS Dev Nugget 200 Swift flatMapAug 05, 2016
iOS Dev Nugget 199 Swift Talk Video SeriesJul 26, 2016
iOS Dev Nugget 198 KZPlaygroundJul 20, 2016
iOS Dev Nugget 197 App Initialization CodeJul 09, 2016
iOS Dev Nugget 196 Rename Refactoring for Swift CodeJun 24, 2016
iOS Dev Nugget 193 Result EnumerationMay 20, 2016
iOS Dev Nugget 188 SwiftLintMay 10, 2016
iOS Dev Nugget 187 Creating a Singleton Class in SwiftMay 06, 2016
iOS Dev Nugget 186 Injection for XcodeApr 02, 2016
iOS Dev Nugget 182 Tracking the swift-evolution Git RepositoryMar 26, 2016
iOS Dev Nugget 181 Swift SelectorsMar 21, 2016
iOS Dev Nugget 180 Low Power ModeJan 27, 2016
iOS Dev Nugget 172 Print App Document PathDec 30, 2015
iOS Dev Nugget 168 Using Blocks to Manage ContextsOct 20, 2015
iOS Dev Nugget 158 Checking if Newer APIs Are Available In Older iOS Versions (II)Aug 17, 2015
iOS Dev Nugget 149 Timepiece, a Swift Library for Handling DatesJul 05, 2015
iOS Dev Nugget 143 Don't Forget SQLiteJul 01, 2015
iOS Dev Nugget 142 Grand Central DispatchJun 22, 2015
iOS Dev Nugget 141 Great Swift Standard Library Examples Covered in Playground (Swift 2.0)Jun 01, 2015
iOS Dev Nugget 138 Interoperability: Using Enumerations Defined In Objective-C from SwiftMay 27, 2015
iOS Dev Nugget 137 Named Tuple ElementsMay 19, 2015
iOS Dev Nugget 136 Auto Layout with CartographyMay 13, 2015
iOS Dev Nugget 135 CAShapeLayer, Animated Views and XCPShowView()Apr 29, 2015
iOS Dev Nugget 133 Dollar.swiftApr 22, 2015
iOS Dev Nugget 132 XCPCaptureValue in Swift PlaygroundsApr 14, 2015
iOS Dev Nugget 131 Running Asynchronous Code in Swift PlaygroundsApr 03, 2015
iOS Dev Nugget 129 Browsing the Swift Standard LibraryFeb 27, 2015
iOS Dev Nugget 124 performSelector:withObject:afterDelay: in SwiftFeb 20, 2015
iOS Dev Nugget 123 Using dynamicType in SwiftJan 02, 2015
iOS Dev Nugget 116 method() is unavailable: use object construction Class()
Aug 23, 2018 by Hwee-Boon Yar
Did you know that you can include underscores (_) and leading zeros (0) in numeric literals for clarity?
i.e.
print(001) //1
print(1_000_000) //1000000
print(1.234_567) //1.234567
Works with numbers written in base-2 and base-10 too:
print(0b1000_0001) //129
print(0xCC_CC_CC) //Grayish, If you encode RGB in 3 bytes
Like this post? Follow me @hboon on Twitter.
Related
Nov 03, 2018
iOS Dev Nugget 314 Checked Array SubscriptingSep 22, 2018
iOS Dev Nugget 310 Weak Reference Wrapper ClassSep 07, 2018
iOS Dev Nugget 308 Careful with early return statements in functions that return voidAug 30, 2018
iOS Dev Nugget 307 Array Out of BoundsAug 02, 2018
iOS Dev Nugget 303 Use Enums for StatesJul 21, 2018
iOS Dev Nugget 301 Print App Document Path IIJul 16, 2018
iOS Dev Nugget 300 Pipe OperatorMay 18, 2018
iOS Dev Nugget 292 for-whereMay 12, 2018
iOS Dev Nugget 291 Implicit Member ExpressionsApr 11, 2018
iOS Dev Nugget 287 Modifying a Property Which is a Struct Triggers didSetNov 02, 2017
iOS Dev Nugget 265 value type cannot have a stored property that recursively contains itSep 13, 2017
iOS Dev Nugget 257 AssertsAug 02, 2017
iOS Dev Nugget 251 Retrieving the Current View ControllerJun 28, 2017
iOS Dev Nugget 246 Mapping Swift and Obj-C Method NamesJun 14, 2017
iOS Dev Nugget 244 IteratorProtocolMay 24, 2017
iOS Dev Nugget 241 Swift Enums with LabelsMay 17, 2017
iOS Dev Nugget 240 Print an Object's Unique IdentifierApr 05, 2017
iOS Dev Nugget 234 #available and @availableNov 23, 2016
iOS Dev Nugget 215 dump Instead of print for Swift StructsOct 25, 2016
iOS Dev Nugget 211 Higher Order Functions: map, filter, reduceOct 12, 2016
iOS Dev Nugget 209 Swift DeferSep 28, 2016
iOS Dev Nugget 207 Swift Nil-Coalescing OperatorSep 22, 2016
iOS Dev Nugget 206 Date doesRelativeDateFormattingSep 11, 2016
iOS Dev Nugget 205 The Never Return Type in SwiftSep 07, 2016
iOS Dev Nugget 204 Swift @autoclosureSep 02, 2016
iOS Dev Nugget 203 Swift MeasurementAug 24, 2016
iOS Dev Nugget 202 Swift Enumerations to Encode StatesAug 17, 2016
iOS Dev Nugget 201 Swift Pattern MatchingAug 10, 2016
iOS Dev Nugget 200 Swift flatMapAug 05, 2016
iOS Dev Nugget 199 Swift Talk Video SeriesJul 26, 2016
iOS Dev Nugget 198 KZPlaygroundJul 20, 2016
iOS Dev Nugget 197 App Initialization CodeJul 09, 2016
iOS Dev Nugget 196 Rename Refactoring for Swift CodeJun 24, 2016
iOS Dev Nugget 193 Result EnumerationMay 20, 2016
iOS Dev Nugget 188 SwiftLintMay 10, 2016
iOS Dev Nugget 187 Creating a Singleton Class in SwiftMay 06, 2016
iOS Dev Nugget 186 Injection for XcodeApr 02, 2016
iOS Dev Nugget 182 Tracking the swift-evolution Git RepositoryMar 26, 2016
iOS Dev Nugget 181 Swift SelectorsMar 21, 2016
iOS Dev Nugget 180 Low Power ModeJan 27, 2016
iOS Dev Nugget 172 Print App Document PathDec 30, 2015
iOS Dev Nugget 168 Using Blocks to Manage ContextsOct 20, 2015
iOS Dev Nugget 158 Checking if Newer APIs Are Available In Older iOS Versions (II)Aug 17, 2015
iOS Dev Nugget 149 Timepiece, a Swift Library for Handling DatesJul 05, 2015
iOS Dev Nugget 143 Don't Forget SQLiteJul 01, 2015
iOS Dev Nugget 142 Grand Central DispatchJun 22, 2015
iOS Dev Nugget 141 Great Swift Standard Library Examples Covered in Playground (Swift 2.0)Jun 01, 2015
iOS Dev Nugget 138 Interoperability: Using Enumerations Defined In Objective-C from SwiftMay 27, 2015
iOS Dev Nugget 137 Named Tuple ElementsMay 19, 2015
iOS Dev Nugget 136 Auto Layout with CartographyMay 13, 2015
iOS Dev Nugget 135 CAShapeLayer, Animated Views and XCPShowView()Apr 29, 2015
iOS Dev Nugget 133 Dollar.swiftApr 22, 2015
iOS Dev Nugget 132 XCPCaptureValue in Swift PlaygroundsApr 14, 2015
iOS Dev Nugget 131 Running Asynchronous Code in Swift PlaygroundsApr 03, 2015
iOS Dev Nugget 129 Browsing the Swift Standard LibraryFeb 27, 2015
iOS Dev Nugget 124 performSelector:withObject:afterDelay: in SwiftFeb 20, 2015
iOS Dev Nugget 123 Using dynamicType in SwiftJan 02, 2015
iOS Dev Nugget 116 method() is unavailable: use object construction Class()
Aug 15, 2018 by Hwee-Boon Yar
I'm a big fan of using Swift's strong static typing to reduce bugs, and I recently stumbled upon a library that helps with that.
From the README, imagine you have this defined:
struct User {
  let id: Int
  let email: String
  let address: String
  let subscriptionId: Int?
}

struct Subscription {
  let id: Int
}

func fetchSubscription(byId id: Int) -> Subscription? {
  return subscriptions.first(where: { $0.id == id })
}
Notice that the id properties in both structs and subscriptionId properties are of type Int. This is pretty common. The problem is that Int is a very general type.
And if you call fetchSubscription(byId:) like this, you have introduced a bug:
let subscription = fetchSubscription(byId: user.id)
Strong static typing to the rescue! Tagged provides a simple way to solve it:
import Tagged

struct User {
  let id: Id
  let email: String
  let address: String
  let subscriptionId: Subscription.Id?

  typealias Id = Tagged<User, Int>
}

struct Subscription {
  let id: Id

  typealias Id = Tagged<Subscription, Int>
}
It basically lets you define unique types based off another type (the latter being Int in the example). So you can say that this struct's id and another struct's id property are of different types, despite both of them fundamentally being Int.
Like this post? Follow me @hboon on Twitter.
Related
Jul 24, 2018
iOS Dev Nugget 302 RealmJun 09, 2018
iOS Dev Nugget 295 SwifterSwiftMay 23, 2018
iOS Dev Nugget 293 iOSSnapshotTestCase (was FBSnapshotTestCase)Mar 15, 2018
iOS Dev Nugget 283 Eureka for FormsFeb 28, 2018
iOS Dev Nugget 281 Use R.swift for Static References to Resources Like ImagesFeb 21, 2018
iOS Dev Nugget 280 Using Custom Fonts Without Updating Info.plist ManuallyDec 06, 2017
iOS Dev Nugget 269 Including Finger Touches in App Preview VideosJul 11, 2017
iOS Dev Nugget 248 In-app Native RoutingMar 01, 2017
iOS Dev Nugget 229 PromisesFeb 22, 2017
iOS Dev Nugget 228 Recording and Playing Back Network CallsOct 23, 2016
iOS Dev Nugget 210 PMAlertControllerJun 03, 2016
iOS Dev Nugget 190 Quick Look Plug-in for Mobile Provisioning FilesMay 20, 2016
iOS Dev Nugget 188 SwiftLintApr 20, 2016
iOS Dev Nugget 184 Async LibraryAug 31, 2015
iOS Dev Nugget 151 More Wrappers for Keychain AccessAug 17, 2015
iOS Dev Nugget 149 Timepiece, a Swift Library for Handling DatesJul 27, 2015
iOS Dev Nugget 146 UIStackView and TZStackViewJul 21, 2015
iOS Dev Nugget 145 Listing Available FontsJul 05, 2015
iOS Dev Nugget 143 Don't Forget SQLiteJun 09, 2015
iOS Dev Nugget 139 Custom Build Configurations and Xcode SubprojectsMay 19, 2015
iOS Dev Nugget 136 Auto Layout with CartographyApr 29, 2015
iOS Dev Nugget 133 Dollar.swiftFeb 06, 2015
iOS Dev Nugget 121 InflectorKitDec 26, 2014
iOS Dev Nugget 115 Displaying Information in Settings AppDec 19, 2014
iOS Dev Nugget 114 Preview an Image for DebuggingDec 12, 2014
iOS Dev Nugget 113 GPUImage, a GPU-based Image and Video Processing FrameworkMay 30, 2014
iOS Dev Nugget 85 A More Customizable Button For Different StatesMay 02, 2014
iOS Dev Nugget 81 TMCache For In-Memory and Disk-backed CachingApr 18, 2014
iOS Dev Nugget 79 TweetBot Photo Flicking EffectMar 07, 2014
iOS Dev Nugget 73 Open Source Date Picker from SquareFeb 22, 2014
iOS Dev Nugget 71 TapJan 31, 2014
iOS Dev Nugget 68 Custom URL Schemes DirectoryDec 20, 2013
iOS Dev Nugget 62 Using PDF Instead of PNG Files for Resizable AssetsSep 20, 2013
iOS Dev Nugget 49 Wrapper to Get UIColor ComponentsMay 17, 2013
iOS Dev Nugget 32 FMDB: Thin Objective C Wrapper Around SQLiteOct 06, 2012
iOS Dev Nugget 1 Easy logging of values and objects
Aug 08, 2018 by Hwee-Boon Yar
If you haven't tried CodeRunner, you really ought to. It's basically a macOS app that lets you run code snippets in different languages, include Swift. It doesn't have the fancy features present in Swift Playgrounds and the text editor is quite rudimentary, but despite that, it is really fast to build and run Swift code, so for most built-in non-UI stuff, you can explore Swift code very quickly, e.g. if you wanted to build a DateFormatter and want to experiment with various date formats.
It's really worth checking out. There's a free trial available.
PS: This is not a paid ad
Like this post? Follow me @hboon on Twitter.
Aug 02, 2018 by Hwee-Boon Yar
Anytime you have some logic in a class which checks 2 or more of its properties to represent a state or condition of some sort, consider wrapping that into an enum.
For example:
class Payment {
    var isFree: Bool
    var price: Int?
    var currency: String?

    init() { //... }

    function send() {
        if isFree {
            //do something
        } else {
            if let price = price, let currency = currency {
                //do something with price + currency
            } else {
                //handle this somehow
            }
        }
    }
}
Change it to:
class Payment {
    enum Type {
        case free
        case paid(price: Int, currency: String)
    }
    var type: Type

    init() { //... }

    function send() {
        switch type {
        case .free:
            //do something
        case .paid(let price, let currency):
            //do something with price + currency
        }
    }
}
The code ends up clearer — being explicit that it's handling 2 states, free and paid — and it's less likely to introduce bugs because the code paths are easier to follow and if you need to do something that depends on the type, the compiler will force you to handle all the possible states (free and paid).
The resulting code can sometimes end up being longer, but it's a worthy trade-off.
Like this post? Follow me @hboon on Twitter.
Related
Nov 03, 2018
iOS Dev Nugget 314 Checked Array SubscriptingOct 06, 2018
iOS Dev Nugget 312 Fix Distorted Launch Screens with Hotspot BarSep 22, 2018
iOS Dev Nugget 310 Weak Reference Wrapper ClassSep 15, 2018
iOS Dev Nugget 309 Rule of Thumb Regarding self.Sep 07, 2018
iOS Dev Nugget 308 Careful with early return statements in functions that return voidAug 30, 2018
iOS Dev Nugget 307 Array Out of BoundsAug 23, 2018
iOS Dev Nugget 306 Underscores in Numeric LiteralsJul 21, 2018
iOS Dev Nugget 301 Print App Document Path IIJul 16, 2018
iOS Dev Nugget 300 Pipe OperatorJul 08, 2018
iOS Dev Nugget 299 CurryingJun 24, 2018
iOS Dev Nugget 297 Defensive Checks for Asynchronous CallsMay 18, 2018
iOS Dev Nugget 292 for-whereMay 12, 2018
iOS Dev Nugget 291 Implicit Member ExpressionsApr 27, 2018
iOS Dev Nugget 289 Set Background Color for UIWebView to Match App While Still Loading DocumentsApr 22, 2018
iOS Dev Nugget 288 Use the .custom UIButton type to Fix Flashing when Title is ChangedApr 11, 2018
iOS Dev Nugget 287 Modifying a Property Which is a Struct Triggers didSetApr 07, 2018
iOS Dev Nugget 286 Use Auto Layout for Bottom BarMar 22, 2018
iOS Dev Nugget 284 Use Shell Aliases for Git commandsMar 08, 2018
iOS Dev Nugget 282 Update to My Git no-commit Pre-commit HookJan 24, 2018
iOS Dev Nugget 276 Adding an Indent Default Parameter When Logging Calls in Object HierarchiesJan 18, 2018
iOS Dev Nugget 275 Implementing UIView draw(_:)Dec 28, 2017
iOS Dev Nugget 272 Namespacing using EnumsDec 14, 2017
iOS Dev Nugget 270 Using lazy properties to workaround initializing dependent non-optional propertiesNov 30, 2017
iOS Dev Nugget 268 Using Blocks for Delegate MethodsNov 02, 2017
iOS Dev Nugget 265 value type cannot have a stored property that recursively contains itNov 01, 2017
iOS Dev Nugget 264 Track how long a function takes to run and report progressSep 27, 2017
iOS Dev Nugget 259 CAShapeLayer, UIBezierPath and UIRectCornerSep 13, 2017
iOS Dev Nugget 257 AssertsAug 30, 2017
iOS Dev Nugget 255 Symbolic Breakpoint to watch for View Controller DeallocationAug 10, 2017
iOS Dev Nugget 252 A Little Trick to Write Loosely Coupled View ControllersAug 02, 2017
iOS Dev Nugget 251 Retrieving the Current View ControllerJul 11, 2017
iOS Dev Nugget 248 In-app Native RoutingJun 28, 2017
iOS Dev Nugget 246 Mapping Swift and Obj-C Method NamesJun 14, 2017
iOS Dev Nugget 244 IteratorProtocolMay 24, 2017
iOS Dev Nugget 241 Swift Enums with LabelsMay 17, 2017
iOS Dev Nugget 240 Print an Object's Unique IdentifierMay 03, 2017
iOS Dev Nugget 238 Keep Code in Method at the Same Level of AbstractionApr 05, 2017
iOS Dev Nugget 234 #available and @availableMar 29, 2017
iOS Dev Nugget 233 Separating View Controllers and Their ViewsJan 12, 2017
iOS Dev Nugget 222 Uniquely Identifying User DevicesNov 23, 2016
iOS Dev Nugget 215 dump Instead of print for Swift StructsOct 25, 2016
iOS Dev Nugget 211 Higher Order Functions: map, filter, reduceOct 12, 2016
iOS Dev Nugget 209 Swift DeferSep 28, 2016
iOS Dev Nugget 207 Swift Nil-Coalescing OperatorSep 22, 2016
iOS Dev Nugget 206 Date doesRelativeDateFormattingSep 11, 2016
iOS Dev Nugget 205 The Never Return Type in SwiftSep 07, 2016
iOS Dev Nugget 204 Swift @autoclosureSep 02, 2016
iOS Dev Nugget 203 Swift MeasurementAug 24, 2016
iOS Dev Nugget 202 Swift Enumerations to Encode StatesAug 17, 2016
iOS Dev Nugget 201 Swift Pattern MatchingAug 10, 2016
iOS Dev Nugget 200 Swift flatMapAug 05, 2016
iOS Dev Nugget 199 Swift Talk Video SeriesJul 26, 2016
iOS Dev Nugget 198 KZPlaygroundJul 20, 2016
iOS Dev Nugget 197 App Initialization CodeJul 09, 2016
iOS Dev Nugget 196 Rename Refactoring for Swift CodeJun 24, 2016
iOS Dev Nugget 193 Result EnumerationMay 20, 2016
iOS Dev Nugget 188 SwiftLintMay 10, 2016
iOS Dev Nugget 187 Creating a Singleton Class in SwiftMay 06, 2016
iOS Dev Nugget 186 Injection for XcodeApr 02, 2016
iOS Dev Nugget 182 Tracking the swift-evolution Git RepositoryMar 26, 2016
iOS Dev Nugget 181 Swift SelectorsMar 21, 2016
iOS Dev Nugget 180 Low Power ModeJan 27, 2016
iOS Dev Nugget 172 Print App Document PathDec 30, 2015
iOS Dev Nugget 168 Using Blocks to Manage ContextsOct 20, 2015
iOS Dev Nugget 158 Checking if Newer APIs Are Available In Older iOS Versions (II)Aug 17, 2015
iOS Dev Nugget 149 Timepiece, a Swift Library for Handling DatesJul 05, 2015
iOS Dev Nugget 143 Don't Forget SQLiteJul 01, 2015
iOS Dev Nugget 142 Grand Central DispatchJun 22, 2015
iOS Dev Nugget 141 Great Swift Standard Library Examples Covered in Playground (Swift 2.0)Jun 01, 2015
iOS Dev Nugget 138 Interoperability: Using Enumerations Defined In Objective-C from SwiftMay 27, 2015
iOS Dev Nugget 137 Named Tuple ElementsMay 19, 2015
iOS Dev Nugget 136 Auto Layout with CartographyMay 13, 2015
iOS Dev Nugget 135 CAShapeLayer, Animated Views and XCPShowView()Apr 29, 2015
iOS Dev Nugget 133 Dollar.swiftApr 22, 2015
iOS Dev Nugget 132 XCPCaptureValue in Swift PlaygroundsApr 14, 2015
iOS Dev Nugget 131 Running Asynchronous Code in Swift PlaygroundsApr 03, 2015
iOS Dev Nugget 129 Browsing the Swift Standard LibraryFeb 27, 2015
iOS Dev Nugget 124 performSelector:withObject:afterDelay: in SwiftFeb 20, 2015
iOS Dev Nugget 123 Using dynamicType in SwiftJan 02, 2015
iOS Dev Nugget 116 method() is unavailable: use object construction Class()
Jul 24, 2018 by Hwee-Boon Yar
Most apps need some kind of backing datastore and sometimes plist(s) are a perfectly fine option. When you need to handle more, structured data, you can consider SQLite, perhaps with a wrapper like FMDB. Alternatively, there is Realm which provides a local database and an optional cloud-sync service.
It's easy to get started, especially if you just want to use it for local storage.
Add it to your Podfile:
pod 'RealmSwift'
Install:
$ pod install --repo-update
Import the framework:
import RealmSwift
Define a class that is backed by Realm:
class Item: Object {
    @objc dynamic var itemId: String = UUID().uuidString
    @objc dynamic var body: String = ""
    @objc dynamic var timestamp: Date = Date()

    override static func primaryKey() -> String? {
        return "itemId"
    }
}
The properties that you want stored in Realm has to be declared with @objc and dynamic.
Create the database instance:
let realm = try! Realm()
Fetch objects:
items = realm.objects(Item.self).sorted(byKeyPath: "timestamp", ascending: false)
Create and save a new object:
try! realm.write {
    realm.add(item)
}
Update an object:
try! realm.write {
    item.body = "Something something"
}
Delete an object:
try! realm.write {
    realm.delete(item)
}
You can define parent-child relationships:
class Parent: Object {
    @objc dynamic var parentId: String = UUID().uuidString
    var items = List<Item>()

    override static func primaryKey() -> String? {
        return "parentId"
    }
}
You can perform schema migrations with a migration block:
config.migrationBlock = { migration, oldSchemaVersion in
    if oldSchemaVersion < 10 {
        migration.enumerateObjects(ofType: Item.className()) { oldObject, newObject in
            guard let oldObject = oldObject else { return }
            guard let newObject = newObject else { return }
            newObject["someChangedVarName"] = oldObject["oldChangedVarName"]
        }
    }

    if oldSchemaVersion < 20 {
        //...
    }
}
It's extremely quick to start and low effort to use for local storage.
Like this post? Follow me @hboon on Twitter.
Related
Aug 15, 2018
iOS Dev Nugget 305 Declaring Distinct Types from General TypesJun 09, 2018
iOS Dev Nugget 295 SwifterSwiftMay 23, 2018
iOS Dev Nugget 293 iOSSnapshotTestCase (was FBSnapshotTestCase)Mar 15, 2018
iOS Dev Nugget 283 Eureka for FormsFeb 28, 2018
iOS Dev Nugget 281 Use R.swift for Static References to Resources Like ImagesFeb 21, 2018
iOS Dev Nugget 280 Using Custom Fonts Without Updating Info.plist ManuallyDec 06, 2017
iOS Dev Nugget 269 Including Finger Touches in App Preview VideosJul 11, 2017
iOS Dev Nugget 248 In-app Native RoutingMar 01, 2017
iOS Dev Nugget 229 PromisesFeb 22, 2017
iOS Dev Nugget 228 Recording and Playing Back Network CallsOct 23, 2016
iOS Dev Nugget 210 PMAlertControllerJun 03, 2016
iOS Dev Nugget 190 Quick Look Plug-in for Mobile Provisioning FilesMay 20, 2016
iOS Dev Nugget 188 SwiftLintApr 20, 2016
iOS Dev Nugget 184 Async LibraryAug 31, 2015
iOS Dev Nugget 151 More Wrappers for Keychain AccessAug 17, 2015
iOS Dev Nugget 149 Timepiece, a Swift Library for Handling DatesJul 27, 2015
iOS Dev Nugget 146 UIStackView and TZStackViewJul 21, 2015
iOS Dev Nugget 145 Listing Available FontsJul 05, 2015
iOS Dev Nugget 143 Don't Forget SQLiteJun 09, 2015
iOS Dev Nugget 139 Custom Build Configurations and Xcode SubprojectsMay 19, 2015
iOS Dev Nugget 136 Auto Layout with CartographyApr 29, 2015
iOS Dev Nugget 133 Dollar.swiftFeb 06, 2015
iOS Dev Nugget 121 InflectorKitDec 26, 2014
iOS Dev Nugget 115 Displaying Information in Settings AppDec 19, 2014
iOS Dev Nugget 114 Preview an Image for DebuggingDec 12, 2014
iOS Dev Nugget 113 GPUImage, a GPU-based Image and Video Processing FrameworkMay 30, 2014
iOS Dev Nugget 85 A More Customizable Button For Different StatesMay 02, 2014
iOS Dev Nugget 81 TMCache For In-Memory and Disk-backed CachingApr 18, 2014
iOS Dev Nugget 79 TweetBot Photo Flicking EffectMar 07, 2014
iOS Dev Nugget 73 Open Source Date Picker from SquareFeb 22, 2014
iOS Dev Nugget 71 TapJan 31, 2014
iOS Dev Nugget 68 Custom URL Schemes DirectoryDec 20, 2013
iOS Dev Nugget 62 Using PDF Instead of PNG Files for Resizable AssetsSep 20, 2013
iOS Dev Nugget 49 Wrapper to Get UIColor ComponentsMay 17, 2013
iOS Dev Nugget 32 FMDB: Thin Objective C Wrapper Around SQLiteOct 06, 2012
iOS Dev Nugget 1 Easy logging of values and objects
Jul 21, 2018 by Hwee-Boon Yar
I have written about printing out the document directory in #172, but here's a obvious tweak on hindsight, along with updates for current Swift language changes:
#if DEBUG
    let docPath = FileManager.default.urls(for: FileManager.SearchPathDirectory.documentDirectory, in: FileManager.SearchPathDomainMask.userDomainMask).last?.path
    print("docPath: \(docPath)")
#endif
Like this post? Follow me @hboon on Twitter.
Related
Nov 03, 2018
iOS Dev Nugget 314 Checked Array SubscriptingSep 22, 2018
iOS Dev Nugget 310 Weak Reference Wrapper ClassSep 07, 2018
iOS Dev Nugget 308 Careful with early return statements in functions that return voidAug 30, 2018
iOS Dev Nugget 307 Array Out of BoundsAug 23, 2018
iOS Dev Nugget 306 Underscores in Numeric LiteralsAug 02, 2018
iOS Dev Nugget 303 Use Enums for StatesJul 16, 2018
iOS Dev Nugget 300 Pipe OperatorMay 18, 2018
iOS Dev Nugget 292 for-whereMay 12, 2018
iOS Dev Nugget 291 Implicit Member ExpressionsApr 11, 2018
iOS Dev Nugget 287 Modifying a Property Which is a Struct Triggers didSetNov 02, 2017
iOS Dev Nugget 265 value type cannot have a stored property that recursively contains itSep 13, 2017
iOS Dev Nugget 257 AssertsAug 02, 2017
iOS Dev Nugget 251 Retrieving the Current View ControllerJun 28, 2017
iOS Dev Nugget 246 Mapping Swift and Obj-C Method NamesJun 14, 2017
iOS Dev Nugget 244 IteratorProtocolMay 24, 2017
iOS Dev Nugget 241 Swift Enums with LabelsMay 17, 2017
iOS Dev Nugget 240 Print an Object's Unique IdentifierMay 03, 2017
iOS Dev Nugget 238 Keep Code in Method at the Same Level of AbstractionApr 05, 2017
iOS Dev Nugget 234 #available and @availableMar 01, 2017
iOS Dev Nugget 229 PromisesJan 25, 2017
iOS Dev Nugget 224 Lazy CollectionsNov 23, 2016
iOS Dev Nugget 215 dump Instead of print for Swift StructsOct 25, 2016
iOS Dev Nugget 211 Higher Order Functions: map, filter, reduceOct 12, 2016
iOS Dev Nugget 209 Swift DeferSep 28, 2016
iOS Dev Nugget 207 Swift Nil-Coalescing OperatorSep 22, 2016
iOS Dev Nugget 206 Date doesRelativeDateFormattingSep 11, 2016
iOS Dev Nugget 205 The Never Return Type in SwiftSep 07, 2016
iOS Dev Nugget 204 Swift @autoclosureSep 02, 2016
iOS Dev Nugget 203 Swift MeasurementAug 24, 2016
iOS Dev Nugget 202 Swift Enumerations to Encode StatesAug 17, 2016
iOS Dev Nugget 201 Swift Pattern MatchingAug 10, 2016
iOS Dev Nugget 200 Swift flatMapAug 05, 2016
iOS Dev Nugget 199 Swift Talk Video SeriesJul 26, 2016
iOS Dev Nugget 198 KZPlaygroundJul 20, 2016
iOS Dev Nugget 197 App Initialization CodeJul 09, 2016
iOS Dev Nugget 196 Rename Refactoring for Swift CodeJun 24, 2016
iOS Dev Nugget 193 Result EnumerationMay 26, 2016
iOS Dev Nugget 189 Xcode's Fix All in ScopeMay 20, 2016
iOS Dev Nugget 188 SwiftLintMay 10, 2016
iOS Dev Nugget 187 Creating a Singleton Class in SwiftMay 06, 2016
iOS Dev Nugget 186 Injection for XcodeApr 27, 2016
iOS Dev Nugget 185 Disabling Content Change Animation in CATextLayerApr 20, 2016
iOS Dev Nugget 184 Async LibraryApr 12, 2016
iOS Dev Nugget 183 Quality of Service ClassesApr 02, 2016
iOS Dev Nugget 182 Tracking the swift-evolution Git RepositoryMar 26, 2016
iOS Dev Nugget 181 Swift SelectorsMar 21, 2016
iOS Dev Nugget 180 Low Power ModeMar 01, 2016
iOS Dev Nugget 177 Push Notifications Testing During DevelopmentFeb 23, 2016
iOS Dev Nugget 176 Git no-commit Pre-commit HookFeb 18, 2016
iOS Dev Nugget 175 Displaying a Popover in iPhone AppFeb 11, 2016
iOS Dev Nugget 174 View Controller Containment to Avoid Growing a Fat View Controller Base ClassJan 27, 2016
iOS Dev Nugget 172 Print App Document PathDec 30, 2015
iOS Dev Nugget 168 Using Blocks to Manage ContextsNov 11, 2015
iOS Dev Nugget 161 Read Smalltalk Best Practice PatternsOct 20, 2015
iOS Dev Nugget 158 Checking if Newer APIs Are Available In Older iOS Versions (II)Aug 17, 2015
iOS Dev Nugget 149 Timepiece, a Swift Library for Handling DatesJul 05, 2015
iOS Dev Nugget 143 Don't Forget SQLiteJul 01, 2015
iOS Dev Nugget 142 Grand Central DispatchJun 22, 2015
iOS Dev Nugget 141 Great Swift Standard Library Examples Covered in Playground (Swift 2.0)Jun 01, 2015
iOS Dev Nugget 138 Interoperability: Using Enumerations Defined In Objective-C from SwiftMay 27, 2015
iOS Dev Nugget 137 Named Tuple ElementsMay 19, 2015
iOS Dev Nugget 136 Auto Layout with CartographyMay 13, 2015
iOS Dev Nugget 135 CAShapeLayer, Animated Views and XCPShowView()Apr 29, 2015
iOS Dev Nugget 133 Dollar.swiftApr 22, 2015
iOS Dev Nugget 132 XCPCaptureValue in Swift PlaygroundsApr 14, 2015
iOS Dev Nugget 131 Running Asynchronous Code in Swift PlaygroundsApr 03, 2015
iOS Dev Nugget 129 Browsing the Swift Standard LibraryFeb 27, 2015
iOS Dev Nugget 124 performSelector:withObject:afterDelay: in SwiftFeb 20, 2015
iOS Dev Nugget 123 Using dynamicType in SwiftJan 02, 2015
iOS Dev Nugget 116 method() is unavailable: use object construction Class()
Jul 16, 2018 by Hwee-Boon Yar
I'm going to talk about something that Swift doesn't have.
I'm quite a fan of the pipe operator in Elixir where you can do:
"Elixir rocks"
    |> String.upcase()
    |> String.split()

> ["ELIXIR", "ROCKS"]
Swift doesn't provide the pipe operator, but there are multiple implementations floating around that implements it using operator overloading. One of the libraries gives as an example:
let isEven: (Int) -> Bool = { x in x % 2 == 0 }
[1,2,3,4,5]
    .filter(isEven)
    .map({$0 * 3})
    .reduce(0, +)
which can be rewritten with the library's pipe operator as:
let isEven: (Int) -> Bool = { x in x % 2 == 0 }
[1,2,3,4,5]
    |> (filter, isEven)
    |> (map, {$0 * 3})
    |> (reduce, 0, +)
I just want to point out that. The pipe operator in Elixir (and F#) works in a different way. Let's look at an example. With the pipe operator in Elixir, you should be able to rewrite this code:
bar(foo([1, 2, 3, 4].map({ $0 == 2 })))
into:
[1, 2, 3, 4].map({ $0 == 2 })
    |> foo
    |> bar
In other words, you kind of flip the code with nested function calls from right to left to left-to-right, so it's easier to understand without introducing local variables.
Just wanted to clear this up.
PS: Sorry, this issue is very late.
Like this post? Follow me @hboon on Twitter.
Related
Nov 03, 2018
iOS Dev Nugget 314 Checked Array SubscriptingSep 22, 2018
iOS Dev Nugget 310 Weak Reference Wrapper ClassSep 07, 2018
iOS Dev Nugget 308 Careful with early return statements in functions that return voidAug 30, 2018
iOS Dev Nugget 307 Array Out of BoundsAug 23, 2018
iOS Dev Nugget 306 Underscores in Numeric LiteralsAug 02, 2018
iOS Dev Nugget 303 Use Enums for StatesJul 21, 2018
iOS Dev Nugget 301 Print App Document Path IIMay 18, 2018
iOS Dev Nugget 292 for-whereMay 12, 2018
iOS Dev Nugget 291 Implicit Member ExpressionsApr 11, 2018
iOS Dev Nugget 287 Modifying a Property Which is a Struct Triggers didSetNov 02, 2017
iOS Dev Nugget 265 value type cannot have a stored property that recursively contains itSep 13, 2017
iOS Dev Nugget 257 AssertsAug 02, 2017
iOS Dev Nugget 251 Retrieving the Current View ControllerJun 28, 2017
iOS Dev Nugget 246 Mapping Swift and Obj-C Method NamesJun 14, 2017
iOS Dev Nugget 244 IteratorProtocolMay 24, 2017
iOS Dev Nugget 241 Swift Enums with LabelsMay 17, 2017
iOS Dev Nugget 240 Print an Object's Unique IdentifierApr 05, 2017
iOS Dev Nugget 234 #available and @availableNov 23, 2016
iOS Dev Nugget 215 dump Instead of print for Swift StructsOct 25, 2016
iOS Dev Nugget 211 Higher Order Functions: map, filter, reduceOct 12, 2016
iOS Dev Nugget 209 Swift DeferSep 28, 2016
iOS Dev Nugget 207 Swift Nil-Coalescing OperatorSep 22, 2016
iOS Dev Nugget 206 Date doesRelativeDateFormattingSep 11, 2016
iOS Dev Nugget 205 The Never Return Type in SwiftSep 07, 2016
iOS Dev Nugget 204 Swift @autoclosureSep 02, 2016
iOS Dev Nugget 203 Swift MeasurementAug 24, 2016
iOS Dev Nugget 202 Swift Enumerations to Encode StatesAug 17, 2016
iOS Dev Nugget 201 Swift Pattern MatchingAug 10, 2016
iOS Dev Nugget 200 Swift flatMapAug 05, 2016
iOS Dev Nugget 199 Swift Talk Video SeriesJul 26, 2016
iOS Dev Nugget 198 KZPlaygroundJul 20, 2016
iOS Dev Nugget 197 App Initialization CodeJul 09, 2016
iOS Dev Nugget 196 Rename Refactoring for Swift CodeJun 24, 2016
iOS Dev Nugget 193 Result EnumerationMay 20, 2016
iOS Dev Nugget 188 SwiftLintMay 10, 2016
iOS Dev Nugget 187 Creating a Singleton Class in SwiftMay 06, 2016
iOS Dev Nugget 186 Injection for XcodeApr 02, 2016
iOS Dev Nugget 182 Tracking the swift-evolution Git RepositoryMar 26, 2016
iOS Dev Nugget 181 Swift SelectorsMar 21, 2016
iOS Dev Nugget 180 Low Power ModeJan 27, 2016
iOS Dev Nugget 172 Print App Document PathDec 30, 2015
iOS Dev Nugget 168 Using Blocks to Manage ContextsOct 20, 2015
iOS Dev Nugget 158 Checking if Newer APIs Are Available In Older iOS Versions (II)Aug 17, 2015
iOS Dev Nugget 149 Timepiece, a Swift Library for Handling DatesJul 05, 2015
iOS Dev Nugget 143 Don't Forget SQLiteJul 01, 2015
iOS Dev Nugget 142 Grand Central DispatchJun 22, 2015
iOS Dev Nugget 141 Great Swift Standard Library Examples Covered in Playground (Swift 2.0)Jun 01, 2015
iOS Dev Nugget 138 Interoperability: Using Enumerations Defined In Objective-C from SwiftMay 27, 2015
iOS Dev Nugget 137 Named Tuple ElementsMay 19, 2015
iOS Dev Nugget 136 Auto Layout with CartographyMay 13, 2015
iOS Dev Nugget 135 CAShapeLayer, Animated Views and XCPShowView()Apr 29, 2015
iOS Dev Nugget 133 Dollar.swiftApr 22, 2015
iOS Dev Nugget 132 XCPCaptureValue in Swift PlaygroundsApr 14, 2015
iOS Dev Nugget 131 Running Asynchronous Code in Swift PlaygroundsApr 03, 2015
iOS Dev Nugget 129 Browsing the Swift Standard LibraryFeb 27, 2015
iOS Dev Nugget 124 performSelector:withObject:afterDelay: in SwiftFeb 20, 2015
iOS Dev Nugget 123 Using dynamicType in SwiftJan 02, 2015
iOS Dev Nugget 116 method() is unavailable: use object construction Class()
Jul 08, 2018 by Hwee-Boon Yar
According to Wikipedia:
currying is the technique of translating the evaluation of a function that takes multiple arguments (or a tuple of arguments) into evaluating a sequence of functions, each with a single argument.
In Swift 3, currying was removed. But it is still a useful tool. If you still want to use currying, there's a library for that.
Given a function f:
func f(x: Int, y: Int, z: Int)
which you normally call with f(x: 1, y: 2, z: 3), you turn it into a series of functions that you can call in these order with currying:
let f0 = curry(f)
let f1 = f0(1)
let f2 = f1(2)
let result = f2(3)
This is useful, for e.g., because you can create the functions stored in f1, f2 as you process and gather the arguments.
While an alternative is just to store the values of x, y as we gather them in an object, as we write more functional code, currying is a very useful technique.
Like this post? Follow me @hboon on Twitter.
Related
Oct 06, 2018
iOS Dev Nugget 312 Fix Distorted Launch Screens with Hotspot BarSep 28, 2018
iOS Dev Nugget 311 jqSep 22, 2018
iOS Dev Nugget 310 Weak Reference Wrapper ClassSep 15, 2018
iOS Dev Nugget 309 Rule of Thumb Regarding self.Aug 02, 2018
iOS Dev Nugget 303 Use Enums for StatesJun 24, 2018
iOS Dev Nugget 297 Defensive Checks for Asynchronous CallsJun 01, 2018
iOS Dev Nugget 294 Core Data EditorApr 27, 2018
iOS Dev Nugget 289 Set Background Color for UIWebView to Match App While Still Loading DocumentsApr 22, 2018
iOS Dev Nugget 288 Use the .custom UIButton type to Fix Flashing when Title is ChangedApr 07, 2018
iOS Dev Nugget 286 Use Auto Layout for Bottom BarMar 22, 2018
iOS Dev Nugget 284 Use Shell Aliases for Git commandsMar 08, 2018
iOS Dev Nugget 282 Update to My Git no-commit Pre-commit HookJan 24, 2018
iOS Dev Nugget 276 Adding an Indent Default Parameter When Logging Calls in Object HierarchiesJan 18, 2018
iOS Dev Nugget 275 Implementing UIView draw(_:)Dec 28, 2017
iOS Dev Nugget 272 Namespacing using EnumsDec 20, 2017
iOS Dev Nugget 271 Zhi — Live Reloading Auto Layout Constraints and moreDec 14, 2017
iOS Dev Nugget 270 Using lazy properties to workaround initializing dependent non-optional propertiesNov 30, 2017
iOS Dev Nugget 268 Using Blocks for Delegate MethodsNov 02, 2017
iOS Dev Nugget 265 value type cannot have a stored property that recursively contains itNov 01, 2017
iOS Dev Nugget 264 Track how long a function takes to run and report progressOct 18, 2017
iOS Dev Nugget 262 Apple Device Names APISep 27, 2017
iOS Dev Nugget 259 CAShapeLayer, UIBezierPath and UIRectCornerAug 30, 2017
iOS Dev Nugget 255 Symbolic Breakpoint to watch for View Controller DeallocationAug 23, 2017
iOS Dev Nugget 254 Paw, for Working with APIsAug 10, 2017
iOS Dev Nugget 252 A Little Trick to Write Loosely Coupled View ControllersJul 11, 2017
iOS Dev Nugget 248 In-app Native RoutingJun 14, 2017
iOS Dev Nugget 244 IteratorProtocolMay 03, 2017
iOS Dev Nugget 238 Keep Code in Method at the Same Level of AbstractionApr 26, 2017
iOS Dev Nugget 237 mas-cliApr 19, 2017
iOS Dev Nugget 236 Look up Error CodesMar 29, 2017
iOS Dev Nugget 233 Separating View Controllers and Their ViewsFeb 09, 2017
iOS Dev Nugget 226 React NativeJan 12, 2017
iOS Dev Nugget 222 Uniquely Identifying User DevicesJul 09, 2016
iOS Dev Nugget 196 Rename Refactoring for Swift CodeJul 06, 2016
iOS Dev Nugget 195 Tools of the TradeMay 06, 2016
iOS Dev Nugget 186 Injection for XcodeFeb 03, 2016
iOS Dev Nugget 173 Xcode Package Manager, AlcatrazJan 11, 2016
iOS Dev Nugget 170 HomebrewJan 05, 2016
iOS Dev Nugget 169 fastlane: deliverSep 07, 2015
iOS Dev Nugget 152 Lossy PNG CompressionAug 07, 2015
iOS Dev Nugget 147 NSRegularExpression and NSDataDetectorMar 06, 2015
iOS Dev Nugget 125 View Debugging in XcodeFeb 13, 2015
iOS Dev Nugget 122 Importing Many Test Photos into iOS Simulator IINov 28, 2014
iOS Dev Nugget 111 iOS Support MatrixOct 24, 2014
iOS Dev Nugget 106 Command Line Access to Developer PortalOct 17, 2014
iOS Dev Nugget 105 Try FLEXSep 12, 2014
iOS Dev Nugget 100 Try RevealSep 05, 2014
iOS Dev Nugget 99 Try PaintCodeAug 15, 2014
iOS Dev Nugget 96 Jack, A Native App For iTunes ConnectJul 04, 2014
iOS Dev Nugget 90 Full-Text Searchable WWDC Video Text TranscriptsApr 04, 2014
iOS Dev Nugget 77 RubyMotion Tutorial For Objective C DevelopersJan 17, 2014
iOS Dev Nugget 66 JBChartView for ChartingJan 04, 2014
iOS Dev Nugget 64 Placeholder Views Using PAPlaceholderDec 27, 2013
iOS Dev Nugget 63 Update Your iOS Development ToolboxOct 18, 2013
iOS Dev Nugget 53 Try Kaleidoscope, File Comparison for MacOct 11, 2013
iOS Dev Nugget 52 Set Up Crashlytics For Ad Hoc and App Store Builds OnlyJun 21, 2013
iOS Dev Nugget 36 Use TestFlight for Ad Hoc BuildsMay 11, 2013
iOS Dev Nugget 31 3rd Party Documentation ViewersMar 10, 2013
iOS Dev Nugget 22 Try AppCodeJan 05, 2013
iOS Dev Nugget 14 Charles Web Debugging Proxy
Jul 01, 2018 by Hwee-Boon Yar
Did you know that you can set conditions for your breakpoints?
- Click at the gutter in Xcode editor on the line of code to set a breakpoint
- Ctrl-click the breakpoint and choose
Edit Breakpoint
- Type in the condition. eg.
i == 13
Conditional breakpoints will only break when it matches the condition.
Like this post? Follow me @hboon on Twitter.
Related
Feb 15, 2018
iOS Dev Nugget 279 Reclaim Disk Space by Deleting Old SimulatorsJan 31, 2018
iOS Dev Nugget 277 REPL in LLDBNov 15, 2017
iOS Dev Nugget 266 Play a System Sound for Simple Untethered DebuggingAug 30, 2017
iOS Dev Nugget 255 Symbolic Breakpoint to watch for View Controller DeallocationJun 21, 2017
iOS Dev Nugget 245 Show Call HierarchyMar 08, 2017
iOS Dev Nugget 230 Shortcut to Generate Quick Help DocumentationFeb 03, 2017
iOS Dev Nugget 225 Contextual Help for Xcode Build SettingsDec 29, 2016
iOS Dev Nugget 220 Don't Download Xcode from the Mac App StoreNov 08, 2016
iOS Dev Nugget 213 Download Your App Data on iOS Device for DebuggingJun 28, 2016
iOS Dev Nugget 194 Debugging CGContextDrawImage: invalid context 0x0Jun 17, 2016
iOS Dev Nugget 192 Download Xcode from Downloads for Apple Developers Website Instead of Mac App StoreMay 26, 2016
iOS Dev Nugget 189 Xcode's Fix All in ScopeMar 12, 2016
iOS Dev Nugget 179 Dragging the Program CounterMar 07, 2016
iOS Dev Nugget 178 Breakpoint Actions for LoggingFeb 03, 2016
iOS Dev Nugget 173 Xcode Package Manager, AlcatrazDec 15, 2015
iOS Dev Nugget 166 @expr import UIKitNov 18, 2015
iOS Dev Nugget 162 Reclaim Disk Space from Xcode Usage
Jun 24, 2018 by Hwee-Boon Yar
This is a common pattern:
let someModel = getCurrentModel()
functionThatIsAsynchronousEspeciallyAWebAPICall(model: someModel) { result in
    doSomething(with: result)
}
functionThatIsAsynchronousEspeciallyAWebAPICall() is a function that is asynchronous and sometimes takes a few seconds or more to complete and call its completion handler.
In an app that has user accounts or something similar, this becomes:
let account = getAccount()
functionThatIsAsynchronousEspeciallyAWebAPICall(account: account) { result in
    doSomething(with: result)
}
Depending on how you implement doSomething(with:), this might not always behalf correctly because by the time the completion handler is called, the user might have switched accounts. It's better to include a check that the current account is still the same.
let account = getAccount()
functionThatIsAsynchronousEspeciallyAWebAPICall(account: account) { result in
    let currentAccount = getAccount()
    guard currentAccount.username == account.username else { return }
    doSomething(with: result)
}
Like this post? Follow me @hboon on Twitter.
Related
Oct 06, 2018
iOS Dev Nugget 312 Fix Distorted Launch Screens with Hotspot BarSep 22, 2018
iOS Dev Nugget 310 Weak Reference Wrapper ClassSep 15, 2018
iOS Dev Nugget 309 Rule of Thumb Regarding self.Aug 02, 2018
iOS Dev Nugget 303 Use Enums for StatesJul 08, 2018
iOS Dev Nugget 299 CurryingApr 27, 2018
iOS Dev Nugget 289 Set Background Color for UIWebView to Match App While Still Loading DocumentsApr 22, 2018
iOS Dev Nugget 288 Use the .custom UIButton type to Fix Flashing when Title is ChangedApr 07, 2018
iOS Dev Nugget 286 Use Auto Layout for Bottom BarMar 22, 2018
iOS Dev Nugget 284 Use Shell Aliases for Git commandsMar 08, 2018
iOS Dev Nugget 282 Update to My Git no-commit Pre-commit HookJan 24, 2018
iOS Dev Nugget 276 Adding an Indent Default Parameter When Logging Calls in Object HierarchiesJan 18, 2018
iOS Dev Nugget 275 Implementing UIView draw(_:)Dec 28, 2017
iOS Dev Nugget 272 Namespacing using EnumsDec 14, 2017
iOS Dev Nugget 270 Using lazy properties to workaround initializing dependent non-optional propertiesNov 30, 2017
iOS Dev Nugget 268 Using Blocks for Delegate MethodsNov 02, 2017
iOS Dev Nugget 265 value type cannot have a stored property that recursively contains itNov 01, 2017
iOS Dev Nugget 264 Track how long a function takes to run and report progressSep 27, 2017
iOS Dev Nugget 259 CAShapeLayer, UIBezierPath and UIRectCornerAug 30, 2017
iOS Dev Nugget 255 Symbolic Breakpoint to watch for View Controller DeallocationAug 10, 2017
iOS Dev Nugget 252 A Little Trick to Write Loosely Coupled View ControllersJul 11, 2017
iOS Dev Nugget 248 In-app Native RoutingJun 14, 2017
iOS Dev Nugget 244 IteratorProtocolMay 03, 2017
iOS Dev Nugget 238 Keep Code in Method at the Same Level of AbstractionMar 29, 2017
iOS Dev Nugget 233 Separating View Controllers and Their ViewsJan 12, 2017
iOS Dev Nugget 222 Uniquely Identifying User Devices
Jun 18, 2018 by Hwee-Boon Yar
Do you use UITableview without self-sizing cells?
I've found an odd behavior that happens when several conditions are met:
- not use self-sizing cells
- the number of rows display is such that it the total content height is slightly more than the table view's height
- you scroll to the bottom of the table
Sometimes when you call reloadData, the table may scroll so there is a gap at the bottom, below the last cell.
Anecdotally, this seems to be fixed by setting UITableview.estimatedRowHeight to 0.
If you experience this, try it out and let me know.
PS: Sorry, I'm late for this issue
Like this post? Follow me @hboon on Twitter.
Jun 09, 2018 by Hwee-Boon Yar
I discovered SwifterSwift recently. In its own words, it's a "A handy collection of more than 500 native Swift extensions to boost your productivity".
Some examples from https://github.com/SwifterSwift/SwifterSwift/blob/master/Examples/Examples.md:
// Remove duplicates from an array
[1, 2, 3, 1, 3].removeDuplicates() -> [1, 2, 3]

date.hour = 14

"hello world".split(by: " ") -> ["hello", "world"]

"123abc".reverse() -> "cba321"

"Hèllö Wórld!".latinize() -> "Hello World!"

√ 9 -> 3

view.addShadow(ofColor .black, radius: 3, opacity: 0.5)

image.kilobytesSize -> 114

imageView.download(from url, contentMode: .scaleAspectFit, placeHolder: UIImage?)
I'm still not sure if importing such libraries will essentially make you form your own dialect of Swift (maybe that's inevitable with all libraries), but there are definitely some gems in there and since the license is MIT, you can at least cherry pick what you want if you rather not import the entire library. So check it out!
Like this post? Follow me @hboon on Twitter.
Related
Aug 15, 2018
iOS Dev Nugget 305 Declaring Distinct Types from General TypesJul 24, 2018
iOS Dev Nugget 302 RealmMay 23, 2018
iOS Dev Nugget 293 iOSSnapshotTestCase (was FBSnapshotTestCase)Mar 15, 2018
iOS Dev Nugget 283 Eureka for FormsFeb 28, 2018
iOS Dev Nugget 281 Use R.swift for Static References to Resources Like ImagesFeb 21, 2018
iOS Dev Nugget 280 Using Custom Fonts Without Updating Info.plist ManuallyDec 06, 2017
iOS Dev Nugget 269 Including Finger Touches in App Preview VideosJul 11, 2017
iOS Dev Nugget 248 In-app Native RoutingMar 01, 2017
iOS Dev Nugget 229 PromisesFeb 22, 2017
iOS Dev Nugget 228 Recording and Playing Back Network CallsOct 23, 2016
iOS Dev Nugget 210 PMAlertControllerJun 03, 2016
iOS Dev Nugget 190 Quick Look Plug-in for Mobile Provisioning FilesMay 20, 2016
iOS Dev Nugget 188 SwiftLintApr 20, 2016
iOS Dev Nugget 184 Async LibraryAug 31, 2015
iOS Dev Nugget 151 More Wrappers for Keychain AccessAug 17, 2015
iOS Dev Nugget 149 Timepiece, a Swift Library for Handling DatesJul 27, 2015
iOS Dev Nugget 146 UIStackView and TZStackViewJul 21, 2015
iOS Dev Nugget 145 Listing Available FontsJul 05, 2015
iOS Dev Nugget 143 Don't Forget SQLiteJun 09, 2015
iOS Dev Nugget 139 Custom Build Configurations and Xcode SubprojectsMay 19, 2015
iOS Dev Nugget 136 Auto Layout with CartographyApr 29, 2015
iOS Dev Nugget 133 Dollar.swiftFeb 06, 2015
iOS Dev Nugget 121 InflectorKitDec 26, 2014
iOS Dev Nugget 115 Displaying Information in Settings AppDec 19, 2014
iOS Dev Nugget 114 Preview an Image for DebuggingDec 12, 2014
iOS Dev Nugget 113 GPUImage, a GPU-based Image and Video Processing FrameworkMay 30, 2014
iOS Dev Nugget 85 A More Customizable Button For Different StatesMay 02, 2014
iOS Dev Nugget 81 TMCache For In-Memory and Disk-backed CachingApr 18, 2014
iOS Dev Nugget 79 TweetBot Photo Flicking EffectMar 07, 2014
iOS Dev Nugget 73 Open Source Date Picker from SquareFeb 22, 2014
iOS Dev Nugget 71 TapJan 31, 2014
iOS Dev Nugget 68 Custom URL Schemes DirectoryDec 20, 2013
iOS Dev Nugget 62 Using PDF Instead of PNG Files for Resizable AssetsSep 20, 2013
iOS Dev Nugget 49 Wrapper to Get UIColor ComponentsMay 17, 2013
iOS Dev Nugget 32 FMDB: Thin Objective C Wrapper Around SQLiteOct 06, 2012
iOS Dev Nugget 1 Easy logging of values and objects
Jun 01, 2018 by Hwee-Boon Yar
If you work with Core Data, you got to check out Core Data Editor. Remember Fred Brooks famous quote:
Show me your flowcharts and conceal your tables, and I shall continue to be mystified. Show me your tables, and I won’t usually need your flowcharts; they’ll be obvious.
It's true. I recently took over a project that uses Core Data and Core Data Editor lets me look at what are the types involved as well as data stored. It has a few handy features like letting you point to your simulator directory and DerivedData directory so that it can automatically list your apps.
As of writing, there's a downloadable release on GitHub.
Like this post? Follow me @hboon on Twitter.
Related
Sep 28, 2018
iOS Dev Nugget 311 jqJul 08, 2018
iOS Dev Nugget 299 CurryingMar 22, 2018
iOS Dev Nugget 284 Use Shell Aliases for Git commandsDec 20, 2017
iOS Dev Nugget 271 Zhi — Live Reloading Auto Layout Constraints and moreOct 18, 2017
iOS Dev Nugget 262 Apple Device Names APIAug 23, 2017
iOS Dev Nugget 254 Paw, for Working with APIsApr 26, 2017
iOS Dev Nugget 237 mas-cliApr 19, 2017
iOS Dev Nugget 236 Look up Error CodesFeb 09, 2017
iOS Dev Nugget 226 React NativeJul 09, 2016
iOS Dev Nugget 196 Rename Refactoring for Swift CodeJul 06, 2016
iOS Dev Nugget 195 Tools of the TradeMay 06, 2016
iOS Dev Nugget 186 Injection for XcodeFeb 03, 2016
iOS Dev Nugget 173 Xcode Package Manager, AlcatrazJan 11, 2016
iOS Dev Nugget 170 HomebrewJan 05, 2016
iOS Dev Nugget 169 fastlane: deliverSep 07, 2015
iOS Dev Nugget 152 Lossy PNG CompressionAug 07, 2015
iOS Dev Nugget 147 NSRegularExpression and NSDataDetectorMar 06, 2015
iOS Dev Nugget 125 View Debugging in XcodeFeb 13, 2015
iOS Dev Nugget 122 Importing Many Test Photos into iOS Simulator IINov 28, 2014
iOS Dev Nugget 111 iOS Support MatrixOct 24, 2014
iOS Dev Nugget 106 Command Line Access to Developer PortalOct 17, 2014
iOS Dev Nugget 105 Try FLEXSep 12, 2014
iOS Dev Nugget 100 Try RevealSep 05, 2014
iOS Dev Nugget 99 Try PaintCodeAug 15, 2014
iOS Dev Nugget 96 Jack, A Native App For iTunes ConnectJul 04, 2014
iOS Dev Nugget 90 Full-Text Searchable WWDC Video Text TranscriptsApr 04, 2014
iOS Dev Nugget 77 RubyMotion Tutorial For Objective C DevelopersJan 17, 2014
iOS Dev Nugget 66 JBChartView for ChartingJan 04, 2014
iOS Dev Nugget 64 Placeholder Views Using PAPlaceholderDec 27, 2013
iOS Dev Nugget 63 Update Your iOS Development ToolboxOct 18, 2013
iOS Dev Nugget 53 Try Kaleidoscope, File Comparison for MacOct 11, 2013
iOS Dev Nugget 52 Set Up Crashlytics For Ad Hoc and App Store Builds OnlyJun 21, 2013
iOS Dev Nugget 36 Use TestFlight for Ad Hoc BuildsMay 11, 2013
iOS Dev Nugget 31 3rd Party Documentation ViewersMar 10, 2013
iOS Dev Nugget 22 Try AppCodeJan 05, 2013
iOS Dev Nugget 14 Charles Web Debugging Proxy
May 23, 2018 by Hwee-Boon Yar
For most iOS apps, displaying the right data in the right way is very important. Traditionally, testing this is hard. It gets especially more complicated as your app feature set grows and you no longer know if a change affects another screen(s).
iOSSnapshotTestCase helps with that by letting us write snapshot tests, or what I like to call "screenshot-based asserts". You write tests cases with it, creating or navigating to the desired screen and then take a screenshot with it, comparing that to a reference screenshot which you made earlier.
It's easy to get started.
- Add the iOSSnapshotTestCase pod with Cocoapods for your test target, run
pod install
-
In Xcode, go to Product > Schemes > Edit Scheme, choose Test, add these to Environment Variables:
FB_REFERENCE_IMAGE_DIR = $(SOURCE_ROOT)/$(PROJECT_NAME)Tests/Snapshots/ReferenceImages
IMAGE_DIFF_DIR = $(SOURCE_ROOT)$/(PROJECT_NAME)Tests/Snapshots/FailureDiffs
Make sure that $(PROJECT_NAME)Tests matches your test folder name in your project directory, otherwise tweak the path accordingly.
The former will be used to store your reference images and the latter the results if they don't match.
-
Create a test class, but subclass FBSnapshotTestCase instead of XCTestCase.
- In the test function, create your view controller/view and call
FBSnapshotVerifyView() passing in the view to test
- In
setUp(), set recordMode to true and run the test case to create and store the reference screenshots in FB_REFERENCE_IMAGE_DIR. You'd want to make sure these screenshots represent how your app should behave.
- From now on, run it with
recordMode = false to compare against the reference screenshots — until you intentionally change your UI and you would need to update your reference snapshot(s). If a test fails, the result, including the difference will be stored in IMAGE_DIFF_DIR.
- You want to add
IMAGE_DIFF_DIR to your .gitignore file.
e.g of a test class:
class AnExampleSnapshotTest: FBSnapshotTestCase {
    override func setUp() {
        super.setUp()
        //Set to true only when creating reference snapshots
        //This line should not be checked into version control
        recordMode = true
    }

    func testExample() {
        //TODO create data, set up controller, etc
        let controller = MyViewController()
        //This will create a reference snapshot or compare against one, depending on the value of `recordMode`
        FBSnapshotVerifyView(controller.view)
    }
}
Like this post? Follow me @hboon on Twitter.
Related
Aug 15, 2018
iOS Dev Nugget 305 Declaring Distinct Types from General TypesJul 24, 2018
iOS Dev Nugget 302 RealmJun 09, 2018
iOS Dev Nugget 295 SwifterSwiftMar 15, 2018
iOS Dev Nugget 283 Eureka for FormsFeb 28, 2018
iOS Dev Nugget 281 Use R.swift for Static References to Resources Like ImagesFeb 21, 2018
iOS Dev Nugget 280 Using Custom Fonts Without Updating Info.plist ManuallyDec 06, 2017
iOS Dev Nugget 269 Including Finger Touches in App Preview VideosJul 11, 2017
iOS Dev Nugget 248 In-app Native RoutingMar 01, 2017
iOS Dev Nugget 229 PromisesFeb 22, 2017
iOS Dev Nugget 228 Recording and Playing Back Network CallsOct 23, 2016
iOS Dev Nugget 210 PMAlertControllerJun 03, 2016
iOS Dev Nugget 190 Quick Look Plug-in for Mobile Provisioning FilesMay 20, 2016
iOS Dev Nugget 188 SwiftLintApr 20, 2016
iOS Dev Nugget 184 Async LibraryAug 31, 2015
iOS Dev Nugget 151 More Wrappers for Keychain AccessAug 17, 2015
iOS Dev Nugget 149 Timepiece, a Swift Library for Handling DatesJul 27, 2015
iOS Dev Nugget 146 UIStackView and TZStackViewJul 21, 2015
iOS Dev Nugget 145 Listing Available FontsJul 05, 2015
iOS Dev Nugget 143 Don't Forget SQLiteJun 09, 2015
iOS Dev Nugget 139 Custom Build Configurations and Xcode SubprojectsMay 19, 2015
iOS Dev Nugget 136 Auto Layout with CartographyApr 29, 2015
iOS Dev Nugget 133 Dollar.swiftFeb 06, 2015
iOS Dev Nugget 121 InflectorKitDec 26, 2014
iOS Dev Nugget 115 Displaying Information in Settings AppDec 19, 2014
iOS Dev Nugget 114 Preview an Image for DebuggingDec 12, 2014
iOS Dev Nugget 113 GPUImage, a GPU-based Image and Video Processing FrameworkMay 30, 2014
iOS Dev Nugget 85 A More Customizable Button For Different StatesMay 02, 2014
iOS Dev Nugget 81 TMCache For In-Memory and Disk-backed CachingApr 18, 2014
iOS Dev Nugget 79 TweetBot Photo Flicking EffectMar 07, 2014
iOS Dev Nugget 73 Open Source Date Picker from SquareFeb 22, 2014
iOS Dev Nugget 71 TapJan 31, 2014
iOS Dev Nugget 68 Custom URL Schemes DirectoryDec 20, 2013
iOS Dev Nugget 62 Using PDF Instead of PNG Files for Resizable AssetsSep 20, 2013
iOS Dev Nugget 49 Wrapper to Get UIColor ComponentsMay 17, 2013
iOS Dev Nugget 32 FMDB: Thin Objective C Wrapper Around SQLiteOct 06, 2012
iOS Dev Nugget 1 Easy logging of values and objects
May 18, 2018 by Hwee-Boon Yar
We often need to go through elements in a collection, but only operating on elements that fulfill a certain condition. E.g. only if the number is odd:
for i in 1...10 {
    if i % 2 == 0 {
        print(i)
    }
}
Here's another way to do it, using filter():
for i in (1...10).filter({$0 % 2 == 0}) {
    print(i)
}
But this is probably the more idiomatic way to do it in Swift:
for i in 1...10 where i % 2 == 0 {
    print(i)
}
Note that you can use where clauses in a similar manner in other places, such as in switch-case statements.
Like this post? Follow me @hboon on Twitter.
Related
Nov 03, 2018
iOS Dev Nugget 314 Checked Array SubscriptingSep 22, 2018
iOS Dev Nugget 310 Weak Reference Wrapper ClassSep 07, 2018
iOS Dev Nugget 308 Careful with early return statements in functions that return voidAug 30, 2018
iOS Dev Nugget 307 Array Out of BoundsAug 23, 2018
iOS Dev Nugget 306 Underscores in Numeric LiteralsAug 02, 2018
iOS Dev Nugget 303 Use Enums for StatesJul 21, 2018
iOS Dev Nugget 301 Print App Document Path IIJul 16, 2018
iOS Dev Nugget 300 Pipe OperatorMay 12, 2018
iOS Dev Nugget 291 Implicit Member ExpressionsApr 11, 2018
iOS Dev Nugget 287 Modifying a Property Which is a Struct Triggers didSetNov 02, 2017
iOS Dev Nugget 265 value type cannot have a stored property that recursively contains itSep 13, 2017
iOS Dev Nugget 257 AssertsAug 02, 2017
iOS Dev Nugget 251 Retrieving the Current View ControllerJun 28, 2017
iOS Dev Nugget 246 Mapping Swift and Obj-C Method NamesJun 14, 2017
iOS Dev Nugget 244 IteratorProtocolMay 24, 2017
iOS Dev Nugget 241 Swift Enums with LabelsMay 17, 2017
iOS Dev Nugget 240 Print an Object's Unique IdentifierApr 05, 2017
iOS Dev Nugget 234 #available and @availableNov 23, 2016
iOS Dev Nugget 215 dump Instead of print for Swift StructsOct 25, 2016
iOS Dev Nugget 211 Higher Order Functions: map, filter, reduceOct 12, 2016
iOS Dev Nugget 209 Swift DeferSep 28, 2016
iOS Dev Nugget 207 Swift Nil-Coalescing OperatorSep 22, 2016
iOS Dev Nugget 206 Date doesRelativeDateFormattingSep 11, 2016
iOS Dev Nugget 205 The Never Return Type in SwiftSep 07, 2016
iOS Dev Nugget 204 Swift @autoclosureSep 02, 2016
iOS Dev Nugget 203 Swift MeasurementAug 24, 2016
iOS Dev Nugget 202 Swift Enumerations to Encode StatesAug 17, 2016
iOS Dev Nugget 201 Swift Pattern MatchingAug 10, 2016
iOS Dev Nugget 200 Swift flatMapAug 05, 2016
iOS Dev Nugget 199 Swift Talk Video SeriesJul 26, 2016
iOS Dev Nugget 198 KZPlaygroundJul 20, 2016
iOS Dev Nugget 197 App Initialization CodeJul 09, 2016
iOS Dev Nugget 196 Rename Refactoring for Swift CodeJun 24, 2016
iOS Dev Nugget 193 Result EnumerationMay 20, 2016
iOS Dev Nugget 188 SwiftLintMay 10, 2016
iOS Dev Nugget 187 Creating a Singleton Class in SwiftMay 06, 2016
iOS Dev Nugget 186 Injection for XcodeApr 02, 2016
iOS Dev Nugget 182 Tracking the swift-evolution Git RepositoryMar 26, 2016
iOS Dev Nugget 181 Swift SelectorsMar 21, 2016
iOS Dev Nugget 180 Low Power ModeJan 27, 2016
iOS Dev Nugget 172 Print App Document PathDec 30, 2015
iOS Dev Nugget 168 Using Blocks to Manage ContextsOct 20, 2015
iOS Dev Nugget 158 Checking if Newer APIs Are Available In Older iOS Versions (II)Aug 17, 2015
iOS Dev Nugget 149 Timepiece, a Swift Library for Handling DatesJul 05, 2015
iOS Dev Nugget 143 Don't Forget SQLiteJul 01, 2015
iOS Dev Nugget 142 Grand Central DispatchJun 22, 2015
iOS Dev Nugget 141 Great Swift Standard Library Examples Covered in Playground (Swift 2.0)Jun 01, 2015
iOS Dev Nugget 138 Interoperability: Using Enumerations Defined In Objective-C from SwiftMay 27, 2015
iOS Dev Nugget 137 Named Tuple ElementsMay 19, 2015
iOS Dev Nugget 136 Auto Layout with CartographyMay 13, 2015
iOS Dev Nugget 135 CAShapeLayer, Animated Views and XCPShowView()Apr 29, 2015
iOS Dev Nugget 133 Dollar.swiftApr 22, 2015
iOS Dev Nugget 132 XCPCaptureValue in Swift PlaygroundsApr 14, 2015
iOS Dev Nugget 131 Running Asynchronous Code in Swift PlaygroundsApr 03, 2015
iOS Dev Nugget 129 Browsing the Swift Standard LibraryFeb 27, 2015
iOS Dev Nugget 124 performSelector:withObject:afterDelay: in SwiftFeb 20, 2015
iOS Dev Nugget 123 Using dynamicType in SwiftJan 02, 2015
iOS Dev Nugget 116 method() is unavailable: use object construction Class()
May 12, 2018 by Hwee-Boon Yar
You have probably used Implicit Member Expressions without knowing what it's called:
var color: UIColor?
color = .white
i.e. the member of a type can be accessed from an inferred type.
You can access static functions:
foo(i: .createInstance())
Did you know that it works with .init() too?
class C {
    static func foo() -> C {
        return .init()
    }
}
func bar(c: C) {}

bar(c: .init())
Notice the 2 calls to init() above.
Like this post? Follow me @hboon on Twitter.
Related
Nov 03, 2018
iOS Dev Nugget 314 Checked Array SubscriptingSep 22, 2018
iOS Dev Nugget 310 Weak Reference Wrapper ClassSep 07, 2018
iOS Dev Nugget 308 Careful with early return statements in functions that return voidAug 30, 2018
iOS Dev Nugget 307 Array Out of BoundsAug 23, 2018
iOS Dev Nugget 306 Underscores in Numeric LiteralsAug 02, 2018
iOS Dev Nugget 303 Use Enums for StatesJul 21, 2018
iOS Dev Nugget 301 Print App Document Path IIJul 16, 2018
iOS Dev Nugget 300 Pipe OperatorMay 18, 2018
iOS Dev Nugget 292 for-whereApr 11, 2018
iOS Dev Nugget 287 Modifying a Property Which is a Struct Triggers didSetNov 02, 2017
iOS Dev Nugget 265 value type cannot have a stored property that recursively contains itSep 13, 2017
iOS Dev Nugget 257 AssertsAug 02, 2017
iOS Dev Nugget 251 Retrieving the Current View ControllerJun 28, 2017
iOS Dev Nugget 246 Mapping Swift and Obj-C Method NamesJun 14, 2017
iOS Dev Nugget 244 IteratorProtocolMay 24, 2017
iOS Dev Nugget 241 Swift Enums with LabelsMay 17, 2017
iOS Dev Nugget 240 Print an Object's Unique IdentifierApr 05, 2017
iOS Dev Nugget 234 #available and @availableNov 23, 2016
iOS Dev Nugget 215 dump Instead of print for Swift StructsOct 25, 2016
iOS Dev Nugget 211 Higher Order Functions: map, filter, reduceOct 12, 2016
iOS Dev Nugget 209 Swift DeferSep 28, 2016
iOS Dev Nugget 207 Swift Nil-Coalescing OperatorSep 22, 2016
iOS Dev Nugget 206 Date doesRelativeDateFormattingSep 11, 2016
iOS Dev Nugget 205 The Never Return Type in SwiftSep 07, 2016
iOS Dev Nugget 204 Swift @autoclosureSep 02, 2016
iOS Dev Nugget 203 Swift MeasurementAug 24, 2016
iOS Dev Nugget 202 Swift Enumerations to Encode StatesAug 17, 2016
iOS Dev Nugget 201 Swift Pattern MatchingAug 10, 2016
iOS Dev Nugget 200 Swift flatMapAug 05, 2016
iOS Dev Nugget 199 Swift Talk Video SeriesJul 26, 2016
iOS Dev Nugget 198 KZPlaygroundJul 20, 2016
iOS Dev Nugget 197 App Initialization CodeJul 09, 2016
iOS Dev Nugget 196 Rename Refactoring for Swift CodeJun 24, 2016
iOS Dev Nugget 193 Result EnumerationMay 20, 2016
iOS Dev Nugget 188 SwiftLintMay 10, 2016
iOS Dev Nugget 187 Creating a Singleton Class in SwiftMay 06, 2016
iOS Dev Nugget 186 Injection for XcodeApr 02, 2016
iOS Dev Nugget 182 Tracking the swift-evolution Git RepositoryMar 26, 2016
iOS Dev Nugget 181 Swift SelectorsMar 21, 2016
iOS Dev Nugget 180 Low Power ModeJan 27, 2016
iOS Dev Nugget 172 Print App Document PathDec 30, 2015
iOS Dev Nugget 168 Using Blocks to Manage ContextsOct 20, 2015
iOS Dev Nugget 158 Checking if Newer APIs Are Available In Older iOS Versions (II)Aug 17, 2015
iOS Dev Nugget 149 Timepiece, a Swift Library for Handling DatesJul 05, 2015
iOS Dev Nugget 143 Don't Forget SQLiteJul 01, 2015
iOS Dev Nugget 142 Grand Central DispatchJun 22, 2015
iOS Dev Nugget 141 Great Swift Standard Library Examples Covered in Playground (Swift 2.0)Jun 01, 2015
iOS Dev Nugget 138 Interoperability: Using Enumerations Defined In Objective-C from SwiftMay 27, 2015
iOS Dev Nugget 137 Named Tuple ElementsMay 19, 2015
iOS Dev Nugget 136 Auto Layout with CartographyMay 13, 2015
iOS Dev Nugget 135 CAShapeLayer, Animated Views and XCPShowView()Apr 29, 2015
iOS Dev Nugget 133 Dollar.swiftApr 22, 2015
iOS Dev Nugget 132 XCPCaptureValue in Swift PlaygroundsApr 14, 2015
iOS Dev Nugget 131 Running Asynchronous Code in Swift PlaygroundsApr 03, 2015
iOS Dev Nugget 129 Browsing the Swift Standard LibraryFeb 27, 2015
iOS Dev Nugget 124 performSelector:withObject:afterDelay: in SwiftFeb 20, 2015
iOS Dev Nugget 123 Using dynamicType in SwiftJan 02, 2015
iOS Dev Nugget 116 method() is unavailable: use object construction Class()
May 03, 2018 by Hwee-Boon Yar
Using Auto Layout with UIScrollView is surprisingly simple. You just need to add constraints to the content that will fill the entire scrollview by anchoring to the 4 edges of the scroll view. You don't need to set the content size of the scroll view explicitly. This is because the 4 edges actually refer to the scroll view's content view rather than the scroll view itself.
let scrollView = UIScrollView()
content.translatesAutoresizingMaskIntoConstraints = false

let content = UIView()
//TODO: Set up `content`, adding subviews, etc
content.translatesAutoresizingMaskIntoConstraints = false
scrollView.addSubview(content)

NSLayoutConstraint.activate([
    content.leadingAnchor.constraint(equalTo: scrollView.leadingAnchor),
    content.trailingAnchor.constraint(equalTo: scrollView.trailingAnchor),
    content.topAnchor.constraint(equalTo: scrollView.topAnchor),
    content.bottomAnchor.constraint(equalTo: scrollView.bottomAnchor),

    //Of course you'll want to layout the scrollview itself. Likely occupying the entire parent
    scrollView.leadingAnchor.constraint(equalTo: view.leadingAnchor),
    scrollView.trailingAnchor.constraint(equalTo: view.trailingAnchor),
    scrollView.topAnchor.constraint(equalTo: view.topAnchor),
    scrollView.bottomAnchor.constraint(equalTo: footerBar.topAnchor),

    //TODO set up constraints for `content` as you would have if there was no `UIScrollView` involved
])
Like this post? Follow me @hboon on Twitter.
Apr 27, 2018 by Hwee-Boon Yar
UIWebView is (still) useful for showing web-based documents — such as help or FAQs — in your app. If the document background color and app's background color don't match and aren't white, you might sometimes see the the UIWebView's white background color appear for a split second the first time a document is loaded.
You can't fix this by setting UIWebView's background color, because it is ignored. Here's an easy way to fix this:
Set webview.isOpaque to false and make sure the UIViewController instance holding the UIWebView has the correct background color.
Like this post? Follow me @hboon on Twitter.
Related
Nov 12, 2018
iOS Dev Nugget 315 UITextContentType.oneTimeCodeOct 06, 2018
iOS Dev Nugget 312 Fix Distorted Launch Screens with Hotspot BarSep 22, 2018
iOS Dev Nugget 310 Weak Reference Wrapper ClassSep 15, 2018
iOS Dev Nugget 309 Rule of Thumb Regarding self.Aug 02, 2018
iOS Dev Nugget 303 Use Enums for StatesJul 08, 2018
iOS Dev Nugget 299 CurryingJun 24, 2018
iOS Dev Nugget 297 Defensive Checks for Asynchronous CallsApr 22, 2018
iOS Dev Nugget 288 Use the .custom UIButton type to Fix Flashing when Title is ChangedApr 07, 2018
iOS Dev Nugget 286 Use Auto Layout for Bottom BarMar 31, 2018
iOS Dev Nugget 285 maskedCornersMar 22, 2018
iOS Dev Nugget 284 Use Shell Aliases for Git commandsMar 08, 2018
iOS Dev Nugget 282 Update to My Git no-commit Pre-commit HookJan 24, 2018
iOS Dev Nugget 276 Adding an Indent Default Parameter When Logging Calls in Object HierarchiesJan 18, 2018
iOS Dev Nugget 275 Implementing UIView draw(_:)Jan 10, 2018
iOS Dev Nugget 274 Password AutoFillDec 28, 2017
iOS Dev Nugget 272 Namespacing using EnumsDec 14, 2017
iOS Dev Nugget 270 Using lazy properties to workaround initializing dependent non-optional propertiesNov 30, 2017
iOS Dev Nugget 268 Using Blocks for Delegate MethodsNov 02, 2017
iOS Dev Nugget 265 value type cannot have a stored property that recursively contains itNov 01, 2017
iOS Dev Nugget 264 Track how long a function takes to run and report progressSep 27, 2017
iOS Dev Nugget 259 CAShapeLayer, UIBezierPath and UIRectCornerAug 30, 2017
iOS Dev Nugget 255 Symbolic Breakpoint to watch for View Controller DeallocationAug 10, 2017
iOS Dev Nugget 252 A Little Trick to Write Loosely Coupled View ControllersJul 11, 2017
iOS Dev Nugget 248 In-app Native RoutingJun 14, 2017
iOS Dev Nugget 244 IteratorProtocolMay 03, 2017
iOS Dev Nugget 238 Keep Code in Method at the Same Level of AbstractionMar 29, 2017
iOS Dev Nugget 233 Separating View Controllers and Their ViewsMar 22, 2017
iOS Dev Nugget 232 Shared Web Credentials: Logging Into iOS app with Password Saved with SafariFeb 15, 2017
iOS Dev Nugget 227 View with Rounded CornersJan 25, 2017
iOS Dev Nugget 224 Lazy CollectionsJan 12, 2017
iOS Dev Nugget 222 Uniquely Identifying User DevicesNov 28, 2016
iOS Dev Nugget 216 File Data ProtectionNov 17, 2016
iOS Dev Nugget 214 Launch App Quickly
Apr 22, 2018 by Hwee-Boon Yar
Do you sometimes you want to change the title of a text-only UIButton while it is on the screen and the text flashes? The easiest way to fix that is to use the .custom button type instead of .system.
Here's some playground code to illustrate this:
import UIKit
import PlaygroundSupport

let view = UIView()
view.backgroundColor = .green
view.frame = CGRect(x: 0, y: 0, width: 200, height: 300)
let b = UIButton(type: .system) //Switch to .custom
b.frame = CGRect(x: 10, y: 10, width: 70, height: 24)
b.setTitle("foo", for: .normal)
b.setTitleColor(.red, for: .normal)
view.addSubview(b)

PlaygroundPage.current.liveView = view

DispatchQueue.main.asyncAfter(deadline: .now() + 2) {
    b.setTitle("bar", for: .normal)
}
Like this post? Follow me @hboon on Twitter.
Related
Nov 12, 2018
iOS Dev Nugget 315 UITextContentType.oneTimeCodeOct 06, 2018
iOS Dev Nugget 312 Fix Distorted Launch Screens with Hotspot BarSep 22, 2018
iOS Dev Nugget 310 Weak Reference Wrapper ClassSep 15, 2018
iOS Dev Nugget 309 Rule of Thumb Regarding self.Aug 02, 2018
iOS Dev Nugget 303 Use Enums for StatesJul 08, 2018
iOS Dev Nugget 299 CurryingJun 24, 2018
iOS Dev Nugget 297 Defensive Checks for Asynchronous CallsApr 27, 2018
iOS Dev Nugget 289 Set Background Color for UIWebView to Match App While Still Loading DocumentsApr 07, 2018
iOS Dev Nugget 286 Use Auto Layout for Bottom BarMar 31, 2018
iOS Dev Nugget 285 maskedCornersMar 22, 2018
iOS Dev Nugget 284 Use Shell Aliases for Git commandsMar 08, 2018
iOS Dev Nugget 282 Update to My Git no-commit Pre-commit HookJan 24, 2018
iOS Dev Nugget 276 Adding an Indent Default Parameter When Logging Calls in Object HierarchiesJan 18, 2018
iOS Dev Nugget 275 Implementing UIView draw(_:)Jan 10, 2018
iOS Dev Nugget 274 Password AutoFillDec 28, 2017
iOS Dev Nugget 272 Namespacing using EnumsDec 14, 2017
iOS Dev Nugget 270 Using lazy properties to workaround initializing dependent non-optional propertiesNov 30, 2017
iOS Dev Nugget 268 Using Blocks for Delegate MethodsNov 02, 2017
iOS Dev Nugget 265 value type cannot have a stored property that recursively contains itNov 01, 2017
iOS Dev Nugget 264 Track how long a function takes to run and report progressSep 27, 2017
iOS Dev Nugget 259 CAShapeLayer, UIBezierPath and UIRectCornerAug 30, 2017
iOS Dev Nugget 255 Symbolic Breakpoint to watch for View Controller DeallocationAug 10, 2017
iOS Dev Nugget 252 A Little Trick to Write Loosely Coupled View ControllersJul 11, 2017
iOS Dev Nugget 248 In-app Native RoutingJun 14, 2017
iOS Dev Nugget 244 IteratorProtocolMay 03, 2017
iOS Dev Nugget 238 Keep Code in Method at the Same Level of AbstractionMar 29, 2017
iOS Dev Nugget 233 Separating View Controllers and Their ViewsMar 22, 2017
iOS Dev Nugget 232 Shared Web Credentials: Logging Into iOS app with Password Saved with SafariFeb 15, 2017
iOS Dev Nugget 227 View with Rounded CornersJan 25, 2017
iOS Dev Nugget 224 Lazy CollectionsJan 12, 2017
iOS Dev Nugget 222 Uniquely Identifying User DevicesNov 28, 2016
iOS Dev Nugget 216 File Data ProtectionNov 17, 2016
iOS Dev Nugget 214 Launch App Quickly
Apr 11, 2018 by Hwee-Boon Yar
Consider this code:
class S {
    var i: Int
    init(i: Int) {
        self.i = i
    }
}

class C {
    var prop1 = S(i: 0) {
        didSet {
            print("did set prop1, with i: \(prop1.i)")
        }
    }
}

var c = C()
print("i: \(c.prop1.i)")
var p = c.prop1
p.i = 1
print("i: \(c.prop1.i)")
c.prop1.i = 2
It prints:
i: 0
i: 1
i: 2
It prints 0, 1, 2 which is fairly obvious because S is a class — a reference type — so when p is actually a reference to the same instance of S, we are just operating on that same instance.
However, here's something that was surprising to me. What happens if we change S to be a struct? i.e.
Replace:
class {
with:
struct {
The output becomes:
i: 0
i: 0
did set prop1, with i: 2
i: 2
S is now a value type, so naturally, i remains at 0 because p is actually a copy of the struct held by the instance of C. Here's what surprised me though. c.prop1.i = 2 copies the struct, sets the new value of i (to 2) and assigns it back to the instance of C, triggering the didSet observer.
I recently wrote some code where this behavior bit me because I wasn't counting on didSet being triggered.
Beware!
Like this post? Follow me @hboon on Twitter.
Related
Nov 03, 2018
iOS Dev Nugget 314 Checked Array SubscriptingSep 22, 2018
iOS Dev Nugget 310 Weak Reference Wrapper ClassSep 07, 2018
iOS Dev Nugget 308 Careful with early return statements in functions that return voidAug 30, 2018
iOS Dev Nugget 307 Array Out of BoundsAug 23, 2018
iOS Dev Nugget 306 Underscores in Numeric LiteralsAug 02, 2018
iOS Dev Nugget 303 Use Enums for StatesJul 21, 2018
iOS Dev Nugget 301 Print App Document Path IIJul 16, 2018
iOS Dev Nugget 300 Pipe OperatorMay 18, 2018
iOS Dev Nugget 292 for-whereMay 12, 2018
iOS Dev Nugget 291 Implicit Member ExpressionsNov 02, 2017
iOS Dev Nugget 265 value type cannot have a stored property that recursively contains itSep 13, 2017
iOS Dev Nugget 257 AssertsAug 02, 2017
iOS Dev Nugget 251 Retrieving the Current View ControllerJun 28, 2017
iOS Dev Nugget 246 Mapping Swift and Obj-C Method NamesJun 14, 2017
iOS Dev Nugget 244 IteratorProtocolMay 24, 2017
iOS Dev Nugget 241 Swift Enums with LabelsMay 17, 2017
iOS Dev Nugget 240 Print an Object's Unique IdentifierApr 05, 2017
iOS Dev Nugget 234 #available and @availableNov 23, 2016
iOS Dev Nugget 215 dump Instead of print for Swift StructsOct 25, 2016
iOS Dev Nugget 211 Higher Order Functions: map, filter, reduceOct 12, 2016
iOS Dev Nugget 209 Swift DeferSep 28, 2016
iOS Dev Nugget 207 Swift Nil-Coalescing OperatorSep 22, 2016
iOS Dev Nugget 206 Date doesRelativeDateFormattingSep 11, 2016
iOS Dev Nugget 205 The Never Return Type in SwiftSep 07, 2016
iOS Dev Nugget 204 Swift @autoclosureSep 02, 2016
iOS Dev Nugget 203 Swift MeasurementAug 24, 2016
iOS Dev Nugget 202 Swift Enumerations to Encode StatesAug 17, 2016
iOS Dev Nugget 201 Swift Pattern MatchingAug 10, 2016
iOS Dev Nugget 200 Swift flatMapAug 05, 2016
iOS Dev Nugget 199 Swift Talk Video SeriesJul 26, 2016
iOS Dev Nugget 198 KZPlaygroundJul 20, 2016
iOS Dev Nugget 197 App Initialization CodeJul 09, 2016
iOS Dev Nugget 196 Rename Refactoring for Swift CodeJun 24, 2016
iOS Dev Nugget 193 Result EnumerationMay 20, 2016
iOS Dev Nugget 188 SwiftLintMay 10, 2016
iOS Dev Nugget 187 Creating a Singleton Class in SwiftMay 06, 2016
iOS Dev Nugget 186 Injection for XcodeApr 02, 2016
iOS Dev Nugget 182 Tracking the swift-evolution Git RepositoryMar 26, 2016
iOS Dev Nugget 181 Swift SelectorsMar 21, 2016
iOS Dev Nugget 180 Low Power ModeJan 27, 2016
iOS Dev Nugget 172 Print App Document PathDec 30, 2015
iOS Dev Nugget 168 Using Blocks to Manage ContextsOct 20, 2015
iOS Dev Nugget 158 Checking if Newer APIs Are Available In Older iOS Versions (II)Aug 17, 2015
iOS Dev Nugget 149 Timepiece, a Swift Library for Handling DatesJul 05, 2015
iOS Dev Nugget 143 Don't Forget SQLiteJul 01, 2015
iOS Dev Nugget 142 Grand Central DispatchJun 22, 2015
iOS Dev Nugget 141 Great Swift Standard Library Examples Covered in Playground (Swift 2.0)Jun 01, 2015
iOS Dev Nugget 138 Interoperability: Using Enumerations Defined In Objective-C from SwiftMay 27, 2015
iOS Dev Nugget 137 Named Tuple ElementsMay 19, 2015
iOS Dev Nugget 136 Auto Layout with CartographyMay 13, 2015
iOS Dev Nugget 135 CAShapeLayer, Animated Views and XCPShowView()Apr 29, 2015
iOS Dev Nugget 133 Dollar.swiftApr 22, 2015
iOS Dev Nugget 132 XCPCaptureValue in Swift PlaygroundsApr 14, 2015
iOS Dev Nugget 131 Running Asynchronous Code in Swift PlaygroundsApr 03, 2015
iOS Dev Nugget 129 Browsing the Swift Standard LibraryFeb 27, 2015
iOS Dev Nugget 124 performSelector:withObject:afterDelay: in SwiftFeb 20, 2015
iOS Dev Nugget 123 Using dynamicType in SwiftJan 02, 2015
iOS Dev Nugget 116 method() is unavailable: use object construction Class()
Apr 07, 2018 by Hwee-Boon Yar
A common pattern for UI layout is to have a bar at the bottom of the screen like UITabBar. It has a fixed height in most cases, but with the iPhone X, you want it to stretch to the bottom of the screen, outside of the safe area while keeping it's contents (in UITabBar's case, the tab buttons) glued to the top of the bar.
Auto Layout anchors provide a very simple way to wire this up. In your view controller:
let buttonsHeight = 44
footerBar.topAnchor.constraint(equalTo: view.layoutGuide.bottomAnchor, constant: -buttonsHeight),
footerBar.bottomAnchor.constraint(equalTo: view.bottomAnchor),
The trick is to anchor the top and bottom of footerBar.
Like this post? Follow me @hboon on Twitter.
Related
Oct 06, 2018
iOS Dev Nugget 312 Fix Distorted Launch Screens with Hotspot BarSep 22, 2018
iOS Dev Nugget 310 Weak Reference Wrapper ClassSep 15, 2018
iOS Dev Nugget 309 Rule of Thumb Regarding self.Aug 02, 2018
iOS Dev Nugget 303 Use Enums for StatesJul 08, 2018
iOS Dev Nugget 299 CurryingJun 24, 2018
iOS Dev Nugget 297 Defensive Checks for Asynchronous CallsMay 03, 2018
iOS Dev Nugget 290 Auto Layout with UIScrollViewApr 27, 2018
iOS Dev Nugget 289 Set Background Color for UIWebView to Match App While Still Loading DocumentsApr 22, 2018
iOS Dev Nugget 288 Use the .custom UIButton type to Fix Flashing when Title is ChangedMar 22, 2018
iOS Dev Nugget 284 Use Shell Aliases for Git commandsMar 08, 2018
iOS Dev Nugget 282 Update to My Git no-commit Pre-commit HookJan 24, 2018
iOS Dev Nugget 276 Adding an Indent Default Parameter When Logging Calls in Object HierarchiesJan 18, 2018
iOS Dev Nugget 275 Implementing UIView draw(_:)Dec 28, 2017
iOS Dev Nugget 272 Namespacing using EnumsDec 20, 2017
iOS Dev Nugget 271 Zhi — Live Reloading Auto Layout Constraints and moreDec 14, 2017
iOS Dev Nugget 270 Using lazy properties to workaround initializing dependent non-optional propertiesNov 30, 2017
iOS Dev Nugget 268 Using Blocks for Delegate MethodsNov 02, 2017
iOS Dev Nugget 265 value type cannot have a stored property that recursively contains itNov 01, 2017
iOS Dev Nugget 264 Track how long a function takes to run and report progressSep 27, 2017
iOS Dev Nugget 259 CAShapeLayer, UIBezierPath and UIRectCornerAug 30, 2017
iOS Dev Nugget 255 Symbolic Breakpoint to watch for View Controller DeallocationAug 10, 2017
iOS Dev Nugget 252 A Little Trick to Write Loosely Coupled View ControllersJul 11, 2017
iOS Dev Nugget 248 In-app Native RoutingJun 14, 2017
iOS Dev Nugget 244 IteratorProtocolMay 03, 2017
iOS Dev Nugget 238 Keep Code in Method at the Same Level of AbstractionMar 29, 2017
iOS Dev Nugget 233 Separating View Controllers and Their ViewsJan 12, 2017
iOS Dev Nugget 222 Uniquely Identifying User DevicesJan 17, 2016
iOS Dev Nugget 171 Dynamic TypeDec 23, 2015
iOS Dev Nugget 167 Animation with Auto LayoutJul 27, 2015
iOS Dev Nugget 146 UIStackView and TZStackViewJan 09, 2015
iOS Dev Nugget 117 UIView-Encapsulated-Layout-HeightOct 31, 2014
iOS Dev Nugget 107 Auto-sizing UITableViewCells
Mar 31, 2018 by Hwee-Boon Yar
This is super handy for implementing rounded corners when performance doesn't matter:
aView.clipsToBounds = true
aView.layer.cornerRadius = 20
But sometimes, maybe the design requires rounding only the top 2 corners. If it's an almost full-screen view, a simple way to do it is to let a view obscure the bottom 2 corners or just make sure it is offscreen (again, if performance is not an issue). But in iOS 11, there's a new property:
var maskedCorners: CACornerMask
This lets you set specific (corners) to mask. Here's some playground code:
import UIKit
import PlaygroundSupport

class VC: UIViewController {
    init() {
        super.init(nibName: nil, bundle: nil)
        view.backgroundColor = .black

        let square = UIView(frame: CGRect(x: 20, y: 20, width: 200, height: 200))
        square.backgroundColor = .white
        square.layer.cornerRadius = 20
        square.layer.maskedCorners = [.layerMinXMinYCorner, .layerMaxXMinYCorner]
        view.addSubview(square)
    }

    required init?(coder aDecoder: NSCoder) {
        fatalError("init(coder:) has not been implemented")
    }
}

PlaygroundPage.current.liveView = VC()
Like this post? Follow me @hboon on Twitter.
Mar 22, 2018 by Hwee-Boon Yar
Like most developers, I use git very often. As I'm a lazy developer, I like to shorten the commands that I use frequently, so I have set these up as aliases:
alias ga='git add'
alias gp='git add -p'
alias gs='clear && git status -s'
alias gd='git diff --color'
alias gdc='git diff --cached --color'
alias gdt='git difftool'
alias gc='git commit $1'
alias gca='git commit -a $1'
alias gb='git branch'
alias gl='git log --color'
alias glo='git log --color --pretty=oneline'
alias gt='git tag'
alias gco='git checkout $1'
alias gcp='git cherry-pick $1'
alias gdn='git diff --name-only'
alias gr='git remote'
I get heavy use out of gb, gco, and gdn.
Do you have aliases for git commands that you found particularly useful?
Like this post? Follow me @hboon on Twitter.
Related
Oct 06, 2018
iOS Dev Nugget 312 Fix Distorted Launch Screens with Hotspot BarSep 28, 2018
iOS Dev Nugget 311 jqSep 22, 2018
iOS Dev Nugget 310 Weak Reference Wrapper ClassSep 15, 2018
iOS Dev Nugget 309 Rule of Thumb Regarding self.Aug 02, 2018
iOS Dev Nugget 303 Use Enums for StatesJul 08, 2018
iOS Dev Nugget 299 CurryingJun 24, 2018
iOS Dev Nugget 297 Defensive Checks for Asynchronous CallsJun 01, 2018
iOS Dev Nugget 294 Core Data EditorApr 27, 2018
iOS Dev Nugget 289 Set Background Color for UIWebView to Match App While Still Loading DocumentsApr 22, 2018
iOS Dev Nugget 288 Use the .custom UIButton type to Fix Flashing when Title is ChangedApr 07, 2018
iOS Dev Nugget 286 Use Auto Layout for Bottom BarMar 08, 2018
iOS Dev Nugget 282 Update to My Git no-commit Pre-commit HookJan 24, 2018
iOS Dev Nugget 276 Adding an Indent Default Parameter When Logging Calls in Object HierarchiesJan 18, 2018
iOS Dev Nugget 275 Implementing UIView draw(_:)Dec 28, 2017
iOS Dev Nugget 272 Namespacing using EnumsDec 20, 2017
iOS Dev Nugget 271 Zhi — Live Reloading Auto Layout Constraints and moreDec 14, 2017
iOS Dev Nugget 270 Using lazy properties to workaround initializing dependent non-optional propertiesNov 30, 2017
iOS Dev Nugget 268 Using Blocks for Delegate MethodsNov 02, 2017
iOS Dev Nugget 265 value type cannot have a stored property that recursively contains itNov 01, 2017
iOS Dev Nugget 264 Track how long a function takes to run and report progressOct 18, 2017
iOS Dev Nugget 262 Apple Device Names APISep 27, 2017
iOS Dev Nugget 259 CAShapeLayer, UIBezierPath and UIRectCornerAug 30, 2017
iOS Dev Nugget 255 Symbolic Breakpoint to watch for View Controller DeallocationAug 23, 2017
iOS Dev Nugget 254 Paw, for Working with APIsAug 10, 2017
iOS Dev Nugget 252 A Little Trick to Write Loosely Coupled View ControllersJul 11, 2017
iOS Dev Nugget 248 In-app Native RoutingJun 14, 2017
iOS Dev Nugget 244 IteratorProtocolMay 03, 2017
iOS Dev Nugget 238 Keep Code in Method at the Same Level of AbstractionApr 26, 2017
iOS Dev Nugget 237 mas-cliApr 19, 2017
iOS Dev Nugget 236 Look up Error CodesMar 29, 2017
iOS Dev Nugget 233 Separating View Controllers and Their ViewsFeb 09, 2017
iOS Dev Nugget 226 React NativeJan 12, 2017
iOS Dev Nugget 222 Uniquely Identifying User DevicesJul 09, 2016
iOS Dev Nugget 196 Rename Refactoring for Swift CodeJul 06, 2016
iOS Dev Nugget 195 Tools of the TradeMay 06, 2016
iOS Dev Nugget 186 Injection for XcodeFeb 03, 2016
iOS Dev Nugget 173 Xcode Package Manager, AlcatrazJan 11, 2016
iOS Dev Nugget 170 HomebrewJan 05, 2016
iOS Dev Nugget 169 fastlane: deliverSep 07, 2015
iOS Dev Nugget 152 Lossy PNG CompressionAug 07, 2015
iOS Dev Nugget 147 NSRegularExpression and NSDataDetectorMar 06, 2015
iOS Dev Nugget 125 View Debugging in XcodeFeb 13, 2015
iOS Dev Nugget 122 Importing Many Test Photos into iOS Simulator IINov 28, 2014
iOS Dev Nugget 111 iOS Support MatrixOct 24, 2014
iOS Dev Nugget 106 Command Line Access to Developer PortalOct 17, 2014
iOS Dev Nugget 105 Try FLEXSep 12, 2014
iOS Dev Nugget 100 Try RevealSep 05, 2014
iOS Dev Nugget 99 Try PaintCodeAug 15, 2014
iOS Dev Nugget 96 Jack, A Native App For iTunes ConnectJul 04, 2014
iOS Dev Nugget 90 Full-Text Searchable WWDC Video Text TranscriptsApr 04, 2014
iOS Dev Nugget 77 RubyMotion Tutorial For Objective C DevelopersJan 17, 2014
iOS Dev Nugget 66 JBChartView for ChartingJan 04, 2014
iOS Dev Nugget 64 Placeholder Views Using PAPlaceholderDec 27, 2013
iOS Dev Nugget 63 Update Your iOS Development ToolboxOct 18, 2013
iOS Dev Nugget 53 Try Kaleidoscope, File Comparison for MacOct 11, 2013
iOS Dev Nugget 52 Set Up Crashlytics For Ad Hoc and App Store Builds OnlyJun 21, 2013
iOS Dev Nugget 36 Use TestFlight for Ad Hoc BuildsMay 11, 2013
iOS Dev Nugget 31 3rd Party Documentation ViewersMar 10, 2013
iOS Dev Nugget 22 Try AppCodeJan 05, 2013
iOS Dev Nugget 14 Charles Web Debugging Proxy
Mar 15, 2018 by Hwee-Boon Yar
If you build lots of forms — screens powered by table views that either read-only information or allow users to enter data such as names, dates/birthdays — Eureka is worth taking a look.
The README is very good, so I'll just show an example from there:
import Eureka

class MyFormViewController: FormViewController {

    override func viewDidLoad() {
        super.viewDidLoad()
        form +++ Section("Section1")
            <<< TextRow(){ row in
                row.title = "Text Row"
                row.placeholder = "Enter text here"
            }
            <<< PhoneRow(){
                $0.title = "Phone Row"
                $0.placeholder = "And numbers here"
            }
        +++ Section("Section2")
            <<< DateRow(){
                $0.title = "Date Row"
                $0.value = Date(timeIntervalSinceReferenceDate: 0)
            }
    }
}
I've found Eureka very handy if your app mostly uses the original look and feel of iOS. If you need to customize the forms UI — while Eureka supports that too, by letting you specify your own custom row and cell classes — I've found it might be a bit more messy than I hoped.
Eureka can be installed via Cocoapods or Carthage.
Like this post? Follow me @hboon on Twitter.
Related
Aug 15, 2018
iOS Dev Nugget 305 Declaring Distinct Types from General TypesJul 24, 2018
iOS Dev Nugget 302 RealmJun 09, 2018
iOS Dev Nugget 295 SwifterSwiftMay 23, 2018
iOS Dev Nugget 293 iOSSnapshotTestCase (was FBSnapshotTestCase)Feb 28, 2018
iOS Dev Nugget 281 Use R.swift for Static References to Resources Like ImagesFeb 21, 2018
iOS Dev Nugget 280 Using Custom Fonts Without Updating Info.plist ManuallyDec 06, 2017
iOS Dev Nugget 269 Including Finger Touches in App Preview VideosJul 11, 2017
iOS Dev Nugget 248 In-app Native RoutingMar 01, 2017
iOS Dev Nugget 229 PromisesFeb 22, 2017
iOS Dev Nugget 228 Recording and Playing Back Network CallsOct 23, 2016
iOS Dev Nugget 210 PMAlertControllerJun 03, 2016
iOS Dev Nugget 190 Quick Look Plug-in for Mobile Provisioning FilesMay 20, 2016
iOS Dev Nugget 188 SwiftLintApr 20, 2016
iOS Dev Nugget 184 Async LibraryAug 31, 2015
iOS Dev Nugget 151 More Wrappers for Keychain AccessAug 17, 2015
iOS Dev Nugget 149 Timepiece, a Swift Library for Handling DatesJul 27, 2015
iOS Dev Nugget 146 UIStackView and TZStackViewJul 21, 2015
iOS Dev Nugget 145 Listing Available FontsJul 05, 2015
iOS Dev Nugget 143 Don't Forget SQLiteJun 09, 2015
iOS Dev Nugget 139 Custom Build Configurations and Xcode SubprojectsMay 19, 2015
iOS Dev Nugget 136 Auto Layout with CartographyApr 29, 2015
iOS Dev Nugget 133 Dollar.swiftFeb 06, 2015
iOS Dev Nugget 121 InflectorKitDec 26, 2014
iOS Dev Nugget 115 Displaying Information in Settings AppDec 19, 2014
iOS Dev Nugget 114 Preview an Image for DebuggingDec 12, 2014
iOS Dev Nugget 113 GPUImage, a GPU-based Image and Video Processing FrameworkMay 30, 2014
iOS Dev Nugget 85 A More Customizable Button For Different StatesMay 02, 2014
iOS Dev Nugget 81 TMCache For In-Memory and Disk-backed CachingApr 18, 2014
iOS Dev Nugget 79 TweetBot Photo Flicking EffectMar 07, 2014
iOS Dev Nugget 73 Open Source Date Picker from SquareFeb 22, 2014
iOS Dev Nugget 71 TapJan 31, 2014
iOS Dev Nugget 68 Custom URL Schemes DirectoryDec 20, 2013
iOS Dev Nugget 62 Using PDF Instead of PNG Files for Resizable AssetsSep 20, 2013
iOS Dev Nugget 49 Wrapper to Get UIColor ComponentsMay 17, 2013
iOS Dev Nugget 32 FMDB: Thin Objective C Wrapper Around SQLiteOct 06, 2012
iOS Dev Nugget 1 Easy logging of values and objects
Mar 08, 2018 by Hwee-Boon Yar
Wanted to share the updated version of my typical pre-commit hook since 2 years ago. It's better at only picking up additions rather than diffs (additions + removals).
I've also included checks for prints and NSLogs.
Sometimes I work on projects in a team and want to make sure that I don't accidentally check in changes to .xcodeproj, so I have a check for that too.
My commit workflow then includes commenting and uncommenting out section of this pre-commit file while I hit warnings and comparing it with the changes I have in mind. Finally I'll just do a git commit -m "some message" -n (with the additional -n switch) to commit, bypassing the precommit hook.
#!/bin/sh

if git rev-parse --verify HEAD >/dev/null 2>&1; then
  against=HEAD
else
  # Initial commit: diff against an empty tree object
  against=4b825dc642cb6eb9a060e54bf8d69288fbee4904
fi

exec 1>&2

#Workaround for filenames with spaces in them (because for loop breaks use space by default)
SAVEIFS=$IFS
IFS=$(echo "\n\b")

for ENTRY in `git diff-index --cached --name-status $against -- | cut -c1,3-`; do
  CHANGE=`echo "$ENTRY" | cut -c1`
  FILE=`echo "$ENTRY" | cut -c2-`
  if [ $CHANGE = "A" ] || [ $CHANGE = "M" ]; then
      if [ ${FILE: -26} == ".xcodeproj/project.pbxproj" ]; then
          echo "$FILE" 'contains .xcodeproj/project.pbxproj! Are you sure?'
          IFS=$SAVEIFS
          exit 1
      fi
      if [ ${FILE: -6} == ".swift" ] || [ ${FILE: -2} == ".m" ] || [ ${FILE: -2} == ".h" ]; then
          if git diff --cached --color=always "$FILE" | perl -wlne 'print $1 if /^\e\[32m\+\e\[m\e\[32m(.*)\e\[m$/' | grep -q '\t'; then
              echo "$FILE" 'contains tabs!'
              IFS=$SAVEIFS
              exit 1
          fi
      fi
      if git diff --cached --color=always "$FILE" | perl -wlne 'print $1 if /^\e\[32m\+\e\[m\e\[32m(.*)\e\[m$/' | grep -q 'kkk'; then
          echo "$FILE" 'contains kkk!'
          IFS=$SAVEIFS
          exit 1
      fi
      if git diff --cached --color=always "$FILE" | perl -wlne 'print $1 if /^\e\[32m\+\e\[m\e\[32m(.*)\e\[m$/' | grep -q ' NSLog'; then
          echo "$FILE" 'contains NSLog!'
          IFS=$SAVEIFS
          exit 1
      fi
      if git diff --cached --color=always "$FILE" | perl -wlne 'print $1 if /^\e\[32m\+\e\[m\e\[32m(.*)\e\[m$/' | grep -q ' print'; then
          echo "$FILE" 'contains print!'
          IFS=$SAVEIFS
          exit 1
      fi
      if git diff --cached --color=always "$FILE" | perl -wlne 'print $1 if /^\e\[32m\+\e\[m\e\[32m(.*)\e\[m$/' | grep -q ' dump'; then
          echo "$FILE" 'contains dump!'
          IFS=$SAVEIFS
          exit 1
      fi
      if git diff --cached --color=always "$FILE" | perl -wlne 'print $1 if /^\e\[32m\+\e\[m\e\[32m(.*)\e\[m$/' | grep -q '007'; then
          echo "$FILE" 'contains 007!'
          IFS=$SAVEIFS
          exit 1
      fi
  fi
done

IFS=$SAVEIFS
exit 0
Like this post? Follow me @hboon on Twitter.
Related
Oct 06, 2018
iOS Dev Nugget 312 Fix Distorted Launch Screens with Hotspot BarSep 22, 2018
iOS Dev Nugget 310 Weak Reference Wrapper ClassSep 15, 2018
iOS Dev Nugget 309 Rule of Thumb Regarding self.Aug 02, 2018
iOS Dev Nugget 303 Use Enums for StatesJul 08, 2018
iOS Dev Nugget 299 CurryingJun 24, 2018
iOS Dev Nugget 297 Defensive Checks for Asynchronous CallsApr 27, 2018
iOS Dev Nugget 289 Set Background Color for UIWebView to Match App While Still Loading DocumentsApr 22, 2018
iOS Dev Nugget 288 Use the .custom UIButton type to Fix Flashing when Title is ChangedApr 07, 2018
iOS Dev Nugget 286 Use Auto Layout for Bottom BarMar 22, 2018
iOS Dev Nugget 284 Use Shell Aliases for Git commandsJan 24, 2018
iOS Dev Nugget 276 Adding an Indent Default Parameter When Logging Calls in Object HierarchiesJan 18, 2018
iOS Dev Nugget 275 Implementing UIView draw(_:)Dec 28, 2017
iOS Dev Nugget 272 Namespacing using EnumsDec 14, 2017
iOS Dev Nugget 270 Using lazy properties to workaround initializing dependent non-optional propertiesNov 30, 2017
iOS Dev Nugget 268 Using Blocks for Delegate MethodsNov 02, 2017
iOS Dev Nugget 265 value type cannot have a stored property that recursively contains itNov 01, 2017
iOS Dev Nugget 264 Track how long a function takes to run and report progressSep 27, 2017
iOS Dev Nugget 259 CAShapeLayer, UIBezierPath and UIRectCornerAug 30, 2017
iOS Dev Nugget 255 Symbolic Breakpoint to watch for View Controller DeallocationAug 10, 2017
iOS Dev Nugget 252 A Little Trick to Write Loosely Coupled View ControllersJul 11, 2017
iOS Dev Nugget 248 In-app Native RoutingJun 14, 2017
iOS Dev Nugget 244 IteratorProtocolMay 03, 2017
iOS Dev Nugget 238 Keep Code in Method at the Same Level of AbstractionMar 29, 2017
iOS Dev Nugget 233 Separating View Controllers and Their ViewsJan 12, 2017
iOS Dev Nugget 222 Uniquely Identifying User Devices
Feb 28, 2018 by Hwee-Boon Yar
Swift is a strongly typed language, so it makes sense when using it to tweak your tools and code to take advantage of type-checking. This week's nugget goes along that line.
The library R.swift automatically generates static references to resources such as font files and image files so that you don't have to refer to them by string. Example from the README:
let icon = UIImage(named: "settings-icon")
let font = UIFont(name: "San Francisco", size: 42)
let color = UIColor(named: "indictator highlight")
let viewController = CustomViewController(nibName: "CustomView", bundle: nil)
let string = String(format: NSLocalizedString("welcome.withName", comment: ""), locale: NSLocale.current, "Arthur Dent")
becomes:
let icon = R.image.settingsIcon()
let font = R.font.sanFrancisco(size: 42)
let color = R.color.indicatorHighlight()
let viewController = CustomViewController(nib: R.nib.customView)
let string = R.string.localizable.welcomeWithName("Arthur Dent")
This avoids the chance of typing a string wrongly and not catching it before submitting a build to the app store.
Installation is simple:
- Include the pod (
R.swift)
- Add a
Run Script phase before Compile Sources: "$PODS_ROOT/R.swift/rswift" generate "$SRCROOT"
- Add the
R.generated.swift file to your project
Like this post? Follow me @hboon on Twitter.
Related
Aug 15, 2018
iOS Dev Nugget 305 Declaring Distinct Types from General TypesJul 24, 2018
iOS Dev Nugget 302 RealmJun 09, 2018
iOS Dev Nugget 295 SwifterSwiftMay 23, 2018
iOS Dev Nugget 293 iOSSnapshotTestCase (was FBSnapshotTestCase)Mar 15, 2018
iOS Dev Nugget 283 Eureka for FormsFeb 21, 2018
iOS Dev Nugget 280 Using Custom Fonts Without Updating Info.plist ManuallyDec 06, 2017
iOS Dev Nugget 269 Including Finger Touches in App Preview VideosJul 11, 2017
iOS Dev Nugget 248 In-app Native RoutingMar 01, 2017
iOS Dev Nugget 229 PromisesFeb 22, 2017
iOS Dev Nugget 228 Recording and Playing Back Network CallsOct 23, 2016
iOS Dev Nugget 210 PMAlertControllerJun 03, 2016
iOS Dev Nugget 190 Quick Look Plug-in for Mobile Provisioning FilesMay 20, 2016
iOS Dev Nugget 188 SwiftLintApr 20, 2016
iOS Dev Nugget 184 Async LibraryAug 31, 2015
iOS Dev Nugget 151 More Wrappers for Keychain AccessAug 17, 2015
iOS Dev Nugget 149 Timepiece, a Swift Library for Handling DatesJul 27, 2015
iOS Dev Nugget 146 UIStackView and TZStackViewJul 21, 2015
iOS Dev Nugget 145 Listing Available FontsJul 05, 2015
iOS Dev Nugget 143 Don't Forget SQLiteJun 09, 2015
iOS Dev Nugget 139 Custom Build Configurations and Xcode SubprojectsMay 19, 2015
iOS Dev Nugget 136 Auto Layout with CartographyApr 29, 2015
iOS Dev Nugget 133 Dollar.swiftFeb 06, 2015
iOS Dev Nugget 121 InflectorKitDec 26, 2014
iOS Dev Nugget 115 Displaying Information in Settings AppDec 19, 2014
iOS Dev Nugget 114 Preview an Image for DebuggingDec 12, 2014
iOS Dev Nugget 113 GPUImage, a GPU-based Image and Video Processing FrameworkMay 30, 2014
iOS Dev Nugget 85 A More Customizable Button For Different StatesMay 02, 2014
iOS Dev Nugget 81 TMCache For In-Memory and Disk-backed CachingApr 18, 2014
iOS Dev Nugget 79 TweetBot Photo Flicking EffectMar 07, 2014
iOS Dev Nugget 73 Open Source Date Picker from SquareFeb 22, 2014
iOS Dev Nugget 71 TapJan 31, 2014
iOS Dev Nugget 68 Custom URL Schemes DirectoryDec 20, 2013
iOS Dev Nugget 62 Using PDF Instead of PNG Files for Resizable AssetsSep 20, 2013
iOS Dev Nugget 49 Wrapper to Get UIColor ComponentsMay 17, 2013
iOS Dev Nugget 32 FMDB: Thin Objective C Wrapper Around SQLiteOct 06, 2012
iOS Dev Nugget 1 Easy logging of values and objects
Feb 21, 2018 by Hwee-Boon Yar
If you use custom fonts in your apps, it can be a hassle to track and maintain the UIAppFonts key in your Info.plist file, especially as you need to figure out each font name yourself. Here's an excellent timesaver: FontBlaster is a library that programmatically loads custom fonts for you. You just need to do this:
- Include the font files in your project like you'd normally do
- Include FontBlaster. (Supports Carthage and CocoaPods)
- Run
FontBlaster.blast()
You no longer need the UIAppFonts key in Info.plist.
I learnt about FontBlaster from Michael Tsai.
Like this post? Follow me @hboon on Twitter.
Related
Aug 15, 2018
iOS Dev Nugget 305 Declaring Distinct Types from General TypesJul 24, 2018
iOS Dev Nugget 302 RealmJun 09, 2018
iOS Dev Nugget 295 SwifterSwiftMay 23, 2018
iOS Dev Nugget 293 iOSSnapshotTestCase (was FBSnapshotTestCase)Mar 15, 2018
iOS Dev Nugget 283 Eureka for FormsFeb 28, 2018
iOS Dev Nugget 281 Use R.swift for Static References to Resources Like ImagesDec 06, 2017
iOS Dev Nugget 269 Including Finger Touches in App Preview VideosOct 11, 2017
iOS Dev Nugget 261 Checking App Download SizeJul 11, 2017
iOS Dev Nugget 248 In-app Native RoutingMar 01, 2017
iOS Dev Nugget 229 PromisesFeb 22, 2017
iOS Dev Nugget 228 Recording and Playing Back Network CallsOct 23, 2016
iOS Dev Nugget 210 PMAlertControllerJun 03, 2016
iOS Dev Nugget 190 Quick Look Plug-in for Mobile Provisioning FilesMay 20, 2016
iOS Dev Nugget 188 SwiftLintApr 20, 2016
iOS Dev Nugget 184 Async LibraryJan 05, 2016
iOS Dev Nugget 169 fastlane: deliverAug 31, 2015
iOS Dev Nugget 151 More Wrappers for Keychain AccessAug 17, 2015
iOS Dev Nugget 149 Timepiece, a Swift Library for Handling DatesAug 13, 2015
iOS Dev Nugget 148 Difference between CFBundleVersion and CFBundleShortVersionStringJul 27, 2015
iOS Dev Nugget 146 UIStackView and TZStackViewJul 21, 2015
iOS Dev Nugget 145 Listing Available FontsJul 05, 2015
iOS Dev Nugget 143 Don't Forget SQLiteJun 09, 2015
iOS Dev Nugget 139 Custom Build Configurations and Xcode SubprojectsMay 19, 2015
iOS Dev Nugget 136 Auto Layout with CartographyApr 29, 2015
iOS Dev Nugget 133 Dollar.swiftMar 27, 2015
iOS Dev Nugget 128 Dependency Management for 3rd Party Code: Git SubmodulesMar 20, 2015
iOS Dev Nugget 127 Dependency Management for 3rd Party Code: CarthageMar 13, 2015
iOS Dev Nugget 126 Dependency Management for 3rd Party Code: CocoapodsFeb 06, 2015
iOS Dev Nugget 121 InflectorKitJan 23, 2015
iOS Dev Nugget 119 Ad Hoc Tethered Install Using iTunesJan 16, 2015
iOS Dev Nugget 118 Vendoring Code and Git SubmodulesDec 26, 2014
iOS Dev Nugget 115 Displaying Information in Settings AppDec 19, 2014
iOS Dev Nugget 114 Preview an Image for DebuggingDec 12, 2014
iOS Dev Nugget 113 GPUImage, a GPU-based Image and Video Processing FrameworkMay 30, 2014
iOS Dev Nugget 85 A More Customizable Button For Different StatesMay 02, 2014
iOS Dev Nugget 81 TMCache For In-Memory and Disk-backed CachingApr 18, 2014
iOS Dev Nugget 79 TweetBot Photo Flicking EffectMar 07, 2014
iOS Dev Nugget 73 Open Source Date Picker from SquareFeb 22, 2014
iOS Dev Nugget 71 TapJan 31, 2014
iOS Dev Nugget 68 Custom URL Schemes DirectoryDec 20, 2013
iOS Dev Nugget 62 Using PDF Instead of PNG Files for Resizable AssetsSep 20, 2013
iOS Dev Nugget 49 Wrapper to Get UIColor ComponentsMay 17, 2013
iOS Dev Nugget 32 FMDB: Thin Objective C Wrapper Around SQLiteOct 06, 2012
iOS Dev Nugget 1 Easy logging of values and objects
Feb 15, 2018 by Hwee-Boon Yar
Related to #162 Reclaim Disk Space from Xcode Usage, if you run:
$ xcrun simctl delete unavailable
simctl will remove old simulators which your current Xcode (xcode-select -p) cannot use.
If you work with multiple versions of Xcode, you have to be careful. This will probably delete simulators that another version of Xcode can use.
Like this post? Follow me @hboon on Twitter.
Related
Jul 01, 2018
iOS Dev Nugget 298 Conditional BreakpointsJan 31, 2018
iOS Dev Nugget 277 REPL in LLDBAug 30, 2017
iOS Dev Nugget 255 Symbolic Breakpoint to watch for View Controller DeallocationJun 21, 2017
iOS Dev Nugget 245 Show Call HierarchyMar 08, 2017
iOS Dev Nugget 230 Shortcut to Generate Quick Help DocumentationFeb 03, 2017
iOS Dev Nugget 225 Contextual Help for Xcode Build SettingsDec 29, 2016
iOS Dev Nugget 220 Don't Download Xcode from the Mac App StoreNov 08, 2016
iOS Dev Nugget 213 Download Your App Data on iOS Device for DebuggingJun 17, 2016
iOS Dev Nugget 192 Download Xcode from Downloads for Apple Developers Website Instead of Mac App StoreMay 26, 2016
iOS Dev Nugget 189 Xcode's Fix All in ScopeMar 12, 2016
iOS Dev Nugget 179 Dragging the Program CounterMar 07, 2016
iOS Dev Nugget 178 Breakpoint Actions for LoggingFeb 03, 2016
iOS Dev Nugget 173 Xcode Package Manager, AlcatrazNov 18, 2015
iOS Dev Nugget 162 Reclaim Disk Space from Xcode Usage
Feb 07, 2018 by Hwee-Boon Yar
Maybe it's an existing project, or for some other reason you are still using Objective-C, here's a nugget for you:
__auto_type i = @123;
NSLog(@"class: %@", NSStringFromClass([i class]));

const __auto_type j = @123;
j = @1;
That last line will compile with an error:
Cannot assign to variable 'j' with const-qualified type 'NSNumber *__strong const'
Typing _auto_type and const __auto_type looks a little unwieldy, so we can define a few macros:
#define let const __auto_type
#define var __auto_type
and use them instead:
var i = @123;
NSLog(@"class: %@", NSStringFromClass([i class]));

let j = @123;
j = @1; //Compilation error
(Probably more useful to store the macros in a new header file and #import them)
I picked up this tip from @_nb
Like this post? Follow me @hboon on Twitter.
Jan 31, 2018 by Hwee-Boon Yar
Did you know that LLDB includes an REPL?
Set a breakpoint in your Xcode project, say the method that gets run when you hit a button. In the debugger proompt, type repl. i.e.:
(lldb) repl
Then paste this in:
let v = UIView()
v.frame = CGRect(x: 20, y: 20, width: 200, height: 20)
v.backgroundColor = .red
let window = UIApplication.shared.windows[0]
window.rootViewController?.view.addSubview(v)
CATransaction.flush()
Hit enter.
You should see that the new red view appears immediately upon CATransaction.flush() while you are still in the debugger. It is important that you are not breaking in application(_:, didFinishLaunchingWithOptions:) for flush() to "load" your changes immediately.
Type : and hit enter to exit the REPL.
Like this post? Follow me @hboon on Twitter.
Related
Jul 01, 2018
iOS Dev Nugget 298 Conditional BreakpointsFeb 15, 2018
iOS Dev Nugget 279 Reclaim Disk Space by Deleting Old SimulatorsNov 15, 2017
iOS Dev Nugget 266 Play a System Sound for Simple Untethered DebuggingAug 30, 2017
iOS Dev Nugget 255 Symbolic Breakpoint to watch for View Controller DeallocationJun 21, 2017
iOS Dev Nugget 245 Show Call HierarchyMar 08, 2017
iOS Dev Nugget 230 Shortcut to Generate Quick Help DocumentationFeb 03, 2017
iOS Dev Nugget 225 Contextual Help for Xcode Build SettingsDec 29, 2016
iOS Dev Nugget 220 Don't Download Xcode from the Mac App StoreNov 08, 2016
iOS Dev Nugget 213 Download Your App Data on iOS Device for DebuggingJun 28, 2016
iOS Dev Nugget 194 Debugging CGContextDrawImage: invalid context 0x0Jun 17, 2016
iOS Dev Nugget 192 Download Xcode from Downloads for Apple Developers Website Instead of Mac App StoreMay 26, 2016
iOS Dev Nugget 189 Xcode's Fix All in ScopeMar 12, 2016
iOS Dev Nugget 179 Dragging the Program CounterMar 07, 2016
iOS Dev Nugget 178 Breakpoint Actions for LoggingFeb 03, 2016
iOS Dev Nugget 173 Xcode Package Manager, AlcatrazDec 15, 2015
iOS Dev Nugget 166 @expr import UIKitNov 18, 2015
iOS Dev Nugget 162 Reclaim Disk Space from Xcode Usage
Jan 24, 2018 by Hwee-Boon Yar
As a printf debugger, I have a little trick I like to use when logging hierarchy function calls. For example:
struct Node {
    var name: String
    var children = [Node]()

    init(_ name: String) {
        self.name = name
    }
    mutating func addChild(child: Node) {
        children.append(child)
    }
    func printHierarchy() {
        print("\(name)")
        for each in children {
            each.printHierarchy()
        }
    }
}

var root = Node("Topmost")
var n1 = Node("n1")
var n2 = Node("n2")
var n3 = Node("n3")
var n4 = Node("n4")
n3.addChild(child: n4)
n2.addChild(child: n3)
root.addChild(child: n1)
root.addChild(child: n2)

root.printHierarchy()
This prints:
Topmost
n1
n2
n3
n4
which isn't that useful. But if we modify printHierarchy() to add an indent argument with a default value of 0:
func printHierarchy(indent: Int=0) {
    print("\(String(repeating: "  ", count: indent))\(name)")
    for each in children {
        each.printHierarchy(indent: indent + 1)
    }
}
Our output becomes:
Topmost
  n1
  n2
    n3
      n4
This is especially useful when we are logging more information in each node to debug method calls up and down the hierarchy.
Like this post? Follow me @hboon on Twitter.
Related
Oct 06, 2018
iOS Dev Nugget 312 Fix Distorted Launch Screens with Hotspot BarSep 22, 2018
iOS Dev Nugget 310 Weak Reference Wrapper ClassSep 15, 2018
iOS Dev Nugget 309 Rule of Thumb Regarding self.Aug 02, 2018
iOS Dev Nugget 303 Use Enums for StatesJul 08, 2018
iOS Dev Nugget 299 CurryingJun 24, 2018
iOS Dev Nugget 297 Defensive Checks for Asynchronous CallsApr 27, 2018
iOS Dev Nugget 289 Set Background Color for UIWebView to Match App While Still Loading DocumentsApr 22, 2018
iOS Dev Nugget 288 Use the .custom UIButton type to Fix Flashing when Title is ChangedApr 07, 2018
iOS Dev Nugget 286 Use Auto Layout for Bottom BarMar 22, 2018
iOS Dev Nugget 284 Use Shell Aliases for Git commandsMar 08, 2018
iOS Dev Nugget 282 Update to My Git no-commit Pre-commit HookJan 18, 2018
iOS Dev Nugget 275 Implementing UIView draw(_:)Dec 28, 2017
iOS Dev Nugget 272 Namespacing using EnumsDec 14, 2017
iOS Dev Nugget 270 Using lazy properties to workaround initializing dependent non-optional propertiesNov 30, 2017
iOS Dev Nugget 268 Using Blocks for Delegate MethodsNov 02, 2017
iOS Dev Nugget 265 value type cannot have a stored property that recursively contains itNov 01, 2017
iOS Dev Nugget 264 Track how long a function takes to run and report progressSep 27, 2017
iOS Dev Nugget 259 CAShapeLayer, UIBezierPath and UIRectCornerAug 30, 2017
iOS Dev Nugget 255 Symbolic Breakpoint to watch for View Controller DeallocationAug 10, 2017
iOS Dev Nugget 252 A Little Trick to Write Loosely Coupled View ControllersJul 11, 2017
iOS Dev Nugget 248 In-app Native RoutingJun 14, 2017
iOS Dev Nugget 244 IteratorProtocolMay 03, 2017
iOS Dev Nugget 238 Keep Code in Method at the Same Level of AbstractionMar 29, 2017
iOS Dev Nugget 233 Separating View Controllers and Their ViewsJan 12, 2017
iOS Dev Nugget 222 Uniquely Identifying User Devices
Jan 18, 2018 by Hwee-Boon Yar
If you perform your own custom view draw by overriding UIView draw(_:) in your subclass, and you trigger it by calling setNeedsDisplay(_:), it's a performance boost if you restrict drawing to just the dirty rectangle passed to draw(_:):
override func draw(_ rect: CGRect) {
    //Only draw inside rect, and not the entire UIView specified by the `bounds` property
}
On macOS, the functions getRectsBeingDrawn(_:count:) and needsToDraw(_:) can be used to discover whether you want to draw, but they are not available on iOS.
I've found that a simple way the handle this is to set the dirty rect as the clipping region:
override func draw(_ rect: CGRect) {
    let context = UIGraphicsGetCurrentContext()
    context?.saveGState()
    let path = UIBezierPath(rect: rect)
    path.addClip()
    //Perform your drawing in `bounds` here
    context?.restoreGState()
}
I'm recently building an app that involves panning many views that implement custom drawing and just introducing clipping makes the performance improve from being dog slow to buttery smooth.
And if you want to go one step further, you can use the "context" technique I mentioned in #168 to clean up the code:
Implement this:
func withGraphicsContext(block: (CGContext?) -> ()) {
    let context = UIGraphicsGetCurrentContext()
    context?.saveGState()
    block(context)
    context?.restoreGState()
}
And you can rewrite draw(_:):
override func draw(_ rect: CGRect) {
    withGraphicsContext { context in
        let path = UIBezierPath(rect: rect)
        path.addClip()
        //Perform your drawing in `bounds` here
    }
}
There is a technote which mentions:
Each UIView is treated as a single element. When you request a redraw, in part or whole, by calling -setNeedsDisplayInRect: or -setNeedsDisplay:, the entire view will be marked for updates
I did some testing and it seems like the statement is either outdated or wrong. But even if it becomes true in the future, clipping wouldn't break your code. So happy drawing!
Like this post? Follow me @hboon on Twitter.
Related
Oct 06, 2018
iOS Dev Nugget 312 Fix Distorted Launch Screens with Hotspot BarSep 22, 2018
iOS Dev Nugget 310 Weak Reference Wrapper ClassSep 15, 2018
iOS Dev Nugget 309 Rule of Thumb Regarding self.Aug 02, 2018
iOS Dev Nugget 303 Use Enums for StatesJul 08, 2018
iOS Dev Nugget 299 CurryingJun 24, 2018
iOS Dev Nugget 297 Defensive Checks for Asynchronous CallsApr 27, 2018
iOS Dev Nugget 289 Set Background Color for UIWebView to Match App While Still Loading DocumentsApr 22, 2018
iOS Dev Nugget 288 Use the .custom UIButton type to Fix Flashing when Title is ChangedApr 07, 2018
iOS Dev Nugget 286 Use Auto Layout for Bottom BarMar 22, 2018
iOS Dev Nugget 284 Use Shell Aliases for Git commandsMar 08, 2018
iOS Dev Nugget 282 Update to My Git no-commit Pre-commit HookJan 24, 2018
iOS Dev Nugget 276 Adding an Indent Default Parameter When Logging Calls in Object HierarchiesDec 28, 2017
iOS Dev Nugget 272 Namespacing using EnumsDec 14, 2017
iOS Dev Nugget 270 Using lazy properties to workaround initializing dependent non-optional propertiesNov 30, 2017
iOS Dev Nugget 268 Using Blocks for Delegate MethodsNov 02, 2017
iOS Dev Nugget 265 value type cannot have a stored property that recursively contains itNov 01, 2017
iOS Dev Nugget 264 Track how long a function takes to run and report progressSep 27, 2017
iOS Dev Nugget 259 CAShapeLayer, UIBezierPath and UIRectCornerAug 30, 2017
iOS Dev Nugget 255 Symbolic Breakpoint to watch for View Controller DeallocationAug 10, 2017
iOS Dev Nugget 252 A Little Trick to Write Loosely Coupled View ControllersJul 11, 2017
iOS Dev Nugget 248 In-app Native RoutingJun 14, 2017
iOS Dev Nugget 244 IteratorProtocolMay 03, 2017
iOS Dev Nugget 238 Keep Code in Method at the Same Level of AbstractionMar 29, 2017
iOS Dev Nugget 233 Separating View Controllers and Their ViewsJan 12, 2017
iOS Dev Nugget 222 Uniquely Identifying User Devices
Jan 10, 2018 by Hwee-Boon Yar
In #232 we looked at how we can use Shared Web Credentials to share login information between your iOS app and Safari by reading/writing to the keychain.
There's a new feature in iOS 11 for apps called Password AutoFill. It lets iOS populate your username and password fields with information from the keychain chosen by the user with a single tap. This goes one step further to reduce the friction for users to move from using your website to running your app.
If you have seen this Password AutoFill QuickType bar in an app, it is AutoFill in action:
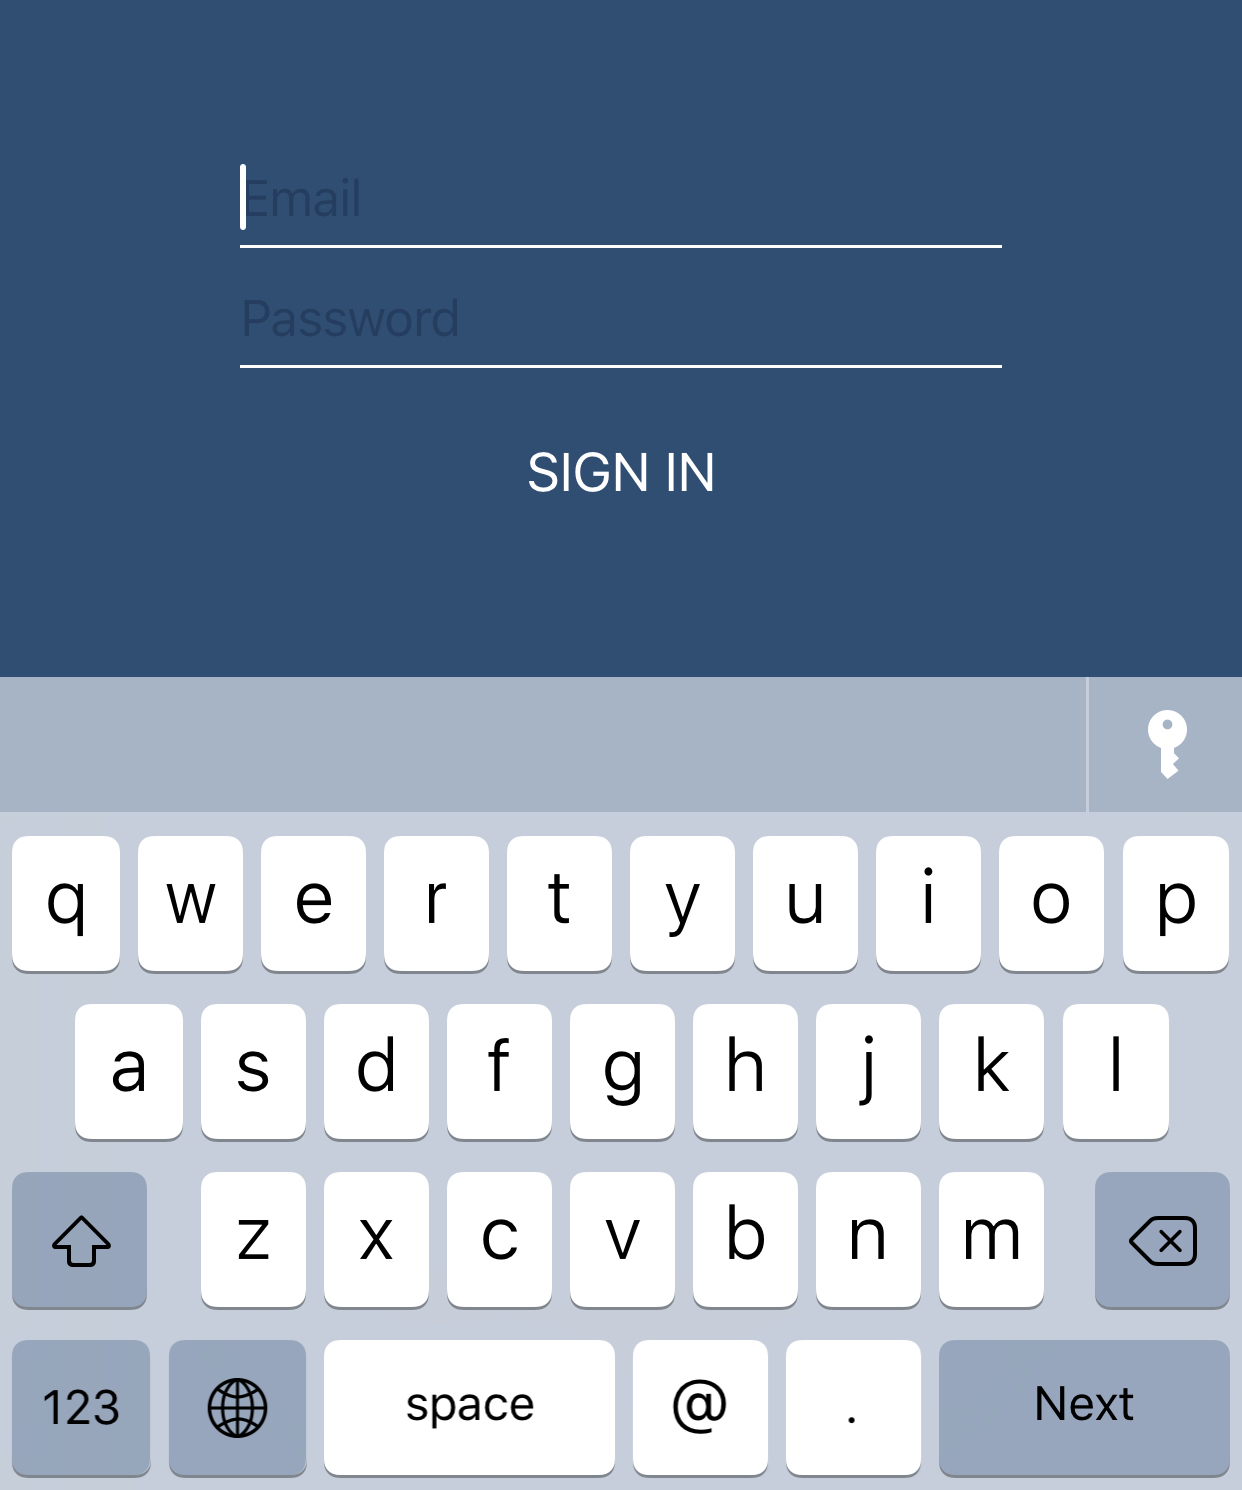
If you tap the button, it should attempt to authenticate using Touch ID and then show you a list of logins to choose from to fill in to the login form. If the app haven't done anything to enable AutoFill, iOS uses some heuristics to try to make it work.
You might even see some a username appearing in the AutoFill QuickType bar, letting you tap on it to choose it right away.
This is all done automatically by iOS
But if want to be sure AutoFill works correctly and show the correct username to the user in the AutoFill QuickType bar, you can set this up explicitly by:
1) Setting the content type of yoru username and password field:
usernameField.textContentType = .username
passwordField.textContentType = .password
2) Enable the associated domains entitlements in Xcode and set up a site associate file on your website. You would have done this if you have already set up Shared Web Credentials.
If you visit the login screen in your app again, you should notice the AutoFill QuickType bar pop up correctly and the username matching your app should appear.
Here's the WWDC video explaining Password AutoFill if you need more details.
Like this post? Follow me @hboon on Twitter.
Related
Nov 12, 2018
iOS Dev Nugget 315 UITextContentType.oneTimeCodeApr 27, 2018
iOS Dev Nugget 289 Set Background Color for UIWebView to Match App While Still Loading DocumentsApr 22, 2018
iOS Dev Nugget 288 Use the .custom UIButton type to Fix Flashing when Title is ChangedMar 31, 2018
iOS Dev Nugget 285 maskedCornersSep 06, 2017
iOS Dev Nugget 256 SFAuthenticationSession for Login Protocols and Single Sign OnMar 22, 2017
iOS Dev Nugget 232 Shared Web Credentials: Logging Into iOS app with Password Saved with SafariFeb 15, 2017
iOS Dev Nugget 227 View with Rounded CornersJan 25, 2017
iOS Dev Nugget 224 Lazy CollectionsNov 28, 2016
iOS Dev Nugget 216 File Data ProtectionNov 17, 2016
iOS Dev Nugget 214 Launch App QuicklySep 23, 2015
iOS Dev Nugget 154 App Transport Security
Jan 03, 2018 by Hwee-Boon Yar
In UIView and its subclasses, there are many properties — such as frame and alpha — that can be animated when they change. i.e. you can do something this and changes will be animated:
UIView.animate(withDuration: 2) {
    self.label.frame = CGRect(x: 150, y: 200, width: 50, height: 20)
    self.button.tintColor = .white
}
Unfortunately, this doesn't work for UILabel's color property. Here's the good news: You can approximate this using transition(with:duration:options:animations:completion:) instead:
UIView.transition(with: label, duration: 2, options: .transitionCrossDissolve, animations: {
    self.label.textColor = .red
}, completion: nil)
Like this post? Follow me @hboon on Twitter.
Dec 28, 2017 by Hwee-Boon Yar
I first read about this idea of namespacing using enums in the article Easy Namespacing in Swift by @khanlou.
For example, for my library Zhi,
I have a file which only has these 2 lines to create a "namespace":
public enum Zhi {
}
Then in other files, I can do this to add to the namespace:
public extension Zhi {
    class StyleParser {
        //...
    }
}
As mentioned in the article, a major limitation is it doesn't work for protocols. So this doesn't work:
public extension Zhi {
    protocol P {}
}
But otherwise, using enums as a namespace is a great way to organize your code.
Like this post? Follow me @hboon on Twitter.
Related
Oct 06, 2018
iOS Dev Nugget 312 Fix Distorted Launch Screens with Hotspot BarSep 22, 2018
iOS Dev Nugget 310 Weak Reference Wrapper ClassSep 15, 2018
iOS Dev Nugget 309 Rule of Thumb Regarding self.Aug 02, 2018
iOS Dev Nugget 303 Use Enums for StatesJul 08, 2018
iOS Dev Nugget 299 CurryingJun 24, 2018
iOS Dev Nugget 297 Defensive Checks for Asynchronous CallsApr 27, 2018
iOS Dev Nugget 289 Set Background Color for UIWebView to Match App While Still Loading DocumentsApr 22, 2018
iOS Dev Nugget 288 Use the .custom UIButton type to Fix Flashing when Title is ChangedApr 07, 2018
iOS Dev Nugget 286 Use Auto Layout for Bottom BarMar 22, 2018
iOS Dev Nugget 284 Use Shell Aliases for Git commandsMar 08, 2018
iOS Dev Nugget 282 Update to My Git no-commit Pre-commit HookJan 24, 2018
iOS Dev Nugget 276 Adding an Indent Default Parameter When Logging Calls in Object HierarchiesJan 18, 2018
iOS Dev Nugget 275 Implementing UIView draw(_:)Dec 14, 2017
iOS Dev Nugget 270 Using lazy properties to workaround initializing dependent non-optional propertiesNov 30, 2017
iOS Dev Nugget 268 Using Blocks for Delegate MethodsNov 02, 2017
iOS Dev Nugget 265 value type cannot have a stored property that recursively contains itNov 01, 2017
iOS Dev Nugget 264 Track how long a function takes to run and report progressSep 27, 2017
iOS Dev Nugget 259 CAShapeLayer, UIBezierPath and UIRectCornerAug 30, 2017
iOS Dev Nugget 255 Symbolic Breakpoint to watch for View Controller DeallocationAug 10, 2017
iOS Dev Nugget 252 A Little Trick to Write Loosely Coupled View ControllersJul 11, 2017
iOS Dev Nugget 248 In-app Native RoutingJun 14, 2017
iOS Dev Nugget 244 IteratorProtocolMay 03, 2017
iOS Dev Nugget 238 Keep Code in Method at the Same Level of AbstractionMar 29, 2017
iOS Dev Nugget 233 Separating View Controllers and Their ViewsJan 12, 2017
iOS Dev Nugget 222 Uniquely Identifying User Devices
Dec 20, 2017 by Hwee-Boon Yar
I wrote a library for working with Auto Layout in Swift. It lets you tweak Auto Layout constraints and watch your app update immediately without a rebuild + run cycle. It’s called Zhi.
The library allows you to specify your auto layout constraints in separate .styles files. It supports:
- Live reloading of Auto Layout constraints as you save the
.styles files, without a rebuild + run cycle
- Apple's Visual Format Language:
H:[p(==v2)]|
- Support an equations-based syntax:
v1.width = v2.width + 10
In addition, the .styles files also support:
- Metrics can be specified
- Colors —
rgb(), rgba() or named colors in UIColor, e.g. red
- Image filenames
- Button title and label text
- Font name, size
- Dynamic type style names, e.g.
callout or caption1
- and more
This means that you can tweak these properties without rebuilding your app during development.
Refer to the README for installation and usage.
Try it out and let me know what you think.
I created a Patreon page. I have been writing iOS Dev Nuggets for more than 5 years. If you want to support me, visit Patreon and consider pledging.
As usual, any tips or comments are welcomed via email.
Like this post? Follow me @hboon on Twitter.
Related
Sep 28, 2018
iOS Dev Nugget 311 jqJul 08, 2018
iOS Dev Nugget 299 CurryingJun 01, 2018
iOS Dev Nugget 294 Core Data EditorMay 03, 2018
iOS Dev Nugget 290 Auto Layout with UIScrollViewApr 07, 2018
iOS Dev Nugget 286 Use Auto Layout for Bottom BarMar 22, 2018
iOS Dev Nugget 284 Use Shell Aliases for Git commandsOct 18, 2017
iOS Dev Nugget 262 Apple Device Names APIAug 23, 2017
iOS Dev Nugget 254 Paw, for Working with APIsApr 26, 2017
iOS Dev Nugget 237 mas-cliApr 19, 2017
iOS Dev Nugget 236 Look up Error CodesFeb 09, 2017
iOS Dev Nugget 226 React NativeJul 09, 2016
iOS Dev Nugget 196 Rename Refactoring for Swift CodeJul 06, 2016
iOS Dev Nugget 195 Tools of the TradeMay 06, 2016
iOS Dev Nugget 186 Injection for XcodeFeb 03, 2016
iOS Dev Nugget 173 Xcode Package Manager, AlcatrazJan 17, 2016
iOS Dev Nugget 171 Dynamic TypeJan 11, 2016
iOS Dev Nugget 170 HomebrewJan 05, 2016
iOS Dev Nugget 169 fastlane: deliverDec 23, 2015
iOS Dev Nugget 167 Animation with Auto LayoutSep 07, 2015
iOS Dev Nugget 152 Lossy PNG CompressionAug 07, 2015
iOS Dev Nugget 147 NSRegularExpression and NSDataDetectorJul 27, 2015
iOS Dev Nugget 146 UIStackView and TZStackViewMar 06, 2015
iOS Dev Nugget 125 View Debugging in XcodeFeb 13, 2015
iOS Dev Nugget 122 Importing Many Test Photos into iOS Simulator IIJan 09, 2015
iOS Dev Nugget 117 UIView-Encapsulated-Layout-HeightNov 28, 2014
iOS Dev Nugget 111 iOS Support MatrixOct 31, 2014
iOS Dev Nugget 107 Auto-sizing UITableViewCellsOct 24, 2014
iOS Dev Nugget 106 Command Line Access to Developer PortalOct 17, 2014
iOS Dev Nugget 105 Try FLEXSep 12, 2014
iOS Dev Nugget 100 Try RevealSep 05, 2014
iOS Dev Nugget 99 Try PaintCodeAug 15, 2014
iOS Dev Nugget 96 Jack, A Native App For iTunes ConnectJul 04, 2014
iOS Dev Nugget 90 Full-Text Searchable WWDC Video Text TranscriptsApr 04, 2014
iOS Dev Nugget 77 RubyMotion Tutorial For Objective C DevelopersJan 17, 2014
iOS Dev Nugget 66 JBChartView for ChartingJan 04, 2014
iOS Dev Nugget 64 Placeholder Views Using PAPlaceholderDec 27, 2013
iOS Dev Nugget 63 Update Your iOS Development ToolboxOct 18, 2013
iOS Dev Nugget 53 Try Kaleidoscope, File Comparison for MacOct 11, 2013
iOS Dev Nugget 52 Set Up Crashlytics For Ad Hoc and App Store Builds OnlyJun 21, 2013
iOS Dev Nugget 36 Use TestFlight for Ad Hoc BuildsMay 11, 2013
iOS Dev Nugget 31 3rd Party Documentation ViewersMar 10, 2013
iOS Dev Nugget 22 Try AppCodeJan 05, 2013
iOS Dev Nugget 14 Charles Web Debugging Proxy
Dec 14, 2017 by Hwee-Boon Yar
In Swift, the lazy keyword changes a property so that it is only calculated when it's accessed. This not only makes it useful for performance reasons, it's also incredibly useful for initializing your class when a non-optional property depends on another property for initialization.
Let's look at an example:
class C {
    var x: UIView
    var y: UIView = {
        var v = UIView()
        x.addSubview(v)
        return v
    }()

    init() {
        x = UIView()
    }
}
This class definition compiles with an error because the value of x is used when computing the value of y:
error: instance member 'x' cannot be used on type 'C'
This wouldn't work even if you change the definition of x to:
var x = UIView()
There's an easy fix — just change y to be lazy:
class C {
    var x: UIView
    lazy var y: UIView = {
        var v = UIView()
        x.addSubview(v)
        return v
    }()

    init() {
        x = UIView()
    }
}
Because lazy properties are only calculated when they are first used — and you don't use them in your initializer before x is initialized, this is a very simple fix.
Like this post? Follow me @hboon on Twitter.
Related
Oct 06, 2018
iOS Dev Nugget 312 Fix Distorted Launch Screens with Hotspot BarSep 22, 2018
iOS Dev Nugget 310 Weak Reference Wrapper ClassSep 15, 2018
iOS Dev Nugget 309 Rule of Thumb Regarding self.Aug 02, 2018
iOS Dev Nugget 303 Use Enums for StatesJul 08, 2018
iOS Dev Nugget 299 CurryingJun 24, 2018
iOS Dev Nugget 297 Defensive Checks for Asynchronous CallsApr 27, 2018
iOS Dev Nugget 289 Set Background Color for UIWebView to Match App While Still Loading DocumentsApr 22, 2018
iOS Dev Nugget 288 Use the .custom UIButton type to Fix Flashing when Title is ChangedApr 07, 2018
iOS Dev Nugget 286 Use Auto Layout for Bottom BarMar 22, 2018
iOS Dev Nugget 284 Use Shell Aliases for Git commandsMar 08, 2018
iOS Dev Nugget 282 Update to My Git no-commit Pre-commit HookJan 24, 2018
iOS Dev Nugget 276 Adding an Indent Default Parameter When Logging Calls in Object HierarchiesJan 18, 2018
iOS Dev Nugget 275 Implementing UIView draw(_:)Dec 28, 2017
iOS Dev Nugget 272 Namespacing using EnumsNov 30, 2017
iOS Dev Nugget 268 Using Blocks for Delegate MethodsNov 02, 2017
iOS Dev Nugget 265 value type cannot have a stored property that recursively contains itNov 01, 2017
iOS Dev Nugget 264 Track how long a function takes to run and report progressSep 27, 2017
iOS Dev Nugget 259 CAShapeLayer, UIBezierPath and UIRectCornerAug 30, 2017
iOS Dev Nugget 255 Symbolic Breakpoint to watch for View Controller DeallocationAug 10, 2017
iOS Dev Nugget 252 A Little Trick to Write Loosely Coupled View ControllersJul 11, 2017
iOS Dev Nugget 248 In-app Native RoutingJun 14, 2017
iOS Dev Nugget 244 IteratorProtocolMay 03, 2017
iOS Dev Nugget 238 Keep Code in Method at the Same Level of AbstractionMar 29, 2017
iOS Dev Nugget 233 Separating View Controllers and Their ViewsJan 12, 2017
iOS Dev Nugget 222 Uniquely Identifying User Devices
Dec 06, 2017 by Hwee-Boon Yar
When creating iOS app preview videos, it's sometimes useful to where your fingers touches on the screen. This is particularly useful if you have multi-finger gestures involved.
There are several libraries that let you do this, one of them is EUMTouchPointView.
Integrating the library is simple. Instead of creating a UIWindow instance, create a EUMShowTouchWindow instance.
When you run your app, touch indicators will appear.
Remember to exclude the library for your app store submission.
Like this post? Follow me @hboon on Twitter.
Related
Aug 15, 2018
iOS Dev Nugget 305 Declaring Distinct Types from General TypesJul 24, 2018
iOS Dev Nugget 302 RealmJun 09, 2018
iOS Dev Nugget 295 SwifterSwiftMay 23, 2018
iOS Dev Nugget 293 iOSSnapshotTestCase (was FBSnapshotTestCase)Mar 15, 2018
iOS Dev Nugget 283 Eureka for FormsFeb 28, 2018
iOS Dev Nugget 281 Use R.swift for Static References to Resources Like ImagesFeb 21, 2018
iOS Dev Nugget 280 Using Custom Fonts Without Updating Info.plist ManuallyOct 11, 2017
iOS Dev Nugget 261 Checking App Download SizeJul 11, 2017
iOS Dev Nugget 248 In-app Native RoutingMar 01, 2017
iOS Dev Nugget 229 PromisesFeb 22, 2017
iOS Dev Nugget 228 Recording and Playing Back Network CallsOct 23, 2016
iOS Dev Nugget 210 PMAlertControllerJun 03, 2016
iOS Dev Nugget 190 Quick Look Plug-in for Mobile Provisioning FilesMay 20, 2016
iOS Dev Nugget 188 SwiftLintApr 20, 2016
iOS Dev Nugget 184 Async LibraryAug 31, 2015
iOS Dev Nugget 151 More Wrappers for Keychain AccessAug 17, 2015
iOS Dev Nugget 149 Timepiece, a Swift Library for Handling DatesJul 27, 2015
iOS Dev Nugget 146 UIStackView and TZStackViewJul 21, 2015
iOS Dev Nugget 145 Listing Available FontsJul 05, 2015
iOS Dev Nugget 143 Don't Forget SQLiteJun 09, 2015
iOS Dev Nugget 139 Custom Build Configurations and Xcode SubprojectsMay 19, 2015
iOS Dev Nugget 136 Auto Layout with CartographyApr 29, 2015
iOS Dev Nugget 133 Dollar.swiftFeb 06, 2015
iOS Dev Nugget 121 InflectorKitDec 26, 2014
iOS Dev Nugget 115 Displaying Information in Settings AppDec 19, 2014
iOS Dev Nugget 114 Preview an Image for DebuggingDec 12, 2014
iOS Dev Nugget 113 GPUImage, a GPU-based Image and Video Processing FrameworkJun 13, 2014
iOS Dev Nugget 87 What's New in iOS 8May 30, 2014
iOS Dev Nugget 85 A More Customizable Button For Different StatesMay 02, 2014
iOS Dev Nugget 81 TMCache For In-Memory and Disk-backed CachingApr 18, 2014
iOS Dev Nugget 79 TweetBot Photo Flicking EffectMar 07, 2014
iOS Dev Nugget 73 Open Source Date Picker from SquareFeb 28, 2014
iOS Dev Nugget 72 Slimming Down Your AppFeb 22, 2014
iOS Dev Nugget 71 TapJan 31, 2014
iOS Dev Nugget 68 Custom URL Schemes DirectoryDec 20, 2013
iOS Dev Nugget 62 Using PDF Instead of PNG Files for Resizable AssetsNov 09, 2013
iOS Dev Nugget 56 Using Affiliate Links to Track Your App DownloadsSep 20, 2013
iOS Dev Nugget 49 Wrapper to Get UIColor ComponentsMay 17, 2013
iOS Dev Nugget 32 FMDB: Thin Objective C Wrapper Around SQLiteOct 06, 2012
iOS Dev Nugget 1 Easy logging of values and objects
Nov 30, 2017 by Hwee-Boon Yar
One of the most common way to reduce coupling when creating a new class is to create a delegate(s) for it. This is a common pattern used in Cocoa (Touch) classes, from simple examples like UIImagePickerController and UIImagePickerControllerDelegate to more complicated examples like UITableView and UITableViewDelegate, and UITableViewDataSource.
You can implement delegates using protocols. e.g.
protocol DelegateOfA {
    func onSomethingHappened()
}

class A {
    var delegate: DelegateOfA?

    init() {}
    func doSomething() {}
}
Use them like this:
class SomeDelegate: DelegateOfA {
    func onSomethingHappened() {
        print("I know something happened")
    }
}

let aDelegate = SomeDelegate()

let a = A()
a.delegate = aDelegate
a.doSomething()

//And this may/will be invoked somehow and fire your delegate methods:
//a.delegate?.onSomethingHappened()
One thing I have done more recently is to use blocks for these delegates:
class A {
    var onSomethingHappened: (()->())?

    init() {}
    func doSomething() {}
}
Use it like this:
let a = A()
a.onSomethingHappened = {
    print("I know something happened")
}
a.doSomething()

//And this may/will be invoked somehow and fire your delegate blocks:
a.onSomethingHappened?()
The overall code is slightly shorter, but more importantly, both the object creation of A and the delegate code are close together, making it easier to read, understand and maintain.
Try it out!
Like this post? Follow me @hboon on Twitter.
Related
Oct 06, 2018
iOS Dev Nugget 312 Fix Distorted Launch Screens with Hotspot BarSep 22, 2018
iOS Dev Nugget 310 Weak Reference Wrapper ClassSep 15, 2018
iOS Dev Nugget 309 Rule of Thumb Regarding self.Aug 02, 2018
iOS Dev Nugget 303 Use Enums for StatesJul 08, 2018
iOS Dev Nugget 299 CurryingJun 24, 2018
iOS Dev Nugget 297 Defensive Checks for Asynchronous CallsApr 27, 2018
iOS Dev Nugget 289 Set Background Color for UIWebView to Match App While Still Loading DocumentsApr 22, 2018
iOS Dev Nugget 288 Use the .custom UIButton type to Fix Flashing when Title is ChangedApr 07, 2018
iOS Dev Nugget 286 Use Auto Layout for Bottom BarMar 22, 2018
iOS Dev Nugget 284 Use Shell Aliases for Git commandsMar 08, 2018
iOS Dev Nugget 282 Update to My Git no-commit Pre-commit HookJan 24, 2018
iOS Dev Nugget 276 Adding an Indent Default Parameter When Logging Calls in Object HierarchiesJan 18, 2018
iOS Dev Nugget 275 Implementing UIView draw(_:)Dec 28, 2017
iOS Dev Nugget 272 Namespacing using EnumsDec 14, 2017
iOS Dev Nugget 270 Using lazy properties to workaround initializing dependent non-optional propertiesNov 02, 2017
iOS Dev Nugget 265 value type cannot have a stored property that recursively contains itNov 01, 2017
iOS Dev Nugget 264 Track how long a function takes to run and report progressSep 27, 2017
iOS Dev Nugget 259 CAShapeLayer, UIBezierPath and UIRectCornerAug 30, 2017
iOS Dev Nugget 255 Symbolic Breakpoint to watch for View Controller DeallocationAug 10, 2017
iOS Dev Nugget 252 A Little Trick to Write Loosely Coupled View ControllersJul 11, 2017
iOS Dev Nugget 248 In-app Native RoutingJun 14, 2017
iOS Dev Nugget 244 IteratorProtocolMay 03, 2017
iOS Dev Nugget 238 Keep Code in Method at the Same Level of AbstractionMar 29, 2017
iOS Dev Nugget 233 Separating View Controllers and Their ViewsJan 12, 2017
iOS Dev Nugget 222 Uniquely Identifying User Devices
Nov 22, 2017 by Hwee-Boon Yar
Picked up this tip from @cabel related to sudo:
If you have a Macbook Pro with Touch ID (i.e. Touch Bar) support, you can enable Touch ID for sudo by adding this line as the 1st line after auth sufficient pam_tid.so in the file /etc/pam.d/sudo:
auth sufficient pam_tid.so
If Touch ID prompt doesn't appear until you keyed in the wrong password, chances are you added the line correctly, but not at the top.
Like this post? Follow me @hboon on Twitter.
Nov 15, 2017 by Hwee-Boon Yar
Sometimes we want a simple confirmation if a line of code has been reached, especially when we need to test on device, untethered. One trick I like to use is to play a system sound:
import AudioToolbox

AudioServicesPlaySystemSound(1109)
Of course, if you are tethered, you can use a breakpoint to play a sound.
Like this post? Follow me @hboon on Twitter.
Nov 02, 2017 by Hwee-Boon Yar
If you create a struct and have a property that is of the same type, e.g:
struct Node {
    var parent: Node?
    init() { }
}
You get this error:
value type 'Node' cannot have a stored property that recursively contains it
There are a few ways to work around this. One is to use a "box" class:
class Box<T> {
    var value: T
    init(value: T) {
        self.value = value
    }
}
And change your Node struct to:
struct Node {
    var parent: Box<Node>?
    init() { }
}
Alternatively, wrap it with an array:
struct Node {
    var parent = [Node]()
    init() { }
}
But when you see this error, it's also good to reflect on whether you are building your data structure correctly. in this example our struct is called Node, naturally nodes may refer to their parent. But since structs are value types, we are always copying the parent. If we build a tree of nodes, this copying behavior is not what we want. The simpler and probably more correct answer here is to just Node to be a class instead:
class Node {
    var parent: Node?
    init() { }
}
This will remove the error and more importantly, provide the correct semantics.
Like this post? Follow me @hboon on Twitter.
Related
Nov 03, 2018
iOS Dev Nugget 314 Checked Array SubscriptingOct 06, 2018
iOS Dev Nugget 312 Fix Distorted Launch Screens with Hotspot BarSep 22, 2018
iOS Dev Nugget 310 Weak Reference Wrapper ClassSep 15, 2018
iOS Dev Nugget 309 Rule of Thumb Regarding self.Sep 07, 2018
iOS Dev Nugget 308 Careful with early return statements in functions that return voidAug 30, 2018
iOS Dev Nugget 307 Array Out of BoundsAug 23, 2018
iOS Dev Nugget 306 Underscores in Numeric LiteralsAug 02, 2018
iOS Dev Nugget 303 Use Enums for StatesJul 21, 2018
iOS Dev Nugget 301 Print App Document Path IIJul 16, 2018
iOS Dev Nugget 300 Pipe OperatorJul 08, 2018
iOS Dev Nugget 299 CurryingJun 24, 2018
iOS Dev Nugget 297 Defensive Checks for Asynchronous CallsMay 18, 2018
iOS Dev Nugget 292 for-whereMay 12, 2018
iOS Dev Nugget 291 Implicit Member ExpressionsApr 27, 2018
iOS Dev Nugget 289 Set Background Color for UIWebView to Match App While Still Loading DocumentsApr 22, 2018
iOS Dev Nugget 288 Use the .custom UIButton type to Fix Flashing when Title is ChangedApr 11, 2018
iOS Dev Nugget 287 Modifying a Property Which is a Struct Triggers didSetApr 07, 2018
iOS Dev Nugget 286 Use Auto Layout for Bottom BarMar 22, 2018
iOS Dev Nugget 284 Use Shell Aliases for Git commandsMar 08, 2018
iOS Dev Nugget 282 Update to My Git no-commit Pre-commit HookJan 24, 2018
iOS Dev Nugget 276 Adding an Indent Default Parameter When Logging Calls in Object HierarchiesJan 18, 2018
iOS Dev Nugget 275 Implementing UIView draw(_:)Dec 28, 2017
iOS Dev Nugget 272 Namespacing using EnumsDec 14, 2017
iOS Dev Nugget 270 Using lazy properties to workaround initializing dependent non-optional propertiesNov 30, 2017
iOS Dev Nugget 268 Using Blocks for Delegate MethodsNov 01, 2017
iOS Dev Nugget 264 Track how long a function takes to run and report progressSep 27, 2017
iOS Dev Nugget 259 CAShapeLayer, UIBezierPath and UIRectCornerSep 13, 2017
iOS Dev Nugget 257 AssertsAug 30, 2017
iOS Dev Nugget 255 Symbolic Breakpoint to watch for View Controller DeallocationAug 10, 2017
iOS Dev Nugget 252 A Little Trick to Write Loosely Coupled View ControllersAug 02, 2017
iOS Dev Nugget 251 Retrieving the Current View ControllerJul 11, 2017
iOS Dev Nugget 248 In-app Native RoutingJun 28, 2017
iOS Dev Nugget 246 Mapping Swift and Obj-C Method NamesJun 14, 2017
iOS Dev Nugget 244 IteratorProtocolMay 24, 2017
iOS Dev Nugget 241 Swift Enums with LabelsMay 17, 2017
iOS Dev Nugget 240 Print an Object's Unique IdentifierMay 03, 2017
iOS Dev Nugget 238 Keep Code in Method at the Same Level of AbstractionApr 05, 2017
iOS Dev Nugget 234 #available and @availableMar 29, 2017
iOS Dev Nugget 233 Separating View Controllers and Their ViewsJan 12, 2017
iOS Dev Nugget 222 Uniquely Identifying User DevicesNov 23, 2016
iOS Dev Nugget 215 dump Instead of print for Swift StructsOct 25, 2016
iOS Dev Nugget 211 Higher Order Functions: map, filter, reduceOct 12, 2016
iOS Dev Nugget 209 Swift DeferSep 28, 2016
iOS Dev Nugget 207 Swift Nil-Coalescing OperatorSep 22, 2016
iOS Dev Nugget 206 Date doesRelativeDateFormattingSep 11, 2016
iOS Dev Nugget 205 The Never Return Type in SwiftSep 07, 2016
iOS Dev Nugget 204 Swift @autoclosureSep 02, 2016
iOS Dev Nugget 203 Swift MeasurementAug 24, 2016
iOS Dev Nugget 202 Swift Enumerations to Encode StatesAug 17, 2016
iOS Dev Nugget 201 Swift Pattern MatchingAug 10, 2016
iOS Dev Nugget 200 Swift flatMapAug 05, 2016
iOS Dev Nugget 199 Swift Talk Video SeriesJul 26, 2016
iOS Dev Nugget 198 KZPlaygroundJul 20, 2016
iOS Dev Nugget 197 App Initialization CodeJul 09, 2016
iOS Dev Nugget 196 Rename Refactoring for Swift CodeJun 24, 2016
iOS Dev Nugget 193 Result EnumerationMay 20, 2016
iOS Dev Nugget 188 SwiftLintMay 10, 2016
iOS Dev Nugget 187 Creating a Singleton Class in SwiftMay 06, 2016
iOS Dev Nugget 186 Injection for XcodeApr 02, 2016
iOS Dev Nugget 182 Tracking the swift-evolution Git RepositoryMar 26, 2016
iOS Dev Nugget 181 Swift SelectorsMar 21, 2016
iOS Dev Nugget 180 Low Power ModeJan 27, 2016
iOS Dev Nugget 172 Print App Document PathDec 30, 2015
iOS Dev Nugget 168 Using Blocks to Manage ContextsOct 20, 2015
iOS Dev Nugget 158 Checking if Newer APIs Are Available In Older iOS Versions (II)Aug 17, 2015
iOS Dev Nugget 149 Timepiece, a Swift Library for Handling DatesJul 05, 2015
iOS Dev Nugget 143 Don't Forget SQLiteJul 01, 2015
iOS Dev Nugget 142 Grand Central DispatchJun 22, 2015
iOS Dev Nugget 141 Great Swift Standard Library Examples Covered in Playground (Swift 2.0)Jun 01, 2015
iOS Dev Nugget 138 Interoperability: Using Enumerations Defined In Objective-C from SwiftMay 27, 2015
iOS Dev Nugget 137 Named Tuple ElementsMay 19, 2015
iOS Dev Nugget 136 Auto Layout with CartographyMay 13, 2015
iOS Dev Nugget 135 CAShapeLayer, Animated Views and XCPShowView()Apr 29, 2015
iOS Dev Nugget 133 Dollar.swiftApr 22, 2015
iOS Dev Nugget 132 XCPCaptureValue in Swift PlaygroundsApr 14, 2015
iOS Dev Nugget 131 Running Asynchronous Code in Swift PlaygroundsApr 03, 2015
iOS Dev Nugget 129 Browsing the Swift Standard LibraryFeb 27, 2015
iOS Dev Nugget 124 performSelector:withObject:afterDelay: in SwiftFeb 20, 2015
iOS Dev Nugget 123 Using dynamicType in SwiftJan 02, 2015
iOS Dev Nugget 116 method() is unavailable: use object construction Class()
Nov 01, 2017 by Hwee-Boon Yar
Often when comparing implementations of the same function, I need to do some simple profiling to compare the total time taken. The simplest approach is to create a Date instance before and after the operation and calculate the difference. These are usually long operations and I want to track progress. This becomes a bit more troublesome when the operation is asynchronous. So I wrote a simple class to help:
import Foundation

class ProgressReporter {
    let startTime = Date()
    var name: String
    var total: Int
    var step: Int

    init(name: String, total: Int = -1, step: Int = 100000) {
        self.name = name
        self.total = total
        self.step = step
        print("\(name.firstUppercased)...")
    }

    func update(current: Int, completion: (()->())? = nil) {
        if current % step == 0 {
            print("Progress \(current)/\(total)")
        }
        if current == total {
            completed()
            completion?()
        }
    }

    func completed() {
        print("Completed")
        print("Time taken to \(name): \(Date().timeIntervalSince(startTime)) secs")
    }
}

extension String {
    var firstUppercased: String {
        guard let first = first else { return "" }
        return String(first).uppercased() + dropFirst()
    }
}
You can use it like this:
func getFileNames(someInput: [String]) {
    let progress = ProgressReporter(name: "get filenames", total: someInput.count)
    var results = [String]()
    for e in results {
        someAsyncOperation(e) {
            progress.update(current: results.count) {
                //do something with results
            }
        }
    }
}
It'll print something like this:
Get filenames
Progress 100000/2000000
Progress 200000/2000000
Progress 300000/2000000
...
Progress 2000000/2000000
Completed
Time taken to get filenames: 100 secs
Like this post? Follow me @hboon on Twitter.
Related
Oct 06, 2018
iOS Dev Nugget 312 Fix Distorted Launch Screens with Hotspot BarSep 22, 2018
iOS Dev Nugget 310 Weak Reference Wrapper ClassSep 15, 2018
iOS Dev Nugget 309 Rule of Thumb Regarding self.Aug 02, 2018
iOS Dev Nugget 303 Use Enums for StatesJul 08, 2018
iOS Dev Nugget 299 CurryingJun 24, 2018
iOS Dev Nugget 297 Defensive Checks for Asynchronous CallsApr 27, 2018
iOS Dev Nugget 289 Set Background Color for UIWebView to Match App While Still Loading DocumentsApr 22, 2018
iOS Dev Nugget 288 Use the .custom UIButton type to Fix Flashing when Title is ChangedApr 07, 2018
iOS Dev Nugget 286 Use Auto Layout for Bottom BarMar 22, 2018
iOS Dev Nugget 284 Use Shell Aliases for Git commandsMar 08, 2018
iOS Dev Nugget 282 Update to My Git no-commit Pre-commit HookJan 24, 2018
iOS Dev Nugget 276 Adding an Indent Default Parameter When Logging Calls in Object HierarchiesJan 18, 2018
iOS Dev Nugget 275 Implementing UIView draw(_:)Dec 28, 2017
iOS Dev Nugget 272 Namespacing using EnumsDec 14, 2017
iOS Dev Nugget 270 Using lazy properties to workaround initializing dependent non-optional propertiesNov 30, 2017
iOS Dev Nugget 268 Using Blocks for Delegate MethodsNov 02, 2017
iOS Dev Nugget 265 value type cannot have a stored property that recursively contains itSep 27, 2017
iOS Dev Nugget 259 CAShapeLayer, UIBezierPath and UIRectCornerAug 30, 2017
iOS Dev Nugget 255 Symbolic Breakpoint to watch for View Controller DeallocationAug 10, 2017
iOS Dev Nugget 252 A Little Trick to Write Loosely Coupled View ControllersJul 11, 2017
iOS Dev Nugget 248 In-app Native RoutingJun 14, 2017
iOS Dev Nugget 244 IteratorProtocolMay 03, 2017
iOS Dev Nugget 238 Keep Code in Method at the Same Level of AbstractionMar 29, 2017
iOS Dev Nugget 233 Separating View Controllers and Their ViewsJan 12, 2017
iOS Dev Nugget 222 Uniquely Identifying User Devices
Oct 25, 2017 by Hwee-Boon Yar
Do you sometimes have this need: edit a file or a few files in one application and then switch to another app and want to select those files? E.g. you edit iOS app screenshots in a graphics editor and then want to upload them in Safari.
Then this tip is for you:
File > New Smart Folder- Click
This Mac
- Click +
- Click
Kind and change it to Last modified date
- Make sure
within last is selected
- Enter 1 (days)
View > as List- Click the
Date Last Opened column header to sort descending
- Click
Save
- Make sure
Add to Sidebar is checked
- Enter a name (e.g.
Recent) and click Save
The Recent smart folder should appear in your Finder sidebar.
With our example, after editing you just need to click the Recent smart folder either in Finder (or in other cases the Open file dialog) to access the most recently modified files.
Like this post? Follow me @hboon on Twitter.
Oct 18, 2017 by Hwee-Boon Yar
This is a continuation of #260 where I talk about including the app version and device Name in feedback/support emails. After thinking about it, I created Apple Device Names. It provides a simple API that maps iPhone10,6 → iPhone X.
It's just a curl command away:
$ curl http://appledevicenames.com/device/iPhone10,6

iPhone X
So to generate something like this:
For info/diagnostic purposes:
  App v1.0.0 build 23 on iPhone X, iOS 11.0.3
You can do this in Swift:
//Stick this somewhere
private func deviceModel() -> String? {
    var keys = [CTL_HW, HW_MACHINE]
    var requiredSize = 0
    let fetchSizeResult = sysctl(&keys, UInt32(keys.count), nil, &requiredSize, nil, 0)
    guard fetchSizeResult == 0 else { return nil }
    var data = [CChar](repeating: 0, count: requiredSize)
    let fetchResult = sysctl(&keys, UInt32(keys.count), &data, &requiredSize, nil, 0)
    guard fetchResult == 0 else { return nil }
    return String(validatingUTF8: data)
}

//Stick this somewhere
func withDeviceName(block: @escaping (String) -> Void)  {
    let fallbackName = "Unknown"
    if let model = deviceModel(),
    let url = URL(string: "https://appledevicenames.com/device/\(model)") {
        URLSession.shared.dataTask(with: url) { data, _ , _ in
            DispatchQueue.main.async {
                if let data = data, let name = String(data: data, encoding: .utf8) {
                    block(name)
                } else {
                    block(fallbackName)
                }
            }
        }.resume()
    } else {
        block(fallbackName)
    }
}

//Calling code
withDeviceName { deviceName in
    let appVersion = Bundle.main.object(forInfoDictionaryKey: "CFBundleShortVersionString")
    let buildNumber = Bundle.main.object(forInfoDictionaryKey: "CFBundleVersion")
    let osVersion = UIDevice.current.systemVersion
    if let appVersion=appVersion, let buildNumber=buildNumber {
        let body = "For info/diagnostic purposes:\n  App v\(appVersion) build \(buildNumber) on \(deviceName), iOS \(osVersion)"
        //body = "For info/diagnostic purposes:\n  App v1.0.0 build 23 on iPhone X, iOS 11.0.3"
        //Use body
    }
}
Like this post? Follow me @hboon on Twitter.
Related
Sep 28, 2018
iOS Dev Nugget 311 jqJul 08, 2018
iOS Dev Nugget 299 CurryingJun 01, 2018
iOS Dev Nugget 294 Core Data EditorMar 22, 2018
iOS Dev Nugget 284 Use Shell Aliases for Git commandsDec 20, 2017
iOS Dev Nugget 271 Zhi — Live Reloading Auto Layout Constraints and moreOct 04, 2017
iOS Dev Nugget 260 Include App Version and Device Name in Feedback/Support EmailAug 23, 2017
iOS Dev Nugget 254 Paw, for Working with APIsApr 26, 2017
iOS Dev Nugget 237 mas-cliApr 19, 2017
iOS Dev Nugget 236 Look up Error CodesFeb 09, 2017
iOS Dev Nugget 226 React NativeJul 09, 2016
iOS Dev Nugget 196 Rename Refactoring for Swift CodeJul 06, 2016
iOS Dev Nugget 195 Tools of the TradeMay 06, 2016
iOS Dev Nugget 186 Injection for XcodeFeb 03, 2016
iOS Dev Nugget 173 Xcode Package Manager, AlcatrazJan 11, 2016
iOS Dev Nugget 170 HomebrewJan 05, 2016
iOS Dev Nugget 169 fastlane: deliverSep 07, 2015
iOS Dev Nugget 152 Lossy PNG CompressionAug 07, 2015
iOS Dev Nugget 147 NSRegularExpression and NSDataDetectorMar 06, 2015
iOS Dev Nugget 125 View Debugging in XcodeFeb 13, 2015
iOS Dev Nugget 122 Importing Many Test Photos into iOS Simulator IINov 28, 2014
iOS Dev Nugget 111 iOS Support MatrixOct 24, 2014
iOS Dev Nugget 106 Command Line Access to Developer PortalOct 17, 2014
iOS Dev Nugget 105 Try FLEXSep 12, 2014
iOS Dev Nugget 100 Try RevealSep 05, 2014
iOS Dev Nugget 99 Try PaintCodeAug 15, 2014
iOS Dev Nugget 96 Jack, A Native App For iTunes ConnectJul 04, 2014
iOS Dev Nugget 90 Full-Text Searchable WWDC Video Text TranscriptsApr 04, 2014
iOS Dev Nugget 77 RubyMotion Tutorial For Objective C DevelopersJan 17, 2014
iOS Dev Nugget 66 JBChartView for ChartingJan 04, 2014
iOS Dev Nugget 64 Placeholder Views Using PAPlaceholderDec 27, 2013
iOS Dev Nugget 63 Update Your iOS Development ToolboxOct 18, 2013
iOS Dev Nugget 53 Try Kaleidoscope, File Comparison for MacOct 11, 2013
iOS Dev Nugget 52 Set Up Crashlytics For Ad Hoc and App Store Builds OnlyJun 21, 2013
iOS Dev Nugget 36 Use TestFlight for Ad Hoc BuildsMay 11, 2013
iOS Dev Nugget 31 3rd Party Documentation ViewersMar 10, 2013
iOS Dev Nugget 22 Try AppCodeJan 05, 2013
iOS Dev Nugget 14 Charles Web Debugging Proxy
Oct 11, 2017 by Hwee-Boon Yar
There's always been an app size limit for cellular downloads. It's 150 MB as of writing.
For those who are along the borderline, here's a great way to check how big your app is:
- Go to iTunes Connect
My Apps- Click the app
- Click
Activity
- Under
All Builds
- Click the version number to expand
- Click on the build
- Click
App Store File Sizes
This reveals a list of device types and their corresponding download sizes.
Like this post? Follow me @hboon on Twitter.
Related
Feb 21, 2018
iOS Dev Nugget 280 Using Custom Fonts Without Updating Info.plist ManuallyDec 06, 2017
iOS Dev Nugget 269 Including Finger Touches in App Preview VideosJan 05, 2016
iOS Dev Nugget 169 fastlane: deliverAug 13, 2015
iOS Dev Nugget 148 Difference between CFBundleVersion and CFBundleShortVersionStringJun 09, 2015
iOS Dev Nugget 139 Custom Build Configurations and Xcode SubprojectsMar 27, 2015
iOS Dev Nugget 128 Dependency Management for 3rd Party Code: Git SubmodulesMar 20, 2015
iOS Dev Nugget 127 Dependency Management for 3rd Party Code: CarthageMar 13, 2015
iOS Dev Nugget 126 Dependency Management for 3rd Party Code: CocoapodsJan 23, 2015
iOS Dev Nugget 119 Ad Hoc Tethered Install Using iTunesJan 16, 2015
iOS Dev Nugget 118 Vendoring Code and Git SubmodulesJun 13, 2014
iOS Dev Nugget 87 What's New in iOS 8Feb 28, 2014
iOS Dev Nugget 72 Slimming Down Your AppNov 09, 2013
iOS Dev Nugget 56 Using Affiliate Links to Track Your App Downloads
Oct 04, 2017 by Hwee-Boon Yar
In my apps, I include a button for users to send me feedback emails. I will pre-fill the email with a line like this:
For info/diagnostic purposes:
    MY_APP_NAME v1.0 build 101 on iPad Pro 9.7 Wifi + Cellular, iOS 10.0
This provides some basic information that can help me understand their issue or feedback better.
I generate this with code like this:
let appVersion = Bundle.main.object(forInfoDictionaryKey: "CFBundleShortVersionString")
let buildNumber = Bundle.main.object(forInfoDictionaryKey: "CFBundleVersion")
let osVersion = UIDevice.current.systemVersion
if let appVersion=appVersion, let buildNumber=buildNumber {
    let body = "For info/diagnostic purposes:\nMY_APP_NAME v\(appVersion) build \(buildNumber), iOS \(osVersion)"
    //Use body
}
If you want to include the device name (iPhone X, etc) property, you can use https://github.com/InderKumarRathore/DeviceGuru.
Like this post? Follow me @hboon on Twitter.
Sep 27, 2017 by Hwee-Boon Yar
In #135 CAShapeLayer, Animated Views and XCPShowView(), we spoke about using CALayer and UIBezierPath to draw and animate outlines.
Here's another common thing you can do with it — Rounded corners:
let canvas = UIView()
canvas.frame = CGRect(x: 0, y: 0, width: 200, height: 300)
canvas.backgroundColor = .blue

let v2 = UIView()
v2.frame = CGRect(x: 20, y: 20, width: 50, height: 60)
v2.backgroundColor = .red
v2.layer.cornerRadius = 8
canvas.addSubview(v2)
And if you only want to round certain corners, use UIRectCorner:
let v3 = UIView()
v3.frame = CGRect(x: 20, y: 100, width: 50, height: 60)
v3.backgroundColor = .green
canvas.addSubview(v3)

let cornerRadius = 12
let layer = CAShapeLayer()
layer.path = UIBezierPath(roundedRect: v3.bounds, byRoundingCorners: [.topLeft, .bottomRight], cornerRadii: CGSize(width: cornerRadius, height: cornerRadius)).cgPath
v3.layer.mask = layer
Like this post? Follow me @hboon on Twitter.
Related
Oct 06, 2018
iOS Dev Nugget 312 Fix Distorted Launch Screens with Hotspot BarSep 22, 2018
iOS Dev Nugget 310 Weak Reference Wrapper ClassSep 15, 2018
iOS Dev Nugget 309 Rule of Thumb Regarding self.Aug 02, 2018
iOS Dev Nugget 303 Use Enums for StatesJul 08, 2018
iOS Dev Nugget 299 CurryingJun 24, 2018
iOS Dev Nugget 297 Defensive Checks for Asynchronous CallsApr 27, 2018
iOS Dev Nugget 289 Set Background Color for UIWebView to Match App While Still Loading DocumentsApr 22, 2018
iOS Dev Nugget 288 Use the .custom UIButton type to Fix Flashing when Title is ChangedApr 07, 2018
iOS Dev Nugget 286 Use Auto Layout for Bottom BarMar 22, 2018
iOS Dev Nugget 284 Use Shell Aliases for Git commandsMar 08, 2018
iOS Dev Nugget 282 Update to My Git no-commit Pre-commit HookJan 24, 2018
iOS Dev Nugget 276 Adding an Indent Default Parameter When Logging Calls in Object HierarchiesJan 18, 2018
iOS Dev Nugget 275 Implementing UIView draw(_:)Dec 28, 2017
iOS Dev Nugget 272 Namespacing using EnumsDec 14, 2017
iOS Dev Nugget 270 Using lazy properties to workaround initializing dependent non-optional propertiesNov 30, 2017
iOS Dev Nugget 268 Using Blocks for Delegate MethodsNov 02, 2017
iOS Dev Nugget 265 value type cannot have a stored property that recursively contains itNov 01, 2017
iOS Dev Nugget 264 Track how long a function takes to run and report progressAug 30, 2017
iOS Dev Nugget 255 Symbolic Breakpoint to watch for View Controller DeallocationAug 10, 2017
iOS Dev Nugget 252 A Little Trick to Write Loosely Coupled View ControllersJul 11, 2017
iOS Dev Nugget 248 In-app Native RoutingJun 14, 2017
iOS Dev Nugget 244 IteratorProtocolMay 03, 2017
iOS Dev Nugget 238 Keep Code in Method at the Same Level of AbstractionMar 29, 2017
iOS Dev Nugget 233 Separating View Controllers and Their ViewsJan 12, 2017
iOS Dev Nugget 222 Uniquely Identifying User Devices
Sep 22, 2017 by Hwee-Boon Yar
This guide from PaintCode is a useful graphical illustration of various iPhone sizes, now updated to include iPhone 8 (Plus) and iPhone X.
There's also additional notes about the iPhone X here.
Like this post? Follow me @hboon on Twitter.
Sep 13, 2017 by Hwee-Boon Yar
In Obj-C, you can use asserts like this:
NSAssert([self foo], @"Something something");
Similarly in Swift:
assert(foo())
In Obj-C, asserts are controlled by ENABLE_NS_ASSERTIONS (Enable Foundation Assertions in Xcode Build Settings) which is default to NO in release builds.
But in Swift, asserts are controlled by the Swift optimization level. With a release build — which defaults SWIFT_OPTIMIZATION_LEVEL (Swift Compiler - Code Generation > Optimization Level) to -O, the assert() doesn't run. It runs with -Onone.
It's not complicated once we realise these are 2 different flags, but it's still a good practice to only run code which has no side effects with an assert to present such errors.
Like this post? Follow me @hboon on Twitter.
Related
Nov 03, 2018
iOS Dev Nugget 314 Checked Array SubscriptingSep 22, 2018
iOS Dev Nugget 310 Weak Reference Wrapper ClassSep 07, 2018
iOS Dev Nugget 308 Careful with early return statements in functions that return voidAug 30, 2018
iOS Dev Nugget 307 Array Out of BoundsAug 23, 2018
iOS Dev Nugget 306 Underscores in Numeric LiteralsAug 02, 2018
iOS Dev Nugget 303 Use Enums for StatesJul 21, 2018
iOS Dev Nugget 301 Print App Document Path IIJul 16, 2018
iOS Dev Nugget 300 Pipe OperatorMay 18, 2018
iOS Dev Nugget 292 for-whereMay 12, 2018
iOS Dev Nugget 291 Implicit Member ExpressionsApr 11, 2018
iOS Dev Nugget 287 Modifying a Property Which is a Struct Triggers didSetFeb 07, 2018
iOS Dev Nugget 278 Type Inference for Objective-CNov 02, 2017
iOS Dev Nugget 265 value type cannot have a stored property that recursively contains itAug 02, 2017
iOS Dev Nugget 251 Retrieving the Current View ControllerJun 28, 2017
iOS Dev Nugget 246 Mapping Swift and Obj-C Method NamesJun 14, 2017
iOS Dev Nugget 244 IteratorProtocolMay 24, 2017
iOS Dev Nugget 241 Swift Enums with LabelsMay 17, 2017
iOS Dev Nugget 240 Print an Object's Unique IdentifierApr 05, 2017
iOS Dev Nugget 234 #available and @availableNov 23, 2016
iOS Dev Nugget 215 dump Instead of print for Swift StructsOct 25, 2016
iOS Dev Nugget 211 Higher Order Functions: map, filter, reduceOct 12, 2016
iOS Dev Nugget 209 Swift DeferSep 28, 2016
iOS Dev Nugget 207 Swift Nil-Coalescing OperatorSep 22, 2016
iOS Dev Nugget 206 Date doesRelativeDateFormattingSep 11, 2016
iOS Dev Nugget 205 The Never Return Type in SwiftSep 07, 2016
iOS Dev Nugget 204 Swift @autoclosureSep 02, 2016
iOS Dev Nugget 203 Swift MeasurementAug 24, 2016
iOS Dev Nugget 202 Swift Enumerations to Encode StatesAug 17, 2016
iOS Dev Nugget 201 Swift Pattern MatchingAug 10, 2016
iOS Dev Nugget 200 Swift flatMapAug 05, 2016
iOS Dev Nugget 199 Swift Talk Video SeriesJul 26, 2016
iOS Dev Nugget 198 KZPlaygroundJul 20, 2016
iOS Dev Nugget 197 App Initialization CodeJul 09, 2016
iOS Dev Nugget 196 Rename Refactoring for Swift CodeJun 24, 2016
iOS Dev Nugget 193 Result EnumerationMay 20, 2016
iOS Dev Nugget 188 SwiftLintMay 10, 2016
iOS Dev Nugget 187 Creating a Singleton Class in SwiftMay 06, 2016
iOS Dev Nugget 186 Injection for XcodeApr 02, 2016
iOS Dev Nugget 182 Tracking the swift-evolution Git RepositoryMar 26, 2016
iOS Dev Nugget 181 Swift SelectorsMar 21, 2016
iOS Dev Nugget 180 Low Power ModeJan 27, 2016
iOS Dev Nugget 172 Print App Document PathDec 30, 2015
iOS Dev Nugget 168 Using Blocks to Manage ContextsOct 20, 2015
iOS Dev Nugget 158 Checking if Newer APIs Are Available In Older iOS Versions (II)Aug 17, 2015
iOS Dev Nugget 149 Timepiece, a Swift Library for Handling DatesJul 05, 2015
iOS Dev Nugget 143 Don't Forget SQLiteJul 01, 2015
iOS Dev Nugget 142 Grand Central DispatchJun 22, 2015
iOS Dev Nugget 141 Great Swift Standard Library Examples Covered in Playground (Swift 2.0)Jun 01, 2015
iOS Dev Nugget 138 Interoperability: Using Enumerations Defined In Objective-C from SwiftMay 27, 2015
iOS Dev Nugget 137 Named Tuple ElementsMay 19, 2015
iOS Dev Nugget 136 Auto Layout with CartographyMay 13, 2015
iOS Dev Nugget 135 CAShapeLayer, Animated Views and XCPShowView()Apr 29, 2015
iOS Dev Nugget 133 Dollar.swiftApr 22, 2015
iOS Dev Nugget 132 XCPCaptureValue in Swift PlaygroundsApr 14, 2015
iOS Dev Nugget 131 Running Asynchronous Code in Swift PlaygroundsApr 03, 2015
iOS Dev Nugget 129 Browsing the Swift Standard LibraryFeb 27, 2015
iOS Dev Nugget 124 performSelector:withObject:afterDelay: in SwiftFeb 20, 2015
iOS Dev Nugget 123 Using dynamicType in SwiftJan 02, 2015
iOS Dev Nugget 116 method() is unavailable: use object construction Class()
Sep 06, 2017 by Hwee-Boon Yar
iOS 11 introduces a new class SFAuthenticationSession which supports Single Sign On (SSO) securely.
It's simple to use!
NSURL* url = [NSURL URLWithString:@"https://the_url_end_point_for_authentication_with_tokens_etc"];
[[SFAuthenticationSession alloc] initWithURL:url callbackURLScheme:nil completionHandler:^(NSURL *callbackURL, NSError *error) {
    //Inspect callbackURL to get the access tokens, etc for the login session
}];
A major benefit of using SFAuthenticationSession is that it runs in a separate process so the user can be confident that the app does not have a way to sniff the password. This is very useful for login protocols such as OAuth or SSO across multiple related applications.
Like this post? Follow me @hboon on Twitter.
Aug 30, 2017 by Hwee-Boon Yar
One of the easiest ways to start hunting down memory leaks is to see if a view controller is not being deallocated. Most common reason being an object stored in an instance variable is (in)directly holding a reference the view controller.
Here's a tip I picked up from @0xced:
Create an Xcode symbolic breakpoint and set the following values:
Symbol: -[UIViewController dealloc]- Add an
Action: Log Message
- Action value:
--- dealloc @(id)[$arg1 description]@ @(id)[$arg1 title]@
- Add another
Action: Sound
Sound: Choose a sound
If you pop or dismiss a view controller and don't hear the sound, there's a leak.
Thanks @0xced!
Like this post? Follow me @hboon on Twitter.
Related
Oct 06, 2018
iOS Dev Nugget 312 Fix Distorted Launch Screens with Hotspot BarSep 22, 2018
iOS Dev Nugget 310 Weak Reference Wrapper ClassSep 15, 2018
iOS Dev Nugget 309 Rule of Thumb Regarding self.Aug 02, 2018
iOS Dev Nugget 303 Use Enums for StatesJul 08, 2018
iOS Dev Nugget 299 CurryingJul 01, 2018
iOS Dev Nugget 298 Conditional BreakpointsJun 24, 2018
iOS Dev Nugget 297 Defensive Checks for Asynchronous CallsApr 27, 2018
iOS Dev Nugget 289 Set Background Color for UIWebView to Match App While Still Loading DocumentsApr 22, 2018
iOS Dev Nugget 288 Use the .custom UIButton type to Fix Flashing when Title is ChangedApr 07, 2018
iOS Dev Nugget 286 Use Auto Layout for Bottom BarMar 22, 2018
iOS Dev Nugget 284 Use Shell Aliases for Git commandsMar 08, 2018
iOS Dev Nugget 282 Update to My Git no-commit Pre-commit HookFeb 15, 2018
iOS Dev Nugget 279 Reclaim Disk Space by Deleting Old SimulatorsJan 31, 2018
iOS Dev Nugget 277 REPL in LLDBJan 24, 2018
iOS Dev Nugget 276 Adding an Indent Default Parameter When Logging Calls in Object HierarchiesJan 18, 2018
iOS Dev Nugget 275 Implementing UIView draw(_:)Dec 28, 2017
iOS Dev Nugget 272 Namespacing using EnumsDec 14, 2017
iOS Dev Nugget 270 Using lazy properties to workaround initializing dependent non-optional propertiesNov 30, 2017
iOS Dev Nugget 268 Using Blocks for Delegate MethodsNov 15, 2017
iOS Dev Nugget 266 Play a System Sound for Simple Untethered DebuggingNov 02, 2017
iOS Dev Nugget 265 value type cannot have a stored property that recursively contains itNov 01, 2017
iOS Dev Nugget 264 Track how long a function takes to run and report progressSep 27, 2017
iOS Dev Nugget 259 CAShapeLayer, UIBezierPath and UIRectCornerAug 10, 2017
iOS Dev Nugget 252 A Little Trick to Write Loosely Coupled View ControllersJul 11, 2017
iOS Dev Nugget 248 In-app Native RoutingJun 21, 2017
iOS Dev Nugget 245 Show Call HierarchyJun 14, 2017
iOS Dev Nugget 244 IteratorProtocolMay 03, 2017
iOS Dev Nugget 238 Keep Code in Method at the Same Level of AbstractionMar 29, 2017
iOS Dev Nugget 233 Separating View Controllers and Their ViewsMar 08, 2017
iOS Dev Nugget 230 Shortcut to Generate Quick Help DocumentationFeb 03, 2017
iOS Dev Nugget 225 Contextual Help for Xcode Build SettingsJan 12, 2017
iOS Dev Nugget 222 Uniquely Identifying User DevicesDec 29, 2016
iOS Dev Nugget 220 Don't Download Xcode from the Mac App StoreNov 08, 2016
iOS Dev Nugget 213 Download Your App Data on iOS Device for DebuggingJun 28, 2016
iOS Dev Nugget 194 Debugging CGContextDrawImage: invalid context 0x0Jun 17, 2016
iOS Dev Nugget 192 Download Xcode from Downloads for Apple Developers Website Instead of Mac App StoreMay 26, 2016
iOS Dev Nugget 189 Xcode's Fix All in ScopeMar 12, 2016
iOS Dev Nugget 179 Dragging the Program CounterMar 07, 2016
iOS Dev Nugget 178 Breakpoint Actions for LoggingFeb 03, 2016
iOS Dev Nugget 173 Xcode Package Manager, AlcatrazDec 15, 2015
iOS Dev Nugget 166 @expr import UIKitNov 18, 2015
iOS Dev Nugget 162 Reclaim Disk Space from Xcode Usage
Aug 23, 2017 by Hwee-Boon Yar
Most apps have to work with web APIs. Paw is a HTTP client with a GUI. It lets you set up projects. You can run and inspect API calls and even let it generate Objective-C/Swift code making those API calls for you, which you can copy to your own codebase. I like to use it as a live document. Making API calls with both valid and invalid parameters and inspecting the results.
It's a wonderful tool to make working with APIs easier.
Like this post? Follow me @hboon on Twitter.
Related
Sep 28, 2018
iOS Dev Nugget 311 jqJul 08, 2018
iOS Dev Nugget 299 CurryingJun 01, 2018
iOS Dev Nugget 294 Core Data EditorMar 22, 2018
iOS Dev Nugget 284 Use Shell Aliases for Git commandsDec 20, 2017
iOS Dev Nugget 271 Zhi — Live Reloading Auto Layout Constraints and moreOct 18, 2017
iOS Dev Nugget 262 Apple Device Names APIJul 19, 2017
iOS Dev Nugget 249 App Transport Security Diagnostics with nscurlApr 26, 2017
iOS Dev Nugget 237 mas-cliApr 19, 2017
iOS Dev Nugget 236 Look up Error CodesFeb 22, 2017
iOS Dev Nugget 228 Recording and Playing Back Network CallsFeb 09, 2017
iOS Dev Nugget 226 React NativeDec 22, 2016
iOS Dev Nugget 219 Test Your App with Airplane Mode enabledJul 09, 2016
iOS Dev Nugget 196 Rename Refactoring for Swift CodeJul 06, 2016
iOS Dev Nugget 195 Tools of the TradeMay 06, 2016
iOS Dev Nugget 186 Injection for XcodeMar 21, 2016
iOS Dev Nugget 180 Low Power ModeFeb 03, 2016
iOS Dev Nugget 173 Xcode Package Manager, AlcatrazJan 11, 2016
iOS Dev Nugget 170 HomebrewJan 05, 2016
iOS Dev Nugget 169 fastlane: deliverOct 07, 2015
iOS Dev Nugget 156 -canOpenURL:Sep 23, 2015
iOS Dev Nugget 154 App Transport SecuritySep 07, 2015
iOS Dev Nugget 152 Lossy PNG CompressionAug 07, 2015
iOS Dev Nugget 147 NSRegularExpression and NSDataDetectorJul 16, 2015
iOS Dev Nugget 144 NSURLSession instead of NSURLConnectionMar 06, 2015
iOS Dev Nugget 125 View Debugging in XcodeFeb 13, 2015
iOS Dev Nugget 122 Importing Many Test Photos into iOS Simulator IINov 28, 2014
iOS Dev Nugget 111 iOS Support MatrixOct 24, 2014
iOS Dev Nugget 106 Command Line Access to Developer PortalOct 17, 2014
iOS Dev Nugget 105 Try FLEXSep 12, 2014
iOS Dev Nugget 100 Try RevealSep 05, 2014
iOS Dev Nugget 99 Try PaintCodeAug 15, 2014
iOS Dev Nugget 96 Jack, A Native App For iTunes ConnectJul 04, 2014
iOS Dev Nugget 90 Full-Text Searchable WWDC Video Text TranscriptsApr 04, 2014
iOS Dev Nugget 77 RubyMotion Tutorial For Objective C DevelopersJan 24, 2014
iOS Dev Nugget 67 Simulating a slow cellular network with Network Link Conditioner on iOSJan 17, 2014
iOS Dev Nugget 66 JBChartView for ChartingJan 04, 2014
iOS Dev Nugget 64 Placeholder Views Using PAPlaceholderDec 27, 2013
iOS Dev Nugget 63 Update Your iOS Development ToolboxOct 18, 2013
iOS Dev Nugget 53 Try Kaleidoscope, File Comparison for MacOct 11, 2013
iOS Dev Nugget 52 Set Up Crashlytics For Ad Hoc and App Store Builds OnlyJul 13, 2013
iOS Dev Nugget 39 Use NSCache Instead of NSMutableDictionary When CachingJun 21, 2013
iOS Dev Nugget 36 Use TestFlight for Ad Hoc BuildsMay 11, 2013
iOS Dev Nugget 31 3rd Party Documentation ViewersMar 10, 2013
iOS Dev Nugget 22 Try AppCodeJan 05, 2013
iOS Dev Nugget 14 Charles Web Debugging ProxyDec 28, 2012
iOS Dev Nugget 13 Simulating a slow cellular network with Network Link Conditioner
Aug 17, 2017 by Hwee-Boon Yar
The HTTPS/2-based push provider API introduced in 2015 has a very nice addition — instead of using certificates for push provider authentication, you can also use JSON Web Tokens (JWT).
To use token-based authentication, you need to generate a key [1] in Apple developer member center. Keys/tokens has two benefits over certificates:
- Keys are tied to a developer account, not to a specific app. A token-based connection to the HTTPS/2 API can be used to send push notifications to all your apps.
- Keys don't expire. But you are required to regenerate tokens within the hour.
If you manage your own push provider infrastructure, using tokens can be very helpful.
Refer to Apple doc on Communicating with APNs for details.
[1] It can be slightly confusing. "Key" is actually a certificate too.
Like this post? Follow me @hboon on Twitter.
Aug 10, 2017 by Hwee-Boon Yar
Using in-app routing is a good way to decouple your UI navigation code from your view controllers. It's good to go further and make sure your view controllers don't rely too much on one another. Here's one trick that I have found useful:
When I create a new view controller, I develop and test it by setting my UIWindow instance's rootViewController to an instance of the view controller. e.g.
- (BOOL)application:(UIApplication *)application didFinishLaunchingWithOptions:(NSDictionary *)launchOptions
    //...
    //Comment out actual root view controller
    //self.window.rootViewController = [ActualRootViewController new];
    TheNewViewController* vc = [TheNewViewController new];
    //Set up view controller
    vc.photoId = @"123";
    self.window.rootViewController = vc;
    [self.window makeKeyAndVisible];
    return YES;
}
The first benefit is you can test it immediately when the app launches, making iterations faster. Equally important: it becomes near impossible to write code that is tightly coupled to this new view controller because you are not using it at the actual call site (yet).
Have fun!
Like this post? Follow me @hboon on Twitter.
Related
Oct 06, 2018
iOS Dev Nugget 312 Fix Distorted Launch Screens with Hotspot BarSep 22, 2018
iOS Dev Nugget 310 Weak Reference Wrapper ClassSep 15, 2018
iOS Dev Nugget 309 Rule of Thumb Regarding self.Aug 02, 2018
iOS Dev Nugget 303 Use Enums for StatesJul 08, 2018
iOS Dev Nugget 299 CurryingJun 24, 2018
iOS Dev Nugget 297 Defensive Checks for Asynchronous CallsApr 27, 2018
iOS Dev Nugget 289 Set Background Color for UIWebView to Match App While Still Loading DocumentsApr 22, 2018
iOS Dev Nugget 288 Use the .custom UIButton type to Fix Flashing when Title is ChangedApr 07, 2018
iOS Dev Nugget 286 Use Auto Layout for Bottom BarMar 22, 2018
iOS Dev Nugget 284 Use Shell Aliases for Git commandsMar 08, 2018
iOS Dev Nugget 282 Update to My Git no-commit Pre-commit HookJan 24, 2018
iOS Dev Nugget 276 Adding an Indent Default Parameter When Logging Calls in Object HierarchiesJan 18, 2018
iOS Dev Nugget 275 Implementing UIView draw(_:)Dec 28, 2017
iOS Dev Nugget 272 Namespacing using EnumsDec 14, 2017
iOS Dev Nugget 270 Using lazy properties to workaround initializing dependent non-optional propertiesNov 30, 2017
iOS Dev Nugget 268 Using Blocks for Delegate MethodsNov 02, 2017
iOS Dev Nugget 265 value type cannot have a stored property that recursively contains itNov 01, 2017
iOS Dev Nugget 264 Track how long a function takes to run and report progressSep 27, 2017
iOS Dev Nugget 259 CAShapeLayer, UIBezierPath and UIRectCornerAug 30, 2017
iOS Dev Nugget 255 Symbolic Breakpoint to watch for View Controller DeallocationJul 11, 2017
iOS Dev Nugget 248 In-app Native RoutingJun 14, 2017
iOS Dev Nugget 244 IteratorProtocolMay 03, 2017
iOS Dev Nugget 238 Keep Code in Method at the Same Level of AbstractionMar 29, 2017
iOS Dev Nugget 233 Separating View Controllers and Their ViewsJan 12, 2017
iOS Dev Nugget 222 Uniquely Identifying User Devices
Aug 02, 2017 by Hwee-Boon Yar
During development, I often want to retrieve the view controller that is currently displayed. This is rather vague — it could mean the view controller at the top of the stack of the current UINavigationController, the currently presented view controller, etc. So I wrote this function which figures it out most of the time:
func currentViewController(_ viewController: UIViewController? = UIApplication.shared.keyWindow?.rootViewController) -> UIViewController? {
    guard let viewController = viewController else { return nil }

    if let viewController = viewController as? UINavigationController {
        if let viewController = viewController.visibleViewController {
            return currentViewController(viewController)
        } else {
            return currentViewController(viewController.topViewController)
        }
    } else if let viewController = viewController as? UITabBarController {
        if let viewControllers = viewController.viewControllers, viewControllers.count > 5, viewController.selectedIndex >= 4 {
            return currentViewController(viewController.moreNavigationController)
        } else {
            return currentViewController(viewController.selectedViewController)
        }
    } else if let viewController = viewController.presentedViewController {
        return viewController
    } else if viewController.childViewControllers.count > 0 {
        return viewController.childViewControllers[0]
    } else {
        return viewController
    }
}
Call it with:
currentViewController()
Like this post? Follow me @hboon on Twitter.
Related
Nov 03, 2018
iOS Dev Nugget 314 Checked Array SubscriptingSep 22, 2018
iOS Dev Nugget 310 Weak Reference Wrapper ClassSep 07, 2018
iOS Dev Nugget 308 Careful with early return statements in functions that return voidAug 30, 2018
iOS Dev Nugget 307 Array Out of BoundsAug 23, 2018
iOS Dev Nugget 306 Underscores in Numeric LiteralsAug 02, 2018
iOS Dev Nugget 303 Use Enums for StatesJul 21, 2018
iOS Dev Nugget 301 Print App Document Path IIJul 16, 2018
iOS Dev Nugget 300 Pipe OperatorMay 18, 2018
iOS Dev Nugget 292 for-whereMay 12, 2018
iOS Dev Nugget 291 Implicit Member ExpressionsApr 11, 2018
iOS Dev Nugget 287 Modifying a Property Which is a Struct Triggers didSetNov 02, 2017
iOS Dev Nugget 265 value type cannot have a stored property that recursively contains itSep 13, 2017
iOS Dev Nugget 257 AssertsJun 28, 2017
iOS Dev Nugget 246 Mapping Swift and Obj-C Method NamesJun 14, 2017
iOS Dev Nugget 244 IteratorProtocolMay 24, 2017
iOS Dev Nugget 241 Swift Enums with LabelsMay 17, 2017
iOS Dev Nugget 240 Print an Object's Unique IdentifierMay 03, 2017
iOS Dev Nugget 238 Keep Code in Method at the Same Level of AbstractionApr 05, 2017
iOS Dev Nugget 234 #available and @availableMar 01, 2017
iOS Dev Nugget 229 PromisesJan 25, 2017
iOS Dev Nugget 224 Lazy CollectionsNov 23, 2016
iOS Dev Nugget 215 dump Instead of print for Swift StructsOct 25, 2016
iOS Dev Nugget 211 Higher Order Functions: map, filter, reduceOct 12, 2016
iOS Dev Nugget 209 Swift DeferSep 28, 2016
iOS Dev Nugget 207 Swift Nil-Coalescing OperatorSep 22, 2016
iOS Dev Nugget 206 Date doesRelativeDateFormattingSep 11, 2016
iOS Dev Nugget 205 The Never Return Type in SwiftSep 07, 2016
iOS Dev Nugget 204 Swift @autoclosureSep 02, 2016
iOS Dev Nugget 203 Swift MeasurementAug 24, 2016
iOS Dev Nugget 202 Swift Enumerations to Encode StatesAug 17, 2016
iOS Dev Nugget 201 Swift Pattern MatchingAug 10, 2016
iOS Dev Nugget 200 Swift flatMapAug 05, 2016
iOS Dev Nugget 199 Swift Talk Video SeriesJul 26, 2016
iOS Dev Nugget 198 KZPlaygroundJul 20, 2016
iOS Dev Nugget 197 App Initialization CodeJul 09, 2016
iOS Dev Nugget 196 Rename Refactoring for Swift CodeJun 24, 2016
iOS Dev Nugget 193 Result EnumerationMay 26, 2016
iOS Dev Nugget 189 Xcode's Fix All in ScopeMay 20, 2016
iOS Dev Nugget 188 SwiftLintMay 10, 2016
iOS Dev Nugget 187 Creating a Singleton Class in SwiftMay 06, 2016
iOS Dev Nugget 186 Injection for XcodeApr 27, 2016
iOS Dev Nugget 185 Disabling Content Change Animation in CATextLayerApr 20, 2016
iOS Dev Nugget 184 Async LibraryApr 12, 2016
iOS Dev Nugget 183 Quality of Service ClassesApr 02, 2016
iOS Dev Nugget 182 Tracking the swift-evolution Git RepositoryMar 26, 2016
iOS Dev Nugget 181 Swift SelectorsMar 21, 2016
iOS Dev Nugget 180 Low Power ModeMar 01, 2016
iOS Dev Nugget 177 Push Notifications Testing During DevelopmentFeb 23, 2016
iOS Dev Nugget 176 Git no-commit Pre-commit HookFeb 18, 2016
iOS Dev Nugget 175 Displaying a Popover in iPhone AppFeb 11, 2016
iOS Dev Nugget 174 View Controller Containment to Avoid Growing a Fat View Controller Base ClassJan 27, 2016
iOS Dev Nugget 172 Print App Document PathDec 30, 2015
iOS Dev Nugget 168 Using Blocks to Manage ContextsNov 11, 2015
iOS Dev Nugget 161 Read Smalltalk Best Practice PatternsOct 20, 2015
iOS Dev Nugget 158 Checking if Newer APIs Are Available In Older iOS Versions (II)Aug 17, 2015
iOS Dev Nugget 149 Timepiece, a Swift Library for Handling DatesJul 05, 2015
iOS Dev Nugget 143 Don't Forget SQLiteJul 01, 2015
iOS Dev Nugget 142 Grand Central DispatchJun 22, 2015
iOS Dev Nugget 141 Great Swift Standard Library Examples Covered in Playground (Swift 2.0)Jun 01, 2015
iOS Dev Nugget 138 Interoperability: Using Enumerations Defined In Objective-C from SwiftMay 27, 2015
iOS Dev Nugget 137 Named Tuple ElementsMay 19, 2015
iOS Dev Nugget 136 Auto Layout with CartographyMay 13, 2015
iOS Dev Nugget 135 CAShapeLayer, Animated Views and XCPShowView()Apr 29, 2015
iOS Dev Nugget 133 Dollar.swiftApr 22, 2015
iOS Dev Nugget 132 XCPCaptureValue in Swift PlaygroundsApr 14, 2015
iOS Dev Nugget 131 Running Asynchronous Code in Swift PlaygroundsApr 03, 2015
iOS Dev Nugget 129 Browsing the Swift Standard LibraryFeb 27, 2015
iOS Dev Nugget 124 performSelector:withObject:afterDelay: in SwiftFeb 20, 2015
iOS Dev Nugget 123 Using dynamicType in SwiftJan 02, 2015
iOS Dev Nugget 116 method() is unavailable: use object construction Class()
Jul 26, 2017 by Hwee-Boon Yar
There's a great technote from Apple that collects many useful pieces of information about Push Notifications in a single place.
Eg. ports used for push:
- 2195 for binary provider API
- 443 for HTTP/2 provider API
- 5223 and 443 for devices receiving push
- 80 inbound + outbound for OS X
That the entire 17.0.0.0/8 address block is assigned to Apple (useful for firewall rules)
and how to reset the push notification permissions alert on iOS:
The first time a push-enabled app registers for push notifications, iOS asks the user if they wish to receive notifications for that app. Once the user has responded to this alert it is not presented again unless the device is restored or the app has been uninstalled for at least a day.
If you want to simulate a first-time run of your app, you can leave the app uninstalled for a day. You can achieve the latter without actually waiting a day by following these steps:
- Delete your app from the device.
- Turn the device off completely and turn it back on.
- Go to Settings > General > Date & Time and set the date ahead a day or more.
- Turn the device off completely again and turn it back on.
Like this post? Follow me @hboon on Twitter.
Jul 19, 2017 by Hwee-Boon Yar
Supporting App Transport Security is important. But not all the keys are obvious.
Here's where nscurl comes in. Mentioned in the same page above, running nscurl --ats-diagnostics --verbose <URL> shows you diagnostics output which will help you determine which keys and values you need to specify for ATS. e.g.:
Default ATS Secure Connection
---
ATS Default Connection
ATS Dictionary:
{
}
Result : PASS
---

================================================================================

Allowing Arbitrary Loads

---
Allow All Loads
ATS Dictionary:
{
    NSAllowsArbitraryLoads = true;
}
Result : PASS
---

================================================================================

Configuring TLS exceptions for httpbin.org

---
TLSv1.2
ATS Dictionary:
{
    NSExceptionDomains =     {
        "httpbin.org" =         {
            NSExceptionMinimumTLSVersion = "TLSv1.2";
        };
    };
}
Result : PASS
Like this post? Follow me @hboon on Twitter.
Related
Aug 08, 2018
iOS Dev Nugget 304 CodeRunnerNov 22, 2017
iOS Dev Nugget 267 Touch ID with sudoAug 23, 2017
iOS Dev Nugget 254 Paw, for Working with APIsMar 15, 2017
iOS Dev Nugget 231 WhatTheFontFeb 22, 2017
iOS Dev Nugget 228 Recording and Playing Back Network CallsJan 19, 2017
iOS Dev Nugget 223 Moving Your Cursor in TerminalJan 05, 2017
iOS Dev Nugget 221 macOS No Longer Remembers Your SSH PassphrasesDec 22, 2016
iOS Dev Nugget 219 Test Your App with Airplane Mode enabledMar 21, 2016
iOS Dev Nugget 180 Low Power ModeJan 11, 2016
iOS Dev Nugget 170 HomebrewDec 09, 2015
iOS Dev Nugget 165 Copy and Paste from ShellOct 07, 2015
iOS Dev Nugget 156 -canOpenURL:Sep 23, 2015
iOS Dev Nugget 154 App Transport SecurityJul 16, 2015
iOS Dev Nugget 144 NSURLSession instead of NSURLConnectionJan 24, 2014
iOS Dev Nugget 67 Simulating a slow cellular network with Network Link Conditioner on iOSJul 13, 2013
iOS Dev Nugget 39 Use NSCache Instead of NSMutableDictionary When CachingJan 05, 2013
iOS Dev Nugget 14 Charles Web Debugging ProxyDec 28, 2012
iOS Dev Nugget 13 Simulating a slow cellular network with Network Link Conditioner
Jul 11, 2017 by Hwee-Boon Yar
While shipping an app in a timely manner should be our top priority, writing well structured code is critical for maintaining and improving your app in the long run. One way to do this is to decouple UI navigation code from your view controllers via a router, so your view controllers know less about each other.
routable-ios by @clayallsopp is a good library for this.
You set up the router in a centralized location, e.g. in your app delegate:
- (BOOL)application:(UIApplication *)application didFinishLaunchingWithOptions:(NSDictionary *)launchOptions {
    UINavigationController* nc = [[UINavigationController alloc] initWithRootViewController:[SomeViewController new]];
    self.window = [[UIWindow alloc] initWithFrame:[[UIScreen mainScreen] bounds]];
    self.window.rootViewController = nc;
    [self.window makeKeyAndVisible];

    [[Routable sharedRouter] map:@"users/:username" toController:[UserViewController class]];
    [[Routable sharedRouter] map:@"places/:id" toController:[PlaceViewController class]];
    [[Routable sharedRouter] setNavigationController:nc];
}
Instead of writing code like this to display a user:
- (void)openUserWithUsername:(NSString*)aString {
    UserViewController* vc = [UserViewController new]
    vc.username = aString;
    //Or worse, you may need to figure if you have a navigation controller here
    [self.navigationController pushViewController:vc animated:YES];
}
You do this, without coupling the current view controller to UserViewController:
- (void)openUserWithUsername:(NSString*)aString {
    NSString* url = [NSString stringWithFormat:@"users/%@", aString];
    [[Routable sharedRouter] open:url];
}
UserViewController needs to implement -initWithRouterParams: to accept the routing argument(s):
- (id)initWithRouterParams:(NSDictionary*)params {
    if ((self = [self initWithNibName:nil bundle:nil])) {
        self.username = [params objectForKey:@"username"];
    }
    return self;
}
There are a few more options listed in the README.
You can install it using CocoaPods.
Like this post? Follow me @hboon on Twitter.
Related
Oct 06, 2018
iOS Dev Nugget 312 Fix Distorted Launch Screens with Hotspot BarSep 22, 2018
iOS Dev Nugget 310 Weak Reference Wrapper ClassSep 15, 2018
iOS Dev Nugget 309 Rule of Thumb Regarding self.Aug 15, 2018
iOS Dev Nugget 305 Declaring Distinct Types from General TypesAug 02, 2018
iOS Dev Nugget 303 Use Enums for StatesJul 24, 2018
iOS Dev Nugget 302 RealmJul 08, 2018
iOS Dev Nugget 299 CurryingJun 24, 2018
iOS Dev Nugget 297 Defensive Checks for Asynchronous CallsJun 09, 2018
iOS Dev Nugget 295 SwifterSwiftMay 23, 2018
iOS Dev Nugget 293 iOSSnapshotTestCase (was FBSnapshotTestCase)Apr 27, 2018
iOS Dev Nugget 289 Set Background Color for UIWebView to Match App While Still Loading DocumentsApr 22, 2018
iOS Dev Nugget 288 Use the .custom UIButton type to Fix Flashing when Title is ChangedApr 07, 2018
iOS Dev Nugget 286 Use Auto Layout for Bottom BarMar 22, 2018
iOS Dev Nugget 284 Use Shell Aliases for Git commandsMar 15, 2018
iOS Dev Nugget 283 Eureka for FormsMar 08, 2018
iOS Dev Nugget 282 Update to My Git no-commit Pre-commit HookFeb 28, 2018
iOS Dev Nugget 281 Use R.swift for Static References to Resources Like ImagesFeb 21, 2018
iOS Dev Nugget 280 Using Custom Fonts Without Updating Info.plist ManuallyJan 24, 2018
iOS Dev Nugget 276 Adding an Indent Default Parameter When Logging Calls in Object HierarchiesJan 18, 2018
iOS Dev Nugget 275 Implementing UIView draw(_:)Dec 28, 2017
iOS Dev Nugget 272 Namespacing using EnumsDec 14, 2017
iOS Dev Nugget 270 Using lazy properties to workaround initializing dependent non-optional propertiesDec 06, 2017
iOS Dev Nugget 269 Including Finger Touches in App Preview VideosNov 30, 2017
iOS Dev Nugget 268 Using Blocks for Delegate MethodsNov 02, 2017
iOS Dev Nugget 265 value type cannot have a stored property that recursively contains itNov 01, 2017
iOS Dev Nugget 264 Track how long a function takes to run and report progressSep 27, 2017
iOS Dev Nugget 259 CAShapeLayer, UIBezierPath and UIRectCornerAug 30, 2017
iOS Dev Nugget 255 Symbolic Breakpoint to watch for View Controller DeallocationAug 10, 2017
iOS Dev Nugget 252 A Little Trick to Write Loosely Coupled View ControllersJun 14, 2017
iOS Dev Nugget 244 IteratorProtocolMay 03, 2017
iOS Dev Nugget 238 Keep Code in Method at the Same Level of AbstractionMar 29, 2017
iOS Dev Nugget 233 Separating View Controllers and Their ViewsMar 01, 2017
iOS Dev Nugget 229 PromisesFeb 22, 2017
iOS Dev Nugget 228 Recording and Playing Back Network CallsJan 12, 2017
iOS Dev Nugget 222 Uniquely Identifying User DevicesOct 23, 2016
iOS Dev Nugget 210 PMAlertControllerJun 03, 2016
iOS Dev Nugget 190 Quick Look Plug-in for Mobile Provisioning FilesMay 20, 2016
iOS Dev Nugget 188 SwiftLintApr 20, 2016
iOS Dev Nugget 184 Async LibraryAug 31, 2015
iOS Dev Nugget 151 More Wrappers for Keychain AccessAug 17, 2015
iOS Dev Nugget 149 Timepiece, a Swift Library for Handling DatesJul 27, 2015
iOS Dev Nugget 146 UIStackView and TZStackViewJul 21, 2015
iOS Dev Nugget 145 Listing Available FontsJul 05, 2015
iOS Dev Nugget 143 Don't Forget SQLiteJun 09, 2015
iOS Dev Nugget 139 Custom Build Configurations and Xcode SubprojectsMay 19, 2015
iOS Dev Nugget 136 Auto Layout with CartographyApr 29, 2015
iOS Dev Nugget 133 Dollar.swiftFeb 06, 2015
iOS Dev Nugget 121 InflectorKitDec 26, 2014
iOS Dev Nugget 115 Displaying Information in Settings AppDec 19, 2014
iOS Dev Nugget 114 Preview an Image for DebuggingDec 12, 2014
iOS Dev Nugget 113 GPUImage, a GPU-based Image and Video Processing FrameworkMay 30, 2014
iOS Dev Nugget 85 A More Customizable Button For Different StatesMay 02, 2014
iOS Dev Nugget 81 TMCache For In-Memory and Disk-backed CachingApr 18, 2014
iOS Dev Nugget 79 TweetBot Photo Flicking EffectMar 07, 2014
iOS Dev Nugget 73 Open Source Date Picker from SquareFeb 22, 2014
iOS Dev Nugget 71 TapJan 31, 2014
iOS Dev Nugget 68 Custom URL Schemes DirectoryDec 20, 2013
iOS Dev Nugget 62 Using PDF Instead of PNG Files for Resizable AssetsSep 20, 2013
iOS Dev Nugget 49 Wrapper to Get UIColor ComponentsMay 17, 2013
iOS Dev Nugget 32 FMDB: Thin Objective C Wrapper Around SQLiteOct 06, 2012
iOS Dev Nugget 1 Easy logging of values and objects
Jul 05, 2017 by Hwee-Boon Yar
Sometimes an ASCII table comes in handy. You have one right at your fingertips. Type in a shell:
man ascii
I picked up this tip from @captainsafia. Thanks Safia!
Update: I fixed a few typos in the code for issue #246. Check the updated version in the archives.
Like this post? Follow me @hboon on Twitter.
Jun 28, 2017 by Hwee-Boon Yar
If you have been writing Obj-C for a while, you should know that it is a good idea to prefix method names of methods what you define a class extension. eg.
@interface UIViewController (MyViewControllerExtension)

- (void)rsConstraintHeightTo:(CGFloat)height;

@end
Naturally, this gets translated to the following when you call the method in Swift:
rsConstraintHeight(to: 10.0);
What if you wanted to write this:
constraint(height: 10.0);
You can do it by changing your Obj-C declaration to use the NS_SWIFT_NAME macro:
@interface UIViewController (MyViewControllerExtension)

- (void)rsConstraintHeightTo:(CGFloat)height NS_SWIFT_NAME(constraint(height:));

@end
Notice that you can map both the method name and the argument.
Similarly, when you expose a method written in Swift to Obj-C, you can map the method name by including the desired method name with the @objc attribute:
//Instead of just @objc, use:
@objc(rsFoo)
func foo() {}
Then in Obj-C:
[self rsFoo];
This can also be used for mapping enum values from Obj-C to Swift. Refer to the docs under Overriding Swift Names for Objective-C Interfaces for more details.
I picked up this tip from Michel Fortin. Thanks Michel!
Like this post? Follow me @hboon on Twitter.
Related
Nov 03, 2018
iOS Dev Nugget 314 Checked Array SubscriptingSep 22, 2018
iOS Dev Nugget 310 Weak Reference Wrapper ClassSep 07, 2018
iOS Dev Nugget 308 Careful with early return statements in functions that return voidAug 30, 2018
iOS Dev Nugget 307 Array Out of BoundsAug 23, 2018
iOS Dev Nugget 306 Underscores in Numeric LiteralsAug 02, 2018
iOS Dev Nugget 303 Use Enums for StatesJul 21, 2018
iOS Dev Nugget 301 Print App Document Path IIJul 16, 2018
iOS Dev Nugget 300 Pipe OperatorMay 18, 2018
iOS Dev Nugget 292 for-whereMay 12, 2018
iOS Dev Nugget 291 Implicit Member ExpressionsApr 11, 2018
iOS Dev Nugget 287 Modifying a Property Which is a Struct Triggers didSetFeb 07, 2018
iOS Dev Nugget 278 Type Inference for Objective-CNov 02, 2017
iOS Dev Nugget 265 value type cannot have a stored property that recursively contains itSep 13, 2017
iOS Dev Nugget 257 AssertsAug 02, 2017
iOS Dev Nugget 251 Retrieving the Current View ControllerJun 14, 2017
iOS Dev Nugget 244 IteratorProtocolMay 24, 2017
iOS Dev Nugget 241 Swift Enums with LabelsMay 17, 2017
iOS Dev Nugget 240 Print an Object's Unique IdentifierApr 05, 2017
iOS Dev Nugget 234 #available and @availableNov 23, 2016
iOS Dev Nugget 215 dump Instead of print for Swift StructsOct 25, 2016
iOS Dev Nugget 211 Higher Order Functions: map, filter, reduceOct 12, 2016
iOS Dev Nugget 209 Swift DeferSep 28, 2016
iOS Dev Nugget 207 Swift Nil-Coalescing OperatorSep 22, 2016
iOS Dev Nugget 206 Date doesRelativeDateFormattingSep 11, 2016
iOS Dev Nugget 205 The Never Return Type in SwiftSep 07, 2016
iOS Dev Nugget 204 Swift @autoclosureSep 02, 2016
iOS Dev Nugget 203 Swift MeasurementAug 24, 2016
iOS Dev Nugget 202 Swift Enumerations to Encode StatesAug 17, 2016
iOS Dev Nugget 201 Swift Pattern MatchingAug 10, 2016
iOS Dev Nugget 200 Swift flatMapAug 05, 2016
iOS Dev Nugget 199 Swift Talk Video SeriesJul 26, 2016
iOS Dev Nugget 198 KZPlaygroundJul 20, 2016
iOS Dev Nugget 197 App Initialization CodeJul 09, 2016
iOS Dev Nugget 196 Rename Refactoring for Swift CodeJun 24, 2016
iOS Dev Nugget 193 Result EnumerationMay 20, 2016
iOS Dev Nugget 188 SwiftLintMay 10, 2016
iOS Dev Nugget 187 Creating a Singleton Class in SwiftMay 06, 2016
iOS Dev Nugget 186 Injection for XcodeApr 02, 2016
iOS Dev Nugget 182 Tracking the swift-evolution Git RepositoryMar 26, 2016
iOS Dev Nugget 181 Swift SelectorsMar 21, 2016
iOS Dev Nugget 180 Low Power ModeJan 27, 2016
iOS Dev Nugget 172 Print App Document PathDec 30, 2015
iOS Dev Nugget 168 Using Blocks to Manage ContextsOct 20, 2015
iOS Dev Nugget 158 Checking if Newer APIs Are Available In Older iOS Versions (II)Aug 17, 2015
iOS Dev Nugget 149 Timepiece, a Swift Library for Handling DatesJul 05, 2015
iOS Dev Nugget 143 Don't Forget SQLiteJul 01, 2015
iOS Dev Nugget 142 Grand Central DispatchJun 22, 2015
iOS Dev Nugget 141 Great Swift Standard Library Examples Covered in Playground (Swift 2.0)Jun 01, 2015
iOS Dev Nugget 138 Interoperability: Using Enumerations Defined In Objective-C from SwiftMay 27, 2015
iOS Dev Nugget 137 Named Tuple ElementsMay 19, 2015
iOS Dev Nugget 136 Auto Layout with CartographyMay 13, 2015
iOS Dev Nugget 135 CAShapeLayer, Animated Views and XCPShowView()Apr 29, 2015
iOS Dev Nugget 133 Dollar.swiftApr 22, 2015
iOS Dev Nugget 132 XCPCaptureValue in Swift PlaygroundsApr 14, 2015
iOS Dev Nugget 131 Running Asynchronous Code in Swift PlaygroundsApr 03, 2015
iOS Dev Nugget 129 Browsing the Swift Standard LibraryFeb 27, 2015
iOS Dev Nugget 124 performSelector:withObject:afterDelay: in SwiftFeb 20, 2015
iOS Dev Nugget 123 Using dynamicType in SwiftJan 02, 2015
iOS Dev Nugget 116 method() is unavailable: use object construction Class()
Jun 21, 2017 by Hwee-Boon Yar
There's a handy little tool in Xcode hidden in the Find menu called Find Call Hierarchy. When invoked (shortcut keys: Ctrl-shift-cmd-h), it displays the call hierarchies for the method under the cursor.
There are often false positives, but it's still very useful.
Like this post? Follow me @hboon on Twitter.
Related
Jul 01, 2018
iOS Dev Nugget 298 Conditional BreakpointsFeb 15, 2018
iOS Dev Nugget 279 Reclaim Disk Space by Deleting Old SimulatorsJan 31, 2018
iOS Dev Nugget 277 REPL in LLDBAug 30, 2017
iOS Dev Nugget 255 Symbolic Breakpoint to watch for View Controller DeallocationMar 08, 2017
iOS Dev Nugget 230 Shortcut to Generate Quick Help DocumentationFeb 03, 2017
iOS Dev Nugget 225 Contextual Help for Xcode Build SettingsDec 29, 2016
iOS Dev Nugget 220 Don't Download Xcode from the Mac App StoreNov 08, 2016
iOS Dev Nugget 213 Download Your App Data on iOS Device for DebuggingJun 17, 2016
iOS Dev Nugget 192 Download Xcode from Downloads for Apple Developers Website Instead of Mac App StoreMay 26, 2016
iOS Dev Nugget 189 Xcode's Fix All in ScopeMar 12, 2016
iOS Dev Nugget 179 Dragging the Program CounterMar 07, 2016
iOS Dev Nugget 178 Breakpoint Actions for LoggingFeb 03, 2016
iOS Dev Nugget 173 Xcode Package Manager, AlcatrazNov 18, 2015
iOS Dev Nugget 162 Reclaim Disk Space from Xcode Usage
Jun 14, 2017 by Hwee-Boon Yar
When we write a for-in loop like this:
for each in someCollection {
    //...
}
Swift calls the makeIterator() method on the collection and then make repeated calls next() on the result until it returns nil.
The object returned by the makeIterator() is of a type that conforms to the IteratorProtocol protocol.
You can make use of IteratorProtocol directly. For example, if you might a list of values and you want to be able to pick the next value from the list and perform an action with it. You could implement this using list-like collection, often a FIFO queue. Alternatively, with iterators:
var i = [1, 2, 3].makeIterator()
i.next() //1
i.next() //2
i.next() //3
i.next() //nil, we are done
Have fun!
Like this post? Follow me @hboon on Twitter.
Related
Nov 03, 2018
iOS Dev Nugget 314 Checked Array SubscriptingOct 06, 2018
iOS Dev Nugget 312 Fix Distorted Launch Screens with Hotspot BarSep 22, 2018
iOS Dev Nugget 310 Weak Reference Wrapper ClassSep 15, 2018
iOS Dev Nugget 309 Rule of Thumb Regarding self.Sep 07, 2018
iOS Dev Nugget 308 Careful with early return statements in functions that return voidAug 30, 2018
iOS Dev Nugget 307 Array Out of BoundsAug 23, 2018
iOS Dev Nugget 306 Underscores in Numeric LiteralsAug 02, 2018
iOS Dev Nugget 303 Use Enums for StatesJul 21, 2018
iOS Dev Nugget 301 Print App Document Path IIJul 16, 2018
iOS Dev Nugget 300 Pipe OperatorJul 08, 2018
iOS Dev Nugget 299 CurryingJun 24, 2018
iOS Dev Nugget 297 Defensive Checks for Asynchronous CallsMay 18, 2018
iOS Dev Nugget 292 for-whereMay 12, 2018
iOS Dev Nugget 291 Implicit Member ExpressionsApr 27, 2018
iOS Dev Nugget 289 Set Background Color for UIWebView to Match App While Still Loading DocumentsApr 22, 2018
iOS Dev Nugget 288 Use the .custom UIButton type to Fix Flashing when Title is ChangedApr 11, 2018
iOS Dev Nugget 287 Modifying a Property Which is a Struct Triggers didSetApr 07, 2018
iOS Dev Nugget 286 Use Auto Layout for Bottom BarMar 22, 2018
iOS Dev Nugget 284 Use Shell Aliases for Git commandsMar 08, 2018
iOS Dev Nugget 282 Update to My Git no-commit Pre-commit HookJan 24, 2018
iOS Dev Nugget 276 Adding an Indent Default Parameter When Logging Calls in Object HierarchiesJan 18, 2018
iOS Dev Nugget 275 Implementing UIView draw(_:)Dec 28, 2017
iOS Dev Nugget 272 Namespacing using EnumsDec 14, 2017
iOS Dev Nugget 270 Using lazy properties to workaround initializing dependent non-optional propertiesNov 30, 2017
iOS Dev Nugget 268 Using Blocks for Delegate MethodsNov 02, 2017
iOS Dev Nugget 265 value type cannot have a stored property that recursively contains itNov 01, 2017
iOS Dev Nugget 264 Track how long a function takes to run and report progressSep 27, 2017
iOS Dev Nugget 259 CAShapeLayer, UIBezierPath and UIRectCornerSep 13, 2017
iOS Dev Nugget 257 AssertsAug 30, 2017
iOS Dev Nugget 255 Symbolic Breakpoint to watch for View Controller DeallocationAug 10, 2017
iOS Dev Nugget 252 A Little Trick to Write Loosely Coupled View ControllersAug 02, 2017
iOS Dev Nugget 251 Retrieving the Current View ControllerJul 11, 2017
iOS Dev Nugget 248 In-app Native RoutingJun 28, 2017
iOS Dev Nugget 246 Mapping Swift and Obj-C Method NamesMay 24, 2017
iOS Dev Nugget 241 Swift Enums with LabelsMay 17, 2017
iOS Dev Nugget 240 Print an Object's Unique IdentifierMay 03, 2017
iOS Dev Nugget 238 Keep Code in Method at the Same Level of AbstractionApr 05, 2017
iOS Dev Nugget 234 #available and @availableMar 29, 2017
iOS Dev Nugget 233 Separating View Controllers and Their ViewsJan 12, 2017
iOS Dev Nugget 222 Uniquely Identifying User DevicesNov 23, 2016
iOS Dev Nugget 215 dump Instead of print for Swift StructsOct 25, 2016
iOS Dev Nugget 211 Higher Order Functions: map, filter, reduceOct 12, 2016
iOS Dev Nugget 209 Swift DeferSep 28, 2016
iOS Dev Nugget 207 Swift Nil-Coalescing OperatorSep 22, 2016
iOS Dev Nugget 206 Date doesRelativeDateFormattingSep 11, 2016
iOS Dev Nugget 205 The Never Return Type in SwiftSep 07, 2016
iOS Dev Nugget 204 Swift @autoclosureSep 02, 2016
iOS Dev Nugget 203 Swift MeasurementAug 24, 2016
iOS Dev Nugget 202 Swift Enumerations to Encode StatesAug 17, 2016
iOS Dev Nugget 201 Swift Pattern MatchingAug 10, 2016
iOS Dev Nugget 200 Swift flatMapAug 05, 2016
iOS Dev Nugget 199 Swift Talk Video SeriesJul 26, 2016
iOS Dev Nugget 198 KZPlaygroundJul 20, 2016
iOS Dev Nugget 197 App Initialization CodeJul 09, 2016
iOS Dev Nugget 196 Rename Refactoring for Swift CodeJun 24, 2016
iOS Dev Nugget 193 Result EnumerationMay 20, 2016
iOS Dev Nugget 188 SwiftLintMay 10, 2016
iOS Dev Nugget 187 Creating a Singleton Class in SwiftMay 06, 2016
iOS Dev Nugget 186 Injection for XcodeApr 02, 2016
iOS Dev Nugget 182 Tracking the swift-evolution Git RepositoryMar 26, 2016
iOS Dev Nugget 181 Swift SelectorsMar 21, 2016
iOS Dev Nugget 180 Low Power ModeJan 27, 2016
iOS Dev Nugget 172 Print App Document PathDec 30, 2015
iOS Dev Nugget 168 Using Blocks to Manage ContextsOct 20, 2015
iOS Dev Nugget 158 Checking if Newer APIs Are Available In Older iOS Versions (II)Aug 17, 2015
iOS Dev Nugget 149 Timepiece, a Swift Library for Handling DatesJul 05, 2015
iOS Dev Nugget 143 Don't Forget SQLiteJul 01, 2015
iOS Dev Nugget 142 Grand Central DispatchJun 22, 2015
iOS Dev Nugget 141 Great Swift Standard Library Examples Covered in Playground (Swift 2.0)Jun 01, 2015
iOS Dev Nugget 138 Interoperability: Using Enumerations Defined In Objective-C from SwiftMay 27, 2015
iOS Dev Nugget 137 Named Tuple ElementsMay 19, 2015
iOS Dev Nugget 136 Auto Layout with CartographyMay 13, 2015
iOS Dev Nugget 135 CAShapeLayer, Animated Views and XCPShowView()Apr 29, 2015
iOS Dev Nugget 133 Dollar.swiftApr 22, 2015
iOS Dev Nugget 132 XCPCaptureValue in Swift PlaygroundsApr 14, 2015
iOS Dev Nugget 131 Running Asynchronous Code in Swift PlaygroundsApr 03, 2015
iOS Dev Nugget 129 Browsing the Swift Standard LibraryFeb 27, 2015
iOS Dev Nugget 124 performSelector:withObject:afterDelay: in SwiftFeb 20, 2015
iOS Dev Nugget 123 Using dynamicType in SwiftJan 02, 2015
iOS Dev Nugget 116 method() is unavailable: use object construction Class()
Jun 07, 2017 by Hwee-Boon Yar
Sometimes you put a delayed operation being a flag which you can clear to cancel. It might look like this:
- (void)primeOperation {
    self.flag = YES;
    dispatch_after(dispatch_time(DISPATCH_TIME_NOW, someTimeInSecs * NSEC_PER_SEC), dispatch_get_main_queue(), ^() {
        if (self.flag) {
            self.flag = NO;
            //do something
        }
    });
}
But the problem with this approach is after if you clear the flag and set up the operation again soon enough, you will end up with running that operation twice:
- (void)doSomething {
    [self primeOperation];
    self.flag = NO;
    [self primeOperation];
}
One of the ways to work around this is to create an NSOperation subclass.
Alternatively, you can create a lightweight class that wraps around a BOOL:
@interface BoolWrapper: NSObject

@property(nonatomic) BOOL state;
+ (instancetype)wrapperWithBool:(BOOL)state;

@end

@implementation BoolWrapper

+ (instancetype)wrapperWithBool:(BOOL)state {
    BoolWrapper* result = [self new];
    result.state = state;
    return result;
}

@end
You can change your code so that flag is now an instance of BoolWrapper:
- (void)primeOperation {
    self.flag = [BoolWrapper wrapperWithBool:YES];
    BoolWrapper* previousFlag = self.flag;
    dispatch_after(dispatch_time(DISPATCH_TIME_NOW, someTimeInSecs * NSEC_PER_SEC), dispatch_get_main_queue(), ^() {
        if (self.flag == previousFlag && self.flag.state) {
            self.flag = [BoolWrapper wrapperWithBool:NO];
            //do something
        }
    });
}
This will now work since the identity check self.flag == previousFlag takes care that we are referring to the same "operation".
Like this post? Follow me @hboon on Twitter.
May 31, 2017 by Hwee-Boon Yar
2 tips today, but about Finder.app rather than iOS app development :)
-
If you hit F5 in Finder, the last item in the current directory will be selected and Finder will scroll to it. This should work with most function keys, but it seems like all of them will beep except F5. This selection and scrolling behavior puzzled me for years until it was explained to me: it's just Finder searching for a match alphabetically. If no match is found, it selects the last item and scrolls to it.
-
Hit cmd+shift+. to show hidden files in Finder.
Like this post? Follow me @hboon on Twitter.
May 24, 2017 by Hwee-Boon Yar
I like to use Swift enums to encode states and operations related to them since Swift enums are types that can have methods attached to them. I learnt one thing about enums recently, that enums with associated values can have labels. The Swift Programming Language book doesn't seem to mention this.
Eg. You have might an enum called Feeling with 3 cases.
enum Feeling {
    case happy(String, Int)
    case normal
    case unhappy(String, Int)
}

let theFeels1 = Feeling.normal
let theFeels2 = Feeling.happy("Because the weather is perfect", 2)
As you add more associated values, you start to lose track of what each value represents.
enum Feeling {
    case happy(String, String, Int, Int)
    case normal
    case unhappy(String, Int)
}
You can create a different struct for each case and pass in a struct instance.
Alternatively, you can add labels!
enum Feeling {
    case happy(reason: String, activity: String, numberOfPeopleWIthYou: Int, score: Int)
    case normal
    case unhappy(reason: String, score: Int)
}
Then you can/have to use labels when creating instances:
let theFeel = Feeling.happy(reason: "Because the weather is perfect", activity: "grocery shopping", numberOfPeopleWIthYou: 0, score: 2)
They look better when you dump() them:
dump(theFeel)

__lldb_expr_86.Feeling.happy
  ▿ happy: (4 elements)
    - reason: "Because the weather is perfect"
    - activity: "grocery shopping"
    - numberOfPeopleWIthYou: 0
    - score: 2
You can (optionally) use the labels in a switch statement if you want to. It checks that the label matches. Notice that score doesn't use a label.
switch theFeel {
case .happy(reason: let reason, _, _, let score):
    print("happy \(reason) with score: \(score)")
case .unhappy:
    print("unhappy")
case .normal:
    print("normal")
}
Interestingly, you don't have to have labels for every value, but I can't think of a good reason to use this:
enum Feeling {
    case happy(reason: String, String, Int, score: Int)
    case normal
    case unhappy(reason: String, score: Int)
}
Like this post? Follow me @hboon on Twitter.
Related
Nov 03, 2018
iOS Dev Nugget 314 Checked Array SubscriptingSep 22, 2018
iOS Dev Nugget 310 Weak Reference Wrapper ClassSep 07, 2018
iOS Dev Nugget 308 Careful with early return statements in functions that return voidAug 30, 2018
iOS Dev Nugget 307 Array Out of BoundsAug 23, 2018
iOS Dev Nugget 306 Underscores in Numeric LiteralsAug 02, 2018
iOS Dev Nugget 303 Use Enums for StatesJul 21, 2018
iOS Dev Nugget 301 Print App Document Path IIJul 16, 2018
iOS Dev Nugget 300 Pipe OperatorMay 18, 2018
iOS Dev Nugget 292 for-whereMay 12, 2018
iOS Dev Nugget 291 Implicit Member ExpressionsApr 11, 2018
iOS Dev Nugget 287 Modifying a Property Which is a Struct Triggers didSetNov 02, 2017
iOS Dev Nugget 265 value type cannot have a stored property that recursively contains itSep 13, 2017
iOS Dev Nugget 257 AssertsAug 02, 2017
iOS Dev Nugget 251 Retrieving the Current View ControllerJun 28, 2017
iOS Dev Nugget 246 Mapping Swift and Obj-C Method NamesJun 14, 2017
iOS Dev Nugget 244 IteratorProtocolMay 17, 2017
iOS Dev Nugget 240 Print an Object's Unique IdentifierApr 05, 2017
iOS Dev Nugget 234 #available and @availableNov 23, 2016
iOS Dev Nugget 215 dump Instead of print for Swift StructsOct 25, 2016
iOS Dev Nugget 211 Higher Order Functions: map, filter, reduceOct 12, 2016
iOS Dev Nugget 209 Swift DeferSep 28, 2016
iOS Dev Nugget 207 Swift Nil-Coalescing OperatorSep 22, 2016
iOS Dev Nugget 206 Date doesRelativeDateFormattingSep 11, 2016
iOS Dev Nugget 205 The Never Return Type in SwiftSep 07, 2016
iOS Dev Nugget 204 Swift @autoclosureSep 02, 2016
iOS Dev Nugget 203 Swift MeasurementAug 24, 2016
iOS Dev Nugget 202 Swift Enumerations to Encode StatesAug 17, 2016
iOS Dev Nugget 201 Swift Pattern MatchingAug 10, 2016
iOS Dev Nugget 200 Swift flatMapAug 05, 2016
iOS Dev Nugget 199 Swift Talk Video SeriesJul 26, 2016
iOS Dev Nugget 198 KZPlaygroundJul 20, 2016
iOS Dev Nugget 197 App Initialization CodeJul 09, 2016
iOS Dev Nugget 196 Rename Refactoring for Swift CodeJun 24, 2016
iOS Dev Nugget 193 Result EnumerationMay 20, 2016
iOS Dev Nugget 188 SwiftLintMay 10, 2016
iOS Dev Nugget 187 Creating a Singleton Class in SwiftMay 06, 2016
iOS Dev Nugget 186 Injection for XcodeApr 02, 2016
iOS Dev Nugget 182 Tracking the swift-evolution Git RepositoryMar 26, 2016
iOS Dev Nugget 181 Swift SelectorsMar 21, 2016
iOS Dev Nugget 180 Low Power ModeJan 27, 2016
iOS Dev Nugget 172 Print App Document PathDec 30, 2015
iOS Dev Nugget 168 Using Blocks to Manage ContextsOct 20, 2015
iOS Dev Nugget 158 Checking if Newer APIs Are Available In Older iOS Versions (II)Aug 17, 2015
iOS Dev Nugget 149 Timepiece, a Swift Library for Handling DatesJul 05, 2015
iOS Dev Nugget 143 Don't Forget SQLiteJul 01, 2015
iOS Dev Nugget 142 Grand Central DispatchJun 22, 2015
iOS Dev Nugget 141 Great Swift Standard Library Examples Covered in Playground (Swift 2.0)Jun 01, 2015
iOS Dev Nugget 138 Interoperability: Using Enumerations Defined In Objective-C from SwiftMay 27, 2015
iOS Dev Nugget 137 Named Tuple ElementsMay 19, 2015
iOS Dev Nugget 136 Auto Layout with CartographyMay 13, 2015
iOS Dev Nugget 135 CAShapeLayer, Animated Views and XCPShowView()Apr 29, 2015
iOS Dev Nugget 133 Dollar.swiftApr 22, 2015
iOS Dev Nugget 132 XCPCaptureValue in Swift PlaygroundsApr 14, 2015
iOS Dev Nugget 131 Running Asynchronous Code in Swift PlaygroundsApr 03, 2015
iOS Dev Nugget 129 Browsing the Swift Standard LibraryFeb 27, 2015
iOS Dev Nugget 124 performSelector:withObject:afterDelay: in SwiftFeb 20, 2015
iOS Dev Nugget 123 Using dynamicType in SwiftJan 02, 2015
iOS Dev Nugget 116 method() is unavailable: use object construction Class()
May 17, 2017 by Hwee-Boon Yar
Sometimes, in Swift — especially for debugging — you will want to see if 2 objects references you are holding are actually referring to the same object. The ObjectIdentifier struct is useful for this.
var o1 = NSObject()
var o2 = o1
var o3 = NSObject()
print("o1's \(ObjectIdentifier(o1).debugDescription)")
print("o2's \(ObjectIdentifier(o2).debugDescription)")
print("o3's \(ObjectIdentifier(o3).debugDescription)")
You'll get something a unique identifier for each object instance like this and you can see that o1 and o2 refers to the same instance.
o1's ObjectIdentifier(0x0000608000001620)
o2's ObjectIdentifier(0x0000608000001620)
o3's ObjectIdentifier(0x0000610000001530)
Note that ObjectIdentifier doesn't work for value types like structs and enums.
Like this post? Follow me @hboon on Twitter.
Related
Nov 03, 2018
iOS Dev Nugget 314 Checked Array SubscriptingSep 22, 2018
iOS Dev Nugget 310 Weak Reference Wrapper ClassSep 07, 2018
iOS Dev Nugget 308 Careful with early return statements in functions that return voidAug 30, 2018
iOS Dev Nugget 307 Array Out of BoundsAug 23, 2018
iOS Dev Nugget 306 Underscores in Numeric LiteralsAug 02, 2018
iOS Dev Nugget 303 Use Enums for StatesJul 21, 2018
iOS Dev Nugget 301 Print App Document Path IIJul 16, 2018
iOS Dev Nugget 300 Pipe OperatorMay 18, 2018
iOS Dev Nugget 292 for-whereMay 12, 2018
iOS Dev Nugget 291 Implicit Member ExpressionsApr 11, 2018
iOS Dev Nugget 287 Modifying a Property Which is a Struct Triggers didSetNov 02, 2017
iOS Dev Nugget 265 value type cannot have a stored property that recursively contains itSep 13, 2017
iOS Dev Nugget 257 AssertsAug 02, 2017
iOS Dev Nugget 251 Retrieving the Current View ControllerJun 28, 2017
iOS Dev Nugget 246 Mapping Swift and Obj-C Method NamesJun 14, 2017
iOS Dev Nugget 244 IteratorProtocolMay 24, 2017
iOS Dev Nugget 241 Swift Enums with LabelsApr 05, 2017
iOS Dev Nugget 234 #available and @availableNov 23, 2016
iOS Dev Nugget 215 dump Instead of print for Swift StructsOct 25, 2016
iOS Dev Nugget 211 Higher Order Functions: map, filter, reduceOct 12, 2016
iOS Dev Nugget 209 Swift DeferSep 28, 2016
iOS Dev Nugget 207 Swift Nil-Coalescing OperatorSep 22, 2016
iOS Dev Nugget 206 Date doesRelativeDateFormattingSep 11, 2016
iOS Dev Nugget 205 The Never Return Type in SwiftSep 07, 2016
iOS Dev Nugget 204 Swift @autoclosureSep 02, 2016
iOS Dev Nugget 203 Swift MeasurementAug 24, 2016
iOS Dev Nugget 202 Swift Enumerations to Encode StatesAug 17, 2016
iOS Dev Nugget 201 Swift Pattern MatchingAug 10, 2016
iOS Dev Nugget 200 Swift flatMapAug 05, 2016
iOS Dev Nugget 199 Swift Talk Video SeriesJul 26, 2016
iOS Dev Nugget 198 KZPlaygroundJul 20, 2016
iOS Dev Nugget 197 App Initialization CodeJul 09, 2016
iOS Dev Nugget 196 Rename Refactoring for Swift CodeJun 24, 2016
iOS Dev Nugget 193 Result EnumerationMay 20, 2016
iOS Dev Nugget 188 SwiftLintMay 10, 2016
iOS Dev Nugget 187 Creating a Singleton Class in SwiftMay 06, 2016
iOS Dev Nugget 186 Injection for XcodeApr 02, 2016
iOS Dev Nugget 182 Tracking the swift-evolution Git RepositoryMar 26, 2016
iOS Dev Nugget 181 Swift SelectorsMar 21, 2016
iOS Dev Nugget 180 Low Power ModeJan 27, 2016
iOS Dev Nugget 172 Print App Document PathDec 30, 2015
iOS Dev Nugget 168 Using Blocks to Manage ContextsOct 20, 2015
iOS Dev Nugget 158 Checking if Newer APIs Are Available In Older iOS Versions (II)Aug 17, 2015
iOS Dev Nugget 149 Timepiece, a Swift Library for Handling DatesJul 05, 2015
iOS Dev Nugget 143 Don't Forget SQLiteJul 01, 2015
iOS Dev Nugget 142 Grand Central DispatchJun 22, 2015
iOS Dev Nugget 141 Great Swift Standard Library Examples Covered in Playground (Swift 2.0)Jun 01, 2015
iOS Dev Nugget 138 Interoperability: Using Enumerations Defined In Objective-C from SwiftMay 27, 2015
iOS Dev Nugget 137 Named Tuple ElementsMay 19, 2015
iOS Dev Nugget 136 Auto Layout with CartographyMay 13, 2015
iOS Dev Nugget 135 CAShapeLayer, Animated Views and XCPShowView()Apr 29, 2015
iOS Dev Nugget 133 Dollar.swiftApr 22, 2015
iOS Dev Nugget 132 XCPCaptureValue in Swift PlaygroundsApr 14, 2015
iOS Dev Nugget 131 Running Asynchronous Code in Swift PlaygroundsApr 03, 2015
iOS Dev Nugget 129 Browsing the Swift Standard LibraryFeb 27, 2015
iOS Dev Nugget 124 performSelector:withObject:afterDelay: in SwiftFeb 20, 2015
iOS Dev Nugget 123 Using dynamicType in SwiftJan 02, 2015
iOS Dev Nugget 116 method() is unavailable: use object construction Class()
May 10, 2017 by Hwee-Boon Yar
This tip is if you work with Core Location and wants to continue receiving location updates while the app is suspended.
You need to add the UIBackgroundModes key with value location to the app's Info.plist. In addition, — this is easy to miss because it was only added in iOS 9 — you want to set CLLocationManager's allowsBackgroundLocationUpdates property to true. In addition to getting updates while the app is suspended, if the app is killed and the device crosses the CLRegion you are monitoring, the app will be automatically launched. So this property is also useful for toggling that behavior.
Like this post? Follow me @hboon on Twitter.
May 03, 2017 by Hwee-Boon Yar
I first read about keep the code in a method at the same level of abstraction in the book Smalltalk Best Practice Patterns. But here's an alternative online explanation:
E.g. A method with body written at more than 1 level of abstraction:
public List<ResultDto> buildResult(Set<ResultEntity> resultSet) {
    List<ResultDto> result = new ArrayList<>();
    for (ResultEntity entity : resultSet) {
        ResultDto dto = new ResultDto();
        dto.setShoeSize(entity.getShoeSize());
        dto.setNumberOfEarthWorms(entity.getNumberOfEarthWorms());
        dto.setAge(computeAge(entity.getBirthday()));
        result.add(dto);
    }
    return result;
}
The same method refactored to 2 separate methods, each with its body written at the same level of abstraction:
public List<ResultDto> buildResult(Set<ResultEntity> resultSet) {
    List<ResultDto> result = new ArrayList<>();
    for (ResultEntity entity : resultSet) {
        result.add(toDto(entity));
    }
    return result;
}

private ResultDto toDto(ResultEntity entity) {
    ResultDto dto = new ResultDto();
    dto.setShoeSize(entity.getShoeSize());
    dto.setNumberOfEarthWorms(entity.getNumberOfEarthWorms());
    dto.setAge(computeAge(entity.getBirthday()));
    return dto;
}
The problem with the original code:
There are two levels of abstractions in this method. First there is the loop which acts upon the whole result set and second there is the loop body which converts a single entity to a DTO. For the latter there is no syntactical grouping. The reader of the code has to find out that the first four lines of the loop body belong together. The code also doesn't explicitly state that these four lines convert an entity to a DTO. So the following code is better:
And the refactoring helps to improve things:
Now there are two smaller methods each of which is written in terms of a single level of abstraction. This is better readable as no mental grouping is necessary. Furthermore the two methods are still separately understandable (PSU) so no mental inlining is necessary and if you don't care about the details of the toDto method, you can just read and understand buildResult without being distracted by unnecessary detail.
(The code looks like its Java, but should be easy to read if you know Swift or Obj-C)
Like this post? Follow me @hboon on Twitter.
Related
Oct 06, 2018
iOS Dev Nugget 312 Fix Distorted Launch Screens with Hotspot BarSep 22, 2018
iOS Dev Nugget 310 Weak Reference Wrapper ClassSep 15, 2018
iOS Dev Nugget 309 Rule of Thumb Regarding self.Aug 02, 2018
iOS Dev Nugget 303 Use Enums for StatesJul 21, 2018
iOS Dev Nugget 301 Print App Document Path IIJul 08, 2018
iOS Dev Nugget 299 CurryingJun 24, 2018
iOS Dev Nugget 297 Defensive Checks for Asynchronous CallsApr 27, 2018
iOS Dev Nugget 289 Set Background Color for UIWebView to Match App While Still Loading DocumentsApr 22, 2018
iOS Dev Nugget 288 Use the .custom UIButton type to Fix Flashing when Title is ChangedApr 07, 2018
iOS Dev Nugget 286 Use Auto Layout for Bottom BarMar 22, 2018
iOS Dev Nugget 284 Use Shell Aliases for Git commandsMar 08, 2018
iOS Dev Nugget 282 Update to My Git no-commit Pre-commit HookJan 24, 2018
iOS Dev Nugget 276 Adding an Indent Default Parameter When Logging Calls in Object HierarchiesJan 18, 2018
iOS Dev Nugget 275 Implementing UIView draw(_:)Dec 28, 2017
iOS Dev Nugget 272 Namespacing using EnumsDec 14, 2017
iOS Dev Nugget 270 Using lazy properties to workaround initializing dependent non-optional propertiesNov 30, 2017
iOS Dev Nugget 268 Using Blocks for Delegate MethodsNov 02, 2017
iOS Dev Nugget 265 value type cannot have a stored property that recursively contains itNov 01, 2017
iOS Dev Nugget 264 Track how long a function takes to run and report progressSep 27, 2017
iOS Dev Nugget 259 CAShapeLayer, UIBezierPath and UIRectCornerAug 30, 2017
iOS Dev Nugget 255 Symbolic Breakpoint to watch for View Controller DeallocationAug 10, 2017
iOS Dev Nugget 252 A Little Trick to Write Loosely Coupled View ControllersAug 02, 2017
iOS Dev Nugget 251 Retrieving the Current View ControllerJul 11, 2017
iOS Dev Nugget 248 In-app Native RoutingJun 14, 2017
iOS Dev Nugget 244 IteratorProtocolMar 29, 2017
iOS Dev Nugget 233 Separating View Controllers and Their ViewsMar 01, 2017
iOS Dev Nugget 229 PromisesJan 25, 2017
iOS Dev Nugget 224 Lazy CollectionsJan 12, 2017
iOS Dev Nugget 222 Uniquely Identifying User DevicesJun 24, 2016
iOS Dev Nugget 193 Result EnumerationMay 26, 2016
iOS Dev Nugget 189 Xcode's Fix All in ScopeMay 20, 2016
iOS Dev Nugget 188 SwiftLintMay 10, 2016
iOS Dev Nugget 187 Creating a Singleton Class in SwiftMay 06, 2016
iOS Dev Nugget 186 Injection for XcodeApr 27, 2016
iOS Dev Nugget 185 Disabling Content Change Animation in CATextLayerApr 20, 2016
iOS Dev Nugget 184 Async LibraryApr 12, 2016
iOS Dev Nugget 183 Quality of Service ClassesApr 02, 2016
iOS Dev Nugget 182 Tracking the swift-evolution Git RepositoryMar 26, 2016
iOS Dev Nugget 181 Swift SelectorsMar 21, 2016
iOS Dev Nugget 180 Low Power ModeMar 01, 2016
iOS Dev Nugget 177 Push Notifications Testing During DevelopmentFeb 23, 2016
iOS Dev Nugget 176 Git no-commit Pre-commit HookFeb 18, 2016
iOS Dev Nugget 175 Displaying a Popover in iPhone AppFeb 11, 2016
iOS Dev Nugget 174 View Controller Containment to Avoid Growing a Fat View Controller Base ClassJan 27, 2016
iOS Dev Nugget 172 Print App Document PathDec 30, 2015
iOS Dev Nugget 168 Using Blocks to Manage ContextsNov 11, 2015
iOS Dev Nugget 161 Read Smalltalk Best Practice PatternsOct 20, 2015
iOS Dev Nugget 158 Checking if Newer APIs Are Available In Older iOS Versions (II)
Apr 26, 2017 by Hwee-Boon Yar
Found this tool called mas-cli which provides a command line interface to the Mac App Store. You can install via Homebrew:
$ brew install mas
You can list apps:
$ mas list

443987910 1Password (6.6.4)
587512244 Kaleidoscope (2.1.0)
405399194 Kindle (1.12.4e)
Or upgrade a specific app:
$ mas upgrade 405399194
Or you can update everywhere app (including Xcode):
$ mas upgrade
Don't forget the option to run multiple versions of Xcode side-by-side by getting it directly from Apple's Developers Website.
Learn more about cli-mas.
Like this post? Follow me @hboon on Twitter.
Related
Sep 28, 2018
iOS Dev Nugget 311 jqJul 08, 2018
iOS Dev Nugget 299 CurryingJun 01, 2018
iOS Dev Nugget 294 Core Data EditorMar 22, 2018
iOS Dev Nugget 284 Use Shell Aliases for Git commandsDec 20, 2017
iOS Dev Nugget 271 Zhi — Live Reloading Auto Layout Constraints and moreOct 18, 2017
iOS Dev Nugget 262 Apple Device Names APIAug 23, 2017
iOS Dev Nugget 254 Paw, for Working with APIsApr 19, 2017
iOS Dev Nugget 236 Look up Error CodesFeb 09, 2017
iOS Dev Nugget 226 React NativeJul 09, 2016
iOS Dev Nugget 196 Rename Refactoring for Swift CodeJul 06, 2016
iOS Dev Nugget 195 Tools of the TradeMay 06, 2016
iOS Dev Nugget 186 Injection for XcodeFeb 03, 2016
iOS Dev Nugget 173 Xcode Package Manager, AlcatrazJan 11, 2016
iOS Dev Nugget 170 HomebrewJan 05, 2016
iOS Dev Nugget 169 fastlane: deliverSep 07, 2015
iOS Dev Nugget 152 Lossy PNG CompressionAug 07, 2015
iOS Dev Nugget 147 NSRegularExpression and NSDataDetectorMar 06, 2015
iOS Dev Nugget 125 View Debugging in XcodeFeb 13, 2015
iOS Dev Nugget 122 Importing Many Test Photos into iOS Simulator IINov 28, 2014
iOS Dev Nugget 111 iOS Support MatrixOct 24, 2014
iOS Dev Nugget 106 Command Line Access to Developer PortalOct 17, 2014
iOS Dev Nugget 105 Try FLEXSep 12, 2014
iOS Dev Nugget 100 Try RevealSep 05, 2014
iOS Dev Nugget 99 Try PaintCodeAug 15, 2014
iOS Dev Nugget 96 Jack, A Native App For iTunes ConnectJul 04, 2014
iOS Dev Nugget 90 Full-Text Searchable WWDC Video Text TranscriptsApr 04, 2014
iOS Dev Nugget 77 RubyMotion Tutorial For Objective C DevelopersJan 17, 2014
iOS Dev Nugget 66 JBChartView for ChartingJan 04, 2014
iOS Dev Nugget 64 Placeholder Views Using PAPlaceholderDec 27, 2013
iOS Dev Nugget 63 Update Your iOS Development ToolboxOct 18, 2013
iOS Dev Nugget 53 Try Kaleidoscope, File Comparison for MacOct 11, 2013
iOS Dev Nugget 52 Set Up Crashlytics For Ad Hoc and App Store Builds OnlyJun 21, 2013
iOS Dev Nugget 36 Use TestFlight for Ad Hoc BuildsMay 11, 2013
iOS Dev Nugget 31 3rd Party Documentation ViewersMar 10, 2013
iOS Dev Nugget 22 Try AppCodeJan 05, 2013
iOS Dev Nugget 14 Charles Web Debugging Proxy
Apr 19, 2017 by Hwee-Boon Yar
While developing for iOS (or macOS/watchOS/tvOS), do you sometimes see an error code returned by an Apple API and wonder what it is? Check out OSStatus. You can search for them, say -1004.
Like this post? Follow me @hboon on Twitter.
Related
Sep 28, 2018
iOS Dev Nugget 311 jqJul 08, 2018
iOS Dev Nugget 299 CurryingJun 01, 2018
iOS Dev Nugget 294 Core Data EditorMar 22, 2018
iOS Dev Nugget 284 Use Shell Aliases for Git commandsDec 20, 2017
iOS Dev Nugget 271 Zhi — Live Reloading Auto Layout Constraints and moreOct 18, 2017
iOS Dev Nugget 262 Apple Device Names APIAug 23, 2017
iOS Dev Nugget 254 Paw, for Working with APIsApr 26, 2017
iOS Dev Nugget 237 mas-cliFeb 09, 2017
iOS Dev Nugget 226 React NativeJul 09, 2016
iOS Dev Nugget 196 Rename Refactoring for Swift CodeJul 06, 2016
iOS Dev Nugget 195 Tools of the TradeMay 06, 2016
iOS Dev Nugget 186 Injection for XcodeFeb 03, 2016
iOS Dev Nugget 173 Xcode Package Manager, AlcatrazJan 11, 2016
iOS Dev Nugget 170 HomebrewJan 05, 2016
iOS Dev Nugget 169 fastlane: deliverSep 07, 2015
iOS Dev Nugget 152 Lossy PNG CompressionAug 07, 2015
iOS Dev Nugget 147 NSRegularExpression and NSDataDetectorMar 06, 2015
iOS Dev Nugget 125 View Debugging in XcodeFeb 13, 2015
iOS Dev Nugget 122 Importing Many Test Photos into iOS Simulator IINov 28, 2014
iOS Dev Nugget 111 iOS Support MatrixOct 24, 2014
iOS Dev Nugget 106 Command Line Access to Developer PortalOct 17, 2014
iOS Dev Nugget 105 Try FLEXSep 12, 2014
iOS Dev Nugget 100 Try RevealSep 05, 2014
iOS Dev Nugget 99 Try PaintCodeAug 15, 2014
iOS Dev Nugget 96 Jack, A Native App For iTunes ConnectJul 04, 2014
iOS Dev Nugget 90 Full-Text Searchable WWDC Video Text TranscriptsApr 04, 2014
iOS Dev Nugget 77 RubyMotion Tutorial For Objective C DevelopersJan 17, 2014
iOS Dev Nugget 66 JBChartView for ChartingJan 04, 2014
iOS Dev Nugget 64 Placeholder Views Using PAPlaceholderDec 27, 2013
iOS Dev Nugget 63 Update Your iOS Development ToolboxOct 18, 2013
iOS Dev Nugget 53 Try Kaleidoscope, File Comparison for MacOct 11, 2013
iOS Dev Nugget 52 Set Up Crashlytics For Ad Hoc and App Store Builds OnlyJun 21, 2013
iOS Dev Nugget 36 Use TestFlight for Ad Hoc BuildsMay 11, 2013
iOS Dev Nugget 31 3rd Party Documentation ViewersMar 10, 2013
iOS Dev Nugget 22 Try AppCodeJan 05, 2013
iOS Dev Nugget 14 Charles Web Debugging Proxy
Apr 13, 2017 by Hwee-Boon Yar
Continuing from #103 and #163, another useful argument to pass at launch is -NSShowNonLocalizedStrings YES. This will make every string returned by NSLocalizedString() be capitalized if it isn't localized. A wonderful way to find any strings that aren't localized yet.
Like this post? Follow me @hboon on Twitter.
Related
Nov 25, 2015
iOS Dev Nugget 163 Testing Localization Using Launch Arguments (II)Sep 15, 2015
iOS Dev Nugget 153 Shortcut to Open Log in SimulatorMay 13, 2015
iOS Dev Nugget 135 CAShapeLayer, Animated Views and XCPShowView()Mar 06, 2015
iOS Dev Nugget 125 View Debugging in XcodeFeb 13, 2015
iOS Dev Nugget 122 Importing Many Test Photos into iOS Simulator IIOct 17, 2014
iOS Dev Nugget 105 Try FLEXOct 03, 2014
iOS Dev Nugget 103 Testing Localization Using Launch ArgumentsJun 13, 2014
iOS Dev Nugget 87 What's New in iOS 8Mar 28, 2014
iOS Dev Nugget 76 Importing Many Test Photos into iOS SimulatorMay 04, 2013
iOS Dev Nugget 30 Shortcut key to toggle slow animations in the iOS simulator (part II)Apr 27, 2013
iOS Dev Nugget 29 Simulating a Custom LocationApr 12, 2013
iOS Dev Nugget 27 Two-finger touch in SimulatorMar 31, 2013
iOS Dev Nugget 25 Watch out for hotspot and in-call status bar heightMar 22, 2013
iOS Dev Nugget 24 Take Screenshots in the SimulatorJan 05, 2013
iOS Dev Nugget 14 Charles Web Debugging ProxyDec 28, 2012
iOS Dev Nugget 13 Simulating a slow cellular network with Network Link ConditionerNov 23, 2012
iOS Dev Nugget 8 Copy and paste from/to the iOS SimulatorNov 09, 2012
iOS Dev Nugget 6 Open app in Simulator with Finder
Apr 05, 2017 by Hwee-Boon Yar
In many apps, you'd often want to support the newest 2 major iOS versions (or more).
In the earlier days, in Obj-C, you could check directly — using NSProcessInfo — the iOS version number and see which features are available. Then Apple recommended for us to check directly if a feature is available by checking if a class or an object responds to specific selectors instead of checking iOS version numbers.
With Swift, the official recommendation switches back to checking iOS version numbers again with the use of #available. Not only can you use #available to check against iOS version numbers at runtime in Swift, you can apply the @available attribute to Swift functions and methods to indicate the minimum iOS version it requires. e.g.
@available(iOS 9, *)
func functionThatRequiresiOS9() {
    if #available(iOS 10, *) {
        functionThatRequiresiOS10()
    }
}
There are other uses of @available, for example in Swift 3.1, the @available attribute has been expanded to support Swift language versions. This is useful primarily for library authors:
@available(swift, obsoleted: 3.1)
func functionThatIsObsoleteIn3Dot1andLater() {
}
PS: everything above applies to watchOS, tvOS and macOS too.
Like this post? Follow me @hboon on Twitter.
Related
Nov 03, 2018
iOS Dev Nugget 314 Checked Array SubscriptingSep 22, 2018
iOS Dev Nugget 310 Weak Reference Wrapper ClassSep 07, 2018
iOS Dev Nugget 308 Careful with early return statements in functions that return voidAug 30, 2018
iOS Dev Nugget 307 Array Out of BoundsAug 23, 2018
iOS Dev Nugget 306 Underscores in Numeric LiteralsAug 02, 2018
iOS Dev Nugget 303 Use Enums for StatesJul 21, 2018
iOS Dev Nugget 301 Print App Document Path IIJul 16, 2018
iOS Dev Nugget 300 Pipe OperatorMay 18, 2018
iOS Dev Nugget 292 for-whereMay 12, 2018
iOS Dev Nugget 291 Implicit Member ExpressionsApr 11, 2018
iOS Dev Nugget 287 Modifying a Property Which is a Struct Triggers didSetNov 02, 2017
iOS Dev Nugget 265 value type cannot have a stored property that recursively contains itSep 13, 2017
iOS Dev Nugget 257 AssertsAug 02, 2017
iOS Dev Nugget 251 Retrieving the Current View ControllerJun 28, 2017
iOS Dev Nugget 246 Mapping Swift and Obj-C Method NamesJun 14, 2017
iOS Dev Nugget 244 IteratorProtocolMay 24, 2017
iOS Dev Nugget 241 Swift Enums with LabelsMay 17, 2017
iOS Dev Nugget 240 Print an Object's Unique IdentifierNov 23, 2016
iOS Dev Nugget 215 dump Instead of print for Swift StructsOct 25, 2016
iOS Dev Nugget 211 Higher Order Functions: map, filter, reduceOct 12, 2016
iOS Dev Nugget 209 Swift DeferSep 28, 2016
iOS Dev Nugget 207 Swift Nil-Coalescing OperatorSep 22, 2016
iOS Dev Nugget 206 Date doesRelativeDateFormattingSep 11, 2016
iOS Dev Nugget 205 The Never Return Type in SwiftSep 07, 2016
iOS Dev Nugget 204 Swift @autoclosureSep 02, 2016
iOS Dev Nugget 203 Swift MeasurementAug 24, 2016
iOS Dev Nugget 202 Swift Enumerations to Encode StatesAug 17, 2016
iOS Dev Nugget 201 Swift Pattern MatchingAug 10, 2016
iOS Dev Nugget 200 Swift flatMapAug 05, 2016
iOS Dev Nugget 199 Swift Talk Video SeriesJul 26, 2016
iOS Dev Nugget 198 KZPlaygroundJul 20, 2016
iOS Dev Nugget 197 App Initialization CodeJul 09, 2016
iOS Dev Nugget 196 Rename Refactoring for Swift CodeJun 24, 2016
iOS Dev Nugget 193 Result EnumerationMay 20, 2016
iOS Dev Nugget 188 SwiftLintMay 10, 2016
iOS Dev Nugget 187 Creating a Singleton Class in SwiftMay 06, 2016
iOS Dev Nugget 186 Injection for XcodeApr 02, 2016
iOS Dev Nugget 182 Tracking the swift-evolution Git RepositoryMar 26, 2016
iOS Dev Nugget 181 Swift SelectorsMar 21, 2016
iOS Dev Nugget 180 Low Power ModeJan 27, 2016
iOS Dev Nugget 172 Print App Document PathDec 30, 2015
iOS Dev Nugget 168 Using Blocks to Manage ContextsOct 20, 2015
iOS Dev Nugget 158 Checking if Newer APIs Are Available In Older iOS Versions (II)Aug 17, 2015
iOS Dev Nugget 149 Timepiece, a Swift Library for Handling DatesJul 05, 2015
iOS Dev Nugget 143 Don't Forget SQLiteJul 01, 2015
iOS Dev Nugget 142 Grand Central DispatchJun 22, 2015
iOS Dev Nugget 141 Great Swift Standard Library Examples Covered in Playground (Swift 2.0)Jun 01, 2015
iOS Dev Nugget 138 Interoperability: Using Enumerations Defined In Objective-C from SwiftMay 27, 2015
iOS Dev Nugget 137 Named Tuple ElementsMay 19, 2015
iOS Dev Nugget 136 Auto Layout with CartographyMay 13, 2015
iOS Dev Nugget 135 CAShapeLayer, Animated Views and XCPShowView()Apr 29, 2015
iOS Dev Nugget 133 Dollar.swiftApr 22, 2015
iOS Dev Nugget 132 XCPCaptureValue in Swift PlaygroundsApr 14, 2015
iOS Dev Nugget 131 Running Asynchronous Code in Swift PlaygroundsApr 03, 2015
iOS Dev Nugget 129 Browsing the Swift Standard LibraryFeb 27, 2015
iOS Dev Nugget 124 performSelector:withObject:afterDelay: in SwiftFeb 20, 2015
iOS Dev Nugget 123 Using dynamicType in SwiftJan 02, 2015
iOS Dev Nugget 116 method() is unavailable: use object construction Class()
Mar 29, 2017 by Hwee-Boon Yar
I'm a fan of not using Interface Builder/Storyboards and creating views in code, maintaining a separate view hierarchy alongside the hierarchy of view controllers in your app. I wrote a post about not using Interface Builder a few years ago. It's been a few years, so some of it might be outdated, but the premise remains the same.
Soroush Khanlou talks in more detail about pushing some of view controller's responsibility into its views in Smarter Views and is very relevant. Check it out.
Like this post? Follow me @hboon on Twitter.
Related
Oct 06, 2018
iOS Dev Nugget 312 Fix Distorted Launch Screens with Hotspot BarSep 22, 2018
iOS Dev Nugget 310 Weak Reference Wrapper ClassSep 15, 2018
iOS Dev Nugget 309 Rule of Thumb Regarding self.Aug 02, 2018
iOS Dev Nugget 303 Use Enums for StatesJul 08, 2018
iOS Dev Nugget 299 CurryingJun 24, 2018
iOS Dev Nugget 297 Defensive Checks for Asynchronous CallsApr 27, 2018
iOS Dev Nugget 289 Set Background Color for UIWebView to Match App While Still Loading DocumentsApr 22, 2018
iOS Dev Nugget 288 Use the .custom UIButton type to Fix Flashing when Title is ChangedApr 07, 2018
iOS Dev Nugget 286 Use Auto Layout for Bottom BarMar 22, 2018
iOS Dev Nugget 284 Use Shell Aliases for Git commandsMar 08, 2018
iOS Dev Nugget 282 Update to My Git no-commit Pre-commit HookJan 24, 2018
iOS Dev Nugget 276 Adding an Indent Default Parameter When Logging Calls in Object HierarchiesJan 18, 2018
iOS Dev Nugget 275 Implementing UIView draw(_:)Dec 28, 2017
iOS Dev Nugget 272 Namespacing using EnumsDec 14, 2017
iOS Dev Nugget 270 Using lazy properties to workaround initializing dependent non-optional propertiesNov 30, 2017
iOS Dev Nugget 268 Using Blocks for Delegate MethodsNov 02, 2017
iOS Dev Nugget 265 value type cannot have a stored property that recursively contains itNov 01, 2017
iOS Dev Nugget 264 Track how long a function takes to run and report progressSep 27, 2017
iOS Dev Nugget 259 CAShapeLayer, UIBezierPath and UIRectCornerAug 30, 2017
iOS Dev Nugget 255 Symbolic Breakpoint to watch for View Controller DeallocationAug 10, 2017
iOS Dev Nugget 252 A Little Trick to Write Loosely Coupled View ControllersJul 11, 2017
iOS Dev Nugget 248 In-app Native RoutingJun 14, 2017
iOS Dev Nugget 244 IteratorProtocolMay 03, 2017
iOS Dev Nugget 238 Keep Code in Method at the Same Level of AbstractionJan 12, 2017
iOS Dev Nugget 222 Uniquely Identifying User Devices
Mar 22, 2017 by Hwee-Boon Yar
In iOS 8, Apple has added Shared Web Credentials which lets you share login information between your iOS app and Safari. Adding support for Shared Web Credentials consists of 2 parts:
- Serving up a site association file on your website.
- Reading/writing to the keychain in your iOS app.
Note that sharing of login is 2-way, so when your user logs in manually with username/password or changes password in your app, it's also helpful to save it into the keychain so your website can use it (when accessed with Safari).
Detailed instruction is available at Apple.
Like this post? Follow me @hboon on Twitter.
Related
Nov 12, 2018
iOS Dev Nugget 315 UITextContentType.oneTimeCodeApr 27, 2018
iOS Dev Nugget 289 Set Background Color for UIWebView to Match App While Still Loading DocumentsApr 22, 2018
iOS Dev Nugget 288 Use the .custom UIButton type to Fix Flashing when Title is ChangedMar 31, 2018
iOS Dev Nugget 285 maskedCornersJan 10, 2018
iOS Dev Nugget 274 Password AutoFillFeb 15, 2017
iOS Dev Nugget 227 View with Rounded CornersJan 25, 2017
iOS Dev Nugget 224 Lazy CollectionsJan 12, 2017
iOS Dev Nugget 222 Uniquely Identifying User DevicesNov 28, 2016
iOS Dev Nugget 216 File Data ProtectionNov 17, 2016
iOS Dev Nugget 214 Launch App QuicklyAug 31, 2015
iOS Dev Nugget 151 More Wrappers for Keychain AccessSep 13, 2013
iOS Dev Nugget 48 Utility Library for Keychain Access
Mar 15, 2017 by Hwee-Boon Yar
Have you ever looked at some text in an app or website and wondered what that font is? You may like WhatTheFont then. You can take a photo or screenshot and let the app figure it out for you.
Like this post? Follow me @hboon on Twitter.
Mar 08, 2017 by Hwee-Boon Yar
Hitting cmd+opt+/ in Xcode while the cursor is on a type or function declaration will generate a quick help documentation for you. E.g.
With a function like this:
func foo(name: String) -> Int {}
This is generated:
/// Description
///
/// - Parameter name: name description
/// - Returns: return value description
Works with both Swift and Obj-C.
PS: This shortcut might already be used by another app. E.g. Alfred uses this for one of it's shortcuts. It's available via Editor > Structure > Add Documentation, so you can reassign a different shortcut.
Like this post? Follow me @hboon on Twitter.
Related
Jul 01, 2018
iOS Dev Nugget 298 Conditional BreakpointsFeb 15, 2018
iOS Dev Nugget 279 Reclaim Disk Space by Deleting Old SimulatorsJan 31, 2018
iOS Dev Nugget 277 REPL in LLDBAug 30, 2017
iOS Dev Nugget 255 Symbolic Breakpoint to watch for View Controller DeallocationJun 21, 2017
iOS Dev Nugget 245 Show Call HierarchyFeb 03, 2017
iOS Dev Nugget 225 Contextual Help for Xcode Build SettingsDec 29, 2016
iOS Dev Nugget 220 Don't Download Xcode from the Mac App StoreNov 08, 2016
iOS Dev Nugget 213 Download Your App Data on iOS Device for DebuggingJun 17, 2016
iOS Dev Nugget 192 Download Xcode from Downloads for Apple Developers Website Instead of Mac App StoreMay 26, 2016
iOS Dev Nugget 189 Xcode's Fix All in ScopeMar 12, 2016
iOS Dev Nugget 179 Dragging the Program CounterMar 07, 2016
iOS Dev Nugget 178 Breakpoint Actions for LoggingFeb 03, 2016
iOS Dev Nugget 173 Xcode Package Manager, AlcatrazNov 18, 2015
iOS Dev Nugget 162 Reclaim Disk Space from Xcode Usage
Mar 01, 2017 by Hwee-Boon Yar
Heard of Promises?
If you haven't, here's an example of what promises help to improve:
fetchUserId({ id in
    fetchUserNameFromId(id, success: { name in
        fetchUserFollowStatusFromName(name, success: { isFollowed in
            // The three calls in a row succeeded YAY!
            reloadList()
        }, failure: { error in
            // Fetching user ID failed
            reloadList()
        })
    }, failure: { error in
        // Fetching user name failed
        reloadList()
    })
}) {  error in
    // Fetching user follow status failed
    reloadList()
}
🙉🙈🙊#callbackHell
With promises, you can write something like:
fetchUserId()
    .then(fetchUserNameFromId)
    .then(fetchUserFollowStatusFromName)
    .then(updateFollowStatus)
    .onError(showErrorPopup)
    .finally(reloadList)
Basically, without the ever-increasing indentation, making flow control clearer.
Another example is when you fire off several network calls in parallel and only want to act (eg. display them on screen) when results from all of them have been returned. Promises let you do something like this:
whenAll(fetchHeaderInformation(), fetchBodyInformation(), fetchFooterInformation()).then { allInfo in
  //All the results are ready
}
The async example code above was taken from the freshOS repository README.
Like this post? Follow me @hboon on Twitter.
Related
Aug 15, 2018
iOS Dev Nugget 305 Declaring Distinct Types from General TypesJul 24, 2018
iOS Dev Nugget 302 RealmJul 21, 2018
iOS Dev Nugget 301 Print App Document Path IIJun 09, 2018
iOS Dev Nugget 295 SwifterSwiftMay 23, 2018
iOS Dev Nugget 293 iOSSnapshotTestCase (was FBSnapshotTestCase)Mar 15, 2018
iOS Dev Nugget 283 Eureka for FormsFeb 28, 2018
iOS Dev Nugget 281 Use R.swift for Static References to Resources Like ImagesFeb 21, 2018
iOS Dev Nugget 280 Using Custom Fonts Without Updating Info.plist ManuallyDec 06, 2017
iOS Dev Nugget 269 Including Finger Touches in App Preview VideosAug 02, 2017
iOS Dev Nugget 251 Retrieving the Current View ControllerJul 11, 2017
iOS Dev Nugget 248 In-app Native RoutingMay 03, 2017
iOS Dev Nugget 238 Keep Code in Method at the Same Level of AbstractionFeb 22, 2017
iOS Dev Nugget 228 Recording and Playing Back Network CallsJan 25, 2017
iOS Dev Nugget 224 Lazy CollectionsOct 23, 2016
iOS Dev Nugget 210 PMAlertControllerJun 24, 2016
iOS Dev Nugget 193 Result EnumerationJun 03, 2016
iOS Dev Nugget 190 Quick Look Plug-in for Mobile Provisioning FilesMay 26, 2016
iOS Dev Nugget 189 Xcode's Fix All in ScopeMay 20, 2016
iOS Dev Nugget 188 SwiftLintMay 10, 2016
iOS Dev Nugget 187 Creating a Singleton Class in SwiftMay 06, 2016
iOS Dev Nugget 186 Injection for XcodeApr 27, 2016
iOS Dev Nugget 185 Disabling Content Change Animation in CATextLayerApr 20, 2016
iOS Dev Nugget 184 Async LibraryApr 12, 2016
iOS Dev Nugget 183 Quality of Service ClassesApr 02, 2016
iOS Dev Nugget 182 Tracking the swift-evolution Git RepositoryMar 26, 2016
iOS Dev Nugget 181 Swift SelectorsMar 21, 2016
iOS Dev Nugget 180 Low Power ModeMar 01, 2016
iOS Dev Nugget 177 Push Notifications Testing During DevelopmentFeb 23, 2016
iOS Dev Nugget 176 Git no-commit Pre-commit HookFeb 18, 2016
iOS Dev Nugget 175 Displaying a Popover in iPhone AppFeb 11, 2016
iOS Dev Nugget 174 View Controller Containment to Avoid Growing a Fat View Controller Base ClassJan 27, 2016
iOS Dev Nugget 172 Print App Document PathDec 30, 2015
iOS Dev Nugget 168 Using Blocks to Manage ContextsNov 11, 2015
iOS Dev Nugget 161 Read Smalltalk Best Practice PatternsOct 20, 2015
iOS Dev Nugget 158 Checking if Newer APIs Are Available In Older iOS Versions (II)Aug 31, 2015
iOS Dev Nugget 151 More Wrappers for Keychain AccessAug 17, 2015
iOS Dev Nugget 149 Timepiece, a Swift Library for Handling DatesJul 27, 2015
iOS Dev Nugget 146 UIStackView and TZStackViewJul 21, 2015
iOS Dev Nugget 145 Listing Available FontsJul 05, 2015
iOS Dev Nugget 143 Don't Forget SQLiteJun 09, 2015
iOS Dev Nugget 139 Custom Build Configurations and Xcode SubprojectsMay 19, 2015
iOS Dev Nugget 136 Auto Layout with CartographyApr 29, 2015
iOS Dev Nugget 133 Dollar.swiftFeb 06, 2015
iOS Dev Nugget 121 InflectorKitDec 26, 2014
iOS Dev Nugget 115 Displaying Information in Settings AppDec 19, 2014
iOS Dev Nugget 114 Preview an Image for DebuggingDec 12, 2014
iOS Dev Nugget 113 GPUImage, a GPU-based Image and Video Processing FrameworkMay 30, 2014
iOS Dev Nugget 85 A More Customizable Button For Different StatesMay 02, 2014
iOS Dev Nugget 81 TMCache For In-Memory and Disk-backed CachingApr 18, 2014
iOS Dev Nugget 79 TweetBot Photo Flicking EffectMar 07, 2014
iOS Dev Nugget 73 Open Source Date Picker from SquareFeb 22, 2014
iOS Dev Nugget 71 TapJan 31, 2014
iOS Dev Nugget 68 Custom URL Schemes DirectoryDec 20, 2013
iOS Dev Nugget 62 Using PDF Instead of PNG Files for Resizable AssetsSep 20, 2013
iOS Dev Nugget 49 Wrapper to Get UIColor ComponentsMay 17, 2013
iOS Dev Nugget 32 FMDB: Thin Objective C Wrapper Around SQLiteOct 06, 2012
iOS Dev Nugget 1 Easy logging of values and objects
Feb 22, 2017 by Hwee-Boon Yar
Did you know that since iOS 2, there's a class included in Foundation called NSURLProtocol?
From the docs:
An NSURLProtocol object handles the loading of protocol-specific URL data. The NSURLProtocol class itself is an abstract class that provides the infrastructure for processing URLs with a specific URL scheme. You create subclasses for any custom protocols or URL schemes that your app supports.
Basically, it lets you implement a proxy for URL loading in your app. How does that help?
- I like to work offline — without connectivity to focus — sometimes. But most apps need to at least make a network request or two and fetch some data via an API call. You can use
NSURLProtocol to do just that.
- Alternatively, you might be have automated tests that makes network calls. You'll generally want those to be deterministic and playing back a known, static version using
NSURLProtocol is very useful.
There's a library that does just that — VCRURLConnection. From the README, here's how you make a recording:
[VCR start];

NSString *path = @"http://example.com/example";
NSURL *url = [NSURL URLWithString:path];
NSURLRequest *request = [NSURLRequest requestWithURL:url];

// use either NSURLSession or NSURLConnection
NSURLSessionDataTask *task = [[NSURLSession sharedSession] dataTaskWithRequest:request];
[task resume];

// NSURLSession makes a real network request and VCRURLConnection
// will record the request/response pair.

// once async request is complete or application is ready to exit:
[VCR save:@"/path/to/cassette.json"]; // copy the output file into your project
You can play it back with:
NSURL *cassetteURL = [NSURL fileURLWithPath:@"/path/to/cassette.json"];
[VCR loadCassetteWithContentsOfURL:cassetteURL];
[VCR start];

// request an HTTP interaction that was recorded to cassette.json
NSString *path = @"http://example.com/example";
NSURL *url = [NSURL URLWithString:path];
NSURLRequest *request = [NSURLRequest requestWithURL:url];

// use either NSURLSession or NSURLConnection
NSURLSessionDataTask *task = [[NSURLSession sharedSession] dataTaskWithRequest:request];
[task resume];

// The cassette has a recording for this request, so no network request
// is made. Instead NSURLConnectionDelegate methods are called with the
// previously recorded response.
It's available over Carthage and Cocoapods.
Pretty handy isn't it?
Like this post? Follow me @hboon on Twitter.
Related
Aug 15, 2018
iOS Dev Nugget 305 Declaring Distinct Types from General TypesJul 24, 2018
iOS Dev Nugget 302 RealmJun 09, 2018
iOS Dev Nugget 295 SwifterSwiftMay 23, 2018
iOS Dev Nugget 293 iOSSnapshotTestCase (was FBSnapshotTestCase)Mar 15, 2018
iOS Dev Nugget 283 Eureka for FormsFeb 28, 2018
iOS Dev Nugget 281 Use R.swift for Static References to Resources Like ImagesFeb 21, 2018
iOS Dev Nugget 280 Using Custom Fonts Without Updating Info.plist ManuallyDec 06, 2017
iOS Dev Nugget 269 Including Finger Touches in App Preview VideosAug 23, 2017
iOS Dev Nugget 254 Paw, for Working with APIsJul 19, 2017
iOS Dev Nugget 249 App Transport Security Diagnostics with nscurlJul 11, 2017
iOS Dev Nugget 248 In-app Native RoutingMar 01, 2017
iOS Dev Nugget 229 PromisesDec 22, 2016
iOS Dev Nugget 219 Test Your App with Airplane Mode enabledOct 23, 2016
iOS Dev Nugget 210 PMAlertControllerJun 03, 2016
iOS Dev Nugget 190 Quick Look Plug-in for Mobile Provisioning FilesMay 20, 2016
iOS Dev Nugget 188 SwiftLintApr 20, 2016
iOS Dev Nugget 184 Async LibraryMar 21, 2016
iOS Dev Nugget 180 Low Power ModeOct 07, 2015
iOS Dev Nugget 156 -canOpenURL:Sep 23, 2015
iOS Dev Nugget 154 App Transport SecurityAug 31, 2015
iOS Dev Nugget 151 More Wrappers for Keychain AccessAug 17, 2015
iOS Dev Nugget 149 Timepiece, a Swift Library for Handling DatesJul 27, 2015
iOS Dev Nugget 146 UIStackView and TZStackViewJul 21, 2015
iOS Dev Nugget 145 Listing Available FontsJul 16, 2015
iOS Dev Nugget 144 NSURLSession instead of NSURLConnectionJul 05, 2015
iOS Dev Nugget 143 Don't Forget SQLiteJun 09, 2015
iOS Dev Nugget 139 Custom Build Configurations and Xcode SubprojectsMay 19, 2015
iOS Dev Nugget 136 Auto Layout with CartographyApr 29, 2015
iOS Dev Nugget 133 Dollar.swiftFeb 06, 2015
iOS Dev Nugget 121 InflectorKitDec 26, 2014
iOS Dev Nugget 115 Displaying Information in Settings AppDec 19, 2014
iOS Dev Nugget 114 Preview an Image for DebuggingDec 12, 2014
iOS Dev Nugget 113 GPUImage, a GPU-based Image and Video Processing FrameworkMay 30, 2014
iOS Dev Nugget 85 A More Customizable Button For Different StatesMay 02, 2014
iOS Dev Nugget 81 TMCache For In-Memory and Disk-backed CachingApr 18, 2014
iOS Dev Nugget 79 TweetBot Photo Flicking EffectMar 07, 2014
iOS Dev Nugget 73 Open Source Date Picker from SquareFeb 22, 2014
iOS Dev Nugget 71 TapJan 31, 2014
iOS Dev Nugget 68 Custom URL Schemes DirectoryJan 24, 2014
iOS Dev Nugget 67 Simulating a slow cellular network with Network Link Conditioner on iOSDec 20, 2013
iOS Dev Nugget 62 Using PDF Instead of PNG Files for Resizable AssetsSep 20, 2013
iOS Dev Nugget 49 Wrapper to Get UIColor ComponentsJul 13, 2013
iOS Dev Nugget 39 Use NSCache Instead of NSMutableDictionary When CachingMay 17, 2013
iOS Dev Nugget 32 FMDB: Thin Objective C Wrapper Around SQLiteJan 05, 2013
iOS Dev Nugget 14 Charles Web Debugging ProxyDec 28, 2012
iOS Dev Nugget 13 Simulating a slow cellular network with Network Link ConditionerOct 06, 2012
iOS Dev Nugget 1 Easy logging of values and objects
Feb 15, 2017 by Hwee-Boon Yar
Sometimes you want to make a subview have rounded corners. An easy way to do this is:
v.backgroundColor = bgColor
v.layer.cornerRadius = 7
v.layer.masksToBounds = true
This works well most of the time, but you run into performance degradation when you render more complex subviews with rounded corners, e.g many UILabels with rounded corners in a UITableView with many cells.
An easy way around this issue is to switch of masksToBounds and set the background on the layer instead of the view:
v.layer.backgroundColor = bgColor.cgColor
v.layer.cornerRadius = 7
Like this post? Follow me @hboon on Twitter.
Feb 09, 2017 by Hwee-Boon Yar
In #77, I mentioned RubyMotion as an alternative for building iOS (and now OS X and Android) apps. Since it generates native code and uses a dialect of Ruby, it's especially attractive to developers who are already familiar with Ruby.
In a similar way, I'd like to point out React Native which lets you write iOS (and Android) apps in Javascript. I'm not a big fan of Javascript, but React Native (and similarly React for web) opens up a different paradigm for mobile app development which is well worth looking into. Even if you are never going to be using React Native for iOS app development, it's well worth spending an hour running through the official tutorial. You should at least go through these:
- Install React Native (it's just a shell command away)
- Create a React Native project (another command)
- Run the empty app in the simulator
- Hit
Cmd+D to bring up the menu, enable Live Reload
- Make a few simple changes in
index.ios.js
- Examine how a "screen"/component is defined/created in
index.ios.js
- Continue with the tutorial to learn about stuff such as
Props, State and Style
This should give you a good introduction to what React Native offers.
Like this post? Follow me @hboon on Twitter.
Related
Sep 28, 2018
iOS Dev Nugget 311 jqJul 08, 2018
iOS Dev Nugget 299 CurryingJun 01, 2018
iOS Dev Nugget 294 Core Data EditorMar 22, 2018
iOS Dev Nugget 284 Use Shell Aliases for Git commandsDec 20, 2017
iOS Dev Nugget 271 Zhi — Live Reloading Auto Layout Constraints and moreOct 18, 2017
iOS Dev Nugget 262 Apple Device Names APIAug 23, 2017
iOS Dev Nugget 254 Paw, for Working with APIsApr 26, 2017
iOS Dev Nugget 237 mas-cliApr 19, 2017
iOS Dev Nugget 236 Look up Error CodesJul 09, 2016
iOS Dev Nugget 196 Rename Refactoring for Swift CodeJul 06, 2016
iOS Dev Nugget 195 Tools of the TradeMay 06, 2016
iOS Dev Nugget 186 Injection for XcodeFeb 03, 2016
iOS Dev Nugget 173 Xcode Package Manager, AlcatrazJan 11, 2016
iOS Dev Nugget 170 HomebrewJan 05, 2016
iOS Dev Nugget 169 fastlane: deliverSep 07, 2015
iOS Dev Nugget 152 Lossy PNG CompressionAug 07, 2015
iOS Dev Nugget 147 NSRegularExpression and NSDataDetectorMar 06, 2015
iOS Dev Nugget 125 View Debugging in XcodeFeb 13, 2015
iOS Dev Nugget 122 Importing Many Test Photos into iOS Simulator IINov 28, 2014
iOS Dev Nugget 111 iOS Support MatrixOct 24, 2014
iOS Dev Nugget 106 Command Line Access to Developer PortalOct 17, 2014
iOS Dev Nugget 105 Try FLEXSep 12, 2014
iOS Dev Nugget 100 Try RevealSep 05, 2014
iOS Dev Nugget 99 Try PaintCodeAug 15, 2014
iOS Dev Nugget 96 Jack, A Native App For iTunes ConnectJul 04, 2014
iOS Dev Nugget 90 Full-Text Searchable WWDC Video Text TranscriptsApr 04, 2014
iOS Dev Nugget 77 RubyMotion Tutorial For Objective C DevelopersJan 17, 2014
iOS Dev Nugget 66 JBChartView for ChartingJan 04, 2014
iOS Dev Nugget 64 Placeholder Views Using PAPlaceholderDec 27, 2013
iOS Dev Nugget 63 Update Your iOS Development ToolboxOct 18, 2013
iOS Dev Nugget 53 Try Kaleidoscope, File Comparison for MacOct 11, 2013
iOS Dev Nugget 52 Set Up Crashlytics For Ad Hoc and App Store Builds OnlyJun 21, 2013
iOS Dev Nugget 36 Use TestFlight for Ad Hoc BuildsMay 11, 2013
iOS Dev Nugget 31 3rd Party Documentation ViewersMar 10, 2013
iOS Dev Nugget 22 Try AppCodeJan 05, 2013
iOS Dev Nugget 14 Charles Web Debugging Proxy
Feb 03, 2017 by Hwee-Boon Yar
There are many configuration options in Xcode's Build Settings. Some are seldom-used, while some are new. You can check what they do by revealing the Quick Help Inspector (cmd+opt+2 as of writing).
Some of us are on small screens. You can opt-double click on a setting to display a popup showing the same information.
Similarly, opt-click on a symbol (class, function/method) in the code editor to view its documentation.
Pressing the opt key while clicking or double-clicking on macOS often brings up something additional in various apps.
Like this post? Follow me @hboon on Twitter.
Related
Jul 01, 2018
iOS Dev Nugget 298 Conditional BreakpointsFeb 15, 2018
iOS Dev Nugget 279 Reclaim Disk Space by Deleting Old SimulatorsJan 31, 2018
iOS Dev Nugget 277 REPL in LLDBOct 25, 2017
iOS Dev Nugget 263 Smart Folders for Quick Access to Most Recent FilesAug 30, 2017
iOS Dev Nugget 255 Symbolic Breakpoint to watch for View Controller DeallocationJul 05, 2017
iOS Dev Nugget 247 ASCII TableJun 21, 2017
iOS Dev Nugget 245 Show Call HierarchyMay 31, 2017
iOS Dev Nugget 242 Finder TipsMar 08, 2017
iOS Dev Nugget 230 Shortcut to Generate Quick Help DocumentationJan 19, 2017
iOS Dev Nugget 223 Moving Your Cursor in TerminalJan 05, 2017
iOS Dev Nugget 221 macOS No Longer Remembers Your SSH PassphrasesDec 29, 2016
iOS Dev Nugget 220 Don't Download Xcode from the Mac App StoreNov 08, 2016
iOS Dev Nugget 213 Download Your App Data on iOS Device for DebuggingJun 17, 2016
iOS Dev Nugget 192 Download Xcode from Downloads for Apple Developers Website Instead of Mac App StoreMay 26, 2016
iOS Dev Nugget 189 Xcode's Fix All in ScopeMar 12, 2016
iOS Dev Nugget 179 Dragging the Program CounterMar 07, 2016
iOS Dev Nugget 178 Breakpoint Actions for LoggingFeb 03, 2016
iOS Dev Nugget 173 Xcode Package Manager, AlcatrazJan 11, 2016
iOS Dev Nugget 170 HomebrewDec 09, 2015
iOS Dev Nugget 165 Copy and Paste from ShellNov 18, 2015
iOS Dev Nugget 162 Reclaim Disk Space from Xcode Usage
Jan 25, 2017 by Hwee-Boon Yar
Collection has a property called lazy which is very useful for performance reasons. From the docs, lazy:
A view onto this collection that provides lazy implementations of normally eager operations, such as map and filter.
Array implements Collection, so if you have a large array, you can do this:
var veryLargeArray = [1, 20, 30, 4, 55]
var c = veryLargeArray.lazy.map { $0 * $0 }
c[1] //Random access without processing the entire array
It's a tiny, localized change to your code that, under the right circumstances, can have incredible performance improvements. Since lazy is a property of the Collection protocol, you can use it with all collection types that implement it, including Dictionary and Set.
Like this post? Follow me @hboon on Twitter.
Related
Nov 12, 2018
iOS Dev Nugget 315 UITextContentType.oneTimeCodeJul 21, 2018
iOS Dev Nugget 301 Print App Document Path IIApr 27, 2018
iOS Dev Nugget 289 Set Background Color for UIWebView to Match App While Still Loading DocumentsApr 22, 2018
iOS Dev Nugget 288 Use the .custom UIButton type to Fix Flashing when Title is ChangedMar 31, 2018
iOS Dev Nugget 285 maskedCornersJan 10, 2018
iOS Dev Nugget 274 Password AutoFillAug 02, 2017
iOS Dev Nugget 251 Retrieving the Current View ControllerMay 03, 2017
iOS Dev Nugget 238 Keep Code in Method at the Same Level of AbstractionMar 22, 2017
iOS Dev Nugget 232 Shared Web Credentials: Logging Into iOS app with Password Saved with SafariMar 01, 2017
iOS Dev Nugget 229 PromisesFeb 15, 2017
iOS Dev Nugget 227 View with Rounded CornersNov 28, 2016
iOS Dev Nugget 216 File Data ProtectionNov 17, 2016
iOS Dev Nugget 214 Launch App QuicklyJun 24, 2016
iOS Dev Nugget 193 Result EnumerationMay 26, 2016
iOS Dev Nugget 189 Xcode's Fix All in ScopeMay 20, 2016
iOS Dev Nugget 188 SwiftLintMay 10, 2016
iOS Dev Nugget 187 Creating a Singleton Class in SwiftMay 06, 2016
iOS Dev Nugget 186 Injection for XcodeApr 27, 2016
iOS Dev Nugget 185 Disabling Content Change Animation in CATextLayerApr 20, 2016
iOS Dev Nugget 184 Async LibraryApr 12, 2016
iOS Dev Nugget 183 Quality of Service ClassesApr 02, 2016
iOS Dev Nugget 182 Tracking the swift-evolution Git RepositoryMar 26, 2016
iOS Dev Nugget 181 Swift SelectorsMar 21, 2016
iOS Dev Nugget 180 Low Power ModeMar 01, 2016
iOS Dev Nugget 177 Push Notifications Testing During DevelopmentFeb 23, 2016
iOS Dev Nugget 176 Git no-commit Pre-commit HookFeb 18, 2016
iOS Dev Nugget 175 Displaying a Popover in iPhone AppFeb 11, 2016
iOS Dev Nugget 174 View Controller Containment to Avoid Growing a Fat View Controller Base ClassJan 27, 2016
iOS Dev Nugget 172 Print App Document PathDec 30, 2015
iOS Dev Nugget 168 Using Blocks to Manage ContextsNov 11, 2015
iOS Dev Nugget 161 Read Smalltalk Best Practice PatternsOct 20, 2015
iOS Dev Nugget 158 Checking if Newer APIs Are Available In Older iOS Versions (II)
Jan 19, 2017 by Hwee-Boon Yar
As developers using macOS, we often need to use the Terminal app or an equivalent. Sometimes you want to edit a command that you ran earlier. Most shells let you recall history by pressing the up arrow key. But what happens if you need to edit a long command? Again, depending on your shell, you might be able to use your left/right arrow keys or possibly alt-left/alt-right (for fish shell).
Did you know that you can opt-click in Terminal to move your cursor? It's a major time-saver.
PS: I'm not sure if (arguably non-iOS) tips such as this are of interest to you. If you can hit reply and let me know in a few words if you want more or less of these, it'll be much appreciated!
Like this post? Follow me @hboon on Twitter.
Related
Aug 08, 2018
iOS Dev Nugget 304 CodeRunnerNov 22, 2017
iOS Dev Nugget 267 Touch ID with sudoOct 25, 2017
iOS Dev Nugget 263 Smart Folders for Quick Access to Most Recent FilesJul 19, 2017
iOS Dev Nugget 249 App Transport Security Diagnostics with nscurlJul 05, 2017
iOS Dev Nugget 247 ASCII TableMay 31, 2017
iOS Dev Nugget 242 Finder TipsMar 15, 2017
iOS Dev Nugget 231 WhatTheFontFeb 03, 2017
iOS Dev Nugget 225 Contextual Help for Xcode Build SettingsJan 05, 2017
iOS Dev Nugget 221 macOS No Longer Remembers Your SSH PassphrasesJan 11, 2016
iOS Dev Nugget 170 HomebrewDec 09, 2015
iOS Dev Nugget 165 Copy and Paste from Shell
Jan 12, 2017 by Hwee-Boon Yar
Sometimes you legitimately want to identify user iOS devices uniquely. You can use UIDevice's identifierForVendor for that. From the docs:
The value of this property is the same for apps that come from the same vendor running on the same device. A different value is returned for apps on the same device that come from different vendors, and for apps on different devices regardless of vendor.
However, the identifier value may change if all the apps under same developer account are deleted and reinstalled. One workaround is to store it in the Keychain. You want to be careful and set the item to be not synchronizable so you don't end up with the same identifier being assigned to every device owned by the same user.
Like this post? Follow me @hboon on Twitter.
Related
Oct 06, 2018
iOS Dev Nugget 312 Fix Distorted Launch Screens with Hotspot BarSep 22, 2018
iOS Dev Nugget 310 Weak Reference Wrapper ClassSep 15, 2018
iOS Dev Nugget 309 Rule of Thumb Regarding self.Aug 02, 2018
iOS Dev Nugget 303 Use Enums for StatesJul 08, 2018
iOS Dev Nugget 299 CurryingJun 24, 2018
iOS Dev Nugget 297 Defensive Checks for Asynchronous CallsApr 27, 2018
iOS Dev Nugget 289 Set Background Color for UIWebView to Match App While Still Loading DocumentsApr 22, 2018
iOS Dev Nugget 288 Use the .custom UIButton type to Fix Flashing when Title is ChangedApr 07, 2018
iOS Dev Nugget 286 Use Auto Layout for Bottom BarMar 22, 2018
iOS Dev Nugget 284 Use Shell Aliases for Git commandsMar 08, 2018
iOS Dev Nugget 282 Update to My Git no-commit Pre-commit HookJan 24, 2018
iOS Dev Nugget 276 Adding an Indent Default Parameter When Logging Calls in Object HierarchiesJan 18, 2018
iOS Dev Nugget 275 Implementing UIView draw(_:)Dec 28, 2017
iOS Dev Nugget 272 Namespacing using EnumsDec 14, 2017
iOS Dev Nugget 270 Using lazy properties to workaround initializing dependent non-optional propertiesNov 30, 2017
iOS Dev Nugget 268 Using Blocks for Delegate MethodsNov 02, 2017
iOS Dev Nugget 265 value type cannot have a stored property that recursively contains itNov 01, 2017
iOS Dev Nugget 264 Track how long a function takes to run and report progressSep 27, 2017
iOS Dev Nugget 259 CAShapeLayer, UIBezierPath and UIRectCornerAug 30, 2017
iOS Dev Nugget 255 Symbolic Breakpoint to watch for View Controller DeallocationAug 10, 2017
iOS Dev Nugget 252 A Little Trick to Write Loosely Coupled View ControllersJul 11, 2017
iOS Dev Nugget 248 In-app Native RoutingJun 14, 2017
iOS Dev Nugget 244 IteratorProtocolMay 03, 2017
iOS Dev Nugget 238 Keep Code in Method at the Same Level of AbstractionMar 29, 2017
iOS Dev Nugget 233 Separating View Controllers and Their ViewsMar 22, 2017
iOS Dev Nugget 232 Shared Web Credentials: Logging Into iOS app with Password Saved with SafariAug 31, 2015
iOS Dev Nugget 151 More Wrappers for Keychain AccessSep 13, 2013
iOS Dev Nugget 48 Utility Library for Keychain Access
Jan 05, 2017 by Hwee-Boon Yar
If you have upgraded to macOS 10.12.2 and use SSH (e.g. with git), you'll probably notice that macOS no longer seem to store your keys and their passphrases with ssh-agent. Here's a solution from @mjtsai:
Add this to your .ssh/config file to:
Host *
  UseKeychain yes
  AddKeysToAgent yes
Like this post? Follow me @hboon on Twitter.
Related
Aug 08, 2018
iOS Dev Nugget 304 CodeRunnerNov 22, 2017
iOS Dev Nugget 267 Touch ID with sudoOct 25, 2017
iOS Dev Nugget 263 Smart Folders for Quick Access to Most Recent FilesJul 19, 2017
iOS Dev Nugget 249 App Transport Security Diagnostics with nscurlJul 05, 2017
iOS Dev Nugget 247 ASCII TableMay 31, 2017
iOS Dev Nugget 242 Finder TipsMar 15, 2017
iOS Dev Nugget 231 WhatTheFontFeb 03, 2017
iOS Dev Nugget 225 Contextual Help for Xcode Build SettingsJan 19, 2017
iOS Dev Nugget 223 Moving Your Cursor in TerminalJan 11, 2016
iOS Dev Nugget 170 HomebrewDec 09, 2015
iOS Dev Nugget 165 Copy and Paste from Shell
Dec 29, 2016 by Hwee-Boon Yar
Over the years, I've found that downloading Xcode from the Mac App Store has several disadvantages. You no longer have control over which version of Xcode you are running. And a new version of Xcode gets downloaded halfway and you are unable to continue working.
Most developers also download the latest beta version of Xcode from Apple's website for testing their apps against newer versions of iOS or to take advantage of APIs in soon-to-be released versions of iOS.
There's a Downloads for Apple Developers website where you can download other versions of Xcode, including the latest production version. Downloading Xcode from here instead of the Mac App Store lets you run different versions of Xcode in parallel easily.
Like this post? Follow me @hboon on Twitter.
Related
Jul 01, 2018
iOS Dev Nugget 298 Conditional BreakpointsFeb 15, 2018
iOS Dev Nugget 279 Reclaim Disk Space by Deleting Old SimulatorsJan 31, 2018
iOS Dev Nugget 277 REPL in LLDBAug 30, 2017
iOS Dev Nugget 255 Symbolic Breakpoint to watch for View Controller DeallocationJun 21, 2017
iOS Dev Nugget 245 Show Call HierarchyMar 08, 2017
iOS Dev Nugget 230 Shortcut to Generate Quick Help DocumentationFeb 03, 2017
iOS Dev Nugget 225 Contextual Help for Xcode Build SettingsNov 08, 2016
iOS Dev Nugget 213 Download Your App Data on iOS Device for DebuggingJun 17, 2016
iOS Dev Nugget 192 Download Xcode from Downloads for Apple Developers Website Instead of Mac App StoreMay 26, 2016
iOS Dev Nugget 189 Xcode's Fix All in ScopeMar 12, 2016
iOS Dev Nugget 179 Dragging the Program CounterMar 07, 2016
iOS Dev Nugget 178 Breakpoint Actions for LoggingFeb 03, 2016
iOS Dev Nugget 173 Xcode Package Manager, AlcatrazNov 18, 2015
iOS Dev Nugget 162 Reclaim Disk Space from Xcode Usage
Dec 22, 2016 by Hwee-Boon Yar
In #13 and #67, I mentioned using Link Conditioner on macOS and iOS respectively to simulate a slower network for testing your app. Here's an extension of that:
Test your app with Airplane Mode enabled!
Depending on your priorities, this can mean getting the app to work almost perfectly in offline mode — i.e. caching enough data so that you can fulfill most of user needs (e.g. maps apps or document viewer apps) and persisting user operations that require connectivity (such as posting a tweet) so they can be "played back" when there's connectivity — to something similar like displaying an alert to the user notifying that the app needs connectivity to work.
At the very least, you should check that the app doesn't break without connectivity, e.g. overriding your app's local cache with empty or "nil" data because of failed network requests.
Like this post? Follow me @hboon on Twitter.
Related
Aug 23, 2017
iOS Dev Nugget 254 Paw, for Working with APIsJul 19, 2017
iOS Dev Nugget 249 App Transport Security Diagnostics with nscurlFeb 22, 2017
iOS Dev Nugget 228 Recording and Playing Back Network CallsMar 21, 2016
iOS Dev Nugget 180 Low Power ModeOct 07, 2015
iOS Dev Nugget 156 -canOpenURL:Sep 23, 2015
iOS Dev Nugget 154 App Transport SecurityJul 16, 2015
iOS Dev Nugget 144 NSURLSession instead of NSURLConnectionJan 24, 2014
iOS Dev Nugget 67 Simulating a slow cellular network with Network Link Conditioner on iOSJul 13, 2013
iOS Dev Nugget 39 Use NSCache Instead of NSMutableDictionary When CachingJan 05, 2013
iOS Dev Nugget 14 Charles Web Debugging ProxyDec 28, 2012
iOS Dev Nugget 13 Simulating a slow cellular network with Network Link Conditioner
Dec 14, 2016 by Hwee-Boon Yar
Using a view controller (or rather its view) to display content is a very standard operation in iOS apps. Here's a common way to do it:
let detailVC = DetailViewController()
vc.navigationController?.pushViewController(detailVC, animated: true)
DetailViewController performs one or more network operations, fetching data from a remote server and then displays the results to the user.
What we sometimes get wrong is writing a function like displayActivityIndicatorView() to display an instance of UIActivityIndicatorView in the middle of the screen blocking all interaction, including tapping the back/close/cancel button to cancel the operation until the data is available:
class DetailViewController: UIViewController {
    override func viewDidLoad() {
        displayActivityIndicatorView()
        loadDataOverNetworkSyncAndDisplay()
        hideActivityIndicatorView()
    }

    func loadDataOverNetworkSyncAndDisplay() {
        self.fetchDataByCallingAPI()
        self.displayFetchedData()
    }
}
This is bad UI and makes the user feel like they do not have control since they can't interact with the app while waiting for the data to load.
I prefer to display an empty screen (or preferably displaying cached data), and when the data is fetched, update the screen:
class DetailViewController: UIViewController {
    override func viewDidLoad() {
        displayWhateverDataIsAvailable()
        loadDataOverNetworkAsyncAndDisplay()
    }

    func loadDataOverNetworkAsyncAndDisplay() {
        DispatchQueue.global().async {
            self.fetchDataByCallingAPI()
            DispatchQueue.main.async {
                self.displayFetchedData()
            }
        }
    }
}
This lets the user cancel the operation if they like and if there's cached data displayed, interact with it.
Like this post? Follow me @hboon on Twitter.
Dec 07, 2016 by Hwee-Boon Yar
CloudKit is a remote datastore provided by Apple. One of the most common usage patterns for it is to persist data across app installs and devices.
Unlike iCloud Core Data (which is now defunct), you need to provide your own local storage mechanism. You can use Core Data, SQLite, plists, among many other options. This also works particularly well if you use your local datastore as a cache for CloudKit. Unlikely solutions like the soon-to-be-defunct Parse, CloudKit doesn't support server side code. So an easy way to think about CloudKit is to think of it as a remote database that you can read-write directly from your apps.
I'll list a few important concepts in CloudKit and mention the closest RDBMS concept. Note that since CloudKit isn't a RDBMS, the terms usually don't mean exactly the same thing:
Database - there is a public database and a private database. Every user can access the public database and each user can only access their own data in the private database.Zones - zones group records together. Updates to records in a zone can be an atomic transaction. There is a default zone in both the public database and private database. You can only create custom zones in the private database. This is similar to a database in an RDBMS.Record type - a collection of records. This is similar to a table. A record type consists of fields which can be one of several built-in types such as String, Date/Time, Int(64) or a list of these types, such as a List of Strings. Record - a row of data. This is equivalent to a row in a table.Dashboard - CloudKit provides a web-based dashboard
Code to use CloudKit is too long for a nugget, so I'll point you to Apple's CloudKit quick start guide.
CloudKit is practically free for most usage patterns, so check it out.
Like this post? Follow me @hboon on Twitter.
Nov 28, 2016 by Hwee-Boon Yar
One of the simplest ways to improve security for your app data is to make use of the file data protection APIs
The iOS Security doc is an important document which also talks about other aspects of iOS security. File data protection is simple to understand though.
There are a few options:
- NSFileProtectionComplete — file is only accessible when device is unlocked
- NSFileProtectionCompleteUnlessOpen — file is accessible while the device is unlocked and will remain unlocked while it's open. THis is useful if you want to read/write to it while running in a background task
- NSFileProtectionCompleteUntilFirstUserAuthentication — file is accessible once the device is unlocked and until it is rebooted
- NSFileProtectionNone - file is not encrypted
To set them on a per-file basis:
FileManager.default.setAttributes([FileAttributeKey.protectionKey: NSData.WritingOptions.completeFileProtection], ofItemAtPath: filePath)
If you want to set a default protection class for every file your app creates, you can specify the com.apple.developer.default-data-protection entitlement in Xcode.
File protection is easy to implement, and hardware-optimized. You should use it.
Like this post? Follow me @hboon on Twitter.
Related
Nov 12, 2018
iOS Dev Nugget 315 UITextContentType.oneTimeCodeApr 27, 2018
iOS Dev Nugget 289 Set Background Color for UIWebView to Match App While Still Loading DocumentsApr 22, 2018
iOS Dev Nugget 288 Use the .custom UIButton type to Fix Flashing when Title is ChangedMar 31, 2018
iOS Dev Nugget 285 maskedCornersJan 10, 2018
iOS Dev Nugget 274 Password AutoFillSep 06, 2017
iOS Dev Nugget 256 SFAuthenticationSession for Login Protocols and Single Sign OnMar 22, 2017
iOS Dev Nugget 232 Shared Web Credentials: Logging Into iOS app with Password Saved with SafariFeb 15, 2017
iOS Dev Nugget 227 View with Rounded CornersJan 25, 2017
iOS Dev Nugget 224 Lazy CollectionsNov 17, 2016
iOS Dev Nugget 214 Launch App QuicklySep 23, 2015
iOS Dev Nugget 154 App Transport Security
Nov 23, 2016 by Hwee-Boon Yar
If you want to print a struct, especially a collection, use dump() instead of print(). The latter prints one long line like this (wrapped here):
[Item(title: "Item 1", age: 10, address: Address(value: "address 1")), Item(title: "Item 2", age: 10, address: Address(value: "address 1"))]
whereas dump() does this:
▿ 2 elements
  ▿ Item
    - title: "Item 1"
    - age: 10
    ▿ address: Address
      - value: "address 1"
  ▿ Item
    - title: "Item 2"
    - age: 10
    ▿ address: Address
      - value: "address 1"
Like this post? Follow me @hboon on Twitter.
Related
Nov 03, 2018
iOS Dev Nugget 314 Checked Array SubscriptingSep 22, 2018
iOS Dev Nugget 310 Weak Reference Wrapper ClassSep 07, 2018
iOS Dev Nugget 308 Careful with early return statements in functions that return voidAug 30, 2018
iOS Dev Nugget 307 Array Out of BoundsAug 23, 2018
iOS Dev Nugget 306 Underscores in Numeric LiteralsAug 02, 2018
iOS Dev Nugget 303 Use Enums for StatesJul 21, 2018
iOS Dev Nugget 301 Print App Document Path IIJul 16, 2018
iOS Dev Nugget 300 Pipe OperatorMay 18, 2018
iOS Dev Nugget 292 for-whereMay 12, 2018
iOS Dev Nugget 291 Implicit Member ExpressionsApr 11, 2018
iOS Dev Nugget 287 Modifying a Property Which is a Struct Triggers didSetNov 02, 2017
iOS Dev Nugget 265 value type cannot have a stored property that recursively contains itSep 13, 2017
iOS Dev Nugget 257 AssertsAug 02, 2017
iOS Dev Nugget 251 Retrieving the Current View ControllerJun 28, 2017
iOS Dev Nugget 246 Mapping Swift and Obj-C Method NamesJun 14, 2017
iOS Dev Nugget 244 IteratorProtocolMay 24, 2017
iOS Dev Nugget 241 Swift Enums with LabelsMay 17, 2017
iOS Dev Nugget 240 Print an Object's Unique IdentifierApr 05, 2017
iOS Dev Nugget 234 #available and @availableOct 25, 2016
iOS Dev Nugget 211 Higher Order Functions: map, filter, reduceOct 12, 2016
iOS Dev Nugget 209 Swift DeferSep 28, 2016
iOS Dev Nugget 207 Swift Nil-Coalescing OperatorSep 22, 2016
iOS Dev Nugget 206 Date doesRelativeDateFormattingSep 11, 2016
iOS Dev Nugget 205 The Never Return Type in SwiftSep 07, 2016
iOS Dev Nugget 204 Swift @autoclosureSep 02, 2016
iOS Dev Nugget 203 Swift MeasurementAug 24, 2016
iOS Dev Nugget 202 Swift Enumerations to Encode StatesAug 17, 2016
iOS Dev Nugget 201 Swift Pattern MatchingAug 10, 2016
iOS Dev Nugget 200 Swift flatMapAug 05, 2016
iOS Dev Nugget 199 Swift Talk Video SeriesJul 26, 2016
iOS Dev Nugget 198 KZPlaygroundJul 20, 2016
iOS Dev Nugget 197 App Initialization CodeJul 09, 2016
iOS Dev Nugget 196 Rename Refactoring for Swift CodeJun 24, 2016
iOS Dev Nugget 193 Result EnumerationMay 20, 2016
iOS Dev Nugget 188 SwiftLintMay 10, 2016
iOS Dev Nugget 187 Creating a Singleton Class in SwiftMay 06, 2016
iOS Dev Nugget 186 Injection for XcodeApr 02, 2016
iOS Dev Nugget 182 Tracking the swift-evolution Git RepositoryMar 26, 2016
iOS Dev Nugget 181 Swift SelectorsMar 21, 2016
iOS Dev Nugget 180 Low Power ModeJan 27, 2016
iOS Dev Nugget 172 Print App Document PathDec 30, 2015
iOS Dev Nugget 168 Using Blocks to Manage ContextsOct 20, 2015
iOS Dev Nugget 158 Checking if Newer APIs Are Available In Older iOS Versions (II)Aug 17, 2015
iOS Dev Nugget 149 Timepiece, a Swift Library for Handling DatesJul 05, 2015
iOS Dev Nugget 143 Don't Forget SQLiteJul 01, 2015
iOS Dev Nugget 142 Grand Central DispatchJun 22, 2015
iOS Dev Nugget 141 Great Swift Standard Library Examples Covered in Playground (Swift 2.0)Jun 01, 2015
iOS Dev Nugget 138 Interoperability: Using Enumerations Defined In Objective-C from SwiftMay 27, 2015
iOS Dev Nugget 137 Named Tuple ElementsMay 19, 2015
iOS Dev Nugget 136 Auto Layout with CartographyMay 13, 2015
iOS Dev Nugget 135 CAShapeLayer, Animated Views and XCPShowView()Apr 29, 2015
iOS Dev Nugget 133 Dollar.swiftApr 22, 2015
iOS Dev Nugget 132 XCPCaptureValue in Swift PlaygroundsApr 14, 2015
iOS Dev Nugget 131 Running Asynchronous Code in Swift PlaygroundsApr 03, 2015
iOS Dev Nugget 129 Browsing the Swift Standard LibraryFeb 27, 2015
iOS Dev Nugget 124 performSelector:withObject:afterDelay: in SwiftFeb 20, 2015
iOS Dev Nugget 123 Using dynamicType in SwiftJan 02, 2015
iOS Dev Nugget 116 method() is unavailable: use object construction Class()
Nov 17, 2016 by Hwee-Boon Yar
Here's a simple tip that might drastically improve your app performance: don't block your app launch.
i.e. when you implement application(_:didFinishLaunchingWithOptions:) or related methods in UIApplicationDelegate such as application(_:willFinishLaunchingWithOptions:), don't perform operations in them that run synchronously in the main thread. Naturally, running long operations in your app delegate on the main thread blocks your app from launching/resuming. It can be overlooked though. For example, when you implement and perform data migration when your app launches. Initially this might be an immediate operation. But as you go along and the app's data model become more complex and the user accumulates more data, a simple data migration might take too long and causes the app launch to be noticeably slower. This is not only poor user experience — a slow app launch can cause iOS to kill your app.
The same principle applies to methods such as applicationDidBecomeActive(_:).
Like this post? Follow me @hboon on Twitter.
Related
Nov 12, 2018
iOS Dev Nugget 315 UITextContentType.oneTimeCodeApr 27, 2018
iOS Dev Nugget 289 Set Background Color for UIWebView to Match App While Still Loading DocumentsApr 22, 2018
iOS Dev Nugget 288 Use the .custom UIButton type to Fix Flashing when Title is ChangedMar 31, 2018
iOS Dev Nugget 285 maskedCornersJan 10, 2018
iOS Dev Nugget 274 Password AutoFillMar 22, 2017
iOS Dev Nugget 232 Shared Web Credentials: Logging Into iOS app with Password Saved with SafariFeb 15, 2017
iOS Dev Nugget 227 View with Rounded CornersJan 25, 2017
iOS Dev Nugget 224 Lazy CollectionsNov 28, 2016
iOS Dev Nugget 216 File Data ProtectionApr 20, 2016
iOS Dev Nugget 184 Async LibraryApr 12, 2016
iOS Dev Nugget 183 Quality of Service ClassesMar 21, 2016
iOS Dev Nugget 180 Low Power Mode
Nov 08, 2016 by Hwee-Boon Yar
Sometimes you want to grab all the directory and files you wrote into your app's document directory for testing/debugging. When running on the simulator, you can print the document directory and access it directly. How's how you can do it on an actual device:
- Plug in your iOS device via USB
- In Xcode, choose
Window > Devices
- Click on your iOS device under
DEVICES
- Under
Installed Apps, click on your app
- Click the gear button
- Click
Download Container
This will download the entire sandbox container, including temp files.
Happy debugging!
Like this post? Follow me @hboon on Twitter.
Related
Jul 01, 2018
iOS Dev Nugget 298 Conditional BreakpointsFeb 15, 2018
iOS Dev Nugget 279 Reclaim Disk Space by Deleting Old SimulatorsJan 31, 2018
iOS Dev Nugget 277 REPL in LLDBNov 15, 2017
iOS Dev Nugget 266 Play a System Sound for Simple Untethered DebuggingAug 30, 2017
iOS Dev Nugget 255 Symbolic Breakpoint to watch for View Controller DeallocationJun 21, 2017
iOS Dev Nugget 245 Show Call HierarchyMar 08, 2017
iOS Dev Nugget 230 Shortcut to Generate Quick Help DocumentationFeb 03, 2017
iOS Dev Nugget 225 Contextual Help for Xcode Build SettingsDec 29, 2016
iOS Dev Nugget 220 Don't Download Xcode from the Mac App StoreJun 28, 2016
iOS Dev Nugget 194 Debugging CGContextDrawImage: invalid context 0x0Jun 17, 2016
iOS Dev Nugget 192 Download Xcode from Downloads for Apple Developers Website Instead of Mac App StoreMay 26, 2016
iOS Dev Nugget 189 Xcode's Fix All in ScopeMar 12, 2016
iOS Dev Nugget 179 Dragging the Program CounterMar 07, 2016
iOS Dev Nugget 178 Breakpoint Actions for LoggingFeb 03, 2016
iOS Dev Nugget 173 Xcode Package Manager, AlcatrazDec 15, 2015
iOS Dev Nugget 166 @expr import UIKitNov 18, 2015
iOS Dev Nugget 162 Reclaim Disk Space from Xcode Usage
Nov 04, 2016 by Hwee-Boon Yar
Rather than a specific piece of code, I want to talk about a kind of "pattern" that I like to use.
With good connectivity for most iOS devices nowadays, I noticed there's a paradigm that works quite well for many types of apps.
Where applicable, use your app's local datastore as a temporary cache — be it Core Data, SQLite, plist or any other databases. This is only possible if you have a server side database/API which you can sync to.
I took a quick look at the top apps in the app store and can easily name a few types of apps that can work with this model, e.g. chat apps, Twitter apps, Facebook apps, news apps, podcasts apps. There are more and they tend to display content that is refreshed very often.
This gives you the advantage of having a single source of truth (the server) and if any goes wrong, you can just blow away your local datastore and rebuild it from the server.
Like this post? Follow me @hboon on Twitter.
Oct 25, 2016 by Hwee-Boon Yar
Here's something I read in a tweet by @steveluscher a while back.
map([🌽, 🐮, 🐔], cook)
=> [🍿, 🍔, 🍳]

filter([🍿, 🍔, 🍳], isVegetarian)
=>  [🍿, 🍳]

reduce([🍿, 🍳], eat)
=> 💩
Wonderful illustration of how these higher order functions for functional programming work.
PS: I mentioned in last week's issue about iOS Conf SG. The video of my talk is now available here. There are gems in the conference such as Leveraging Swift's Type System by @benjaminencz. There are many others. Check out all the talks here.
Like this post? Follow me @hboon on Twitter.
Related
Nov 03, 2018
iOS Dev Nugget 314 Checked Array SubscriptingSep 22, 2018
iOS Dev Nugget 310 Weak Reference Wrapper ClassSep 07, 2018
iOS Dev Nugget 308 Careful with early return statements in functions that return voidAug 30, 2018
iOS Dev Nugget 307 Array Out of BoundsAug 23, 2018
iOS Dev Nugget 306 Underscores in Numeric LiteralsAug 02, 2018
iOS Dev Nugget 303 Use Enums for StatesJul 21, 2018
iOS Dev Nugget 301 Print App Document Path IIJul 16, 2018
iOS Dev Nugget 300 Pipe OperatorMay 18, 2018
iOS Dev Nugget 292 for-whereMay 12, 2018
iOS Dev Nugget 291 Implicit Member ExpressionsApr 11, 2018
iOS Dev Nugget 287 Modifying a Property Which is a Struct Triggers didSetNov 02, 2017
iOS Dev Nugget 265 value type cannot have a stored property that recursively contains itSep 13, 2017
iOS Dev Nugget 257 AssertsAug 02, 2017
iOS Dev Nugget 251 Retrieving the Current View ControllerJun 28, 2017
iOS Dev Nugget 246 Mapping Swift and Obj-C Method NamesJun 14, 2017
iOS Dev Nugget 244 IteratorProtocolMay 24, 2017
iOS Dev Nugget 241 Swift Enums with LabelsMay 17, 2017
iOS Dev Nugget 240 Print an Object's Unique IdentifierApr 05, 2017
iOS Dev Nugget 234 #available and @availableNov 23, 2016
iOS Dev Nugget 215 dump Instead of print for Swift StructsOct 12, 2016
iOS Dev Nugget 209 Swift DeferSep 28, 2016
iOS Dev Nugget 207 Swift Nil-Coalescing OperatorSep 22, 2016
iOS Dev Nugget 206 Date doesRelativeDateFormattingSep 11, 2016
iOS Dev Nugget 205 The Never Return Type in SwiftSep 07, 2016
iOS Dev Nugget 204 Swift @autoclosureSep 02, 2016
iOS Dev Nugget 203 Swift MeasurementAug 24, 2016
iOS Dev Nugget 202 Swift Enumerations to Encode StatesAug 17, 2016
iOS Dev Nugget 201 Swift Pattern MatchingAug 10, 2016
iOS Dev Nugget 200 Swift flatMapAug 05, 2016
iOS Dev Nugget 199 Swift Talk Video SeriesJul 26, 2016
iOS Dev Nugget 198 KZPlaygroundJul 20, 2016
iOS Dev Nugget 197 App Initialization CodeJul 09, 2016
iOS Dev Nugget 196 Rename Refactoring for Swift CodeJun 24, 2016
iOS Dev Nugget 193 Result EnumerationMay 20, 2016
iOS Dev Nugget 188 SwiftLintMay 10, 2016
iOS Dev Nugget 187 Creating a Singleton Class in SwiftMay 06, 2016
iOS Dev Nugget 186 Injection for XcodeApr 02, 2016
iOS Dev Nugget 182 Tracking the swift-evolution Git RepositoryMar 26, 2016
iOS Dev Nugget 181 Swift SelectorsMar 21, 2016
iOS Dev Nugget 180 Low Power ModeJan 27, 2016
iOS Dev Nugget 172 Print App Document PathDec 30, 2015
iOS Dev Nugget 168 Using Blocks to Manage ContextsOct 20, 2015
iOS Dev Nugget 158 Checking if Newer APIs Are Available In Older iOS Versions (II)Aug 17, 2015
iOS Dev Nugget 149 Timepiece, a Swift Library for Handling DatesJul 05, 2015
iOS Dev Nugget 143 Don't Forget SQLiteJul 01, 2015
iOS Dev Nugget 142 Grand Central DispatchJun 22, 2015
iOS Dev Nugget 141 Great Swift Standard Library Examples Covered in Playground (Swift 2.0)Jun 01, 2015
iOS Dev Nugget 138 Interoperability: Using Enumerations Defined In Objective-C from SwiftMay 27, 2015
iOS Dev Nugget 137 Named Tuple ElementsMay 19, 2015
iOS Dev Nugget 136 Auto Layout with CartographyMay 13, 2015
iOS Dev Nugget 135 CAShapeLayer, Animated Views and XCPShowView()Apr 29, 2015
iOS Dev Nugget 133 Dollar.swiftApr 22, 2015
iOS Dev Nugget 132 XCPCaptureValue in Swift PlaygroundsApr 14, 2015
iOS Dev Nugget 131 Running Asynchronous Code in Swift PlaygroundsApr 03, 2015
iOS Dev Nugget 129 Browsing the Swift Standard LibraryFeb 27, 2015
iOS Dev Nugget 124 performSelector:withObject:afterDelay: in SwiftFeb 20, 2015
iOS Dev Nugget 123 Using dynamicType in SwiftJan 02, 2015
iOS Dev Nugget 116 method() is unavailable: use object construction Class()
Oct 23, 2016 by Hwee-Boon Yar
UIAlertController was introduced in iOS 8 providing a block-based API among other changes. But it is still not very customizable. If you want to show e.g a large image or otherwise more customizable content, PMAlertController is one good solution. It has a similar API to UIAlertController and is available via CocoaPods and Carthage.
Here's sample code from the README (Swift 3):
let alertVC = PMAlertController(title: "A Title", description: "My Description", image: UIImage(named: "img.png"), style: .alert)

alertVC.addAction(PMAlertAction(title: "Cancel", style: .cancel, action: { () -> Void in
            print("Capture action Cancel")
        }))

alertVC.addAction(PMAlertAction(title: "OK", style: .default, action: { () in
            print("Capture action OK")
        }))

self.present(alertVC, animated: true, completion: nil)
PS: For the last 2 days, I was at iOS Conf SG along with a great lineup of speakers including @natashatherobot, @merowing_, @_ryannystrom and @inamiy. If you are interested in my talk, here's a link to the deck. The videos for the all the talks should be up soon. I'll post links soon.
Like this post? Follow me @hboon on Twitter.
Related
Aug 15, 2018
iOS Dev Nugget 305 Declaring Distinct Types from General TypesJul 24, 2018
iOS Dev Nugget 302 RealmJun 09, 2018
iOS Dev Nugget 295 SwifterSwiftMay 23, 2018
iOS Dev Nugget 293 iOSSnapshotTestCase (was FBSnapshotTestCase)Mar 15, 2018
iOS Dev Nugget 283 Eureka for FormsFeb 28, 2018
iOS Dev Nugget 281 Use R.swift for Static References to Resources Like ImagesFeb 21, 2018
iOS Dev Nugget 280 Using Custom Fonts Without Updating Info.plist ManuallyDec 06, 2017
iOS Dev Nugget 269 Including Finger Touches in App Preview VideosJul 11, 2017
iOS Dev Nugget 248 In-app Native RoutingMar 01, 2017
iOS Dev Nugget 229 PromisesFeb 22, 2017
iOS Dev Nugget 228 Recording and Playing Back Network CallsJun 03, 2016
iOS Dev Nugget 190 Quick Look Plug-in for Mobile Provisioning FilesMay 20, 2016
iOS Dev Nugget 188 SwiftLintApr 20, 2016
iOS Dev Nugget 184 Async LibraryAug 31, 2015
iOS Dev Nugget 151 More Wrappers for Keychain AccessAug 17, 2015
iOS Dev Nugget 149 Timepiece, a Swift Library for Handling DatesJul 27, 2015
iOS Dev Nugget 146 UIStackView and TZStackViewJul 21, 2015
iOS Dev Nugget 145 Listing Available FontsJul 05, 2015
iOS Dev Nugget 143 Don't Forget SQLiteJun 09, 2015
iOS Dev Nugget 139 Custom Build Configurations and Xcode SubprojectsMay 19, 2015
iOS Dev Nugget 136 Auto Layout with CartographyApr 29, 2015
iOS Dev Nugget 133 Dollar.swiftFeb 06, 2015
iOS Dev Nugget 121 InflectorKitDec 26, 2014
iOS Dev Nugget 115 Displaying Information in Settings AppDec 19, 2014
iOS Dev Nugget 114 Preview an Image for DebuggingDec 12, 2014
iOS Dev Nugget 113 GPUImage, a GPU-based Image and Video Processing FrameworkMay 30, 2014
iOS Dev Nugget 85 A More Customizable Button For Different StatesMay 02, 2014
iOS Dev Nugget 81 TMCache For In-Memory and Disk-backed CachingApr 18, 2014
iOS Dev Nugget 79 TweetBot Photo Flicking EffectMar 07, 2014
iOS Dev Nugget 73 Open Source Date Picker from SquareFeb 22, 2014
iOS Dev Nugget 71 TapJan 31, 2014
iOS Dev Nugget 68 Custom URL Schemes DirectoryDec 20, 2013
iOS Dev Nugget 62 Using PDF Instead of PNG Files for Resizable AssetsSep 20, 2013
iOS Dev Nugget 49 Wrapper to Get UIColor ComponentsMay 17, 2013
iOS Dev Nugget 32 FMDB: Thin Objective C Wrapper Around SQLiteOct 06, 2012
iOS Dev Nugget 1 Easy logging of values and objects
Oct 12, 2016 by Hwee-Boon Yar
Swift 2.0 introduced the defer statement that let us run code just before a function returns.
This is especially useful if you need to clean up resources at multiple points within the same function. E.g.
func writeOutput() {
    var stream: NSOutputStream //initialize it. Possibly a subclass
    if (someCondition) {
        doSomething()
        stream.close()
        return
    } else {
        doSomethingElse()
    }
    stream.close()
}
The example above is contrived, and the code can be improved with some refactoring. But in the function, you can see that clean up code (stream.close()) has to be run at two places. This breaks the DRY principle, and is easy to miss when you modify the code. With the defer statement you can rewrite it:
func writeOutput() {
    var stream: NSOutputStream //initialize it. Possibly a subclass
    defer {
        stream.close()
    }
    if (someCondition) {
        doSomething()
        return
    } else {
        doSomethingElse()
    }
}
The code in the defer block runs right before the function returns. So clean up code only appears once and is close to the initialization code, making it easier to reason. You can write multiple defer blocks in a function and they will be called in reverse order if you initialize multiple resources.
So use defer. Cleaner, fewer errors.
Like this post? Follow me @hboon on Twitter.
Related
Nov 03, 2018
iOS Dev Nugget 314 Checked Array SubscriptingSep 22, 2018
iOS Dev Nugget 310 Weak Reference Wrapper ClassSep 07, 2018
iOS Dev Nugget 308 Careful with early return statements in functions that return voidAug 30, 2018
iOS Dev Nugget 307 Array Out of BoundsAug 23, 2018
iOS Dev Nugget 306 Underscores in Numeric LiteralsAug 02, 2018
iOS Dev Nugget 303 Use Enums for StatesJul 21, 2018
iOS Dev Nugget 301 Print App Document Path IIJul 16, 2018
iOS Dev Nugget 300 Pipe OperatorMay 18, 2018
iOS Dev Nugget 292 for-whereMay 12, 2018
iOS Dev Nugget 291 Implicit Member ExpressionsApr 11, 2018
iOS Dev Nugget 287 Modifying a Property Which is a Struct Triggers didSetNov 02, 2017
iOS Dev Nugget 265 value type cannot have a stored property that recursively contains itSep 13, 2017
iOS Dev Nugget 257 AssertsAug 02, 2017
iOS Dev Nugget 251 Retrieving the Current View ControllerJun 28, 2017
iOS Dev Nugget 246 Mapping Swift and Obj-C Method NamesJun 14, 2017
iOS Dev Nugget 244 IteratorProtocolMay 24, 2017
iOS Dev Nugget 241 Swift Enums with LabelsMay 17, 2017
iOS Dev Nugget 240 Print an Object's Unique IdentifierApr 05, 2017
iOS Dev Nugget 234 #available and @availableNov 23, 2016
iOS Dev Nugget 215 dump Instead of print for Swift StructsOct 25, 2016
iOS Dev Nugget 211 Higher Order Functions: map, filter, reduceSep 28, 2016
iOS Dev Nugget 207 Swift Nil-Coalescing OperatorSep 22, 2016
iOS Dev Nugget 206 Date doesRelativeDateFormattingSep 11, 2016
iOS Dev Nugget 205 The Never Return Type in SwiftSep 07, 2016
iOS Dev Nugget 204 Swift @autoclosureSep 02, 2016
iOS Dev Nugget 203 Swift MeasurementAug 24, 2016
iOS Dev Nugget 202 Swift Enumerations to Encode StatesAug 17, 2016
iOS Dev Nugget 201 Swift Pattern MatchingAug 10, 2016
iOS Dev Nugget 200 Swift flatMapAug 05, 2016
iOS Dev Nugget 199 Swift Talk Video SeriesJul 26, 2016
iOS Dev Nugget 198 KZPlaygroundJul 20, 2016
iOS Dev Nugget 197 App Initialization CodeJul 09, 2016
iOS Dev Nugget 196 Rename Refactoring for Swift CodeJun 24, 2016
iOS Dev Nugget 193 Result EnumerationMay 20, 2016
iOS Dev Nugget 188 SwiftLintMay 10, 2016
iOS Dev Nugget 187 Creating a Singleton Class in SwiftMay 06, 2016
iOS Dev Nugget 186 Injection for XcodeApr 02, 2016
iOS Dev Nugget 182 Tracking the swift-evolution Git RepositoryMar 26, 2016
iOS Dev Nugget 181 Swift SelectorsMar 21, 2016
iOS Dev Nugget 180 Low Power ModeJan 27, 2016
iOS Dev Nugget 172 Print App Document PathDec 30, 2015
iOS Dev Nugget 168 Using Blocks to Manage ContextsOct 20, 2015
iOS Dev Nugget 158 Checking if Newer APIs Are Available In Older iOS Versions (II)Aug 17, 2015
iOS Dev Nugget 149 Timepiece, a Swift Library for Handling DatesJul 05, 2015
iOS Dev Nugget 143 Don't Forget SQLiteJul 01, 2015
iOS Dev Nugget 142 Grand Central DispatchJun 22, 2015
iOS Dev Nugget 141 Great Swift Standard Library Examples Covered in Playground (Swift 2.0)Jun 01, 2015
iOS Dev Nugget 138 Interoperability: Using Enumerations Defined In Objective-C from SwiftMay 27, 2015
iOS Dev Nugget 137 Named Tuple ElementsMay 19, 2015
iOS Dev Nugget 136 Auto Layout with CartographyMay 13, 2015
iOS Dev Nugget 135 CAShapeLayer, Animated Views and XCPShowView()Apr 29, 2015
iOS Dev Nugget 133 Dollar.swiftApr 22, 2015
iOS Dev Nugget 132 XCPCaptureValue in Swift PlaygroundsApr 14, 2015
iOS Dev Nugget 131 Running Asynchronous Code in Swift PlaygroundsApr 03, 2015
iOS Dev Nugget 129 Browsing the Swift Standard LibraryFeb 27, 2015
iOS Dev Nugget 124 performSelector:withObject:afterDelay: in SwiftFeb 20, 2015
iOS Dev Nugget 123 Using dynamicType in SwiftJan 02, 2015
iOS Dev Nugget 116 method() is unavailable: use object construction Class()
Oct 07, 2016 by Hwee-Boon Yar
UIViewController adds the methods showViewController(_:sender:) and showDetailViewController(_:sender:) in iOS 8.
They do the right thing with UINavigationController and UISplitViewController, e.g for UINavigationController, showViewController(_:sender:) will push the view controller and showDetailViewController(_:sender:) will do a present it.
In your own custom view controllers, you can also override these methods to display the view controllers appropriately.
The beauty of these pair of methods is that they walk up the view controller hierarchy looking for view controllers that implement them and do the right thing.
Using showViewController(_:sender:) and showDetailViewController(_:sender:) helps decouple the shown/presented view controller from knowledge of the view controller hierarchy.
Like this post? Follow me @hboon on Twitter.
Sep 28, 2016 by Hwee-Boon Yar
In #61, I talked about the null coalescing operator for Obj-C. This is also available in Swift as the nil-coalescing operator ??.
Here's an example where it's useful. You have an optional object that you want to use if it contains a value, otherwise fallback to a default.
let possiblyNilObject: NSObject? = nil
let defaultObject = NSObject()
You could use if-let-else:
let v3: NSObject
if let v1 = possiblyNilObject {
    v3 = v1
} else {
    v3 = defaultObject
}
Or the ternary conditional operator:
let v4 = possiblyNilObject != nil ? possiblyNilObject! : defaultObject
Or alternatively, the nil-coalescing operator:
let v5 = possiblyNilObject ?? defaultObject
Like this post? Follow me @hboon on Twitter.
Related
Nov 03, 2018
iOS Dev Nugget 314 Checked Array SubscriptingSep 22, 2018
iOS Dev Nugget 310 Weak Reference Wrapper ClassSep 07, 2018
iOS Dev Nugget 308 Careful with early return statements in functions that return voidAug 30, 2018
iOS Dev Nugget 307 Array Out of BoundsAug 23, 2018
iOS Dev Nugget 306 Underscores in Numeric LiteralsAug 02, 2018
iOS Dev Nugget 303 Use Enums for StatesJul 21, 2018
iOS Dev Nugget 301 Print App Document Path IIJul 16, 2018
iOS Dev Nugget 300 Pipe OperatorMay 18, 2018
iOS Dev Nugget 292 for-whereMay 12, 2018
iOS Dev Nugget 291 Implicit Member ExpressionsApr 11, 2018
iOS Dev Nugget 287 Modifying a Property Which is a Struct Triggers didSetNov 02, 2017
iOS Dev Nugget 265 value type cannot have a stored property that recursively contains itSep 13, 2017
iOS Dev Nugget 257 AssertsAug 02, 2017
iOS Dev Nugget 251 Retrieving the Current View ControllerJun 28, 2017
iOS Dev Nugget 246 Mapping Swift and Obj-C Method NamesJun 14, 2017
iOS Dev Nugget 244 IteratorProtocolMay 24, 2017
iOS Dev Nugget 241 Swift Enums with LabelsMay 17, 2017
iOS Dev Nugget 240 Print an Object's Unique IdentifierApr 05, 2017
iOS Dev Nugget 234 #available and @availableNov 23, 2016
iOS Dev Nugget 215 dump Instead of print for Swift StructsOct 25, 2016
iOS Dev Nugget 211 Higher Order Functions: map, filter, reduceOct 12, 2016
iOS Dev Nugget 209 Swift DeferSep 22, 2016
iOS Dev Nugget 206 Date doesRelativeDateFormattingSep 11, 2016
iOS Dev Nugget 205 The Never Return Type in SwiftSep 07, 2016
iOS Dev Nugget 204 Swift @autoclosureSep 02, 2016
iOS Dev Nugget 203 Swift MeasurementAug 24, 2016
iOS Dev Nugget 202 Swift Enumerations to Encode StatesAug 17, 2016
iOS Dev Nugget 201 Swift Pattern MatchingAug 10, 2016
iOS Dev Nugget 200 Swift flatMapAug 05, 2016
iOS Dev Nugget 199 Swift Talk Video SeriesJul 26, 2016
iOS Dev Nugget 198 KZPlaygroundJul 20, 2016
iOS Dev Nugget 197 App Initialization CodeJul 09, 2016
iOS Dev Nugget 196 Rename Refactoring for Swift CodeJun 24, 2016
iOS Dev Nugget 193 Result EnumerationMay 20, 2016
iOS Dev Nugget 188 SwiftLintMay 10, 2016
iOS Dev Nugget 187 Creating a Singleton Class in SwiftMay 06, 2016
iOS Dev Nugget 186 Injection for XcodeApr 02, 2016
iOS Dev Nugget 182 Tracking the swift-evolution Git RepositoryMar 26, 2016
iOS Dev Nugget 181 Swift SelectorsMar 21, 2016
iOS Dev Nugget 180 Low Power ModeJan 27, 2016
iOS Dev Nugget 172 Print App Document PathDec 30, 2015
iOS Dev Nugget 168 Using Blocks to Manage ContextsOct 20, 2015
iOS Dev Nugget 158 Checking if Newer APIs Are Available In Older iOS Versions (II)Aug 17, 2015
iOS Dev Nugget 149 Timepiece, a Swift Library for Handling DatesJul 05, 2015
iOS Dev Nugget 143 Don't Forget SQLiteJul 01, 2015
iOS Dev Nugget 142 Grand Central DispatchJun 22, 2015
iOS Dev Nugget 141 Great Swift Standard Library Examples Covered in Playground (Swift 2.0)Jun 01, 2015
iOS Dev Nugget 138 Interoperability: Using Enumerations Defined In Objective-C from SwiftMay 27, 2015
iOS Dev Nugget 137 Named Tuple ElementsMay 19, 2015
iOS Dev Nugget 136 Auto Layout with CartographyMay 13, 2015
iOS Dev Nugget 135 CAShapeLayer, Animated Views and XCPShowView()Apr 29, 2015
iOS Dev Nugget 133 Dollar.swiftApr 22, 2015
iOS Dev Nugget 132 XCPCaptureValue in Swift PlaygroundsApr 14, 2015
iOS Dev Nugget 131 Running Asynchronous Code in Swift PlaygroundsApr 03, 2015
iOS Dev Nugget 129 Browsing the Swift Standard LibraryFeb 27, 2015
iOS Dev Nugget 124 performSelector:withObject:afterDelay: in SwiftFeb 20, 2015
iOS Dev Nugget 123 Using dynamicType in SwiftJan 02, 2015
iOS Dev Nugget 116 method() is unavailable: use object construction Class()
Sep 22, 2016 by Hwee-Boon Yar
In NSDate (now Date), there's a handy property doesRelativeDateFormatting that, when enabled, returns string values such as "today" and "tomorrow" from string(from:) when appropriate in that locale:
let dateFormatter1 = DateFormatter()
dateFormatter1.dateStyle = .full
dateFormatter1.doesRelativeDateFormatting = true
print(dateFormatter1.string(from: d)) //Today

let dateFormatter2 = DateFormatter()
dateFormatter2.dateStyle = .full
print(dateFormatter2.string(from: d)) //Thurs, September 22, 2016

let dateFormatter3 = DateFormatter()
dateFormatter3.dateStyle = .full
dateFormatter3.locale = Locale(identifier: "zh_Hans_SG")
dateFormatter3.doesRelativeDateFormatting = true
print(dateFormatter3.string(from: d)) //Chinese equivalent of "Today"
Like this post? Follow me @hboon on Twitter.
Related
Nov 03, 2018
iOS Dev Nugget 314 Checked Array SubscriptingSep 22, 2018
iOS Dev Nugget 310 Weak Reference Wrapper ClassSep 07, 2018
iOS Dev Nugget 308 Careful with early return statements in functions that return voidAug 30, 2018
iOS Dev Nugget 307 Array Out of BoundsAug 23, 2018
iOS Dev Nugget 306 Underscores in Numeric LiteralsAug 02, 2018
iOS Dev Nugget 303 Use Enums for StatesJul 21, 2018
iOS Dev Nugget 301 Print App Document Path IIJul 16, 2018
iOS Dev Nugget 300 Pipe OperatorMay 18, 2018
iOS Dev Nugget 292 for-whereMay 12, 2018
iOS Dev Nugget 291 Implicit Member ExpressionsApr 11, 2018
iOS Dev Nugget 287 Modifying a Property Which is a Struct Triggers didSetNov 02, 2017
iOS Dev Nugget 265 value type cannot have a stored property that recursively contains itSep 13, 2017
iOS Dev Nugget 257 AssertsAug 02, 2017
iOS Dev Nugget 251 Retrieving the Current View ControllerJun 28, 2017
iOS Dev Nugget 246 Mapping Swift and Obj-C Method NamesJun 14, 2017
iOS Dev Nugget 244 IteratorProtocolMay 24, 2017
iOS Dev Nugget 241 Swift Enums with LabelsMay 17, 2017
iOS Dev Nugget 240 Print an Object's Unique IdentifierApr 05, 2017
iOS Dev Nugget 234 #available and @availableNov 23, 2016
iOS Dev Nugget 215 dump Instead of print for Swift StructsOct 25, 2016
iOS Dev Nugget 211 Higher Order Functions: map, filter, reduceOct 12, 2016
iOS Dev Nugget 209 Swift DeferSep 28, 2016
iOS Dev Nugget 207 Swift Nil-Coalescing OperatorSep 11, 2016
iOS Dev Nugget 205 The Never Return Type in SwiftSep 07, 2016
iOS Dev Nugget 204 Swift @autoclosureSep 02, 2016
iOS Dev Nugget 203 Swift MeasurementAug 24, 2016
iOS Dev Nugget 202 Swift Enumerations to Encode StatesAug 17, 2016
iOS Dev Nugget 201 Swift Pattern MatchingAug 10, 2016
iOS Dev Nugget 200 Swift flatMapAug 05, 2016
iOS Dev Nugget 199 Swift Talk Video SeriesJul 26, 2016
iOS Dev Nugget 198 KZPlaygroundJul 20, 2016
iOS Dev Nugget 197 App Initialization CodeJul 09, 2016
iOS Dev Nugget 196 Rename Refactoring for Swift CodeJun 24, 2016
iOS Dev Nugget 193 Result EnumerationMay 20, 2016
iOS Dev Nugget 188 SwiftLintMay 10, 2016
iOS Dev Nugget 187 Creating a Singleton Class in SwiftMay 06, 2016
iOS Dev Nugget 186 Injection for XcodeApr 02, 2016
iOS Dev Nugget 182 Tracking the swift-evolution Git RepositoryMar 26, 2016
iOS Dev Nugget 181 Swift SelectorsMar 21, 2016
iOS Dev Nugget 180 Low Power ModeJan 27, 2016
iOS Dev Nugget 172 Print App Document PathDec 30, 2015
iOS Dev Nugget 168 Using Blocks to Manage ContextsOct 20, 2015
iOS Dev Nugget 158 Checking if Newer APIs Are Available In Older iOS Versions (II)Aug 17, 2015
iOS Dev Nugget 149 Timepiece, a Swift Library for Handling DatesJul 05, 2015
iOS Dev Nugget 143 Don't Forget SQLiteJul 01, 2015
iOS Dev Nugget 142 Grand Central DispatchJun 22, 2015
iOS Dev Nugget 141 Great Swift Standard Library Examples Covered in Playground (Swift 2.0)Jun 01, 2015
iOS Dev Nugget 138 Interoperability: Using Enumerations Defined In Objective-C from SwiftMay 27, 2015
iOS Dev Nugget 137 Named Tuple ElementsMay 19, 2015
iOS Dev Nugget 136 Auto Layout with CartographyMay 13, 2015
iOS Dev Nugget 135 CAShapeLayer, Animated Views and XCPShowView()Apr 29, 2015
iOS Dev Nugget 133 Dollar.swiftApr 22, 2015
iOS Dev Nugget 132 XCPCaptureValue in Swift PlaygroundsApr 14, 2015
iOS Dev Nugget 131 Running Asynchronous Code in Swift PlaygroundsApr 03, 2015
iOS Dev Nugget 129 Browsing the Swift Standard LibraryFeb 27, 2015
iOS Dev Nugget 124 performSelector:withObject:afterDelay: in SwiftFeb 20, 2015
iOS Dev Nugget 123 Using dynamicType in SwiftJan 02, 2015
iOS Dev Nugget 116 method() is unavailable: use object construction Class()
Sep 11, 2016 by Hwee-Boon Yar
If you use functions like abort() in Swift, and write code after the function call, you'll notice the compiler issues the warning "Will never be executed":
func foo() {
    abort()
    print("Should not reach here") //Warning for this line
}
And when you call abort() (which doesn't return a value) as the last statement in a function that expects a value to be returned, the compiler doesn't generate a warning.
func bar() -> Int {
    if true {
        abort()
    } else {
        return 1
    }
}
This works because abort() is defined with the return type Never:
public func abort() -> Never
Similarly for exit():
public func exit(_: Int32) -> Never
The documentation says this about Never:
Use Never as the return type when declaring a closure, function, or method that unconditionally throws an error, traps, or otherwise does not terminate.
So if you want to write your own function that logs a catastrophic error and then call fatalError(), you should use the return type Never to signal to the compiler:
func catastrophicError(error: String) -> Never {
    postErrorToSomeCustomLogFacility(error)
}
Like this post? Follow me @hboon on Twitter.
Related
Nov 03, 2018
iOS Dev Nugget 314 Checked Array SubscriptingSep 22, 2018
iOS Dev Nugget 310 Weak Reference Wrapper ClassSep 07, 2018
iOS Dev Nugget 308 Careful with early return statements in functions that return voidAug 30, 2018
iOS Dev Nugget 307 Array Out of BoundsAug 23, 2018
iOS Dev Nugget 306 Underscores in Numeric LiteralsAug 02, 2018
iOS Dev Nugget 303 Use Enums for StatesJul 21, 2018
iOS Dev Nugget 301 Print App Document Path IIJul 16, 2018
iOS Dev Nugget 300 Pipe OperatorMay 18, 2018
iOS Dev Nugget 292 for-whereMay 12, 2018
iOS Dev Nugget 291 Implicit Member ExpressionsApr 11, 2018
iOS Dev Nugget 287 Modifying a Property Which is a Struct Triggers didSetNov 02, 2017
iOS Dev Nugget 265 value type cannot have a stored property that recursively contains itSep 13, 2017
iOS Dev Nugget 257 AssertsAug 02, 2017
iOS Dev Nugget 251 Retrieving the Current View ControllerJun 28, 2017
iOS Dev Nugget 246 Mapping Swift and Obj-C Method NamesJun 14, 2017
iOS Dev Nugget 244 IteratorProtocolMay 24, 2017
iOS Dev Nugget 241 Swift Enums with LabelsMay 17, 2017
iOS Dev Nugget 240 Print an Object's Unique IdentifierApr 05, 2017
iOS Dev Nugget 234 #available and @availableNov 23, 2016
iOS Dev Nugget 215 dump Instead of print for Swift StructsOct 25, 2016
iOS Dev Nugget 211 Higher Order Functions: map, filter, reduceOct 12, 2016
iOS Dev Nugget 209 Swift DeferSep 28, 2016
iOS Dev Nugget 207 Swift Nil-Coalescing OperatorSep 22, 2016
iOS Dev Nugget 206 Date doesRelativeDateFormattingSep 07, 2016
iOS Dev Nugget 204 Swift @autoclosureSep 02, 2016
iOS Dev Nugget 203 Swift MeasurementAug 24, 2016
iOS Dev Nugget 202 Swift Enumerations to Encode StatesAug 17, 2016
iOS Dev Nugget 201 Swift Pattern MatchingAug 10, 2016
iOS Dev Nugget 200 Swift flatMapAug 05, 2016
iOS Dev Nugget 199 Swift Talk Video SeriesJul 26, 2016
iOS Dev Nugget 198 KZPlaygroundJul 20, 2016
iOS Dev Nugget 197 App Initialization CodeJul 09, 2016
iOS Dev Nugget 196 Rename Refactoring for Swift CodeJun 24, 2016
iOS Dev Nugget 193 Result EnumerationMay 20, 2016
iOS Dev Nugget 188 SwiftLintMay 10, 2016
iOS Dev Nugget 187 Creating a Singleton Class in SwiftMay 06, 2016
iOS Dev Nugget 186 Injection for XcodeApr 02, 2016
iOS Dev Nugget 182 Tracking the swift-evolution Git RepositoryMar 26, 2016
iOS Dev Nugget 181 Swift SelectorsMar 21, 2016
iOS Dev Nugget 180 Low Power ModeJan 27, 2016
iOS Dev Nugget 172 Print App Document PathDec 30, 2015
iOS Dev Nugget 168 Using Blocks to Manage ContextsOct 20, 2015
iOS Dev Nugget 158 Checking if Newer APIs Are Available In Older iOS Versions (II)Aug 17, 2015
iOS Dev Nugget 149 Timepiece, a Swift Library for Handling DatesJul 05, 2015
iOS Dev Nugget 143 Don't Forget SQLiteJul 01, 2015
iOS Dev Nugget 142 Grand Central DispatchJun 22, 2015
iOS Dev Nugget 141 Great Swift Standard Library Examples Covered in Playground (Swift 2.0)Jun 01, 2015
iOS Dev Nugget 138 Interoperability: Using Enumerations Defined In Objective-C from SwiftMay 27, 2015
iOS Dev Nugget 137 Named Tuple ElementsMay 19, 2015
iOS Dev Nugget 136 Auto Layout with CartographyMay 13, 2015
iOS Dev Nugget 135 CAShapeLayer, Animated Views and XCPShowView()Apr 29, 2015
iOS Dev Nugget 133 Dollar.swiftApr 22, 2015
iOS Dev Nugget 132 XCPCaptureValue in Swift PlaygroundsApr 14, 2015
iOS Dev Nugget 131 Running Asynchronous Code in Swift PlaygroundsApr 03, 2015
iOS Dev Nugget 129 Browsing the Swift Standard LibraryFeb 27, 2015
iOS Dev Nugget 124 performSelector:withObject:afterDelay: in SwiftFeb 20, 2015
iOS Dev Nugget 123 Using dynamicType in SwiftJan 02, 2015
iOS Dev Nugget 116 method() is unavailable: use object construction Class()
Sep 07, 2016 by Hwee-Boon Yar
Swift provides the @autoclosure declaration attribute. When applied to a function parameter type, it converts the call site expression into a no-arg closure with a return value, delaying the evaluation of the expression. For example, in the following code, both normalFunction() and withAutoClosure() are called with the output of foo(), but because withAutoClosure()'s argument is declared as @autoclosure, it doesn't evaluate foo(). Instead the foo() call is wrapped into a closure which is then passed to withAutoClosure().
func foo() -> Int {
    print("foo called")
    return 1
}

func normalFunction(_ i: Int) {
    print("normalFunction:")
    print("    Value returned by foo: \(i)\n")
}

func withAutoClosure(_ fn: @autoclosure ()->Int) {
    print("withAutoClosure:")
//  print("value returned: \(fn())")
    print("    Notice foo is not called?")
}

normalFunction(foo())
withAutoClosure(foo())
This will produce the output:
foo called
normalFunction:
    Value returned by foo: 1

withAutoClosure:
    Notice foo is not called?
Using @autoclosure, you can decide to skip the evaluating the expression or evaluate it one or more times. The Swift blog gives an example of implementing assert() using @autoclosure, as well as short-circuiting logical operators.
Note that @autoclosure has to be used judiciously because the someone reading the code cannot easily determine that the argument has @autoclosure applied to it.
PS: This code is written in Swift 3. Minor modifications would make it work with Swift 2.2
PPS: If you have any interesting (and short) tip you would to share or a feature you would like me to talk about, reply to this email
Like this post? Follow me @hboon on Twitter.
Related
Nov 03, 2018
iOS Dev Nugget 314 Checked Array SubscriptingSep 22, 2018
iOS Dev Nugget 310 Weak Reference Wrapper ClassSep 07, 2018
iOS Dev Nugget 308 Careful with early return statements in functions that return voidAug 30, 2018
iOS Dev Nugget 307 Array Out of BoundsAug 23, 2018
iOS Dev Nugget 306 Underscores in Numeric LiteralsAug 02, 2018
iOS Dev Nugget 303 Use Enums for StatesJul 21, 2018
iOS Dev Nugget 301 Print App Document Path IIJul 16, 2018
iOS Dev Nugget 300 Pipe OperatorMay 18, 2018
iOS Dev Nugget 292 for-whereMay 12, 2018
iOS Dev Nugget 291 Implicit Member ExpressionsApr 11, 2018
iOS Dev Nugget 287 Modifying a Property Which is a Struct Triggers didSetNov 02, 2017
iOS Dev Nugget 265 value type cannot have a stored property that recursively contains itSep 13, 2017
iOS Dev Nugget 257 AssertsAug 02, 2017
iOS Dev Nugget 251 Retrieving the Current View ControllerJun 28, 2017
iOS Dev Nugget 246 Mapping Swift and Obj-C Method NamesJun 14, 2017
iOS Dev Nugget 244 IteratorProtocolMay 24, 2017
iOS Dev Nugget 241 Swift Enums with LabelsMay 17, 2017
iOS Dev Nugget 240 Print an Object's Unique IdentifierApr 05, 2017
iOS Dev Nugget 234 #available and @availableNov 23, 2016
iOS Dev Nugget 215 dump Instead of print for Swift StructsOct 25, 2016
iOS Dev Nugget 211 Higher Order Functions: map, filter, reduceOct 12, 2016
iOS Dev Nugget 209 Swift DeferSep 28, 2016
iOS Dev Nugget 207 Swift Nil-Coalescing OperatorSep 22, 2016
iOS Dev Nugget 206 Date doesRelativeDateFormattingSep 11, 2016
iOS Dev Nugget 205 The Never Return Type in SwiftSep 02, 2016
iOS Dev Nugget 203 Swift MeasurementAug 24, 2016
iOS Dev Nugget 202 Swift Enumerations to Encode StatesAug 17, 2016
iOS Dev Nugget 201 Swift Pattern MatchingAug 10, 2016
iOS Dev Nugget 200 Swift flatMapAug 05, 2016
iOS Dev Nugget 199 Swift Talk Video SeriesJul 26, 2016
iOS Dev Nugget 198 KZPlaygroundJul 20, 2016
iOS Dev Nugget 197 App Initialization CodeJul 09, 2016
iOS Dev Nugget 196 Rename Refactoring for Swift CodeJun 24, 2016
iOS Dev Nugget 193 Result EnumerationMay 20, 2016
iOS Dev Nugget 188 SwiftLintMay 10, 2016
iOS Dev Nugget 187 Creating a Singleton Class in SwiftMay 06, 2016
iOS Dev Nugget 186 Injection for XcodeApr 02, 2016
iOS Dev Nugget 182 Tracking the swift-evolution Git RepositoryMar 26, 2016
iOS Dev Nugget 181 Swift SelectorsMar 21, 2016
iOS Dev Nugget 180 Low Power ModeJan 27, 2016
iOS Dev Nugget 172 Print App Document PathDec 30, 2015
iOS Dev Nugget 168 Using Blocks to Manage ContextsOct 20, 2015
iOS Dev Nugget 158 Checking if Newer APIs Are Available In Older iOS Versions (II)Aug 17, 2015
iOS Dev Nugget 149 Timepiece, a Swift Library for Handling DatesJul 05, 2015
iOS Dev Nugget 143 Don't Forget SQLiteJul 01, 2015
iOS Dev Nugget 142 Grand Central DispatchJun 22, 2015
iOS Dev Nugget 141 Great Swift Standard Library Examples Covered in Playground (Swift 2.0)Jun 01, 2015
iOS Dev Nugget 138 Interoperability: Using Enumerations Defined In Objective-C from SwiftMay 27, 2015
iOS Dev Nugget 137 Named Tuple ElementsMay 19, 2015
iOS Dev Nugget 136 Auto Layout with CartographyMay 13, 2015
iOS Dev Nugget 135 CAShapeLayer, Animated Views and XCPShowView()Apr 29, 2015
iOS Dev Nugget 133 Dollar.swiftApr 22, 2015
iOS Dev Nugget 132 XCPCaptureValue in Swift PlaygroundsApr 14, 2015
iOS Dev Nugget 131 Running Asynchronous Code in Swift PlaygroundsApr 03, 2015
iOS Dev Nugget 129 Browsing the Swift Standard LibraryFeb 27, 2015
iOS Dev Nugget 124 performSelector:withObject:afterDelay: in SwiftFeb 20, 2015
iOS Dev Nugget 123 Using dynamicType in SwiftJan 02, 2015
iOS Dev Nugget 116 method() is unavailable: use object construction Class()
Sep 02, 2016 by Hwee-Boon Yar
Swift provides a Measurement type that represents a value and its unit. e.g. 2cm.
var v1 = Measurement(value: 1, unit: UnitLength.inches) //1"
v1.convert(to: UnitLength.centimeters) //v1 is now in cm
var v2 = Measurement(value: 2, unit: UnitLength.inches) //2"
v1+v2 //addition
Measurements helps introduce type safety into calculations and reduces conversion errors.
Like this post? Follow me @hboon on Twitter.
Related
Nov 03, 2018
iOS Dev Nugget 314 Checked Array SubscriptingSep 22, 2018
iOS Dev Nugget 310 Weak Reference Wrapper ClassSep 07, 2018
iOS Dev Nugget 308 Careful with early return statements in functions that return voidAug 30, 2018
iOS Dev Nugget 307 Array Out of BoundsAug 23, 2018
iOS Dev Nugget 306 Underscores in Numeric LiteralsAug 02, 2018
iOS Dev Nugget 303 Use Enums for StatesJul 21, 2018
iOS Dev Nugget 301 Print App Document Path IIJul 16, 2018
iOS Dev Nugget 300 Pipe OperatorMay 18, 2018
iOS Dev Nugget 292 for-whereMay 12, 2018
iOS Dev Nugget 291 Implicit Member ExpressionsApr 11, 2018
iOS Dev Nugget 287 Modifying a Property Which is a Struct Triggers didSetNov 02, 2017
iOS Dev Nugget 265 value type cannot have a stored property that recursively contains itSep 13, 2017
iOS Dev Nugget 257 AssertsAug 02, 2017
iOS Dev Nugget 251 Retrieving the Current View ControllerJun 28, 2017
iOS Dev Nugget 246 Mapping Swift and Obj-C Method NamesJun 14, 2017
iOS Dev Nugget 244 IteratorProtocolMay 24, 2017
iOS Dev Nugget 241 Swift Enums with LabelsMay 17, 2017
iOS Dev Nugget 240 Print an Object's Unique IdentifierApr 05, 2017
iOS Dev Nugget 234 #available and @availableNov 23, 2016
iOS Dev Nugget 215 dump Instead of print for Swift StructsOct 25, 2016
iOS Dev Nugget 211 Higher Order Functions: map, filter, reduceOct 12, 2016
iOS Dev Nugget 209 Swift DeferSep 28, 2016
iOS Dev Nugget 207 Swift Nil-Coalescing OperatorSep 22, 2016
iOS Dev Nugget 206 Date doesRelativeDateFormattingSep 11, 2016
iOS Dev Nugget 205 The Never Return Type in SwiftSep 07, 2016
iOS Dev Nugget 204 Swift @autoclosureAug 24, 2016
iOS Dev Nugget 202 Swift Enumerations to Encode StatesAug 17, 2016
iOS Dev Nugget 201 Swift Pattern MatchingAug 10, 2016
iOS Dev Nugget 200 Swift flatMapAug 05, 2016
iOS Dev Nugget 199 Swift Talk Video SeriesJul 26, 2016
iOS Dev Nugget 198 KZPlaygroundJul 20, 2016
iOS Dev Nugget 197 App Initialization CodeJul 09, 2016
iOS Dev Nugget 196 Rename Refactoring for Swift CodeJun 24, 2016
iOS Dev Nugget 193 Result EnumerationMay 20, 2016
iOS Dev Nugget 188 SwiftLintMay 10, 2016
iOS Dev Nugget 187 Creating a Singleton Class in SwiftMay 06, 2016
iOS Dev Nugget 186 Injection for XcodeApr 02, 2016
iOS Dev Nugget 182 Tracking the swift-evolution Git RepositoryMar 26, 2016
iOS Dev Nugget 181 Swift SelectorsMar 21, 2016
iOS Dev Nugget 180 Low Power ModeJan 27, 2016
iOS Dev Nugget 172 Print App Document PathDec 30, 2015
iOS Dev Nugget 168 Using Blocks to Manage ContextsOct 20, 2015
iOS Dev Nugget 158 Checking if Newer APIs Are Available In Older iOS Versions (II)Aug 17, 2015
iOS Dev Nugget 149 Timepiece, a Swift Library for Handling DatesJul 05, 2015
iOS Dev Nugget 143 Don't Forget SQLiteJul 01, 2015
iOS Dev Nugget 142 Grand Central DispatchJun 22, 2015
iOS Dev Nugget 141 Great Swift Standard Library Examples Covered in Playground (Swift 2.0)Jun 01, 2015
iOS Dev Nugget 138 Interoperability: Using Enumerations Defined In Objective-C from SwiftMay 27, 2015
iOS Dev Nugget 137 Named Tuple ElementsMay 19, 2015
iOS Dev Nugget 136 Auto Layout with CartographyMay 13, 2015
iOS Dev Nugget 135 CAShapeLayer, Animated Views and XCPShowView()Apr 29, 2015
iOS Dev Nugget 133 Dollar.swiftApr 22, 2015
iOS Dev Nugget 132 XCPCaptureValue in Swift PlaygroundsApr 14, 2015
iOS Dev Nugget 131 Running Asynchronous Code in Swift PlaygroundsApr 03, 2015
iOS Dev Nugget 129 Browsing the Swift Standard LibraryFeb 27, 2015
iOS Dev Nugget 124 performSelector:withObject:afterDelay: in SwiftFeb 20, 2015
iOS Dev Nugget 123 Using dynamicType in SwiftJan 02, 2015
iOS Dev Nugget 116 method() is unavailable: use object construction Class()
Aug 24, 2016 by Hwee-Boon Yar
Swift Enumerations with associated values are useful for representing a constrained set of cases with associated values. For e.g. in #193, I talked about using Result Enumerations to simplify error handling. In that example, there are 2 possible cases/states — Success and Failure.
In a similar manner, you can use enum cases to encode values such that you can simplify code and reduce duplication by eliminating nil handling. A good example is when you are building a tree or a linked list. There is often a Node type that looks like this for singly linked lists:
class Node<T> {
    var next: Node<T>?
    var value: T?
}
Or for binary trees:
class Node<T> {
    var left: Node<T>?
    var right: Node<T>?
    var value: T?
}
While you can rely on optionals, it gets unwieldly as you need to do nil checks for each var that is an optional Node.
Using enums, you can instead do:
indirect enum Node<T> {
    case Node(value: T)
    case Empty
}
A good example of this approach for working with Binary trees can be found at The power of Swift enums. Look under the title Binary trees.
Enums are shaping up to be a very useful construct in Swift.
Like this post? Follow me @hboon on Twitter.
Related
Nov 03, 2018
iOS Dev Nugget 314 Checked Array SubscriptingSep 22, 2018
iOS Dev Nugget 310 Weak Reference Wrapper ClassSep 07, 2018
iOS Dev Nugget 308 Careful with early return statements in functions that return voidAug 30, 2018
iOS Dev Nugget 307 Array Out of BoundsAug 23, 2018
iOS Dev Nugget 306 Underscores in Numeric LiteralsAug 02, 2018
iOS Dev Nugget 303 Use Enums for StatesJul 21, 2018
iOS Dev Nugget 301 Print App Document Path IIJul 16, 2018
iOS Dev Nugget 300 Pipe OperatorMay 18, 2018
iOS Dev Nugget 292 for-whereMay 12, 2018
iOS Dev Nugget 291 Implicit Member ExpressionsApr 11, 2018
iOS Dev Nugget 287 Modifying a Property Which is a Struct Triggers didSetNov 02, 2017
iOS Dev Nugget 265 value type cannot have a stored property that recursively contains itSep 13, 2017
iOS Dev Nugget 257 AssertsAug 02, 2017
iOS Dev Nugget 251 Retrieving the Current View ControllerJun 28, 2017
iOS Dev Nugget 246 Mapping Swift and Obj-C Method NamesJun 14, 2017
iOS Dev Nugget 244 IteratorProtocolMay 24, 2017
iOS Dev Nugget 241 Swift Enums with LabelsMay 17, 2017
iOS Dev Nugget 240 Print an Object's Unique IdentifierApr 05, 2017
iOS Dev Nugget 234 #available and @availableNov 23, 2016
iOS Dev Nugget 215 dump Instead of print for Swift StructsOct 25, 2016
iOS Dev Nugget 211 Higher Order Functions: map, filter, reduceOct 12, 2016
iOS Dev Nugget 209 Swift DeferSep 28, 2016
iOS Dev Nugget 207 Swift Nil-Coalescing OperatorSep 22, 2016
iOS Dev Nugget 206 Date doesRelativeDateFormattingSep 11, 2016
iOS Dev Nugget 205 The Never Return Type in SwiftSep 07, 2016
iOS Dev Nugget 204 Swift @autoclosureSep 02, 2016
iOS Dev Nugget 203 Swift MeasurementAug 17, 2016
iOS Dev Nugget 201 Swift Pattern MatchingAug 10, 2016
iOS Dev Nugget 200 Swift flatMapAug 05, 2016
iOS Dev Nugget 199 Swift Talk Video SeriesJul 26, 2016
iOS Dev Nugget 198 KZPlaygroundJul 20, 2016
iOS Dev Nugget 197 App Initialization CodeJul 09, 2016
iOS Dev Nugget 196 Rename Refactoring for Swift CodeJun 24, 2016
iOS Dev Nugget 193 Result EnumerationMay 20, 2016
iOS Dev Nugget 188 SwiftLintMay 10, 2016
iOS Dev Nugget 187 Creating a Singleton Class in SwiftMay 06, 2016
iOS Dev Nugget 186 Injection for XcodeApr 02, 2016
iOS Dev Nugget 182 Tracking the swift-evolution Git RepositoryMar 26, 2016
iOS Dev Nugget 181 Swift SelectorsMar 21, 2016
iOS Dev Nugget 180 Low Power ModeJan 27, 2016
iOS Dev Nugget 172 Print App Document PathDec 30, 2015
iOS Dev Nugget 168 Using Blocks to Manage ContextsOct 20, 2015
iOS Dev Nugget 158 Checking if Newer APIs Are Available In Older iOS Versions (II)Aug 17, 2015
iOS Dev Nugget 149 Timepiece, a Swift Library for Handling DatesJul 05, 2015
iOS Dev Nugget 143 Don't Forget SQLiteJul 01, 2015
iOS Dev Nugget 142 Grand Central DispatchJun 22, 2015
iOS Dev Nugget 141 Great Swift Standard Library Examples Covered in Playground (Swift 2.0)Jun 01, 2015
iOS Dev Nugget 138 Interoperability: Using Enumerations Defined In Objective-C from SwiftMay 27, 2015
iOS Dev Nugget 137 Named Tuple ElementsMay 19, 2015
iOS Dev Nugget 136 Auto Layout with CartographyMay 13, 2015
iOS Dev Nugget 135 CAShapeLayer, Animated Views and XCPShowView()Apr 29, 2015
iOS Dev Nugget 133 Dollar.swiftApr 22, 2015
iOS Dev Nugget 132 XCPCaptureValue in Swift PlaygroundsApr 14, 2015
iOS Dev Nugget 131 Running Asynchronous Code in Swift PlaygroundsApr 03, 2015
iOS Dev Nugget 129 Browsing the Swift Standard LibraryFeb 27, 2015
iOS Dev Nugget 124 performSelector:withObject:afterDelay: in SwiftFeb 20, 2015
iOS Dev Nugget 123 Using dynamicType in SwiftJan 02, 2015
iOS Dev Nugget 116 method() is unavailable: use object construction Class()
Aug 17, 2016 by Hwee-Boon Yar
I was going to write a tip about pattern matching using enums, but realized that someone else has already done a great job, including other forms of pattern matching in Swift, and not only against enums. So I'll point you to this post by Benedikt Terhechte :)
Enumerations are powerful in Swift, I expect to be writing more about using them over here.
Like this post? Follow me @hboon on Twitter.
Related
Nov 03, 2018
iOS Dev Nugget 314 Checked Array SubscriptingSep 22, 2018
iOS Dev Nugget 310 Weak Reference Wrapper ClassSep 07, 2018
iOS Dev Nugget 308 Careful with early return statements in functions that return voidAug 30, 2018
iOS Dev Nugget 307 Array Out of BoundsAug 23, 2018
iOS Dev Nugget 306 Underscores in Numeric LiteralsAug 02, 2018
iOS Dev Nugget 303 Use Enums for StatesJul 21, 2018
iOS Dev Nugget 301 Print App Document Path IIJul 16, 2018
iOS Dev Nugget 300 Pipe OperatorMay 18, 2018
iOS Dev Nugget 292 for-whereMay 12, 2018
iOS Dev Nugget 291 Implicit Member ExpressionsApr 11, 2018
iOS Dev Nugget 287 Modifying a Property Which is a Struct Triggers didSetNov 02, 2017
iOS Dev Nugget 265 value type cannot have a stored property that recursively contains itSep 13, 2017
iOS Dev Nugget 257 AssertsAug 02, 2017
iOS Dev Nugget 251 Retrieving the Current View ControllerJun 28, 2017
iOS Dev Nugget 246 Mapping Swift and Obj-C Method NamesJun 14, 2017
iOS Dev Nugget 244 IteratorProtocolMay 24, 2017
iOS Dev Nugget 241 Swift Enums with LabelsMay 17, 2017
iOS Dev Nugget 240 Print an Object's Unique IdentifierApr 05, 2017
iOS Dev Nugget 234 #available and @availableNov 23, 2016
iOS Dev Nugget 215 dump Instead of print for Swift StructsOct 25, 2016
iOS Dev Nugget 211 Higher Order Functions: map, filter, reduceOct 12, 2016
iOS Dev Nugget 209 Swift DeferSep 28, 2016
iOS Dev Nugget 207 Swift Nil-Coalescing OperatorSep 22, 2016
iOS Dev Nugget 206 Date doesRelativeDateFormattingSep 11, 2016
iOS Dev Nugget 205 The Never Return Type in SwiftSep 07, 2016
iOS Dev Nugget 204 Swift @autoclosureSep 02, 2016
iOS Dev Nugget 203 Swift MeasurementAug 24, 2016
iOS Dev Nugget 202 Swift Enumerations to Encode StatesAug 10, 2016
iOS Dev Nugget 200 Swift flatMapAug 05, 2016
iOS Dev Nugget 199 Swift Talk Video SeriesJul 26, 2016
iOS Dev Nugget 198 KZPlaygroundJul 20, 2016
iOS Dev Nugget 197 App Initialization CodeJul 09, 2016
iOS Dev Nugget 196 Rename Refactoring for Swift CodeJun 24, 2016
iOS Dev Nugget 193 Result EnumerationMay 20, 2016
iOS Dev Nugget 188 SwiftLintMay 10, 2016
iOS Dev Nugget 187 Creating a Singleton Class in SwiftMay 06, 2016
iOS Dev Nugget 186 Injection for XcodeApr 02, 2016
iOS Dev Nugget 182 Tracking the swift-evolution Git RepositoryMar 26, 2016
iOS Dev Nugget 181 Swift SelectorsMar 21, 2016
iOS Dev Nugget 180 Low Power ModeJan 27, 2016
iOS Dev Nugget 172 Print App Document PathDec 30, 2015
iOS Dev Nugget 168 Using Blocks to Manage ContextsOct 20, 2015
iOS Dev Nugget 158 Checking if Newer APIs Are Available In Older iOS Versions (II)Aug 17, 2015
iOS Dev Nugget 149 Timepiece, a Swift Library for Handling DatesJul 05, 2015
iOS Dev Nugget 143 Don't Forget SQLiteJul 01, 2015
iOS Dev Nugget 142 Grand Central DispatchJun 22, 2015
iOS Dev Nugget 141 Great Swift Standard Library Examples Covered in Playground (Swift 2.0)Jun 01, 2015
iOS Dev Nugget 138 Interoperability: Using Enumerations Defined In Objective-C from SwiftMay 27, 2015
iOS Dev Nugget 137 Named Tuple ElementsMay 19, 2015
iOS Dev Nugget 136 Auto Layout with CartographyMay 13, 2015
iOS Dev Nugget 135 CAShapeLayer, Animated Views and XCPShowView()Apr 29, 2015
iOS Dev Nugget 133 Dollar.swiftApr 22, 2015
iOS Dev Nugget 132 XCPCaptureValue in Swift PlaygroundsApr 14, 2015
iOS Dev Nugget 131 Running Asynchronous Code in Swift PlaygroundsApr 03, 2015
iOS Dev Nugget 129 Browsing the Swift Standard LibraryFeb 27, 2015
iOS Dev Nugget 124 performSelector:withObject:afterDelay: in SwiftFeb 20, 2015
iOS Dev Nugget 123 Using dynamicType in SwiftJan 02, 2015
iOS Dev Nugget 116 method() is unavailable: use object construction Class()
Aug 10, 2016 by Hwee-Boon Yar
Swift arrays have a flatMap function that is very handy. Suppose you have an array of Int and want to perform an operation for each element and return the results as a new array. This is the classic use of map:
let source1 = [1, 2, 3]
let l1 = source1.map {$0*2}
l1 //[2, 4, 6] of type [Int]
If the source array is of type [Int?], it becomes trickier:
let source2: [Int?] = [1, 2, nil, 3]
let l2 = source2.map {$0} //Can't easily do $0*2, we'll just use $0 for illustration
l2 //[{some 1}, {some 2}, nil, {some 3}] of type [Int?]
Notice that the result (l2) is now an [Int?]. Sometimes you want a [Int], discarding any nil values. This is where flatMap comes in:
let l1 = [1, 2, nil, 3].flatMap {$0}
l1 //[1, 2, 3]
The result is an [Int].
flatMap performs the operation and discards the value if it's nil. This is useful in this case:
let someSourceIdentifiers = ...
let objectsFound = someSourceIdentifiers.flatMap {lookupObject($0)}
There's another use of flatMap, which is to flatten arrays.
let l2 = [[1, 2], [3, 4, 5]].flatMap {$0}
l2 //[1, 2, 3, 4, 5]
In other words, it unpacks 1 level of array.
Notice how it doesn't unpack here:
let l3 = [1, [2, 3, 4], 5].flatMap {$0}
l3 //[1, [2, 3, 4], 5]
Like this post? Follow me @hboon on Twitter.
Related
Nov 03, 2018
iOS Dev Nugget 314 Checked Array SubscriptingSep 22, 2018
iOS Dev Nugget 310 Weak Reference Wrapper ClassSep 07, 2018
iOS Dev Nugget 308 Careful with early return statements in functions that return voidAug 30, 2018
iOS Dev Nugget 307 Array Out of BoundsAug 23, 2018
iOS Dev Nugget 306 Underscores in Numeric LiteralsAug 02, 2018
iOS Dev Nugget 303 Use Enums for StatesJul 21, 2018
iOS Dev Nugget 301 Print App Document Path IIJul 16, 2018
iOS Dev Nugget 300 Pipe OperatorMay 18, 2018
iOS Dev Nugget 292 for-whereMay 12, 2018
iOS Dev Nugget 291 Implicit Member ExpressionsApr 11, 2018
iOS Dev Nugget 287 Modifying a Property Which is a Struct Triggers didSetNov 02, 2017
iOS Dev Nugget 265 value type cannot have a stored property that recursively contains itSep 13, 2017
iOS Dev Nugget 257 AssertsAug 02, 2017
iOS Dev Nugget 251 Retrieving the Current View ControllerJun 28, 2017
iOS Dev Nugget 246 Mapping Swift and Obj-C Method NamesJun 14, 2017
iOS Dev Nugget 244 IteratorProtocolMay 24, 2017
iOS Dev Nugget 241 Swift Enums with LabelsMay 17, 2017
iOS Dev Nugget 240 Print an Object's Unique IdentifierApr 05, 2017
iOS Dev Nugget 234 #available and @availableNov 23, 2016
iOS Dev Nugget 215 dump Instead of print for Swift StructsOct 25, 2016
iOS Dev Nugget 211 Higher Order Functions: map, filter, reduceOct 12, 2016
iOS Dev Nugget 209 Swift DeferSep 28, 2016
iOS Dev Nugget 207 Swift Nil-Coalescing OperatorSep 22, 2016
iOS Dev Nugget 206 Date doesRelativeDateFormattingSep 11, 2016
iOS Dev Nugget 205 The Never Return Type in SwiftSep 07, 2016
iOS Dev Nugget 204 Swift @autoclosureSep 02, 2016
iOS Dev Nugget 203 Swift MeasurementAug 24, 2016
iOS Dev Nugget 202 Swift Enumerations to Encode StatesAug 17, 2016
iOS Dev Nugget 201 Swift Pattern MatchingAug 05, 2016
iOS Dev Nugget 199 Swift Talk Video SeriesJul 26, 2016
iOS Dev Nugget 198 KZPlaygroundJul 20, 2016
iOS Dev Nugget 197 App Initialization CodeJul 09, 2016
iOS Dev Nugget 196 Rename Refactoring for Swift CodeJun 24, 2016
iOS Dev Nugget 193 Result EnumerationMay 20, 2016
iOS Dev Nugget 188 SwiftLintMay 10, 2016
iOS Dev Nugget 187 Creating a Singleton Class in SwiftMay 06, 2016
iOS Dev Nugget 186 Injection for XcodeApr 02, 2016
iOS Dev Nugget 182 Tracking the swift-evolution Git RepositoryMar 26, 2016
iOS Dev Nugget 181 Swift SelectorsMar 21, 2016
iOS Dev Nugget 180 Low Power ModeJan 27, 2016
iOS Dev Nugget 172 Print App Document PathDec 30, 2015
iOS Dev Nugget 168 Using Blocks to Manage ContextsOct 20, 2015
iOS Dev Nugget 158 Checking if Newer APIs Are Available In Older iOS Versions (II)Aug 17, 2015
iOS Dev Nugget 149 Timepiece, a Swift Library for Handling DatesJul 05, 2015
iOS Dev Nugget 143 Don't Forget SQLiteJul 01, 2015
iOS Dev Nugget 142 Grand Central DispatchJun 22, 2015
iOS Dev Nugget 141 Great Swift Standard Library Examples Covered in Playground (Swift 2.0)Jun 01, 2015
iOS Dev Nugget 138 Interoperability: Using Enumerations Defined In Objective-C from SwiftMay 27, 2015
iOS Dev Nugget 137 Named Tuple ElementsMay 19, 2015
iOS Dev Nugget 136 Auto Layout with CartographyMay 13, 2015
iOS Dev Nugget 135 CAShapeLayer, Animated Views and XCPShowView()Apr 29, 2015
iOS Dev Nugget 133 Dollar.swiftApr 22, 2015
iOS Dev Nugget 132 XCPCaptureValue in Swift PlaygroundsApr 14, 2015
iOS Dev Nugget 131 Running Asynchronous Code in Swift PlaygroundsApr 03, 2015
iOS Dev Nugget 129 Browsing the Swift Standard LibraryFeb 27, 2015
iOS Dev Nugget 124 performSelector:withObject:afterDelay: in SwiftFeb 20, 2015
iOS Dev Nugget 123 Using dynamicType in SwiftJan 02, 2015
iOS Dev Nugget 116 method() is unavailable: use object construction Class()
Aug 05, 2016 by Hwee-Boon Yar
Swift Talk is a weekly video series about Swift where the hosts talk through a problem and write the code for the solution. The discussion and live coding format is great because in their own words, the series is:
packed with live-coding and discussions about the pros and cons of our decisions.
It alternates bi-weekly between free and subscriber-only content.
Check it out, it's great.
Like this post? Follow me @hboon on Twitter.
Related
Nov 03, 2018
iOS Dev Nugget 314 Checked Array SubscriptingSep 22, 2018
iOS Dev Nugget 310 Weak Reference Wrapper ClassSep 07, 2018
iOS Dev Nugget 308 Careful with early return statements in functions that return voidAug 30, 2018
iOS Dev Nugget 307 Array Out of BoundsAug 23, 2018
iOS Dev Nugget 306 Underscores in Numeric LiteralsAug 02, 2018
iOS Dev Nugget 303 Use Enums for StatesJul 21, 2018
iOS Dev Nugget 301 Print App Document Path IIJul 16, 2018
iOS Dev Nugget 300 Pipe OperatorMay 18, 2018
iOS Dev Nugget 292 for-whereMay 12, 2018
iOS Dev Nugget 291 Implicit Member ExpressionsApr 11, 2018
iOS Dev Nugget 287 Modifying a Property Which is a Struct Triggers didSetNov 02, 2017
iOS Dev Nugget 265 value type cannot have a stored property that recursively contains itSep 13, 2017
iOS Dev Nugget 257 AssertsAug 02, 2017
iOS Dev Nugget 251 Retrieving the Current View ControllerJun 28, 2017
iOS Dev Nugget 246 Mapping Swift and Obj-C Method NamesJun 14, 2017
iOS Dev Nugget 244 IteratorProtocolMay 24, 2017
iOS Dev Nugget 241 Swift Enums with LabelsMay 17, 2017
iOS Dev Nugget 240 Print an Object's Unique IdentifierApr 05, 2017
iOS Dev Nugget 234 #available and @availableNov 23, 2016
iOS Dev Nugget 215 dump Instead of print for Swift StructsOct 25, 2016
iOS Dev Nugget 211 Higher Order Functions: map, filter, reduceOct 12, 2016
iOS Dev Nugget 209 Swift DeferSep 28, 2016
iOS Dev Nugget 207 Swift Nil-Coalescing OperatorSep 22, 2016
iOS Dev Nugget 206 Date doesRelativeDateFormattingSep 11, 2016
iOS Dev Nugget 205 The Never Return Type in SwiftSep 07, 2016
iOS Dev Nugget 204 Swift @autoclosureSep 02, 2016
iOS Dev Nugget 203 Swift MeasurementAug 24, 2016
iOS Dev Nugget 202 Swift Enumerations to Encode StatesAug 17, 2016
iOS Dev Nugget 201 Swift Pattern MatchingAug 10, 2016
iOS Dev Nugget 200 Swift flatMapJul 26, 2016
iOS Dev Nugget 198 KZPlaygroundJul 20, 2016
iOS Dev Nugget 197 App Initialization CodeJul 09, 2016
iOS Dev Nugget 196 Rename Refactoring for Swift CodeJun 24, 2016
iOS Dev Nugget 193 Result EnumerationMay 20, 2016
iOS Dev Nugget 188 SwiftLintMay 10, 2016
iOS Dev Nugget 187 Creating a Singleton Class in SwiftMay 06, 2016
iOS Dev Nugget 186 Injection for XcodeApr 02, 2016
iOS Dev Nugget 182 Tracking the swift-evolution Git RepositoryMar 26, 2016
iOS Dev Nugget 181 Swift SelectorsMar 21, 2016
iOS Dev Nugget 180 Low Power ModeJan 27, 2016
iOS Dev Nugget 172 Print App Document PathDec 30, 2015
iOS Dev Nugget 168 Using Blocks to Manage ContextsOct 20, 2015
iOS Dev Nugget 158 Checking if Newer APIs Are Available In Older iOS Versions (II)Aug 17, 2015
iOS Dev Nugget 149 Timepiece, a Swift Library for Handling DatesJul 05, 2015
iOS Dev Nugget 143 Don't Forget SQLiteJul 01, 2015
iOS Dev Nugget 142 Grand Central DispatchJun 22, 2015
iOS Dev Nugget 141 Great Swift Standard Library Examples Covered in Playground (Swift 2.0)Jun 01, 2015
iOS Dev Nugget 138 Interoperability: Using Enumerations Defined In Objective-C from SwiftMay 27, 2015
iOS Dev Nugget 137 Named Tuple ElementsMay 19, 2015
iOS Dev Nugget 136 Auto Layout with CartographyMay 13, 2015
iOS Dev Nugget 135 CAShapeLayer, Animated Views and XCPShowView()Apr 29, 2015
iOS Dev Nugget 133 Dollar.swiftApr 22, 2015
iOS Dev Nugget 132 XCPCaptureValue in Swift PlaygroundsApr 14, 2015
iOS Dev Nugget 131 Running Asynchronous Code in Swift PlaygroundsApr 03, 2015
iOS Dev Nugget 129 Browsing the Swift Standard LibraryFeb 27, 2015
iOS Dev Nugget 124 performSelector:withObject:afterDelay: in SwiftFeb 20, 2015
iOS Dev Nugget 123 Using dynamicType in SwiftJan 02, 2015
iOS Dev Nugget 116 method() is unavailable: use object construction Class()
Jul 26, 2016 by Hwee-Boon Yar
Swift Playgrounds are wonderful for teaching, exploring API and prototyping ideas and algorithms. If you like Swift Playgrounds but work with Obj-C, you are going to love KZPlayground by @merowing_. Available as a CocoaPod, you can bundle it into your project (during development). In many ways, it works even better than Swift playgrounds.
Check out the demo video.
Like this post? Follow me @hboon on Twitter.
Related
Nov 03, 2018
iOS Dev Nugget 314 Checked Array SubscriptingSep 22, 2018
iOS Dev Nugget 310 Weak Reference Wrapper ClassSep 07, 2018
iOS Dev Nugget 308 Careful with early return statements in functions that return voidAug 30, 2018
iOS Dev Nugget 307 Array Out of BoundsAug 23, 2018
iOS Dev Nugget 306 Underscores in Numeric LiteralsAug 02, 2018
iOS Dev Nugget 303 Use Enums for StatesJul 21, 2018
iOS Dev Nugget 301 Print App Document Path IIJul 16, 2018
iOS Dev Nugget 300 Pipe OperatorMay 18, 2018
iOS Dev Nugget 292 for-whereMay 12, 2018
iOS Dev Nugget 291 Implicit Member ExpressionsApr 11, 2018
iOS Dev Nugget 287 Modifying a Property Which is a Struct Triggers didSetFeb 07, 2018
iOS Dev Nugget 278 Type Inference for Objective-CNov 02, 2017
iOS Dev Nugget 265 value type cannot have a stored property that recursively contains itSep 13, 2017
iOS Dev Nugget 257 AssertsAug 02, 2017
iOS Dev Nugget 251 Retrieving the Current View ControllerJun 28, 2017
iOS Dev Nugget 246 Mapping Swift and Obj-C Method NamesJun 14, 2017
iOS Dev Nugget 244 IteratorProtocolMay 24, 2017
iOS Dev Nugget 241 Swift Enums with LabelsMay 17, 2017
iOS Dev Nugget 240 Print an Object's Unique IdentifierApr 05, 2017
iOS Dev Nugget 234 #available and @availableNov 23, 2016
iOS Dev Nugget 215 dump Instead of print for Swift StructsOct 25, 2016
iOS Dev Nugget 211 Higher Order Functions: map, filter, reduceOct 12, 2016
iOS Dev Nugget 209 Swift DeferSep 28, 2016
iOS Dev Nugget 207 Swift Nil-Coalescing OperatorSep 22, 2016
iOS Dev Nugget 206 Date doesRelativeDateFormattingSep 11, 2016
iOS Dev Nugget 205 The Never Return Type in SwiftSep 07, 2016
iOS Dev Nugget 204 Swift @autoclosureSep 02, 2016
iOS Dev Nugget 203 Swift MeasurementAug 24, 2016
iOS Dev Nugget 202 Swift Enumerations to Encode StatesAug 17, 2016
iOS Dev Nugget 201 Swift Pattern MatchingAug 10, 2016
iOS Dev Nugget 200 Swift flatMapAug 05, 2016
iOS Dev Nugget 199 Swift Talk Video SeriesJul 20, 2016
iOS Dev Nugget 197 App Initialization CodeJul 09, 2016
iOS Dev Nugget 196 Rename Refactoring for Swift CodeJun 24, 2016
iOS Dev Nugget 193 Result EnumerationMay 20, 2016
iOS Dev Nugget 188 SwiftLintMay 10, 2016
iOS Dev Nugget 187 Creating a Singleton Class in SwiftMay 06, 2016
iOS Dev Nugget 186 Injection for XcodeApr 02, 2016
iOS Dev Nugget 182 Tracking the swift-evolution Git RepositoryMar 26, 2016
iOS Dev Nugget 181 Swift SelectorsMar 21, 2016
iOS Dev Nugget 180 Low Power ModeJan 27, 2016
iOS Dev Nugget 172 Print App Document PathDec 30, 2015
iOS Dev Nugget 168 Using Blocks to Manage ContextsOct 20, 2015
iOS Dev Nugget 158 Checking if Newer APIs Are Available In Older iOS Versions (II)Aug 17, 2015
iOS Dev Nugget 149 Timepiece, a Swift Library for Handling DatesJul 05, 2015
iOS Dev Nugget 143 Don't Forget SQLiteJul 01, 2015
iOS Dev Nugget 142 Grand Central DispatchJun 22, 2015
iOS Dev Nugget 141 Great Swift Standard Library Examples Covered in Playground (Swift 2.0)Jun 01, 2015
iOS Dev Nugget 138 Interoperability: Using Enumerations Defined In Objective-C from SwiftMay 27, 2015
iOS Dev Nugget 137 Named Tuple ElementsMay 19, 2015
iOS Dev Nugget 136 Auto Layout with CartographyMay 13, 2015
iOS Dev Nugget 135 CAShapeLayer, Animated Views and XCPShowView()Apr 29, 2015
iOS Dev Nugget 133 Dollar.swiftApr 22, 2015
iOS Dev Nugget 132 XCPCaptureValue in Swift PlaygroundsApr 14, 2015
iOS Dev Nugget 131 Running Asynchronous Code in Swift PlaygroundsApr 03, 2015
iOS Dev Nugget 129 Browsing the Swift Standard LibraryFeb 27, 2015
iOS Dev Nugget 124 performSelector:withObject:afterDelay: in SwiftFeb 20, 2015
iOS Dev Nugget 123 Using dynamicType in SwiftJan 02, 2015
iOS Dev Nugget 116 method() is unavailable: use object construction Class()
Jul 20, 2016 by Hwee-Boon Yar
Sometimes you want to set global state before any of your other code runs. With Obj-C, you can override the +load method for a class to do that. The +load method runs once-only, automatically when the class is loaded at launch.
If you try to override the class load() function in Swift, you will get the error "Method 'load()' defines Objective-C class method 'load', which is not permitted by Swift". So you have to fall back to overriding the class function initialize() instead. There is a key difference between load() and initialize(). The former basically runs when the app starts up (when the class is loaded), but the latter only when the class is first used, so you might want to implement initialize() for your class which implements UIApplicationDelegate.
Either way, you should be careful not to put long running code in load() or initialize() because that will block the main thread and the launch of your app.
Like this post? Follow me @hboon on Twitter.
Related
Nov 03, 2018
iOS Dev Nugget 314 Checked Array SubscriptingSep 22, 2018
iOS Dev Nugget 310 Weak Reference Wrapper ClassSep 07, 2018
iOS Dev Nugget 308 Careful with early return statements in functions that return voidAug 30, 2018
iOS Dev Nugget 307 Array Out of BoundsAug 23, 2018
iOS Dev Nugget 306 Underscores in Numeric LiteralsAug 02, 2018
iOS Dev Nugget 303 Use Enums for StatesJul 21, 2018
iOS Dev Nugget 301 Print App Document Path IIJul 16, 2018
iOS Dev Nugget 300 Pipe OperatorMay 18, 2018
iOS Dev Nugget 292 for-whereMay 12, 2018
iOS Dev Nugget 291 Implicit Member ExpressionsApr 11, 2018
iOS Dev Nugget 287 Modifying a Property Which is a Struct Triggers didSetNov 02, 2017
iOS Dev Nugget 265 value type cannot have a stored property that recursively contains itSep 13, 2017
iOS Dev Nugget 257 AssertsAug 02, 2017
iOS Dev Nugget 251 Retrieving the Current View ControllerJun 28, 2017
iOS Dev Nugget 246 Mapping Swift and Obj-C Method NamesJun 14, 2017
iOS Dev Nugget 244 IteratorProtocolMay 24, 2017
iOS Dev Nugget 241 Swift Enums with LabelsMay 17, 2017
iOS Dev Nugget 240 Print an Object's Unique IdentifierApr 05, 2017
iOS Dev Nugget 234 #available and @availableNov 23, 2016
iOS Dev Nugget 215 dump Instead of print for Swift StructsOct 25, 2016
iOS Dev Nugget 211 Higher Order Functions: map, filter, reduceOct 12, 2016
iOS Dev Nugget 209 Swift DeferSep 28, 2016
iOS Dev Nugget 207 Swift Nil-Coalescing OperatorSep 22, 2016
iOS Dev Nugget 206 Date doesRelativeDateFormattingSep 11, 2016
iOS Dev Nugget 205 The Never Return Type in SwiftSep 07, 2016
iOS Dev Nugget 204 Swift @autoclosureSep 02, 2016
iOS Dev Nugget 203 Swift MeasurementAug 24, 2016
iOS Dev Nugget 202 Swift Enumerations to Encode StatesAug 17, 2016
iOS Dev Nugget 201 Swift Pattern MatchingAug 10, 2016
iOS Dev Nugget 200 Swift flatMapAug 05, 2016
iOS Dev Nugget 199 Swift Talk Video SeriesJul 26, 2016
iOS Dev Nugget 198 KZPlaygroundJul 09, 2016
iOS Dev Nugget 196 Rename Refactoring for Swift CodeJun 24, 2016
iOS Dev Nugget 193 Result EnumerationMay 20, 2016
iOS Dev Nugget 188 SwiftLintMay 10, 2016
iOS Dev Nugget 187 Creating a Singleton Class in SwiftMay 06, 2016
iOS Dev Nugget 186 Injection for XcodeApr 02, 2016
iOS Dev Nugget 182 Tracking the swift-evolution Git RepositoryMar 26, 2016
iOS Dev Nugget 181 Swift SelectorsMar 21, 2016
iOS Dev Nugget 180 Low Power ModeJan 27, 2016
iOS Dev Nugget 172 Print App Document PathDec 30, 2015
iOS Dev Nugget 168 Using Blocks to Manage ContextsOct 20, 2015
iOS Dev Nugget 158 Checking if Newer APIs Are Available In Older iOS Versions (II)Aug 17, 2015
iOS Dev Nugget 149 Timepiece, a Swift Library for Handling DatesJul 05, 2015
iOS Dev Nugget 143 Don't Forget SQLiteJul 01, 2015
iOS Dev Nugget 142 Grand Central DispatchJun 22, 2015
iOS Dev Nugget 141 Great Swift Standard Library Examples Covered in Playground (Swift 2.0)Jun 01, 2015
iOS Dev Nugget 138 Interoperability: Using Enumerations Defined In Objective-C from SwiftMay 27, 2015
iOS Dev Nugget 137 Named Tuple ElementsMay 19, 2015
iOS Dev Nugget 136 Auto Layout with CartographyMay 13, 2015
iOS Dev Nugget 135 CAShapeLayer, Animated Views and XCPShowView()Apr 29, 2015
iOS Dev Nugget 133 Dollar.swiftApr 22, 2015
iOS Dev Nugget 132 XCPCaptureValue in Swift PlaygroundsApr 14, 2015
iOS Dev Nugget 131 Running Asynchronous Code in Swift PlaygroundsApr 03, 2015
iOS Dev Nugget 129 Browsing the Swift Standard LibraryFeb 27, 2015
iOS Dev Nugget 124 performSelector:withObject:afterDelay: in SwiftFeb 20, 2015
iOS Dev Nugget 123 Using dynamicType in SwiftJan 02, 2015
iOS Dev Nugget 116 method() is unavailable: use object construction Class()
Jul 09, 2016 by Hwee-Boon Yar
If you work with Swift, you'll notice that Xcode doesn't let you refactor Swift code yet. This brings us to another wonderful tool by John Holdsworth called Refactorator.
Refactorator lets you perform rename refactorings on your Swift code. You can install it via Alcatraz.
Like this post? Follow me @hboon on Twitter.
Related
Nov 03, 2018
iOS Dev Nugget 314 Checked Array SubscriptingSep 28, 2018
iOS Dev Nugget 311 jqSep 22, 2018
iOS Dev Nugget 310 Weak Reference Wrapper ClassSep 07, 2018
iOS Dev Nugget 308 Careful with early return statements in functions that return voidAug 30, 2018
iOS Dev Nugget 307 Array Out of BoundsAug 23, 2018
iOS Dev Nugget 306 Underscores in Numeric LiteralsAug 02, 2018
iOS Dev Nugget 303 Use Enums for StatesJul 21, 2018
iOS Dev Nugget 301 Print App Document Path IIJul 16, 2018
iOS Dev Nugget 300 Pipe OperatorJul 08, 2018
iOS Dev Nugget 299 CurryingJun 01, 2018
iOS Dev Nugget 294 Core Data EditorMay 18, 2018
iOS Dev Nugget 292 for-whereMay 12, 2018
iOS Dev Nugget 291 Implicit Member ExpressionsApr 11, 2018
iOS Dev Nugget 287 Modifying a Property Which is a Struct Triggers didSetMar 22, 2018
iOS Dev Nugget 284 Use Shell Aliases for Git commandsDec 20, 2017
iOS Dev Nugget 271 Zhi — Live Reloading Auto Layout Constraints and moreNov 02, 2017
iOS Dev Nugget 265 value type cannot have a stored property that recursively contains itOct 18, 2017
iOS Dev Nugget 262 Apple Device Names APISep 13, 2017
iOS Dev Nugget 257 AssertsAug 23, 2017
iOS Dev Nugget 254 Paw, for Working with APIsAug 02, 2017
iOS Dev Nugget 251 Retrieving the Current View ControllerJun 28, 2017
iOS Dev Nugget 246 Mapping Swift and Obj-C Method NamesJun 14, 2017
iOS Dev Nugget 244 IteratorProtocolMay 24, 2017
iOS Dev Nugget 241 Swift Enums with LabelsMay 17, 2017
iOS Dev Nugget 240 Print an Object's Unique IdentifierApr 26, 2017
iOS Dev Nugget 237 mas-cliApr 19, 2017
iOS Dev Nugget 236 Look up Error CodesApr 05, 2017
iOS Dev Nugget 234 #available and @availableFeb 09, 2017
iOS Dev Nugget 226 React NativeNov 23, 2016
iOS Dev Nugget 215 dump Instead of print for Swift StructsOct 25, 2016
iOS Dev Nugget 211 Higher Order Functions: map, filter, reduceOct 12, 2016
iOS Dev Nugget 209 Swift DeferSep 28, 2016
iOS Dev Nugget 207 Swift Nil-Coalescing OperatorSep 22, 2016
iOS Dev Nugget 206 Date doesRelativeDateFormattingSep 11, 2016
iOS Dev Nugget 205 The Never Return Type in SwiftSep 07, 2016
iOS Dev Nugget 204 Swift @autoclosureSep 02, 2016
iOS Dev Nugget 203 Swift MeasurementAug 24, 2016
iOS Dev Nugget 202 Swift Enumerations to Encode StatesAug 17, 2016
iOS Dev Nugget 201 Swift Pattern MatchingAug 10, 2016
iOS Dev Nugget 200 Swift flatMapAug 05, 2016
iOS Dev Nugget 199 Swift Talk Video SeriesJul 26, 2016
iOS Dev Nugget 198 KZPlaygroundJul 20, 2016
iOS Dev Nugget 197 App Initialization CodeJul 06, 2016
iOS Dev Nugget 195 Tools of the TradeJun 24, 2016
iOS Dev Nugget 193 Result EnumerationMay 20, 2016
iOS Dev Nugget 188 SwiftLintMay 10, 2016
iOS Dev Nugget 187 Creating a Singleton Class in SwiftMay 06, 2016
iOS Dev Nugget 186 Injection for XcodeApr 02, 2016
iOS Dev Nugget 182 Tracking the swift-evolution Git RepositoryMar 26, 2016
iOS Dev Nugget 181 Swift SelectorsMar 21, 2016
iOS Dev Nugget 180 Low Power ModeFeb 03, 2016
iOS Dev Nugget 173 Xcode Package Manager, AlcatrazJan 27, 2016
iOS Dev Nugget 172 Print App Document PathJan 11, 2016
iOS Dev Nugget 170 HomebrewJan 05, 2016
iOS Dev Nugget 169 fastlane: deliverDec 30, 2015
iOS Dev Nugget 168 Using Blocks to Manage ContextsOct 20, 2015
iOS Dev Nugget 158 Checking if Newer APIs Are Available In Older iOS Versions (II)Sep 07, 2015
iOS Dev Nugget 152 Lossy PNG CompressionAug 17, 2015
iOS Dev Nugget 149 Timepiece, a Swift Library for Handling DatesAug 07, 2015
iOS Dev Nugget 147 NSRegularExpression and NSDataDetectorJul 05, 2015
iOS Dev Nugget 143 Don't Forget SQLiteJul 01, 2015
iOS Dev Nugget 142 Grand Central DispatchJun 22, 2015
iOS Dev Nugget 141 Great Swift Standard Library Examples Covered in Playground (Swift 2.0)Jun 01, 2015
iOS Dev Nugget 138 Interoperability: Using Enumerations Defined In Objective-C from SwiftMay 27, 2015
iOS Dev Nugget 137 Named Tuple ElementsMay 19, 2015
iOS Dev Nugget 136 Auto Layout with CartographyMay 13, 2015
iOS Dev Nugget 135 CAShapeLayer, Animated Views and XCPShowView()Apr 29, 2015
iOS Dev Nugget 133 Dollar.swiftApr 22, 2015
iOS Dev Nugget 132 XCPCaptureValue in Swift PlaygroundsApr 14, 2015
iOS Dev Nugget 131 Running Asynchronous Code in Swift PlaygroundsApr 03, 2015
iOS Dev Nugget 129 Browsing the Swift Standard LibraryMar 06, 2015
iOS Dev Nugget 125 View Debugging in XcodeFeb 27, 2015
iOS Dev Nugget 124 performSelector:withObject:afterDelay: in SwiftFeb 20, 2015
iOS Dev Nugget 123 Using dynamicType in SwiftFeb 13, 2015
iOS Dev Nugget 122 Importing Many Test Photos into iOS Simulator IIJan 02, 2015
iOS Dev Nugget 116 method() is unavailable: use object construction Class()Nov 28, 2014
iOS Dev Nugget 111 iOS Support MatrixOct 24, 2014
iOS Dev Nugget 106 Command Line Access to Developer PortalOct 17, 2014
iOS Dev Nugget 105 Try FLEXSep 12, 2014
iOS Dev Nugget 100 Try RevealSep 05, 2014
iOS Dev Nugget 99 Try PaintCodeAug 15, 2014
iOS Dev Nugget 96 Jack, A Native App For iTunes ConnectJul 04, 2014
iOS Dev Nugget 90 Full-Text Searchable WWDC Video Text TranscriptsApr 04, 2014
iOS Dev Nugget 77 RubyMotion Tutorial For Objective C DevelopersJan 17, 2014
iOS Dev Nugget 66 JBChartView for ChartingJan 04, 2014
iOS Dev Nugget 64 Placeholder Views Using PAPlaceholderDec 27, 2013
iOS Dev Nugget 63 Update Your iOS Development ToolboxOct 18, 2013
iOS Dev Nugget 53 Try Kaleidoscope, File Comparison for MacOct 11, 2013
iOS Dev Nugget 52 Set Up Crashlytics For Ad Hoc and App Store Builds OnlyJun 21, 2013
iOS Dev Nugget 36 Use TestFlight for Ad Hoc BuildsMay 11, 2013
iOS Dev Nugget 31 3rd Party Documentation ViewersMar 10, 2013
iOS Dev Nugget 22 Try AppCodeJan 05, 2013
iOS Dev Nugget 14 Charles Web Debugging Proxy
Jul 06, 2016 by Hwee-Boon Yar
Every developer has their favorite set of tools. I have written about a few of them so I'll link to those tips. Here's what I use mainly for iOS app development (in alphabetical order):
AppCode is worth using just for the refactoring tools, quick-fix functionality and inspections.
A proxy server that lets you examine HTTP(S) requests made by (other) apps.
A third-party documentation viewer. Viewing documentation in Xcode used to be very slow. Dash was much faster, but the speed difference is not so significant anymore.
A very handy tool for reducing the size of your PNG files.
A pretty diff tool
I write most of my code in MacVim. Still one of the faster way to enter and edit text.
A tool that lets you make HTTP(S) API requests and display the results in a nice format. Supports extension which generate code you can copy and paste to make the same requests in your project.
I built this app so I can work out regular expressions as well as test them.
Similar to ImageOptim, but for PDFs.
An excellent vector drawing app. Has great support for generating images at different resolutions — especially useful for app icons and in-app assets — with the click of a button.
Like this post? Follow me @hboon on Twitter.
Related
Sep 28, 2018
iOS Dev Nugget 311 jqJul 08, 2018
iOS Dev Nugget 299 CurryingJun 01, 2018
iOS Dev Nugget 294 Core Data EditorMar 22, 2018
iOS Dev Nugget 284 Use Shell Aliases for Git commandsDec 20, 2017
iOS Dev Nugget 271 Zhi — Live Reloading Auto Layout Constraints and moreOct 18, 2017
iOS Dev Nugget 262 Apple Device Names APIAug 23, 2017
iOS Dev Nugget 254 Paw, for Working with APIsApr 26, 2017
iOS Dev Nugget 237 mas-cliApr 19, 2017
iOS Dev Nugget 236 Look up Error CodesFeb 09, 2017
iOS Dev Nugget 226 React NativeJul 09, 2016
iOS Dev Nugget 196 Rename Refactoring for Swift CodeMay 06, 2016
iOS Dev Nugget 186 Injection for XcodeFeb 03, 2016
iOS Dev Nugget 173 Xcode Package Manager, AlcatrazJan 11, 2016
iOS Dev Nugget 170 HomebrewJan 05, 2016
iOS Dev Nugget 169 fastlane: deliverSep 07, 2015
iOS Dev Nugget 152 Lossy PNG CompressionAug 07, 2015
iOS Dev Nugget 147 NSRegularExpression and NSDataDetectorMar 06, 2015
iOS Dev Nugget 125 View Debugging in XcodeFeb 13, 2015
iOS Dev Nugget 122 Importing Many Test Photos into iOS Simulator IINov 28, 2014
iOS Dev Nugget 111 iOS Support MatrixOct 24, 2014
iOS Dev Nugget 106 Command Line Access to Developer PortalOct 17, 2014
iOS Dev Nugget 105 Try FLEXSep 12, 2014
iOS Dev Nugget 100 Try RevealSep 05, 2014
iOS Dev Nugget 99 Try PaintCodeAug 15, 2014
iOS Dev Nugget 96 Jack, A Native App For iTunes ConnectJul 04, 2014
iOS Dev Nugget 90 Full-Text Searchable WWDC Video Text TranscriptsApr 04, 2014
iOS Dev Nugget 77 RubyMotion Tutorial For Objective C DevelopersJan 17, 2014
iOS Dev Nugget 66 JBChartView for ChartingJan 04, 2014
iOS Dev Nugget 64 Placeholder Views Using PAPlaceholderDec 27, 2013
iOS Dev Nugget 63 Update Your iOS Development ToolboxOct 18, 2013
iOS Dev Nugget 53 Try Kaleidoscope, File Comparison for MacOct 11, 2013
iOS Dev Nugget 52 Set Up Crashlytics For Ad Hoc and App Store Builds OnlyJun 21, 2013
iOS Dev Nugget 36 Use TestFlight for Ad Hoc BuildsMay 11, 2013
iOS Dev Nugget 31 3rd Party Documentation ViewersMar 10, 2013
iOS Dev Nugget 22 Try AppCodeJan 05, 2013
iOS Dev Nugget 14 Charles Web Debugging Proxy
Jun 28, 2016 by Hwee-Boon Yar
When working with Core Graphics, you may sometimes see this error message, but it's not obvious where it went wrong:
CGContextDrawImage: invalid context 0x0
Set a symbolic breakpoint for CGPostError and inspect the stack trace.
Like this post? Follow me @hboon on Twitter.
Jun 24, 2016 by Hwee-Boon Yar
Swift Enumerations supports Associated Values. It's an excellent feature to simplify your error handling code without throwing exceptions.
Very often, your app needs to run an operation (doSomething()) that will either return a result if it runs successfully, or an error if it doesn't. The error is often represented by an error message, an error code, or both. There are several ways to do this without using enums. One of them being throwing an exception upon an error or always returning a tuple with 2 elements, 1 representing the successful value, the other representing the error. But with enums, you can do this:
enum Result<T> {
    case Success(T)
    case Failure(String)
}

func doSomething() -> Result<Int> {
    return Result.Success(123)
    //return Result.Failure("error message") //Uncomment this line to simulate error
}

var result = doSomething()
switch result {
case let .Success(val):
    print("Did something successfully, returning value: \(val)")
case let .Failure(err):
    print("Failed to do something with reason: \(err)")
}
Because you are using a switch statement, it also makes it impossible for you to forget about handling an enum state.
This technique is sometimes referred to as Result Enums.
Like this post? Follow me @hboon on Twitter.
Related
Nov 03, 2018
iOS Dev Nugget 314 Checked Array SubscriptingSep 22, 2018
iOS Dev Nugget 310 Weak Reference Wrapper ClassSep 07, 2018
iOS Dev Nugget 308 Careful with early return statements in functions that return voidAug 30, 2018
iOS Dev Nugget 307 Array Out of BoundsAug 23, 2018
iOS Dev Nugget 306 Underscores in Numeric LiteralsAug 02, 2018
iOS Dev Nugget 303 Use Enums for StatesJul 21, 2018
iOS Dev Nugget 301 Print App Document Path IIJul 16, 2018
iOS Dev Nugget 300 Pipe OperatorMay 18, 2018
iOS Dev Nugget 292 for-whereMay 12, 2018
iOS Dev Nugget 291 Implicit Member ExpressionsApr 11, 2018
iOS Dev Nugget 287 Modifying a Property Which is a Struct Triggers didSetNov 02, 2017
iOS Dev Nugget 265 value type cannot have a stored property that recursively contains itSep 13, 2017
iOS Dev Nugget 257 AssertsAug 02, 2017
iOS Dev Nugget 251 Retrieving the Current View ControllerJun 28, 2017
iOS Dev Nugget 246 Mapping Swift and Obj-C Method NamesJun 14, 2017
iOS Dev Nugget 244 IteratorProtocolJun 07, 2017
iOS Dev Nugget 243 Wrapping BOOL in a ClassMay 24, 2017
iOS Dev Nugget 241 Swift Enums with LabelsMay 17, 2017
iOS Dev Nugget 240 Print an Object's Unique IdentifierMay 03, 2017
iOS Dev Nugget 238 Keep Code in Method at the Same Level of AbstractionApr 05, 2017
iOS Dev Nugget 234 #available and @availableMar 01, 2017
iOS Dev Nugget 229 PromisesJan 25, 2017
iOS Dev Nugget 224 Lazy CollectionsDec 14, 2016
iOS Dev Nugget 218 Display an Empty Screen While Loading Data Instead of BlockingNov 23, 2016
iOS Dev Nugget 215 dump Instead of print for Swift StructsNov 04, 2016
iOS Dev Nugget 212 Local Datastore as a CacheOct 25, 2016
iOS Dev Nugget 211 Higher Order Functions: map, filter, reduceOct 12, 2016
iOS Dev Nugget 209 Swift DeferSep 28, 2016
iOS Dev Nugget 207 Swift Nil-Coalescing OperatorSep 22, 2016
iOS Dev Nugget 206 Date doesRelativeDateFormattingSep 11, 2016
iOS Dev Nugget 205 The Never Return Type in SwiftSep 07, 2016
iOS Dev Nugget 204 Swift @autoclosureSep 02, 2016
iOS Dev Nugget 203 Swift MeasurementAug 24, 2016
iOS Dev Nugget 202 Swift Enumerations to Encode StatesAug 17, 2016
iOS Dev Nugget 201 Swift Pattern MatchingAug 10, 2016
iOS Dev Nugget 200 Swift flatMapAug 05, 2016
iOS Dev Nugget 199 Swift Talk Video SeriesJul 26, 2016
iOS Dev Nugget 198 KZPlaygroundJul 20, 2016
iOS Dev Nugget 197 App Initialization CodeJul 09, 2016
iOS Dev Nugget 196 Rename Refactoring for Swift CodeMay 26, 2016
iOS Dev Nugget 189 Xcode's Fix All in ScopeMay 20, 2016
iOS Dev Nugget 188 SwiftLintMay 10, 2016
iOS Dev Nugget 187 Creating a Singleton Class in SwiftMay 06, 2016
iOS Dev Nugget 186 Injection for XcodeApr 27, 2016
iOS Dev Nugget 185 Disabling Content Change Animation in CATextLayerApr 20, 2016
iOS Dev Nugget 184 Async LibraryApr 12, 2016
iOS Dev Nugget 183 Quality of Service ClassesApr 02, 2016
iOS Dev Nugget 182 Tracking the swift-evolution Git RepositoryMar 26, 2016
iOS Dev Nugget 181 Swift SelectorsMar 21, 2016
iOS Dev Nugget 180 Low Power ModeMar 01, 2016
iOS Dev Nugget 177 Push Notifications Testing During DevelopmentFeb 23, 2016
iOS Dev Nugget 176 Git no-commit Pre-commit HookFeb 18, 2016
iOS Dev Nugget 175 Displaying a Popover in iPhone AppFeb 11, 2016
iOS Dev Nugget 174 View Controller Containment to Avoid Growing a Fat View Controller Base ClassJan 27, 2016
iOS Dev Nugget 172 Print App Document PathDec 30, 2015
iOS Dev Nugget 168 Using Blocks to Manage ContextsNov 11, 2015
iOS Dev Nugget 161 Read Smalltalk Best Practice PatternsOct 20, 2015
iOS Dev Nugget 158 Checking if Newer APIs Are Available In Older iOS Versions (II)Aug 17, 2015
iOS Dev Nugget 149 Timepiece, a Swift Library for Handling DatesJul 05, 2015
iOS Dev Nugget 143 Don't Forget SQLiteJul 01, 2015
iOS Dev Nugget 142 Grand Central DispatchJun 22, 2015
iOS Dev Nugget 141 Great Swift Standard Library Examples Covered in Playground (Swift 2.0)Jun 01, 2015
iOS Dev Nugget 138 Interoperability: Using Enumerations Defined In Objective-C from SwiftMay 27, 2015
iOS Dev Nugget 137 Named Tuple ElementsMay 19, 2015
iOS Dev Nugget 136 Auto Layout with CartographyMay 13, 2015
iOS Dev Nugget 135 CAShapeLayer, Animated Views and XCPShowView()Apr 29, 2015
iOS Dev Nugget 133 Dollar.swiftApr 22, 2015
iOS Dev Nugget 132 XCPCaptureValue in Swift PlaygroundsApr 14, 2015
iOS Dev Nugget 131 Running Asynchronous Code in Swift PlaygroundsApr 03, 2015
iOS Dev Nugget 129 Browsing the Swift Standard LibraryFeb 27, 2015
iOS Dev Nugget 124 performSelector:withObject:afterDelay: in SwiftFeb 20, 2015
iOS Dev Nugget 123 Using dynamicType in SwiftJan 02, 2015
iOS Dev Nugget 116 method() is unavailable: use object construction Class()
Jun 17, 2016 by Hwee-Boon Yar
Normally, you'd download Xcode from the Mac App Store and let it (auto)update when a new version is available. There's a better way though. Don't download from the app store. Instead, download from Apple's Downloads for Apple Developers page. This lets you easily run multiple versions of Xcode in parallel (you can rename the .app file) and avoids the issue where the Mac App Store decides to start a download/install process and you are stuck not having Xcode available.
Like this post? Follow me @hboon on Twitter.
Related
Jul 01, 2018
iOS Dev Nugget 298 Conditional BreakpointsFeb 15, 2018
iOS Dev Nugget 279 Reclaim Disk Space by Deleting Old SimulatorsJan 31, 2018
iOS Dev Nugget 277 REPL in LLDBAug 30, 2017
iOS Dev Nugget 255 Symbolic Breakpoint to watch for View Controller DeallocationJun 21, 2017
iOS Dev Nugget 245 Show Call HierarchyMar 08, 2017
iOS Dev Nugget 230 Shortcut to Generate Quick Help DocumentationFeb 03, 2017
iOS Dev Nugget 225 Contextual Help for Xcode Build SettingsDec 29, 2016
iOS Dev Nugget 220 Don't Download Xcode from the Mac App StoreNov 08, 2016
iOS Dev Nugget 213 Download Your App Data on iOS Device for DebuggingMay 26, 2016
iOS Dev Nugget 189 Xcode's Fix All in ScopeMar 12, 2016
iOS Dev Nugget 179 Dragging the Program CounterMar 07, 2016
iOS Dev Nugget 178 Breakpoint Actions for LoggingFeb 03, 2016
iOS Dev Nugget 173 Xcode Package Manager, AlcatrazNov 18, 2015
iOS Dev Nugget 162 Reclaim Disk Space from Xcode Usage
Jun 10, 2016 by Hwee-Boon Yar
If you use Core Location to track user's location, one way to reduce power consumption is to set the pausesLocationUpdatesAutomatically property of CLLocationManager along with activityType to an appropriate type so Core Location knows when it can pause location updates.
var locationManager = CLLocationManager()
locationManager.pause = true
locationManager.activityType = .Fitness
Like this post? Follow me @hboon on Twitter.
Jun 03, 2016 by Hwee-Boon Yar
Occasionally, we'll need to open up a mobile provisioning file for verification. Craig Hockenberry provides a handy Quick Look plug-in for .mobileprovision files. A release can be downloaded from GitHub. The README has some extra details on installation and additional configuration.
It's a time-saver!
Like this post? Follow me @hboon on Twitter.
Related
Aug 15, 2018
iOS Dev Nugget 305 Declaring Distinct Types from General TypesJul 24, 2018
iOS Dev Nugget 302 RealmJun 09, 2018
iOS Dev Nugget 295 SwifterSwiftMay 23, 2018
iOS Dev Nugget 293 iOSSnapshotTestCase (was FBSnapshotTestCase)Mar 15, 2018
iOS Dev Nugget 283 Eureka for FormsFeb 28, 2018
iOS Dev Nugget 281 Use R.swift for Static References to Resources Like ImagesFeb 21, 2018
iOS Dev Nugget 280 Using Custom Fonts Without Updating Info.plist ManuallyDec 06, 2017
iOS Dev Nugget 269 Including Finger Touches in App Preview VideosJul 11, 2017
iOS Dev Nugget 248 In-app Native RoutingMar 01, 2017
iOS Dev Nugget 229 PromisesFeb 22, 2017
iOS Dev Nugget 228 Recording and Playing Back Network CallsOct 23, 2016
iOS Dev Nugget 210 PMAlertControllerMay 20, 2016
iOS Dev Nugget 188 SwiftLintApr 20, 2016
iOS Dev Nugget 184 Async LibraryAug 31, 2015
iOS Dev Nugget 151 More Wrappers for Keychain AccessAug 17, 2015
iOS Dev Nugget 149 Timepiece, a Swift Library for Handling DatesJul 27, 2015
iOS Dev Nugget 146 UIStackView and TZStackViewJul 21, 2015
iOS Dev Nugget 145 Listing Available FontsJul 05, 2015
iOS Dev Nugget 143 Don't Forget SQLiteJun 09, 2015
iOS Dev Nugget 139 Custom Build Configurations and Xcode SubprojectsMay 19, 2015
iOS Dev Nugget 136 Auto Layout with CartographyApr 29, 2015
iOS Dev Nugget 133 Dollar.swiftFeb 06, 2015
iOS Dev Nugget 121 InflectorKitDec 26, 2014
iOS Dev Nugget 115 Displaying Information in Settings AppDec 19, 2014
iOS Dev Nugget 114 Preview an Image for DebuggingDec 12, 2014
iOS Dev Nugget 113 GPUImage, a GPU-based Image and Video Processing FrameworkMay 30, 2014
iOS Dev Nugget 85 A More Customizable Button For Different StatesMay 02, 2014
iOS Dev Nugget 81 TMCache For In-Memory and Disk-backed CachingApr 18, 2014
iOS Dev Nugget 79 TweetBot Photo Flicking EffectMar 07, 2014
iOS Dev Nugget 73 Open Source Date Picker from SquareFeb 22, 2014
iOS Dev Nugget 71 TapJan 31, 2014
iOS Dev Nugget 68 Custom URL Schemes DirectoryDec 20, 2013
iOS Dev Nugget 62 Using PDF Instead of PNG Files for Resizable AssetsSep 20, 2013
iOS Dev Nugget 49 Wrapper to Get UIColor ComponentsMay 17, 2013
iOS Dev Nugget 32 FMDB: Thin Objective C Wrapper Around SQLiteOct 06, 2012
iOS Dev Nugget 1 Easy logging of values and objects
May 26, 2016 by Hwee-Boon Yar
I learnt this tip from @jim_rutherford via this tweet.
When there's more than one warning or error that Xcode can fix with a Fix-it, you can go to the Editor menu and choose Fix All in Scope (Cmd+Opt+Ctrl+F) to fix all the warning/errors in the current scope (method or class) where your cursor is at.
E.g. if you have this in a method:
let r = CGRect(1, 2, 3, 4)
let p = CGPoint(1, 2)
place your cursor anywhere in that method and hit Cmd+Opt+Ctrl+F to invoke Fix all in Scope and it will be updated to these:
let r = CGRect(x: 1, y: 2, width: 3, height: 4)
let p = CGPoint(x: 1, y: 2)
If you place your cursor outside the method but in the class, it will attempt to fix all the warning/errors in that class instead.
Like this post? Follow me @hboon on Twitter.
Related
Jul 21, 2018
iOS Dev Nugget 301 Print App Document Path IIJul 01, 2018
iOS Dev Nugget 298 Conditional BreakpointsFeb 15, 2018
iOS Dev Nugget 279 Reclaim Disk Space by Deleting Old SimulatorsJan 31, 2018
iOS Dev Nugget 277 REPL in LLDBAug 30, 2017
iOS Dev Nugget 255 Symbolic Breakpoint to watch for View Controller DeallocationAug 02, 2017
iOS Dev Nugget 251 Retrieving the Current View ControllerJun 21, 2017
iOS Dev Nugget 245 Show Call HierarchyMay 03, 2017
iOS Dev Nugget 238 Keep Code in Method at the Same Level of AbstractionMar 08, 2017
iOS Dev Nugget 230 Shortcut to Generate Quick Help DocumentationMar 01, 2017
iOS Dev Nugget 229 PromisesFeb 03, 2017
iOS Dev Nugget 225 Contextual Help for Xcode Build SettingsJan 25, 2017
iOS Dev Nugget 224 Lazy CollectionsDec 29, 2016
iOS Dev Nugget 220 Don't Download Xcode from the Mac App StoreNov 08, 2016
iOS Dev Nugget 213 Download Your App Data on iOS Device for DebuggingJun 24, 2016
iOS Dev Nugget 193 Result EnumerationJun 17, 2016
iOS Dev Nugget 192 Download Xcode from Downloads for Apple Developers Website Instead of Mac App StoreMay 20, 2016
iOS Dev Nugget 188 SwiftLintMay 10, 2016
iOS Dev Nugget 187 Creating a Singleton Class in SwiftMay 06, 2016
iOS Dev Nugget 186 Injection for XcodeApr 27, 2016
iOS Dev Nugget 185 Disabling Content Change Animation in CATextLayerApr 20, 2016
iOS Dev Nugget 184 Async LibraryApr 12, 2016
iOS Dev Nugget 183 Quality of Service ClassesApr 02, 2016
iOS Dev Nugget 182 Tracking the swift-evolution Git RepositoryMar 26, 2016
iOS Dev Nugget 181 Swift SelectorsMar 21, 2016
iOS Dev Nugget 180 Low Power ModeMar 12, 2016
iOS Dev Nugget 179 Dragging the Program CounterMar 07, 2016
iOS Dev Nugget 178 Breakpoint Actions for LoggingMar 01, 2016
iOS Dev Nugget 177 Push Notifications Testing During DevelopmentFeb 23, 2016
iOS Dev Nugget 176 Git no-commit Pre-commit HookFeb 18, 2016
iOS Dev Nugget 175 Displaying a Popover in iPhone AppFeb 11, 2016
iOS Dev Nugget 174 View Controller Containment to Avoid Growing a Fat View Controller Base ClassFeb 03, 2016
iOS Dev Nugget 173 Xcode Package Manager, AlcatrazJan 27, 2016
iOS Dev Nugget 172 Print App Document PathDec 30, 2015
iOS Dev Nugget 168 Using Blocks to Manage ContextsNov 18, 2015
iOS Dev Nugget 162 Reclaim Disk Space from Xcode UsageNov 11, 2015
iOS Dev Nugget 161 Read Smalltalk Best Practice PatternsOct 20, 2015
iOS Dev Nugget 158 Checking if Newer APIs Are Available In Older iOS Versions (II)
May 20, 2016 by Hwee-Boon Yar
One of the most important parts of writing code is writing maintainable code. In a group setting especially, a style guide is very important. Lint tools help to enforce that (as well as checking for certain types of bugs). SwiftLint is a lint tool that is based on GitHub's Swift Style Guide.
Install it with Homebrew:
brew install swiftlint
There are 2 ways to use it, either A) run it from the shell, which will examine Swift code files in the current directory:
swiftlint
Or B) Add a Run Script Phase:
if which swiftlint >/dev/null; then
    swiftlint
else
    echo "warning: SwiftLint not installed, download from https://github.com/realm/SwiftLint"
fi
As with all things Swift, it's a relatively new tool and it implements 31 rules as of writing.
There are more options such as using the autocorrect option and more, described in the README.
Like this post? Follow me @hboon on Twitter.
Related
Nov 03, 2018
iOS Dev Nugget 314 Checked Array SubscriptingSep 22, 2018
iOS Dev Nugget 310 Weak Reference Wrapper ClassSep 07, 2018
iOS Dev Nugget 308 Careful with early return statements in functions that return voidAug 30, 2018
iOS Dev Nugget 307 Array Out of BoundsAug 23, 2018
iOS Dev Nugget 306 Underscores in Numeric LiteralsAug 15, 2018
iOS Dev Nugget 305 Declaring Distinct Types from General TypesAug 02, 2018
iOS Dev Nugget 303 Use Enums for StatesJul 24, 2018
iOS Dev Nugget 302 RealmJul 21, 2018
iOS Dev Nugget 301 Print App Document Path IIJul 16, 2018
iOS Dev Nugget 300 Pipe OperatorJun 09, 2018
iOS Dev Nugget 295 SwifterSwiftMay 23, 2018
iOS Dev Nugget 293 iOSSnapshotTestCase (was FBSnapshotTestCase)May 18, 2018
iOS Dev Nugget 292 for-whereMay 12, 2018
iOS Dev Nugget 291 Implicit Member ExpressionsApr 11, 2018
iOS Dev Nugget 287 Modifying a Property Which is a Struct Triggers didSetMar 15, 2018
iOS Dev Nugget 283 Eureka for FormsFeb 28, 2018
iOS Dev Nugget 281 Use R.swift for Static References to Resources Like ImagesFeb 21, 2018
iOS Dev Nugget 280 Using Custom Fonts Without Updating Info.plist ManuallyDec 06, 2017
iOS Dev Nugget 269 Including Finger Touches in App Preview VideosNov 02, 2017
iOS Dev Nugget 265 value type cannot have a stored property that recursively contains itSep 13, 2017
iOS Dev Nugget 257 AssertsAug 02, 2017
iOS Dev Nugget 251 Retrieving the Current View ControllerJul 11, 2017
iOS Dev Nugget 248 In-app Native RoutingJun 28, 2017
iOS Dev Nugget 246 Mapping Swift and Obj-C Method NamesJun 14, 2017
iOS Dev Nugget 244 IteratorProtocolMay 24, 2017
iOS Dev Nugget 241 Swift Enums with LabelsMay 17, 2017
iOS Dev Nugget 240 Print an Object's Unique IdentifierMay 03, 2017
iOS Dev Nugget 238 Keep Code in Method at the Same Level of AbstractionApr 05, 2017
iOS Dev Nugget 234 #available and @availableMar 01, 2017
iOS Dev Nugget 229 PromisesFeb 22, 2017
iOS Dev Nugget 228 Recording and Playing Back Network CallsJan 25, 2017
iOS Dev Nugget 224 Lazy CollectionsNov 23, 2016
iOS Dev Nugget 215 dump Instead of print for Swift StructsOct 25, 2016
iOS Dev Nugget 211 Higher Order Functions: map, filter, reduceOct 23, 2016
iOS Dev Nugget 210 PMAlertControllerOct 12, 2016
iOS Dev Nugget 209 Swift DeferSep 28, 2016
iOS Dev Nugget 207 Swift Nil-Coalescing OperatorSep 22, 2016
iOS Dev Nugget 206 Date doesRelativeDateFormattingSep 11, 2016
iOS Dev Nugget 205 The Never Return Type in SwiftSep 07, 2016
iOS Dev Nugget 204 Swift @autoclosureSep 02, 2016
iOS Dev Nugget 203 Swift MeasurementAug 24, 2016
iOS Dev Nugget 202 Swift Enumerations to Encode StatesAug 17, 2016
iOS Dev Nugget 201 Swift Pattern MatchingAug 10, 2016
iOS Dev Nugget 200 Swift flatMapAug 05, 2016
iOS Dev Nugget 199 Swift Talk Video SeriesJul 26, 2016
iOS Dev Nugget 198 KZPlaygroundJul 20, 2016
iOS Dev Nugget 197 App Initialization CodeJul 09, 2016
iOS Dev Nugget 196 Rename Refactoring for Swift CodeJun 24, 2016
iOS Dev Nugget 193 Result EnumerationJun 03, 2016
iOS Dev Nugget 190 Quick Look Plug-in for Mobile Provisioning FilesMay 26, 2016
iOS Dev Nugget 189 Xcode's Fix All in ScopeMay 10, 2016
iOS Dev Nugget 187 Creating a Singleton Class in SwiftMay 06, 2016
iOS Dev Nugget 186 Injection for XcodeApr 27, 2016
iOS Dev Nugget 185 Disabling Content Change Animation in CATextLayerApr 20, 2016
iOS Dev Nugget 184 Async LibraryApr 12, 2016
iOS Dev Nugget 183 Quality of Service ClassesApr 02, 2016
iOS Dev Nugget 182 Tracking the swift-evolution Git RepositoryMar 26, 2016
iOS Dev Nugget 181 Swift SelectorsMar 21, 2016
iOS Dev Nugget 180 Low Power ModeMar 01, 2016
iOS Dev Nugget 177 Push Notifications Testing During DevelopmentFeb 23, 2016
iOS Dev Nugget 176 Git no-commit Pre-commit HookFeb 18, 2016
iOS Dev Nugget 175 Displaying a Popover in iPhone AppFeb 11, 2016
iOS Dev Nugget 174 View Controller Containment to Avoid Growing a Fat View Controller Base ClassJan 27, 2016
iOS Dev Nugget 172 Print App Document PathDec 30, 2015
iOS Dev Nugget 168 Using Blocks to Manage ContextsNov 11, 2015
iOS Dev Nugget 161 Read Smalltalk Best Practice PatternsOct 20, 2015
iOS Dev Nugget 158 Checking if Newer APIs Are Available In Older iOS Versions (II)Aug 31, 2015
iOS Dev Nugget 151 More Wrappers for Keychain AccessAug 17, 2015
iOS Dev Nugget 149 Timepiece, a Swift Library for Handling DatesJul 27, 2015
iOS Dev Nugget 146 UIStackView and TZStackViewJul 21, 2015
iOS Dev Nugget 145 Listing Available FontsJul 05, 2015
iOS Dev Nugget 143 Don't Forget SQLiteJul 01, 2015
iOS Dev Nugget 142 Grand Central DispatchJun 22, 2015
iOS Dev Nugget 141 Great Swift Standard Library Examples Covered in Playground (Swift 2.0)Jun 09, 2015
iOS Dev Nugget 139 Custom Build Configurations and Xcode SubprojectsJun 01, 2015
iOS Dev Nugget 138 Interoperability: Using Enumerations Defined In Objective-C from SwiftMay 27, 2015
iOS Dev Nugget 137 Named Tuple ElementsMay 19, 2015
iOS Dev Nugget 136 Auto Layout with CartographyMay 13, 2015
iOS Dev Nugget 135 CAShapeLayer, Animated Views and XCPShowView()Apr 29, 2015
iOS Dev Nugget 133 Dollar.swiftApr 22, 2015
iOS Dev Nugget 132 XCPCaptureValue in Swift PlaygroundsApr 14, 2015
iOS Dev Nugget 131 Running Asynchronous Code in Swift PlaygroundsApr 03, 2015
iOS Dev Nugget 129 Browsing the Swift Standard LibraryFeb 27, 2015
iOS Dev Nugget 124 performSelector:withObject:afterDelay: in SwiftFeb 20, 2015
iOS Dev Nugget 123 Using dynamicType in SwiftFeb 06, 2015
iOS Dev Nugget 121 InflectorKitJan 02, 2015
iOS Dev Nugget 116 method() is unavailable: use object construction Class()Dec 26, 2014
iOS Dev Nugget 115 Displaying Information in Settings AppDec 19, 2014
iOS Dev Nugget 114 Preview an Image for DebuggingDec 12, 2014
iOS Dev Nugget 113 GPUImage, a GPU-based Image and Video Processing FrameworkMay 30, 2014
iOS Dev Nugget 85 A More Customizable Button For Different StatesMay 02, 2014
iOS Dev Nugget 81 TMCache For In-Memory and Disk-backed CachingApr 18, 2014
iOS Dev Nugget 79 TweetBot Photo Flicking EffectMar 07, 2014
iOS Dev Nugget 73 Open Source Date Picker from SquareFeb 22, 2014
iOS Dev Nugget 71 TapJan 31, 2014
iOS Dev Nugget 68 Custom URL Schemes DirectoryDec 20, 2013
iOS Dev Nugget 62 Using PDF Instead of PNG Files for Resizable AssetsSep 20, 2013
iOS Dev Nugget 49 Wrapper to Get UIColor ComponentsMay 17, 2013
iOS Dev Nugget 32 FMDB: Thin Objective C Wrapper Around SQLiteOct 06, 2012
iOS Dev Nugget 1 Easy logging of values and objects
May 10, 2016 by Hwee-Boon Yar
I'll be covering a few common "patterns" in future issues, especially in Swift. Let's start with something simple — creating a singleton in Swift:
class MyClass {
    static let sharedInstance = MyClass()
}
You can access it with:
MyClass.sharedInstance()
Like this post? Follow me @hboon on Twitter.
Related
Nov 03, 2018
iOS Dev Nugget 314 Checked Array SubscriptingSep 22, 2018
iOS Dev Nugget 310 Weak Reference Wrapper ClassSep 07, 2018
iOS Dev Nugget 308 Careful with early return statements in functions that return voidAug 30, 2018
iOS Dev Nugget 307 Array Out of BoundsAug 23, 2018
iOS Dev Nugget 306 Underscores in Numeric LiteralsAug 02, 2018
iOS Dev Nugget 303 Use Enums for StatesJul 21, 2018
iOS Dev Nugget 301 Print App Document Path IIJul 16, 2018
iOS Dev Nugget 300 Pipe OperatorMay 18, 2018
iOS Dev Nugget 292 for-whereMay 12, 2018
iOS Dev Nugget 291 Implicit Member ExpressionsApr 11, 2018
iOS Dev Nugget 287 Modifying a Property Which is a Struct Triggers didSetNov 02, 2017
iOS Dev Nugget 265 value type cannot have a stored property that recursively contains itSep 13, 2017
iOS Dev Nugget 257 AssertsAug 02, 2017
iOS Dev Nugget 251 Retrieving the Current View ControllerJun 28, 2017
iOS Dev Nugget 246 Mapping Swift and Obj-C Method NamesJun 14, 2017
iOS Dev Nugget 244 IteratorProtocolJun 07, 2017
iOS Dev Nugget 243 Wrapping BOOL in a ClassMay 24, 2017
iOS Dev Nugget 241 Swift Enums with LabelsMay 17, 2017
iOS Dev Nugget 240 Print an Object's Unique IdentifierMay 03, 2017
iOS Dev Nugget 238 Keep Code in Method at the Same Level of AbstractionApr 05, 2017
iOS Dev Nugget 234 #available and @availableMar 01, 2017
iOS Dev Nugget 229 PromisesJan 25, 2017
iOS Dev Nugget 224 Lazy CollectionsDec 14, 2016
iOS Dev Nugget 218 Display an Empty Screen While Loading Data Instead of BlockingNov 23, 2016
iOS Dev Nugget 215 dump Instead of print for Swift StructsNov 04, 2016
iOS Dev Nugget 212 Local Datastore as a CacheOct 25, 2016
iOS Dev Nugget 211 Higher Order Functions: map, filter, reduceOct 12, 2016
iOS Dev Nugget 209 Swift DeferSep 28, 2016
iOS Dev Nugget 207 Swift Nil-Coalescing OperatorSep 22, 2016
iOS Dev Nugget 206 Date doesRelativeDateFormattingSep 11, 2016
iOS Dev Nugget 205 The Never Return Type in SwiftSep 07, 2016
iOS Dev Nugget 204 Swift @autoclosureSep 02, 2016
iOS Dev Nugget 203 Swift MeasurementAug 24, 2016
iOS Dev Nugget 202 Swift Enumerations to Encode StatesAug 17, 2016
iOS Dev Nugget 201 Swift Pattern MatchingAug 10, 2016
iOS Dev Nugget 200 Swift flatMapAug 05, 2016
iOS Dev Nugget 199 Swift Talk Video SeriesJul 26, 2016
iOS Dev Nugget 198 KZPlaygroundJul 20, 2016
iOS Dev Nugget 197 App Initialization CodeJul 09, 2016
iOS Dev Nugget 196 Rename Refactoring for Swift CodeJun 24, 2016
iOS Dev Nugget 193 Result EnumerationMay 26, 2016
iOS Dev Nugget 189 Xcode's Fix All in ScopeMay 20, 2016
iOS Dev Nugget 188 SwiftLintMay 06, 2016
iOS Dev Nugget 186 Injection for XcodeApr 27, 2016
iOS Dev Nugget 185 Disabling Content Change Animation in CATextLayerApr 20, 2016
iOS Dev Nugget 184 Async LibraryApr 12, 2016
iOS Dev Nugget 183 Quality of Service ClassesApr 02, 2016
iOS Dev Nugget 182 Tracking the swift-evolution Git RepositoryMar 26, 2016
iOS Dev Nugget 181 Swift SelectorsMar 21, 2016
iOS Dev Nugget 180 Low Power ModeMar 01, 2016
iOS Dev Nugget 177 Push Notifications Testing During DevelopmentFeb 23, 2016
iOS Dev Nugget 176 Git no-commit Pre-commit HookFeb 18, 2016
iOS Dev Nugget 175 Displaying a Popover in iPhone AppFeb 11, 2016
iOS Dev Nugget 174 View Controller Containment to Avoid Growing a Fat View Controller Base ClassJan 27, 2016
iOS Dev Nugget 172 Print App Document PathDec 30, 2015
iOS Dev Nugget 168 Using Blocks to Manage ContextsNov 11, 2015
iOS Dev Nugget 161 Read Smalltalk Best Practice PatternsOct 20, 2015
iOS Dev Nugget 158 Checking if Newer APIs Are Available In Older iOS Versions (II)Aug 17, 2015
iOS Dev Nugget 149 Timepiece, a Swift Library for Handling DatesJul 05, 2015
iOS Dev Nugget 143 Don't Forget SQLiteJul 01, 2015
iOS Dev Nugget 142 Grand Central DispatchJun 22, 2015
iOS Dev Nugget 141 Great Swift Standard Library Examples Covered in Playground (Swift 2.0)Jun 01, 2015
iOS Dev Nugget 138 Interoperability: Using Enumerations Defined In Objective-C from SwiftMay 27, 2015
iOS Dev Nugget 137 Named Tuple ElementsMay 19, 2015
iOS Dev Nugget 136 Auto Layout with CartographyMay 13, 2015
iOS Dev Nugget 135 CAShapeLayer, Animated Views and XCPShowView()Apr 29, 2015
iOS Dev Nugget 133 Dollar.swiftApr 22, 2015
iOS Dev Nugget 132 XCPCaptureValue in Swift PlaygroundsApr 14, 2015
iOS Dev Nugget 131 Running Asynchronous Code in Swift PlaygroundsApr 03, 2015
iOS Dev Nugget 129 Browsing the Swift Standard LibraryFeb 27, 2015
iOS Dev Nugget 124 performSelector:withObject:afterDelay: in SwiftFeb 20, 2015
iOS Dev Nugget 123 Using dynamicType in SwiftJan 02, 2015
iOS Dev Nugget 116 method() is unavailable: use object construction Class()
May 06, 2016 by Hwee-Boon Yar
A significant part of the time and effort spent while building iOS apps is spent on building and tweaking the user interface. The edit-build-run cycle can sometimes be time-consuming. Reducing the number of this build+run cycles is part of the attractiveness of tools such as React Native and the RubyMotion RedPotion framework. This is often referred to as code live-reloading. But using these tools usually mean switching completely away from Apple's toolchain.
However, Injection for Xcode lets you do it directly from Xcode. It supports both Objective-C and Swift. There's an excellent video in the README that illustrates how it works as well as a description of how to set it up, as well as its limitations. You can install it via Alcatraz. In the author's own words: Injection for Xcode is "nagware" that invites you to make a donation after two weeks.
This is a great time-saver when you build and tweak your user interface. I suggest you give it a try.
Like this post? Follow me @hboon on Twitter.
Related
Nov 03, 2018
iOS Dev Nugget 314 Checked Array SubscriptingSep 28, 2018
iOS Dev Nugget 311 jqSep 22, 2018
iOS Dev Nugget 310 Weak Reference Wrapper ClassSep 07, 2018
iOS Dev Nugget 308 Careful with early return statements in functions that return voidAug 30, 2018
iOS Dev Nugget 307 Array Out of BoundsAug 23, 2018
iOS Dev Nugget 306 Underscores in Numeric LiteralsAug 02, 2018
iOS Dev Nugget 303 Use Enums for StatesJul 21, 2018
iOS Dev Nugget 301 Print App Document Path IIJul 16, 2018
iOS Dev Nugget 300 Pipe OperatorJul 08, 2018
iOS Dev Nugget 299 CurryingJun 01, 2018
iOS Dev Nugget 294 Core Data EditorMay 18, 2018
iOS Dev Nugget 292 for-whereMay 12, 2018
iOS Dev Nugget 291 Implicit Member ExpressionsApr 11, 2018
iOS Dev Nugget 287 Modifying a Property Which is a Struct Triggers didSetMar 22, 2018
iOS Dev Nugget 284 Use Shell Aliases for Git commandsDec 20, 2017
iOS Dev Nugget 271 Zhi — Live Reloading Auto Layout Constraints and moreNov 02, 2017
iOS Dev Nugget 265 value type cannot have a stored property that recursively contains itOct 18, 2017
iOS Dev Nugget 262 Apple Device Names APISep 13, 2017
iOS Dev Nugget 257 AssertsAug 23, 2017
iOS Dev Nugget 254 Paw, for Working with APIsAug 02, 2017
iOS Dev Nugget 251 Retrieving the Current View ControllerJun 28, 2017
iOS Dev Nugget 246 Mapping Swift and Obj-C Method NamesJun 14, 2017
iOS Dev Nugget 244 IteratorProtocolMay 24, 2017
iOS Dev Nugget 241 Swift Enums with LabelsMay 17, 2017
iOS Dev Nugget 240 Print an Object's Unique IdentifierMay 03, 2017
iOS Dev Nugget 238 Keep Code in Method at the Same Level of AbstractionApr 26, 2017
iOS Dev Nugget 237 mas-cliApr 19, 2017
iOS Dev Nugget 236 Look up Error CodesApr 05, 2017
iOS Dev Nugget 234 #available and @availableMar 01, 2017
iOS Dev Nugget 229 PromisesFeb 09, 2017
iOS Dev Nugget 226 React NativeJan 25, 2017
iOS Dev Nugget 224 Lazy CollectionsNov 23, 2016
iOS Dev Nugget 215 dump Instead of print for Swift StructsOct 25, 2016
iOS Dev Nugget 211 Higher Order Functions: map, filter, reduceOct 12, 2016
iOS Dev Nugget 209 Swift DeferSep 28, 2016
iOS Dev Nugget 207 Swift Nil-Coalescing OperatorSep 22, 2016
iOS Dev Nugget 206 Date doesRelativeDateFormattingSep 11, 2016
iOS Dev Nugget 205 The Never Return Type in SwiftSep 07, 2016
iOS Dev Nugget 204 Swift @autoclosureSep 02, 2016
iOS Dev Nugget 203 Swift MeasurementAug 24, 2016
iOS Dev Nugget 202 Swift Enumerations to Encode StatesAug 17, 2016
iOS Dev Nugget 201 Swift Pattern MatchingAug 10, 2016
iOS Dev Nugget 200 Swift flatMapAug 05, 2016
iOS Dev Nugget 199 Swift Talk Video SeriesJul 26, 2016
iOS Dev Nugget 198 KZPlaygroundJul 20, 2016
iOS Dev Nugget 197 App Initialization CodeJul 09, 2016
iOS Dev Nugget 196 Rename Refactoring for Swift CodeJul 06, 2016
iOS Dev Nugget 195 Tools of the TradeJun 24, 2016
iOS Dev Nugget 193 Result EnumerationMay 26, 2016
iOS Dev Nugget 189 Xcode's Fix All in ScopeMay 20, 2016
iOS Dev Nugget 188 SwiftLintMay 10, 2016
iOS Dev Nugget 187 Creating a Singleton Class in SwiftApr 27, 2016
iOS Dev Nugget 185 Disabling Content Change Animation in CATextLayerApr 20, 2016
iOS Dev Nugget 184 Async LibraryApr 12, 2016
iOS Dev Nugget 183 Quality of Service ClassesApr 02, 2016
iOS Dev Nugget 182 Tracking the swift-evolution Git RepositoryMar 26, 2016
iOS Dev Nugget 181 Swift SelectorsMar 21, 2016
iOS Dev Nugget 180 Low Power ModeMar 01, 2016
iOS Dev Nugget 177 Push Notifications Testing During DevelopmentFeb 23, 2016
iOS Dev Nugget 176 Git no-commit Pre-commit HookFeb 18, 2016
iOS Dev Nugget 175 Displaying a Popover in iPhone AppFeb 11, 2016
iOS Dev Nugget 174 View Controller Containment to Avoid Growing a Fat View Controller Base ClassFeb 03, 2016
iOS Dev Nugget 173 Xcode Package Manager, AlcatrazJan 27, 2016
iOS Dev Nugget 172 Print App Document PathJan 11, 2016
iOS Dev Nugget 170 HomebrewJan 05, 2016
iOS Dev Nugget 169 fastlane: deliverDec 30, 2015
iOS Dev Nugget 168 Using Blocks to Manage ContextsNov 11, 2015
iOS Dev Nugget 161 Read Smalltalk Best Practice PatternsOct 20, 2015
iOS Dev Nugget 158 Checking if Newer APIs Are Available In Older iOS Versions (II)Sep 07, 2015
iOS Dev Nugget 152 Lossy PNG CompressionAug 17, 2015
iOS Dev Nugget 149 Timepiece, a Swift Library for Handling DatesAug 07, 2015
iOS Dev Nugget 147 NSRegularExpression and NSDataDetectorJul 05, 2015
iOS Dev Nugget 143 Don't Forget SQLiteJul 01, 2015
iOS Dev Nugget 142 Grand Central DispatchJun 22, 2015
iOS Dev Nugget 141 Great Swift Standard Library Examples Covered in Playground (Swift 2.0)Jun 01, 2015
iOS Dev Nugget 138 Interoperability: Using Enumerations Defined In Objective-C from SwiftMay 27, 2015
iOS Dev Nugget 137 Named Tuple ElementsMay 19, 2015
iOS Dev Nugget 136 Auto Layout with CartographyMay 13, 2015
iOS Dev Nugget 135 CAShapeLayer, Animated Views and XCPShowView()Apr 29, 2015
iOS Dev Nugget 133 Dollar.swiftApr 22, 2015
iOS Dev Nugget 132 XCPCaptureValue in Swift PlaygroundsApr 14, 2015
iOS Dev Nugget 131 Running Asynchronous Code in Swift PlaygroundsApr 03, 2015
iOS Dev Nugget 129 Browsing the Swift Standard LibraryMar 06, 2015
iOS Dev Nugget 125 View Debugging in XcodeFeb 27, 2015
iOS Dev Nugget 124 performSelector:withObject:afterDelay: in SwiftFeb 20, 2015
iOS Dev Nugget 123 Using dynamicType in SwiftFeb 13, 2015
iOS Dev Nugget 122 Importing Many Test Photos into iOS Simulator IIJan 02, 2015
iOS Dev Nugget 116 method() is unavailable: use object construction Class()Nov 28, 2014
iOS Dev Nugget 111 iOS Support MatrixOct 24, 2014
iOS Dev Nugget 106 Command Line Access to Developer PortalOct 17, 2014
iOS Dev Nugget 105 Try FLEXSep 12, 2014
iOS Dev Nugget 100 Try RevealSep 05, 2014
iOS Dev Nugget 99 Try PaintCodeAug 15, 2014
iOS Dev Nugget 96 Jack, A Native App For iTunes ConnectJul 04, 2014
iOS Dev Nugget 90 Full-Text Searchable WWDC Video Text TranscriptsApr 04, 2014
iOS Dev Nugget 77 RubyMotion Tutorial For Objective C DevelopersJan 17, 2014
iOS Dev Nugget 66 JBChartView for ChartingJan 04, 2014
iOS Dev Nugget 64 Placeholder Views Using PAPlaceholderDec 27, 2013
iOS Dev Nugget 63 Update Your iOS Development ToolboxOct 18, 2013
iOS Dev Nugget 53 Try Kaleidoscope, File Comparison for MacOct 11, 2013
iOS Dev Nugget 52 Set Up Crashlytics For Ad Hoc and App Store Builds OnlyJun 21, 2013
iOS Dev Nugget 36 Use TestFlight for Ad Hoc BuildsMay 11, 2013
iOS Dev Nugget 31 3rd Party Documentation ViewersMar 10, 2013
iOS Dev Nugget 22 Try AppCodeJan 05, 2013
iOS Dev Nugget 14 Charles Web Debugging Proxy
Apr 27, 2016 by Hwee-Boon Yar
Short one this week!
When using CATextLayer, it's common to change both the frame/bounds as well as the string property. You might find that even if you precede it with:
[CATransaction setValue:kCFBooleanTrue forKey:kCATransactionDisableActions];
the built-in animation still kicks in and animates the content change in an odd manner (since the bounds has also changed). What you need, to disable that is:
textLayer.actions = @{@"contents": [NSNull null]};
There are various keys you can use to disable built-in animations such as kCAOnOrderIn and kCAOnOrderOut.
Like this post? Follow me @hboon on Twitter.
Related
Jul 21, 2018
iOS Dev Nugget 301 Print App Document Path IIAug 02, 2017
iOS Dev Nugget 251 Retrieving the Current View ControllerMay 03, 2017
iOS Dev Nugget 238 Keep Code in Method at the Same Level of AbstractionMar 01, 2017
iOS Dev Nugget 229 PromisesJan 25, 2017
iOS Dev Nugget 224 Lazy CollectionsJun 24, 2016
iOS Dev Nugget 193 Result EnumerationMay 26, 2016
iOS Dev Nugget 189 Xcode's Fix All in ScopeMay 20, 2016
iOS Dev Nugget 188 SwiftLintMay 10, 2016
iOS Dev Nugget 187 Creating a Singleton Class in SwiftMay 06, 2016
iOS Dev Nugget 186 Injection for XcodeApr 20, 2016
iOS Dev Nugget 184 Async LibraryApr 12, 2016
iOS Dev Nugget 183 Quality of Service ClassesApr 02, 2016
iOS Dev Nugget 182 Tracking the swift-evolution Git RepositoryMar 26, 2016
iOS Dev Nugget 181 Swift SelectorsMar 21, 2016
iOS Dev Nugget 180 Low Power ModeMar 01, 2016
iOS Dev Nugget 177 Push Notifications Testing During DevelopmentFeb 23, 2016
iOS Dev Nugget 176 Git no-commit Pre-commit HookFeb 18, 2016
iOS Dev Nugget 175 Displaying a Popover in iPhone AppFeb 11, 2016
iOS Dev Nugget 174 View Controller Containment to Avoid Growing a Fat View Controller Base ClassJan 27, 2016
iOS Dev Nugget 172 Print App Document PathDec 30, 2015
iOS Dev Nugget 168 Using Blocks to Manage ContextsNov 11, 2015
iOS Dev Nugget 161 Read Smalltalk Best Practice PatternsOct 20, 2015
iOS Dev Nugget 158 Checking if Newer APIs Are Available In Older iOS Versions (II)
Apr 20, 2016 by Hwee-Boon Yar
In #183, I talked about Quality of Service (QoS) classes that were introduced in iOS 8. Async is a small library providing syntax sugar for GCD, supporting QoS.
Instead of doing this the pre-QoS classes way:
dispatch_async(dispatch_get_global_queue(DISPATCH_QUEUE_PRIORITY_BACKGROUND, 0), {
    print("This runs on the background queue")

    dispatch_async(dispatch_get_main_queue(), {
        print("This runs on the main queue, after the previous block")
    })
})
You can do:
Async.background {
    print("This runs on the background queue")
}.main {
    print("This runs on the main queue, after the previous block")
}
There's a couple of examples in the README, including chaining blocks so you don't end up with many levels of code indentation. Check it out.
Like this post? Follow me @hboon on Twitter.
Related
Aug 15, 2018
iOS Dev Nugget 305 Declaring Distinct Types from General TypesJul 24, 2018
iOS Dev Nugget 302 RealmJul 21, 2018
iOS Dev Nugget 301 Print App Document Path IIJun 09, 2018
iOS Dev Nugget 295 SwifterSwiftMay 23, 2018
iOS Dev Nugget 293 iOSSnapshotTestCase (was FBSnapshotTestCase)Mar 15, 2018
iOS Dev Nugget 283 Eureka for FormsFeb 28, 2018
iOS Dev Nugget 281 Use R.swift for Static References to Resources Like ImagesFeb 21, 2018
iOS Dev Nugget 280 Using Custom Fonts Without Updating Info.plist ManuallyDec 06, 2017
iOS Dev Nugget 269 Including Finger Touches in App Preview VideosAug 02, 2017
iOS Dev Nugget 251 Retrieving the Current View ControllerJul 11, 2017
iOS Dev Nugget 248 In-app Native RoutingMay 03, 2017
iOS Dev Nugget 238 Keep Code in Method at the Same Level of AbstractionMar 01, 2017
iOS Dev Nugget 229 PromisesFeb 22, 2017
iOS Dev Nugget 228 Recording and Playing Back Network CallsJan 25, 2017
iOS Dev Nugget 224 Lazy CollectionsNov 17, 2016
iOS Dev Nugget 214 Launch App QuicklyOct 23, 2016
iOS Dev Nugget 210 PMAlertControllerJun 24, 2016
iOS Dev Nugget 193 Result EnumerationJun 03, 2016
iOS Dev Nugget 190 Quick Look Plug-in for Mobile Provisioning FilesMay 26, 2016
iOS Dev Nugget 189 Xcode's Fix All in ScopeMay 20, 2016
iOS Dev Nugget 188 SwiftLintMay 10, 2016
iOS Dev Nugget 187 Creating a Singleton Class in SwiftMay 06, 2016
iOS Dev Nugget 186 Injection for XcodeApr 27, 2016
iOS Dev Nugget 185 Disabling Content Change Animation in CATextLayerApr 12, 2016
iOS Dev Nugget 183 Quality of Service ClassesApr 02, 2016
iOS Dev Nugget 182 Tracking the swift-evolution Git RepositoryMar 26, 2016
iOS Dev Nugget 181 Swift SelectorsMar 21, 2016
iOS Dev Nugget 180 Low Power ModeMar 01, 2016
iOS Dev Nugget 177 Push Notifications Testing During DevelopmentFeb 23, 2016
iOS Dev Nugget 176 Git no-commit Pre-commit HookFeb 18, 2016
iOS Dev Nugget 175 Displaying a Popover in iPhone AppFeb 11, 2016
iOS Dev Nugget 174 View Controller Containment to Avoid Growing a Fat View Controller Base ClassJan 27, 2016
iOS Dev Nugget 172 Print App Document PathDec 30, 2015
iOS Dev Nugget 168 Using Blocks to Manage ContextsNov 11, 2015
iOS Dev Nugget 161 Read Smalltalk Best Practice PatternsOct 20, 2015
iOS Dev Nugget 158 Checking if Newer APIs Are Available In Older iOS Versions (II)Aug 31, 2015
iOS Dev Nugget 151 More Wrappers for Keychain AccessAug 17, 2015
iOS Dev Nugget 149 Timepiece, a Swift Library for Handling DatesJul 27, 2015
iOS Dev Nugget 146 UIStackView and TZStackViewJul 21, 2015
iOS Dev Nugget 145 Listing Available FontsJul 05, 2015
iOS Dev Nugget 143 Don't Forget SQLiteJun 09, 2015
iOS Dev Nugget 139 Custom Build Configurations and Xcode SubprojectsMay 19, 2015
iOS Dev Nugget 136 Auto Layout with CartographyApr 29, 2015
iOS Dev Nugget 133 Dollar.swiftFeb 06, 2015
iOS Dev Nugget 121 InflectorKitDec 26, 2014
iOS Dev Nugget 115 Displaying Information in Settings AppDec 19, 2014
iOS Dev Nugget 114 Preview an Image for DebuggingDec 12, 2014
iOS Dev Nugget 113 GPUImage, a GPU-based Image and Video Processing FrameworkMay 30, 2014
iOS Dev Nugget 85 A More Customizable Button For Different StatesMay 02, 2014
iOS Dev Nugget 81 TMCache For In-Memory and Disk-backed CachingApr 18, 2014
iOS Dev Nugget 79 TweetBot Photo Flicking EffectMar 07, 2014
iOS Dev Nugget 73 Open Source Date Picker from SquareFeb 22, 2014
iOS Dev Nugget 71 TapJan 31, 2014
iOS Dev Nugget 68 Custom URL Schemes DirectoryDec 20, 2013
iOS Dev Nugget 62 Using PDF Instead of PNG Files for Resizable AssetsSep 20, 2013
iOS Dev Nugget 49 Wrapper to Get UIColor ComponentsMay 17, 2013
iOS Dev Nugget 32 FMDB: Thin Objective C Wrapper Around SQLiteOct 06, 2012
iOS Dev Nugget 1 Easy logging of values and objects
Apr 12, 2016 by Hwee-Boon Yar
Quality of Service (QoS) classes are introduced in iOS 8. It's a concept that helps with making iOS energy efficient. QoS classes encompass priorities such as scheduling, CPU and I/O throughput and timer latency.
The primary QoS classes, shown in order of decreasing work importance are:
- User-interactive — Work is virtually instantaneous
- User-initiated — Nearly instantaneous, taking a few secs or less
- Utility — Takes a few seconds to minutes
- Background — Takes significant time. Minutes or hours
There are also two special QoS classes that we can't directly assign:
- Default — falls between user-initiated and utility
- Unspecified — QoS information absent, QoS class to be inferred.
When Grand Central Dispatch (GCD) was introduced, it supports four queue priorities. With the introduction of QoS classes, these queue (and the main thread's) priorities are mapped to the QoS classes:
- Main thread maps to User-interactive QoS class
- DISPATCH_QUEUE_PRIORITY_HIGH maps to User-initiated QoS class
- DISPATCH_QUEUE_PRIORITY_DEFAULT maps to Default QoS class
- DISPATCH_QUEUE_PRIORITY_LOW maps to Utility QoS class
- DISPATCH_QUEUE_PRIORITY_BACKGROUND maps to Background QoS class
While the queue priorities can continue to be used with dispatch_get_global_queue(), it's recommended that the identifiers representing each QoS class be used with dispatch_get_global_queue instead:
- QOS_CLASS_USER_INTERACTIVE
- QOS_CLASS_USER_INITIATED
- QOS_CLASS_UTILITY
- QOS_CLASS_BACKGROUND
E.g.
let utilityGlobalQueue = dispatch_get_global_queue(QOS_CLASS_UTILITY, 0)
The function dispatch_block_create_with_qos_class() has been added so you can use to apply a QoS class at the block level:
let block = dispatch_block_create_with_qos_class(0, QOS_CLASS_UTILITY) {
    //...
}
dispatch_async(myQueue, block)
There is also a qualityOfService property added to NSOperationQueue and NSOperation mirroring the identifiers counterparts mentioned earlier for GCD's queue and block.
The WWDC 2014 video session 710 provides a good introduction into QoS.
Like this post? Follow me @hboon on Twitter.
Related
Jul 21, 2018
iOS Dev Nugget 301 Print App Document Path IIAug 02, 2017
iOS Dev Nugget 251 Retrieving the Current View ControllerMay 03, 2017
iOS Dev Nugget 238 Keep Code in Method at the Same Level of AbstractionMar 01, 2017
iOS Dev Nugget 229 PromisesJan 25, 2017
iOS Dev Nugget 224 Lazy CollectionsNov 17, 2016
iOS Dev Nugget 214 Launch App QuicklyJun 24, 2016
iOS Dev Nugget 193 Result EnumerationMay 26, 2016
iOS Dev Nugget 189 Xcode's Fix All in ScopeMay 20, 2016
iOS Dev Nugget 188 SwiftLintMay 10, 2016
iOS Dev Nugget 187 Creating a Singleton Class in SwiftMay 06, 2016
iOS Dev Nugget 186 Injection for XcodeApr 27, 2016
iOS Dev Nugget 185 Disabling Content Change Animation in CATextLayerApr 20, 2016
iOS Dev Nugget 184 Async LibraryApr 02, 2016
iOS Dev Nugget 182 Tracking the swift-evolution Git RepositoryMar 26, 2016
iOS Dev Nugget 181 Swift SelectorsMar 21, 2016
iOS Dev Nugget 180 Low Power ModeMar 01, 2016
iOS Dev Nugget 177 Push Notifications Testing During DevelopmentFeb 23, 2016
iOS Dev Nugget 176 Git no-commit Pre-commit HookFeb 18, 2016
iOS Dev Nugget 175 Displaying a Popover in iPhone AppFeb 11, 2016
iOS Dev Nugget 174 View Controller Containment to Avoid Growing a Fat View Controller Base ClassJan 27, 2016
iOS Dev Nugget 172 Print App Document PathDec 30, 2015
iOS Dev Nugget 168 Using Blocks to Manage ContextsNov 11, 2015
iOS Dev Nugget 161 Read Smalltalk Best Practice PatternsOct 20, 2015
iOS Dev Nugget 158 Checking if Newer APIs Are Available In Older iOS Versions (II)
Apr 02, 2016 by Hwee-Boon Yar
Following the swift-evolution git repository, specifically the list of proposals on GitHub is a useful way to understand changes made to Swift.
For e.g., with the release of Swift 2.2 (included in Xcode 7.3), the curried function declaration syntax was deprecated. You can read the Removing currying func declaration syntax here. The premise being the declaration syntax:
is of limited usefulness and creates a lot of language and implementation complexity
You can also get a sense of why a feature is introduced and sometimes, background information into how it is useful, and might change in the future. e.g. Swift Language Version Build Configuration talks about the #if swift(>=2.2) syntax for checking Swift language version.
Swift is still a very young language and tracking these changes can help enormously in being able to utilize it efficiently as it changes.
Like this post? Follow me @hboon on Twitter.
Related
Nov 03, 2018
iOS Dev Nugget 314 Checked Array SubscriptingSep 22, 2018
iOS Dev Nugget 310 Weak Reference Wrapper ClassSep 07, 2018
iOS Dev Nugget 308 Careful with early return statements in functions that return voidAug 30, 2018
iOS Dev Nugget 307 Array Out of BoundsAug 23, 2018
iOS Dev Nugget 306 Underscores in Numeric LiteralsAug 02, 2018
iOS Dev Nugget 303 Use Enums for StatesJul 21, 2018
iOS Dev Nugget 301 Print App Document Path IIJul 16, 2018
iOS Dev Nugget 300 Pipe OperatorMay 18, 2018
iOS Dev Nugget 292 for-whereMay 12, 2018
iOS Dev Nugget 291 Implicit Member ExpressionsApr 11, 2018
iOS Dev Nugget 287 Modifying a Property Which is a Struct Triggers didSetNov 02, 2017
iOS Dev Nugget 265 value type cannot have a stored property that recursively contains itSep 13, 2017
iOS Dev Nugget 257 AssertsAug 02, 2017
iOS Dev Nugget 251 Retrieving the Current View ControllerJun 28, 2017
iOS Dev Nugget 246 Mapping Swift and Obj-C Method NamesJun 14, 2017
iOS Dev Nugget 244 IteratorProtocolMay 24, 2017
iOS Dev Nugget 241 Swift Enums with LabelsMay 17, 2017
iOS Dev Nugget 240 Print an Object's Unique IdentifierMay 03, 2017
iOS Dev Nugget 238 Keep Code in Method at the Same Level of AbstractionApr 05, 2017
iOS Dev Nugget 234 #available and @availableMar 01, 2017
iOS Dev Nugget 229 PromisesJan 25, 2017
iOS Dev Nugget 224 Lazy CollectionsNov 23, 2016
iOS Dev Nugget 215 dump Instead of print for Swift StructsOct 25, 2016
iOS Dev Nugget 211 Higher Order Functions: map, filter, reduceOct 12, 2016
iOS Dev Nugget 209 Swift DeferSep 28, 2016
iOS Dev Nugget 207 Swift Nil-Coalescing OperatorSep 22, 2016
iOS Dev Nugget 206 Date doesRelativeDateFormattingSep 11, 2016
iOS Dev Nugget 205 The Never Return Type in SwiftSep 07, 2016
iOS Dev Nugget 204 Swift @autoclosureSep 02, 2016
iOS Dev Nugget 203 Swift MeasurementAug 24, 2016
iOS Dev Nugget 202 Swift Enumerations to Encode StatesAug 17, 2016
iOS Dev Nugget 201 Swift Pattern MatchingAug 10, 2016
iOS Dev Nugget 200 Swift flatMapAug 05, 2016
iOS Dev Nugget 199 Swift Talk Video SeriesJul 26, 2016
iOS Dev Nugget 198 KZPlaygroundJul 20, 2016
iOS Dev Nugget 197 App Initialization CodeJul 09, 2016
iOS Dev Nugget 196 Rename Refactoring for Swift CodeJun 24, 2016
iOS Dev Nugget 193 Result EnumerationMay 26, 2016
iOS Dev Nugget 189 Xcode's Fix All in ScopeMay 20, 2016
iOS Dev Nugget 188 SwiftLintMay 10, 2016
iOS Dev Nugget 187 Creating a Singleton Class in SwiftMay 06, 2016
iOS Dev Nugget 186 Injection for XcodeApr 27, 2016
iOS Dev Nugget 185 Disabling Content Change Animation in CATextLayerApr 20, 2016
iOS Dev Nugget 184 Async LibraryApr 12, 2016
iOS Dev Nugget 183 Quality of Service ClassesMar 26, 2016
iOS Dev Nugget 181 Swift SelectorsMar 21, 2016
iOS Dev Nugget 180 Low Power ModeMar 01, 2016
iOS Dev Nugget 177 Push Notifications Testing During DevelopmentFeb 23, 2016
iOS Dev Nugget 176 Git no-commit Pre-commit HookFeb 18, 2016
iOS Dev Nugget 175 Displaying a Popover in iPhone AppFeb 11, 2016
iOS Dev Nugget 174 View Controller Containment to Avoid Growing a Fat View Controller Base ClassJan 27, 2016
iOS Dev Nugget 172 Print App Document PathDec 30, 2015
iOS Dev Nugget 168 Using Blocks to Manage ContextsNov 11, 2015
iOS Dev Nugget 161 Read Smalltalk Best Practice PatternsOct 20, 2015
iOS Dev Nugget 158 Checking if Newer APIs Are Available In Older iOS Versions (II)Aug 17, 2015
iOS Dev Nugget 149 Timepiece, a Swift Library for Handling DatesJul 05, 2015
iOS Dev Nugget 143 Don't Forget SQLiteJul 01, 2015
iOS Dev Nugget 142 Grand Central DispatchJun 22, 2015
iOS Dev Nugget 141 Great Swift Standard Library Examples Covered in Playground (Swift 2.0)Jun 01, 2015
iOS Dev Nugget 138 Interoperability: Using Enumerations Defined In Objective-C from SwiftMay 27, 2015
iOS Dev Nugget 137 Named Tuple ElementsMay 19, 2015
iOS Dev Nugget 136 Auto Layout with CartographyMay 13, 2015
iOS Dev Nugget 135 CAShapeLayer, Animated Views and XCPShowView()Apr 29, 2015
iOS Dev Nugget 133 Dollar.swiftApr 22, 2015
iOS Dev Nugget 132 XCPCaptureValue in Swift PlaygroundsApr 14, 2015
iOS Dev Nugget 131 Running Asynchronous Code in Swift PlaygroundsApr 03, 2015
iOS Dev Nugget 129 Browsing the Swift Standard LibraryFeb 27, 2015
iOS Dev Nugget 124 performSelector:withObject:afterDelay: in SwiftFeb 20, 2015
iOS Dev Nugget 123 Using dynamicType in SwiftJan 02, 2015
iOS Dev Nugget 116 method() is unavailable: use object construction Class()
Mar 26, 2016 by Hwee-Boon Yar
In Objective-C, you can get a selector at compile time with:
SEL selector = @selector(showHelp);
or at runtime:
NSString* str = @"showHelp";
SEL selector = NSSelectorFromString(str);
There's limited type checking.
In Swift, however you have several options. This does minimum checking that there is a method of the same name:
let _ = Selector("showHelp")
This checks if the method is in the current class:
let _ = #selector(showHelp)
This checks if the method is in the specific class/instance:
let _ = #selector(Login.start)
let _ = #selector(Login.sharedInstance.start)
And this makes the compiler check for arguments (and labels):
let _ = #selector(oneArg(_:)) #single arg
let _ = #selector(twoArg(_:two:)) #two arg
Swift has strong type support and it's worthwhile spending some time to learn about it to reduce run-time programming errors.
Like this post? Follow me @hboon on Twitter.
Related
Nov 03, 2018
iOS Dev Nugget 314 Checked Array SubscriptingSep 22, 2018
iOS Dev Nugget 310 Weak Reference Wrapper ClassSep 07, 2018
iOS Dev Nugget 308 Careful with early return statements in functions that return voidAug 30, 2018
iOS Dev Nugget 307 Array Out of BoundsAug 23, 2018
iOS Dev Nugget 306 Underscores in Numeric LiteralsAug 02, 2018
iOS Dev Nugget 303 Use Enums for StatesJul 21, 2018
iOS Dev Nugget 301 Print App Document Path IIJul 16, 2018
iOS Dev Nugget 300 Pipe OperatorMay 18, 2018
iOS Dev Nugget 292 for-whereMay 12, 2018
iOS Dev Nugget 291 Implicit Member ExpressionsApr 11, 2018
iOS Dev Nugget 287 Modifying a Property Which is a Struct Triggers didSetNov 02, 2017
iOS Dev Nugget 265 value type cannot have a stored property that recursively contains itSep 13, 2017
iOS Dev Nugget 257 AssertsAug 02, 2017
iOS Dev Nugget 251 Retrieving the Current View ControllerJun 28, 2017
iOS Dev Nugget 246 Mapping Swift and Obj-C Method NamesJun 14, 2017
iOS Dev Nugget 244 IteratorProtocolMay 24, 2017
iOS Dev Nugget 241 Swift Enums with LabelsMay 17, 2017
iOS Dev Nugget 240 Print an Object's Unique IdentifierMay 03, 2017
iOS Dev Nugget 238 Keep Code in Method at the Same Level of AbstractionApr 05, 2017
iOS Dev Nugget 234 #available and @availableMar 01, 2017
iOS Dev Nugget 229 PromisesJan 25, 2017
iOS Dev Nugget 224 Lazy CollectionsNov 23, 2016
iOS Dev Nugget 215 dump Instead of print for Swift StructsOct 25, 2016
iOS Dev Nugget 211 Higher Order Functions: map, filter, reduceOct 12, 2016
iOS Dev Nugget 209 Swift DeferSep 28, 2016
iOS Dev Nugget 207 Swift Nil-Coalescing OperatorSep 22, 2016
iOS Dev Nugget 206 Date doesRelativeDateFormattingSep 11, 2016
iOS Dev Nugget 205 The Never Return Type in SwiftSep 07, 2016
iOS Dev Nugget 204 Swift @autoclosureSep 02, 2016
iOS Dev Nugget 203 Swift MeasurementAug 24, 2016
iOS Dev Nugget 202 Swift Enumerations to Encode StatesAug 17, 2016
iOS Dev Nugget 201 Swift Pattern MatchingAug 10, 2016
iOS Dev Nugget 200 Swift flatMapAug 05, 2016
iOS Dev Nugget 199 Swift Talk Video SeriesJul 26, 2016
iOS Dev Nugget 198 KZPlaygroundJul 20, 2016
iOS Dev Nugget 197 App Initialization CodeJul 09, 2016
iOS Dev Nugget 196 Rename Refactoring for Swift CodeJun 24, 2016
iOS Dev Nugget 193 Result EnumerationMay 26, 2016
iOS Dev Nugget 189 Xcode's Fix All in ScopeMay 20, 2016
iOS Dev Nugget 188 SwiftLintMay 10, 2016
iOS Dev Nugget 187 Creating a Singleton Class in SwiftMay 06, 2016
iOS Dev Nugget 186 Injection for XcodeApr 27, 2016
iOS Dev Nugget 185 Disabling Content Change Animation in CATextLayerApr 20, 2016
iOS Dev Nugget 184 Async LibraryApr 12, 2016
iOS Dev Nugget 183 Quality of Service ClassesApr 02, 2016
iOS Dev Nugget 182 Tracking the swift-evolution Git RepositoryMar 21, 2016
iOS Dev Nugget 180 Low Power ModeMar 01, 2016
iOS Dev Nugget 177 Push Notifications Testing During DevelopmentFeb 23, 2016
iOS Dev Nugget 176 Git no-commit Pre-commit HookFeb 18, 2016
iOS Dev Nugget 175 Displaying a Popover in iPhone AppFeb 11, 2016
iOS Dev Nugget 174 View Controller Containment to Avoid Growing a Fat View Controller Base ClassJan 27, 2016
iOS Dev Nugget 172 Print App Document PathDec 30, 2015
iOS Dev Nugget 168 Using Blocks to Manage ContextsNov 11, 2015
iOS Dev Nugget 161 Read Smalltalk Best Practice PatternsOct 20, 2015
iOS Dev Nugget 158 Checking if Newer APIs Are Available In Older iOS Versions (II)Aug 17, 2015
iOS Dev Nugget 149 Timepiece, a Swift Library for Handling DatesJul 05, 2015
iOS Dev Nugget 143 Don't Forget SQLiteJul 01, 2015
iOS Dev Nugget 142 Grand Central DispatchJun 22, 2015
iOS Dev Nugget 141 Great Swift Standard Library Examples Covered in Playground (Swift 2.0)Jun 01, 2015
iOS Dev Nugget 138 Interoperability: Using Enumerations Defined In Objective-C from SwiftMay 27, 2015
iOS Dev Nugget 137 Named Tuple ElementsMay 19, 2015
iOS Dev Nugget 136 Auto Layout with CartographyMay 13, 2015
iOS Dev Nugget 135 CAShapeLayer, Animated Views and XCPShowView()Apr 29, 2015
iOS Dev Nugget 133 Dollar.swiftApr 22, 2015
iOS Dev Nugget 132 XCPCaptureValue in Swift PlaygroundsApr 14, 2015
iOS Dev Nugget 131 Running Asynchronous Code in Swift PlaygroundsApr 03, 2015
iOS Dev Nugget 129 Browsing the Swift Standard LibraryFeb 27, 2015
iOS Dev Nugget 124 performSelector:withObject:afterDelay: in SwiftFeb 20, 2015
iOS Dev Nugget 123 Using dynamicType in SwiftJan 02, 2015
iOS Dev Nugget 116 method() is unavailable: use object construction Class()
Mar 21, 2016 by Hwee-Boon Yar
iOS 9 introduces Low Power Mode. When the user enables Low Power Mode, NSProcessInfo.processInfo().lowPowerModeEnabled returns true. We can observe the NSProcessInfoPowerStateDidChangeNotification notification and check against the lowPowerModeEnabled flag.
func someMethod() {
    NSNotificationCenter.defaultCenter().addObserver(self,
        selector: #selector(lowPowerModeChanged),
        name: NSProcessInfoPowerStateDidChangeNotification,
        object: nil)
}

func lowPowerModeChanged(notification: NSNotification) {
    if NSProcessInfo.processInfo().lowPowerModeEnabled {
        //Do less
    } else {
        //OK
    }
}
When Low Power Mode is enabled, iOS switches off several system features such as background fetch and motion effects, and reduces CPU and GPU performance. As developers, we can play a part too. Switch off expensive visual effects (such as complex animations) or delay unnecessary operations that consumes significant battery such as network operations via cellular connectivity. Be a good iOS citizen app.
#181 talks more about Swift selectors.
Like this post? Follow me @hboon on Twitter.
Related
Nov 03, 2018
iOS Dev Nugget 314 Checked Array SubscriptingSep 22, 2018
iOS Dev Nugget 310 Weak Reference Wrapper ClassSep 07, 2018
iOS Dev Nugget 308 Careful with early return statements in functions that return voidAug 30, 2018
iOS Dev Nugget 307 Array Out of BoundsAug 23, 2018
iOS Dev Nugget 306 Underscores in Numeric LiteralsAug 02, 2018
iOS Dev Nugget 303 Use Enums for StatesJul 21, 2018
iOS Dev Nugget 301 Print App Document Path IIJul 16, 2018
iOS Dev Nugget 300 Pipe OperatorMay 18, 2018
iOS Dev Nugget 292 for-whereMay 12, 2018
iOS Dev Nugget 291 Implicit Member ExpressionsApr 11, 2018
iOS Dev Nugget 287 Modifying a Property Which is a Struct Triggers didSetNov 02, 2017
iOS Dev Nugget 265 value type cannot have a stored property that recursively contains itSep 13, 2017
iOS Dev Nugget 257 AssertsAug 23, 2017
iOS Dev Nugget 254 Paw, for Working with APIsAug 02, 2017
iOS Dev Nugget 251 Retrieving the Current View ControllerJul 19, 2017
iOS Dev Nugget 249 App Transport Security Diagnostics with nscurlJun 28, 2017
iOS Dev Nugget 246 Mapping Swift and Obj-C Method NamesJun 14, 2017
iOS Dev Nugget 244 IteratorProtocolMay 24, 2017
iOS Dev Nugget 241 Swift Enums with LabelsMay 17, 2017
iOS Dev Nugget 240 Print an Object's Unique IdentifierMay 03, 2017
iOS Dev Nugget 238 Keep Code in Method at the Same Level of AbstractionApr 05, 2017
iOS Dev Nugget 234 #available and @availableMar 01, 2017
iOS Dev Nugget 229 PromisesFeb 22, 2017
iOS Dev Nugget 228 Recording and Playing Back Network CallsJan 25, 2017
iOS Dev Nugget 224 Lazy CollectionsDec 22, 2016
iOS Dev Nugget 219 Test Your App with Airplane Mode enabledNov 23, 2016
iOS Dev Nugget 215 dump Instead of print for Swift StructsNov 17, 2016
iOS Dev Nugget 214 Launch App QuicklyOct 25, 2016
iOS Dev Nugget 211 Higher Order Functions: map, filter, reduceOct 12, 2016
iOS Dev Nugget 209 Swift DeferSep 28, 2016
iOS Dev Nugget 207 Swift Nil-Coalescing OperatorSep 22, 2016
iOS Dev Nugget 206 Date doesRelativeDateFormattingSep 11, 2016
iOS Dev Nugget 205 The Never Return Type in SwiftSep 07, 2016
iOS Dev Nugget 204 Swift @autoclosureSep 02, 2016
iOS Dev Nugget 203 Swift MeasurementAug 24, 2016
iOS Dev Nugget 202 Swift Enumerations to Encode StatesAug 17, 2016
iOS Dev Nugget 201 Swift Pattern MatchingAug 10, 2016
iOS Dev Nugget 200 Swift flatMapAug 05, 2016
iOS Dev Nugget 199 Swift Talk Video SeriesJul 26, 2016
iOS Dev Nugget 198 KZPlaygroundJul 20, 2016
iOS Dev Nugget 197 App Initialization CodeJul 09, 2016
iOS Dev Nugget 196 Rename Refactoring for Swift CodeJun 24, 2016
iOS Dev Nugget 193 Result EnumerationJun 10, 2016
iOS Dev Nugget 191 Reducing Power Consumption While Using Core LocationMay 26, 2016
iOS Dev Nugget 189 Xcode's Fix All in ScopeMay 20, 2016
iOS Dev Nugget 188 SwiftLintMay 10, 2016
iOS Dev Nugget 187 Creating a Singleton Class in SwiftMay 06, 2016
iOS Dev Nugget 186 Injection for XcodeApr 27, 2016
iOS Dev Nugget 185 Disabling Content Change Animation in CATextLayerApr 20, 2016
iOS Dev Nugget 184 Async LibraryApr 12, 2016
iOS Dev Nugget 183 Quality of Service ClassesApr 02, 2016
iOS Dev Nugget 182 Tracking the swift-evolution Git RepositoryMar 26, 2016
iOS Dev Nugget 181 Swift SelectorsMar 01, 2016
iOS Dev Nugget 177 Push Notifications Testing During DevelopmentFeb 23, 2016
iOS Dev Nugget 176 Git no-commit Pre-commit HookFeb 18, 2016
iOS Dev Nugget 175 Displaying a Popover in iPhone AppFeb 11, 2016
iOS Dev Nugget 174 View Controller Containment to Avoid Growing a Fat View Controller Base ClassJan 27, 2016
iOS Dev Nugget 172 Print App Document PathDec 30, 2015
iOS Dev Nugget 168 Using Blocks to Manage ContextsNov 11, 2015
iOS Dev Nugget 161 Read Smalltalk Best Practice PatternsOct 20, 2015
iOS Dev Nugget 158 Checking if Newer APIs Are Available In Older iOS Versions (II)Oct 07, 2015
iOS Dev Nugget 156 -canOpenURL:Sep 23, 2015
iOS Dev Nugget 154 App Transport SecurityAug 17, 2015
iOS Dev Nugget 149 Timepiece, a Swift Library for Handling DatesJul 16, 2015
iOS Dev Nugget 144 NSURLSession instead of NSURLConnectionJul 05, 2015
iOS Dev Nugget 143 Don't Forget SQLiteJul 01, 2015
iOS Dev Nugget 142 Grand Central DispatchJun 22, 2015
iOS Dev Nugget 141 Great Swift Standard Library Examples Covered in Playground (Swift 2.0)Jun 01, 2015
iOS Dev Nugget 138 Interoperability: Using Enumerations Defined In Objective-C from SwiftMay 27, 2015
iOS Dev Nugget 137 Named Tuple ElementsMay 19, 2015
iOS Dev Nugget 136 Auto Layout with CartographyMay 13, 2015
iOS Dev Nugget 135 CAShapeLayer, Animated Views and XCPShowView()Apr 29, 2015
iOS Dev Nugget 133 Dollar.swiftApr 22, 2015
iOS Dev Nugget 132 XCPCaptureValue in Swift PlaygroundsApr 14, 2015
iOS Dev Nugget 131 Running Asynchronous Code in Swift PlaygroundsApr 03, 2015
iOS Dev Nugget 129 Browsing the Swift Standard LibraryFeb 27, 2015
iOS Dev Nugget 124 performSelector:withObject:afterDelay: in SwiftFeb 20, 2015
iOS Dev Nugget 123 Using dynamicType in SwiftJan 02, 2015
iOS Dev Nugget 116 method() is unavailable: use object construction Class()Jan 24, 2014
iOS Dev Nugget 67 Simulating a slow cellular network with Network Link Conditioner on iOSJul 13, 2013
iOS Dev Nugget 39 Use NSCache Instead of NSMutableDictionary When CachingJan 05, 2013
iOS Dev Nugget 14 Charles Web Debugging ProxyDec 28, 2012
iOS Dev Nugget 13 Simulating a slow cellular network with Network Link Conditioner
Mar 12, 2016 by Hwee-Boon Yar

While debugging in Xcode and the app is paused, the green arrow by the gutter pointing to the current line of code indicates the position of the program counter.
You can drag and drop the green arrow to point the program counter to another line. This forces execution to continue from the new position when you resume your app. This is particularly useful if you are deep in a debug session and have either accidentally stepped over an additional line or two or want to skip a line of code.
Like this post? Follow me @hboon on Twitter.
Related
Jul 01, 2018
iOS Dev Nugget 298 Conditional BreakpointsFeb 15, 2018
iOS Dev Nugget 279 Reclaim Disk Space by Deleting Old SimulatorsJan 31, 2018
iOS Dev Nugget 277 REPL in LLDBAug 30, 2017
iOS Dev Nugget 255 Symbolic Breakpoint to watch for View Controller DeallocationJun 21, 2017
iOS Dev Nugget 245 Show Call HierarchyMar 08, 2017
iOS Dev Nugget 230 Shortcut to Generate Quick Help DocumentationFeb 03, 2017
iOS Dev Nugget 225 Contextual Help for Xcode Build SettingsDec 29, 2016
iOS Dev Nugget 220 Don't Download Xcode from the Mac App StoreNov 08, 2016
iOS Dev Nugget 213 Download Your App Data on iOS Device for DebuggingJun 17, 2016
iOS Dev Nugget 192 Download Xcode from Downloads for Apple Developers Website Instead of Mac App StoreMay 26, 2016
iOS Dev Nugget 189 Xcode's Fix All in ScopeMar 07, 2016
iOS Dev Nugget 178 Breakpoint Actions for LoggingFeb 03, 2016
iOS Dev Nugget 173 Xcode Package Manager, AlcatrazNov 18, 2015
iOS Dev Nugget 162 Reclaim Disk Space from Xcode Usage
Mar 07, 2016 by Hwee-Boon Yar
The debugger is a very useful tool. But very often, I turn to the old trusty NSLog (and friends) for debugging. If you are trying to narrow down an issue using logging, the add NSLog statements, recompile, run, tap that button to replicate the issue, check output cycle can be inefficient. This is where breakpoints are incredibly useful.
- Click at the gutter in Xcode editor on the line of code where you want to perform the logging.
- Ctrl-click the breakpoint and choose
Edit Breakpoint
- Click
Add Action
- Choose
Log Message
- Type the message to log in the
Message textbox
- Check
Automatically continue after evaluating actions
Trigger the issue. No re-compilation required. Yay!
There's a couple of useful options in the dialog such as making it speak out the message instead of logging.
Like this post? Follow me @hboon on Twitter.
Related
Jul 01, 2018
iOS Dev Nugget 298 Conditional BreakpointsFeb 15, 2018
iOS Dev Nugget 279 Reclaim Disk Space by Deleting Old SimulatorsJan 31, 2018
iOS Dev Nugget 277 REPL in LLDBAug 30, 2017
iOS Dev Nugget 255 Symbolic Breakpoint to watch for View Controller DeallocationJun 21, 2017
iOS Dev Nugget 245 Show Call HierarchyMar 08, 2017
iOS Dev Nugget 230 Shortcut to Generate Quick Help DocumentationFeb 03, 2017
iOS Dev Nugget 225 Contextual Help for Xcode Build SettingsDec 29, 2016
iOS Dev Nugget 220 Don't Download Xcode from the Mac App StoreNov 08, 2016
iOS Dev Nugget 213 Download Your App Data on iOS Device for DebuggingJun 17, 2016
iOS Dev Nugget 192 Download Xcode from Downloads for Apple Developers Website Instead of Mac App StoreMay 26, 2016
iOS Dev Nugget 189 Xcode's Fix All in ScopeMar 12, 2016
iOS Dev Nugget 179 Dragging the Program CounterFeb 03, 2016
iOS Dev Nugget 173 Xcode Package Manager, AlcatrazNov 18, 2015
iOS Dev Nugget 162 Reclaim Disk Space from Xcode Usage
Mar 01, 2016 by Hwee-Boon Yar
Apple announced a new APNS Provider API a few months ago in 2015 based on HTTP/2. The older API had a binary interface and you had to connect to 2 Apple endpoints — one to send push payloads, the other a feedback endpoint where you listen for no-longer valid device tokens. The newer API is much cleaner, you connect to a single endpoint, POST your payload and gets a response, which may inform you that the device token is no longer valid.
I worked on adding push notifications support to a new app recently and wanted to look for 2 things (1) a tool on the desktop that I can initiate test pushes from (2) a RubyGem that supports the new APNS provider API that can be used from server side code.
Testing from Desktop
Pusher is a great (and simple) OS X app that you can use for sending pushes. You can install it via Homebrew cask. If you haven't installed or used Homebrew, check out Nugget #170 for an explanation of what it does. Homebrew-cask is now included with Homebrew, so if you previously had brew-cask installed, you will need to:
- remove it by running:
brew uninstall --force brew-cask
- then update Homebrew by:
brew update.
You can then install Pusher by running brew cask install pusher. The app is pretty explanatory. There's a bonus in the README which even goes into detail of how to generate the push certificate as well as boilerplate code to handle push in your iOS app!
RubyGem for Server
There aren't many RubyGem that support the newer APNS Provider API yet. In fact, I only found one — lowdown by @alloy. It can be installed with gem install lowdown. While it's meant to be used on the server-side, it includes a command line that you can use to initiate pushes for testing purposes, much like Pusher:
lowdown -m "test message" -e development -c <path to PEM file> --debug --verbose <device token>
Like this post? Follow me @hboon on Twitter.
Related
Jul 21, 2018
iOS Dev Nugget 301 Print App Document Path IIAug 17, 2017
iOS Dev Nugget 253 Token-based Push Provider ConnectionsAug 02, 2017
iOS Dev Nugget 251 Retrieving the Current View ControllerJul 26, 2017
iOS Dev Nugget 250 Reset Push Notification Permissions Alert on iOS and MoreMay 03, 2017
iOS Dev Nugget 238 Keep Code in Method at the Same Level of AbstractionMar 01, 2017
iOS Dev Nugget 229 PromisesJan 25, 2017
iOS Dev Nugget 224 Lazy CollectionsJun 24, 2016
iOS Dev Nugget 193 Result EnumerationMay 26, 2016
iOS Dev Nugget 189 Xcode's Fix All in ScopeMay 20, 2016
iOS Dev Nugget 188 SwiftLintMay 10, 2016
iOS Dev Nugget 187 Creating a Singleton Class in SwiftMay 06, 2016
iOS Dev Nugget 186 Injection for XcodeApr 27, 2016
iOS Dev Nugget 185 Disabling Content Change Animation in CATextLayerApr 20, 2016
iOS Dev Nugget 184 Async LibraryApr 12, 2016
iOS Dev Nugget 183 Quality of Service ClassesApr 02, 2016
iOS Dev Nugget 182 Tracking the swift-evolution Git RepositoryMar 26, 2016
iOS Dev Nugget 181 Swift SelectorsMar 21, 2016
iOS Dev Nugget 180 Low Power ModeFeb 23, 2016
iOS Dev Nugget 176 Git no-commit Pre-commit HookFeb 18, 2016
iOS Dev Nugget 175 Displaying a Popover in iPhone AppFeb 11, 2016
iOS Dev Nugget 174 View Controller Containment to Avoid Growing a Fat View Controller Base ClassJan 27, 2016
iOS Dev Nugget 172 Print App Document PathDec 30, 2015
iOS Dev Nugget 168 Using Blocks to Manage ContextsNov 11, 2015
iOS Dev Nugget 161 Read Smalltalk Best Practice PatternsOct 20, 2015
iOS Dev Nugget 158 Checking if Newer APIs Are Available In Older iOS Versions (II)
Feb 23, 2016 by Hwee-Boon Yar
I like to sprinkle specific comments markers (such as NOCOMMIT) in my code while I'm working on it to remind me of TODOs that I need to complete in the current change. I don't ever want to commit my code with this markers in them. Over the years, this has inadvertently happened a few times.
If you are like me, Mark Smith shares a way to prevent this with a git pre-commit hook. I made a slight modification to it so it checks in the index instead of the entire file. This is useful if you do interactive staging (git add -p or git add -i). Here's my version:
#!/bin/sh

if git rev-parse --verify HEAD >/dev/null 2>&1; then
  against=HEAD
else
  # Initial commit: diff against an empty tree object
  against=4b825dc642cb6eb9a060e54bf8d69288fbee4904
fi

exec 1>&2

#Workaround for filenames with spaces in them (because for loop breaks use space by default)
SAVEIFS=$IFS
IFS=$(echo "\n\b")

for ENTRY in `git diff-index --cached --name-status $against -- | cut -c1,3-`; do
  CHANGE=`echo "$ENTRY" | cut -c1`
  FILE=`echo "$ENTRY" | cut -c2-`
  if [ $CHANGE = "A" ] || [ $CHANGE = "M" ]; then
    if git diff --cached "$FILE" | grep -q 'NOCOMMIT'; then
      echo "$FILE" 'contains NOCOMMIT!'
      IFS=$SAVEIFS
      exit 1
    fi
  fi
done

IFS=$SAVEIFS
exit 0
Check out the article to see how to set it up.
- Updated 20160306: Modified to remove warning when commit include deleting files.
- Updated 20160329: Modified to handle path names with spaces.
Like this post? Follow me @hboon on Twitter.
Related
Jul 21, 2018
iOS Dev Nugget 301 Print App Document Path IIAug 02, 2017
iOS Dev Nugget 251 Retrieving the Current View ControllerMay 03, 2017
iOS Dev Nugget 238 Keep Code in Method at the Same Level of AbstractionMar 01, 2017
iOS Dev Nugget 229 PromisesJan 25, 2017
iOS Dev Nugget 224 Lazy CollectionsJun 24, 2016
iOS Dev Nugget 193 Result EnumerationMay 26, 2016
iOS Dev Nugget 189 Xcode's Fix All in ScopeMay 20, 2016
iOS Dev Nugget 188 SwiftLintMay 10, 2016
iOS Dev Nugget 187 Creating a Singleton Class in SwiftMay 06, 2016
iOS Dev Nugget 186 Injection for XcodeApr 27, 2016
iOS Dev Nugget 185 Disabling Content Change Animation in CATextLayerApr 20, 2016
iOS Dev Nugget 184 Async LibraryApr 12, 2016
iOS Dev Nugget 183 Quality of Service ClassesApr 02, 2016
iOS Dev Nugget 182 Tracking the swift-evolution Git RepositoryMar 26, 2016
iOS Dev Nugget 181 Swift SelectorsMar 21, 2016
iOS Dev Nugget 180 Low Power ModeMar 01, 2016
iOS Dev Nugget 177 Push Notifications Testing During DevelopmentFeb 18, 2016
iOS Dev Nugget 175 Displaying a Popover in iPhone AppFeb 11, 2016
iOS Dev Nugget 174 View Controller Containment to Avoid Growing a Fat View Controller Base ClassJan 27, 2016
iOS Dev Nugget 172 Print App Document PathDec 30, 2015
iOS Dev Nugget 168 Using Blocks to Manage ContextsNov 11, 2015
iOS Dev Nugget 161 Read Smalltalk Best Practice PatternsOct 20, 2015
iOS Dev Nugget 158 Checking if Newer APIs Are Available In Older iOS Versions (II)
Feb 18, 2016 by Hwee-Boon Yar
You can show a view controller in a popover by setting modalPresentationStyle to UIModalPresentationPopover. This works nicely in iPad apps, but as noted in the documentation:
In a horizontally compact environment, this option behaves the same as UIModalPresentationFullScreen.
So the view controller will be displayed in full screen. If you want the view controller to be displayed as a popover anyway, you can override this behavior by setting implementing UIPopoverPresentationControllerDelegate. E.g.
//Create theViewControllerToPresent and configure it...
theViewControllerToPresent.delegate = self;
[vc presentViewController:theViewControllerToPresent animated:YES completion:nil];

- (UIModalPresentationStyle)adaptivePresentationStyleForPresentationController:(UIPresentationController *)controller {
    return UIModalPresentationNone;
}
This will force the presentation style to not be adapted to "full-screen mode" on the iPhone.
Like this post? Follow me @hboon on Twitter.
Related
Jul 21, 2018
iOS Dev Nugget 301 Print App Document Path IIAug 02, 2017
iOS Dev Nugget 251 Retrieving the Current View ControllerMay 03, 2017
iOS Dev Nugget 238 Keep Code in Method at the Same Level of AbstractionMar 01, 2017
iOS Dev Nugget 229 PromisesJan 25, 2017
iOS Dev Nugget 224 Lazy CollectionsJun 24, 2016
iOS Dev Nugget 193 Result EnumerationMay 26, 2016
iOS Dev Nugget 189 Xcode's Fix All in ScopeMay 20, 2016
iOS Dev Nugget 188 SwiftLintMay 10, 2016
iOS Dev Nugget 187 Creating a Singleton Class in SwiftMay 06, 2016
iOS Dev Nugget 186 Injection for XcodeApr 27, 2016
iOS Dev Nugget 185 Disabling Content Change Animation in CATextLayerApr 20, 2016
iOS Dev Nugget 184 Async LibraryApr 12, 2016
iOS Dev Nugget 183 Quality of Service ClassesApr 02, 2016
iOS Dev Nugget 182 Tracking the swift-evolution Git RepositoryMar 26, 2016
iOS Dev Nugget 181 Swift SelectorsMar 21, 2016
iOS Dev Nugget 180 Low Power ModeMar 01, 2016
iOS Dev Nugget 177 Push Notifications Testing During DevelopmentFeb 23, 2016
iOS Dev Nugget 176 Git no-commit Pre-commit HookFeb 11, 2016
iOS Dev Nugget 174 View Controller Containment to Avoid Growing a Fat View Controller Base ClassJan 27, 2016
iOS Dev Nugget 172 Print App Document PathDec 30, 2015
iOS Dev Nugget 168 Using Blocks to Manage ContextsNov 11, 2015
iOS Dev Nugget 161 Read Smalltalk Best Practice PatternsOct 20, 2015
iOS Dev Nugget 158 Checking if Newer APIs Are Available In Older iOS Versions (II)
Feb 11, 2016 by Hwee-Boon Yar
In any sizable project, it's easy to end up with a view controller hierarchy with a base class that mostly act as a dumping ground for shared code that is used across one or more view controller subclasses. For many reasons, include the Single Responsibility Principle, a fat base class isn't desirable.
Soroush Khanlou has a great writeup about how to use view controller containment (available since iOS 5) to reduce the size of your view controller base class called Many Controllers Make Light Work. The basic idea is view controller containment lets you compose smaller view controllers that are each dedicated to a single task, and because child view controller's view can be configured to be invisible and still get appearance callbacks such as -viewDidAppear:, you get nice hooks to wire up code.
He gives examples such as extracting code that shows progress/loading views (aka. SVProgressHUD) and app analytics.
Check out the article.
Like this post? Follow me @hboon on Twitter.
Related
Jul 21, 2018
iOS Dev Nugget 301 Print App Document Path IIAug 02, 2017
iOS Dev Nugget 251 Retrieving the Current View ControllerMay 03, 2017
iOS Dev Nugget 238 Keep Code in Method at the Same Level of AbstractionMar 01, 2017
iOS Dev Nugget 229 PromisesJan 25, 2017
iOS Dev Nugget 224 Lazy CollectionsJun 24, 2016
iOS Dev Nugget 193 Result EnumerationMay 26, 2016
iOS Dev Nugget 189 Xcode's Fix All in ScopeMay 20, 2016
iOS Dev Nugget 188 SwiftLintMay 10, 2016
iOS Dev Nugget 187 Creating a Singleton Class in SwiftMay 06, 2016
iOS Dev Nugget 186 Injection for XcodeApr 27, 2016
iOS Dev Nugget 185 Disabling Content Change Animation in CATextLayerApr 20, 2016
iOS Dev Nugget 184 Async LibraryApr 12, 2016
iOS Dev Nugget 183 Quality of Service ClassesApr 02, 2016
iOS Dev Nugget 182 Tracking the swift-evolution Git RepositoryMar 26, 2016
iOS Dev Nugget 181 Swift SelectorsMar 21, 2016
iOS Dev Nugget 180 Low Power ModeMar 01, 2016
iOS Dev Nugget 177 Push Notifications Testing During DevelopmentFeb 23, 2016
iOS Dev Nugget 176 Git no-commit Pre-commit HookFeb 18, 2016
iOS Dev Nugget 175 Displaying a Popover in iPhone AppJan 27, 2016
iOS Dev Nugget 172 Print App Document PathDec 30, 2015
iOS Dev Nugget 168 Using Blocks to Manage ContextsNov 11, 2015
iOS Dev Nugget 161 Read Smalltalk Best Practice PatternsOct 20, 2015
iOS Dev Nugget 158 Checking if Newer APIs Are Available In Older iOS Versions (II)
Feb 03, 2016 by Hwee-Boon Yar
I've talked about package managers for OS X as well as for package managers for code. There is also a very useful, but probably lesser known package manager for Xcode, called Alcatraz.io. In its own words:
Alcatraz is an open-source package manager for Xcode. It lets you discover and install plugins, templates and color schemes without the need for manually cloning or copying files. It installs itself as a part of Xcode and it feels like home.
Installation instructions are on the Alcatraz homepage, but I'll point you to a great article by Krzysztof Zabłocki who talks about a number of great plugins that can be installed with Alcatraz.
Like this post? Follow me @hboon on Twitter.
Related
Sep 28, 2018
iOS Dev Nugget 311 jqJul 08, 2018
iOS Dev Nugget 299 CurryingJul 01, 2018
iOS Dev Nugget 298 Conditional BreakpointsJun 01, 2018
iOS Dev Nugget 294 Core Data EditorMar 22, 2018
iOS Dev Nugget 284 Use Shell Aliases for Git commandsFeb 15, 2018
iOS Dev Nugget 279 Reclaim Disk Space by Deleting Old SimulatorsJan 31, 2018
iOS Dev Nugget 277 REPL in LLDBDec 20, 2017
iOS Dev Nugget 271 Zhi — Live Reloading Auto Layout Constraints and moreOct 18, 2017
iOS Dev Nugget 262 Apple Device Names APIAug 30, 2017
iOS Dev Nugget 255 Symbolic Breakpoint to watch for View Controller DeallocationAug 23, 2017
iOS Dev Nugget 254 Paw, for Working with APIsJun 21, 2017
iOS Dev Nugget 245 Show Call HierarchyApr 26, 2017
iOS Dev Nugget 237 mas-cliApr 19, 2017
iOS Dev Nugget 236 Look up Error CodesMar 08, 2017
iOS Dev Nugget 230 Shortcut to Generate Quick Help DocumentationFeb 09, 2017
iOS Dev Nugget 226 React NativeFeb 03, 2017
iOS Dev Nugget 225 Contextual Help for Xcode Build SettingsDec 29, 2016
iOS Dev Nugget 220 Don't Download Xcode from the Mac App StoreNov 08, 2016
iOS Dev Nugget 213 Download Your App Data on iOS Device for DebuggingJul 09, 2016
iOS Dev Nugget 196 Rename Refactoring for Swift CodeJul 06, 2016
iOS Dev Nugget 195 Tools of the TradeJun 17, 2016
iOS Dev Nugget 192 Download Xcode from Downloads for Apple Developers Website Instead of Mac App StoreMay 26, 2016
iOS Dev Nugget 189 Xcode's Fix All in ScopeMay 06, 2016
iOS Dev Nugget 186 Injection for XcodeMar 12, 2016
iOS Dev Nugget 179 Dragging the Program CounterMar 07, 2016
iOS Dev Nugget 178 Breakpoint Actions for LoggingJan 11, 2016
iOS Dev Nugget 170 HomebrewJan 05, 2016
iOS Dev Nugget 169 fastlane: deliverNov 18, 2015
iOS Dev Nugget 162 Reclaim Disk Space from Xcode UsageSep 07, 2015
iOS Dev Nugget 152 Lossy PNG CompressionAug 07, 2015
iOS Dev Nugget 147 NSRegularExpression and NSDataDetectorMar 06, 2015
iOS Dev Nugget 125 View Debugging in XcodeFeb 13, 2015
iOS Dev Nugget 122 Importing Many Test Photos into iOS Simulator IINov 28, 2014
iOS Dev Nugget 111 iOS Support MatrixOct 24, 2014
iOS Dev Nugget 106 Command Line Access to Developer PortalOct 17, 2014
iOS Dev Nugget 105 Try FLEXSep 12, 2014
iOS Dev Nugget 100 Try RevealSep 05, 2014
iOS Dev Nugget 99 Try PaintCodeAug 15, 2014
iOS Dev Nugget 96 Jack, A Native App For iTunes ConnectJul 04, 2014
iOS Dev Nugget 90 Full-Text Searchable WWDC Video Text TranscriptsApr 04, 2014
iOS Dev Nugget 77 RubyMotion Tutorial For Objective C DevelopersJan 17, 2014
iOS Dev Nugget 66 JBChartView for ChartingJan 04, 2014
iOS Dev Nugget 64 Placeholder Views Using PAPlaceholderDec 27, 2013
iOS Dev Nugget 63 Update Your iOS Development ToolboxOct 18, 2013
iOS Dev Nugget 53 Try Kaleidoscope, File Comparison for MacOct 11, 2013
iOS Dev Nugget 52 Set Up Crashlytics For Ad Hoc and App Store Builds OnlyJun 21, 2013
iOS Dev Nugget 36 Use TestFlight for Ad Hoc BuildsMay 11, 2013
iOS Dev Nugget 31 3rd Party Documentation ViewersMar 10, 2013
iOS Dev Nugget 22 Try AppCodeJan 05, 2013
iOS Dev Nugget 14 Charles Web Debugging Proxy
Jan 27, 2016 by Hwee-Boon Yar
While running your app in the simulator, it's often useful to be able to open your app document directory to inspect data or drop in your own test data. Just drop this into -application:didFinishLaunchingWithOptions: and print it out:
NSString* docPath = [[NSFileManager defaultManager] URLsForDirectory:NSDocumentDirectory inDomains:NSUserDomainMask][0].path;
Or in Swift:
let docPath = NSFileManager.defaultManager().URLsForDirectory(NSSearchPathDirectory.DocumentDirectory, inDomains: NSSearchPathDomainMask.UserDomainMask).last?.path
Like this post? Follow me @hboon on Twitter.
Related
Nov 03, 2018
iOS Dev Nugget 314 Checked Array SubscriptingSep 22, 2018
iOS Dev Nugget 310 Weak Reference Wrapper ClassSep 07, 2018
iOS Dev Nugget 308 Careful with early return statements in functions that return voidAug 30, 2018
iOS Dev Nugget 307 Array Out of BoundsAug 23, 2018
iOS Dev Nugget 306 Underscores in Numeric LiteralsAug 02, 2018
iOS Dev Nugget 303 Use Enums for StatesJul 21, 2018
iOS Dev Nugget 301 Print App Document Path IIJul 16, 2018
iOS Dev Nugget 300 Pipe OperatorMay 18, 2018
iOS Dev Nugget 292 for-whereMay 12, 2018
iOS Dev Nugget 291 Implicit Member ExpressionsApr 11, 2018
iOS Dev Nugget 287 Modifying a Property Which is a Struct Triggers didSetNov 02, 2017
iOS Dev Nugget 265 value type cannot have a stored property that recursively contains itSep 13, 2017
iOS Dev Nugget 257 AssertsAug 02, 2017
iOS Dev Nugget 251 Retrieving the Current View ControllerJun 28, 2017
iOS Dev Nugget 246 Mapping Swift and Obj-C Method NamesJun 14, 2017
iOS Dev Nugget 244 IteratorProtocolMay 24, 2017
iOS Dev Nugget 241 Swift Enums with LabelsMay 17, 2017
iOS Dev Nugget 240 Print an Object's Unique IdentifierMay 03, 2017
iOS Dev Nugget 238 Keep Code in Method at the Same Level of AbstractionApr 05, 2017
iOS Dev Nugget 234 #available and @availableMar 01, 2017
iOS Dev Nugget 229 PromisesJan 25, 2017
iOS Dev Nugget 224 Lazy CollectionsNov 23, 2016
iOS Dev Nugget 215 dump Instead of print for Swift StructsOct 25, 2016
iOS Dev Nugget 211 Higher Order Functions: map, filter, reduceOct 12, 2016
iOS Dev Nugget 209 Swift DeferSep 28, 2016
iOS Dev Nugget 207 Swift Nil-Coalescing OperatorSep 22, 2016
iOS Dev Nugget 206 Date doesRelativeDateFormattingSep 11, 2016
iOS Dev Nugget 205 The Never Return Type in SwiftSep 07, 2016
iOS Dev Nugget 204 Swift @autoclosureSep 02, 2016
iOS Dev Nugget 203 Swift MeasurementAug 24, 2016
iOS Dev Nugget 202 Swift Enumerations to Encode StatesAug 17, 2016
iOS Dev Nugget 201 Swift Pattern MatchingAug 10, 2016
iOS Dev Nugget 200 Swift flatMapAug 05, 2016
iOS Dev Nugget 199 Swift Talk Video SeriesJul 26, 2016
iOS Dev Nugget 198 KZPlaygroundJul 20, 2016
iOS Dev Nugget 197 App Initialization CodeJul 09, 2016
iOS Dev Nugget 196 Rename Refactoring for Swift CodeJun 24, 2016
iOS Dev Nugget 193 Result EnumerationMay 26, 2016
iOS Dev Nugget 189 Xcode's Fix All in ScopeMay 20, 2016
iOS Dev Nugget 188 SwiftLintMay 10, 2016
iOS Dev Nugget 187 Creating a Singleton Class in SwiftMay 06, 2016
iOS Dev Nugget 186 Injection for XcodeApr 27, 2016
iOS Dev Nugget 185 Disabling Content Change Animation in CATextLayerApr 20, 2016
iOS Dev Nugget 184 Async LibraryApr 12, 2016
iOS Dev Nugget 183 Quality of Service ClassesApr 02, 2016
iOS Dev Nugget 182 Tracking the swift-evolution Git RepositoryMar 26, 2016
iOS Dev Nugget 181 Swift SelectorsMar 21, 2016
iOS Dev Nugget 180 Low Power ModeMar 01, 2016
iOS Dev Nugget 177 Push Notifications Testing During DevelopmentFeb 23, 2016
iOS Dev Nugget 176 Git no-commit Pre-commit HookFeb 18, 2016
iOS Dev Nugget 175 Displaying a Popover in iPhone AppFeb 11, 2016
iOS Dev Nugget 174 View Controller Containment to Avoid Growing a Fat View Controller Base ClassDec 30, 2015
iOS Dev Nugget 168 Using Blocks to Manage ContextsNov 11, 2015
iOS Dev Nugget 161 Read Smalltalk Best Practice PatternsOct 20, 2015
iOS Dev Nugget 158 Checking if Newer APIs Are Available In Older iOS Versions (II)Aug 17, 2015
iOS Dev Nugget 149 Timepiece, a Swift Library for Handling DatesJul 05, 2015
iOS Dev Nugget 143 Don't Forget SQLiteJul 01, 2015
iOS Dev Nugget 142 Grand Central DispatchJun 22, 2015
iOS Dev Nugget 141 Great Swift Standard Library Examples Covered in Playground (Swift 2.0)Jun 01, 2015
iOS Dev Nugget 138 Interoperability: Using Enumerations Defined In Objective-C from SwiftMay 27, 2015
iOS Dev Nugget 137 Named Tuple ElementsMay 19, 2015
iOS Dev Nugget 136 Auto Layout with CartographyMay 13, 2015
iOS Dev Nugget 135 CAShapeLayer, Animated Views and XCPShowView()Apr 29, 2015
iOS Dev Nugget 133 Dollar.swiftApr 22, 2015
iOS Dev Nugget 132 XCPCaptureValue in Swift PlaygroundsApr 14, 2015
iOS Dev Nugget 131 Running Asynchronous Code in Swift PlaygroundsApr 03, 2015
iOS Dev Nugget 129 Browsing the Swift Standard LibraryFeb 27, 2015
iOS Dev Nugget 124 performSelector:withObject:afterDelay: in SwiftFeb 20, 2015
iOS Dev Nugget 123 Using dynamicType in SwiftJan 02, 2015
iOS Dev Nugget 116 method() is unavailable: use object construction Class()
Jan 17, 2016 by Hwee-Boon Yar
In iOS 7, along with the complete visual refresh, Dynamic Type was introduced. Users can adjust their preferred global text size in Settings.app > General > Accessibility > Larger Text and apps that support Dynamic Type can automagically adjust text to adapt.
The simplest way to get this to work is by creating UIFont using preferredFontForTextStyle: and passing in one of the text styles listed in the UIFontDescriptor class doc. These are:
UIFontTextStyleHeadline
UIFontTextStyleSubheadline
UIFontTextStyleBody
UIFontTextStyleFootnote
UIFontTextStyleCaption1
UIFontTextStyleCaption2
Instead of creating a UIFont instance with an explicit point size, do this:
UIFont* font = [UIFont preferredFontForTextStyle:UIFontTextStyleBody];
Sometimes, you'll find that you want something that looks like the body font, but in bold. You can create a new UIFontDescriptor based on the one specified by the text style.
UIFont* bodyFont = [UIFont preferredFontForTextStyle:UIFontTextStyleBody];
UIFont* font = [UIFont fontWithDescriptor:[[bodyFont fontDescriptor] fontDescriptorWithSymbolicTraits:UIFontDescriptorTraitBold] size:bodyFont.pointSize];
UIFontDescriptors are a way to describe font attributes and can be used to create a font. Text styles such as UIFontTextStyleBody are strings that map to an UIFontDescriptor instance predefined by Apple to look nice given the user's chosen text size.
When the user tweaks the slider while your app is running (in the background), you'll want to refresh your UI to reflect the updated font sizes. You can do this by observing UIContentSizeCategoryDidChangeNotification and assigning new fonts to your UI elements (such as UILabel).
Note that UI element sizes will likely change when font sizes changes. You'll have to either use Auto Layout, or remember to re-compute frame sizes when that happens.
Like this post? Follow me @hboon on Twitter.
Jan 11, 2016 by Hwee-Boon Yar
Continuing from #165 where I wrote about a shortcut command to copy and paste from the shell, we are going to talk about another command line tool that is not specific to iOS development, but nevertheless, important to iOS developer — Homebrew.
Prior to Homebrew, there are several other ways which command line tools [1] can be installed on OS X. This range from downloading the source and building it yourself to package managers that are similar to Homebrew, such as MacPorts and Fink.
Homebrew is a package manager too, but it is newer (since 2009), and has more momentum than MacPorts and Fink. Unless you have specific needs that make Homebrew unsuitable, go with Homebrew.
There's several ways to install Homebrew. The official method downloads and evaluate this script. While recommended as the official way to install Homebrew, it is always good to decide for yourself if you trust the source.
ruby -e "$(curl -fsSL https://raw.githubusercontent.com/Homebrew/install/master/install)"
To install a package:
brew install wget
To upgrade a package:
brew upgrade wget
To update brew itself:
brew update
If you find that brew doesn't seem to work correctly, run brew update twice and brew doctor.
Here's a couple of packages related to iOS app development:
- carthage
- git
- git-flow
- hub
- sqlite
- wget
[1] There is an extension to Homebrew called Homebrew Cask that supports installing of GUI apps.
Like this post? Follow me @hboon on Twitter.
Related
Sep 28, 2018
iOS Dev Nugget 311 jqAug 08, 2018
iOS Dev Nugget 304 CodeRunnerJul 08, 2018
iOS Dev Nugget 299 CurryingJun 01, 2018
iOS Dev Nugget 294 Core Data EditorMar 22, 2018
iOS Dev Nugget 284 Use Shell Aliases for Git commandsDec 20, 2017
iOS Dev Nugget 271 Zhi — Live Reloading Auto Layout Constraints and moreNov 22, 2017
iOS Dev Nugget 267 Touch ID with sudoOct 25, 2017
iOS Dev Nugget 263 Smart Folders for Quick Access to Most Recent FilesOct 18, 2017
iOS Dev Nugget 262 Apple Device Names APIAug 23, 2017
iOS Dev Nugget 254 Paw, for Working with APIsJul 19, 2017
iOS Dev Nugget 249 App Transport Security Diagnostics with nscurlJul 05, 2017
iOS Dev Nugget 247 ASCII TableMay 31, 2017
iOS Dev Nugget 242 Finder TipsApr 26, 2017
iOS Dev Nugget 237 mas-cliApr 19, 2017
iOS Dev Nugget 236 Look up Error CodesMar 15, 2017
iOS Dev Nugget 231 WhatTheFontFeb 09, 2017
iOS Dev Nugget 226 React NativeFeb 03, 2017
iOS Dev Nugget 225 Contextual Help for Xcode Build SettingsJan 19, 2017
iOS Dev Nugget 223 Moving Your Cursor in TerminalJan 05, 2017
iOS Dev Nugget 221 macOS No Longer Remembers Your SSH PassphrasesJul 09, 2016
iOS Dev Nugget 196 Rename Refactoring for Swift CodeJul 06, 2016
iOS Dev Nugget 195 Tools of the TradeMay 06, 2016
iOS Dev Nugget 186 Injection for XcodeFeb 03, 2016
iOS Dev Nugget 173 Xcode Package Manager, AlcatrazJan 05, 2016
iOS Dev Nugget 169 fastlane: deliverDec 09, 2015
iOS Dev Nugget 165 Copy and Paste from ShellSep 07, 2015
iOS Dev Nugget 152 Lossy PNG CompressionAug 07, 2015
iOS Dev Nugget 147 NSRegularExpression and NSDataDetectorMar 06, 2015
iOS Dev Nugget 125 View Debugging in XcodeFeb 13, 2015
iOS Dev Nugget 122 Importing Many Test Photos into iOS Simulator IINov 28, 2014
iOS Dev Nugget 111 iOS Support MatrixOct 24, 2014
iOS Dev Nugget 106 Command Line Access to Developer PortalOct 17, 2014
iOS Dev Nugget 105 Try FLEXSep 12, 2014
iOS Dev Nugget 100 Try RevealSep 05, 2014
iOS Dev Nugget 99 Try PaintCodeAug 15, 2014
iOS Dev Nugget 96 Jack, A Native App For iTunes ConnectJul 04, 2014
iOS Dev Nugget 90 Full-Text Searchable WWDC Video Text TranscriptsApr 04, 2014
iOS Dev Nugget 77 RubyMotion Tutorial For Objective C DevelopersJan 17, 2014
iOS Dev Nugget 66 JBChartView for ChartingJan 04, 2014
iOS Dev Nugget 64 Placeholder Views Using PAPlaceholderDec 27, 2013
iOS Dev Nugget 63 Update Your iOS Development ToolboxOct 18, 2013
iOS Dev Nugget 53 Try Kaleidoscope, File Comparison for MacOct 11, 2013
iOS Dev Nugget 52 Set Up Crashlytics For Ad Hoc and App Store Builds OnlyJun 21, 2013
iOS Dev Nugget 36 Use TestFlight for Ad Hoc BuildsMay 11, 2013
iOS Dev Nugget 31 3rd Party Documentation ViewersMar 10, 2013
iOS Dev Nugget 22 Try AppCodeJan 05, 2013
iOS Dev Nugget 14 Charles Web Debugging Proxy
Jan 05, 2016 by Hwee-Boon Yar
After building several or even just one iOS app, you probably start to find it tedious having to upload multiple (up to 5) screenshots for each screen dimensions (4 sets for iPhone alone), once for each language supported.
fastlane is a suite of command line tools that lets you automate iOS app setup and deployment, including more developer-oriented tasks such as reloading your iOS developer certificates and profiles to more deployment-oriented tasks such as creating of screenshots and uploading metadata to iTunes Connect. Each of these tools is referenced in the fastlane homepage. Note that you can use most of the tools by themselves or together as a "bigger" fastlane setup.
In this nugget, I'll specifically mention only using deliver which cuts down on the manual work required to upload screenshots and metadata to iTunes Connect. It's a simple tool to start with and a major time saver. Baby steps.
From the README, install it by running:
sudo gem install deliver
Then follow the rest of the instructions at deliver, but you can start with running deliver in your shell in a working directory where the tool will interactively walk you through a wizard to set up your configuration.
deliver
I have my own existing organization for screenshots, with a directory (e.g. iPhone6-Plus) storing screenshots for each screen size, so I just symlink them into the screenshots/ folder which deliver uses.
There are several tools in fastlane that are immediately useful and I might cover them in future nuggets. But until then, it'll be worthwhile spending some effort looking into deliver as well as a few of the other tools.
Like this post? Follow me @hboon on Twitter.
Related
Sep 28, 2018
iOS Dev Nugget 311 jqJul 08, 2018
iOS Dev Nugget 299 CurryingJun 01, 2018
iOS Dev Nugget 294 Core Data EditorMar 22, 2018
iOS Dev Nugget 284 Use Shell Aliases for Git commandsFeb 21, 2018
iOS Dev Nugget 280 Using Custom Fonts Without Updating Info.plist ManuallyDec 20, 2017
iOS Dev Nugget 271 Zhi — Live Reloading Auto Layout Constraints and moreOct 18, 2017
iOS Dev Nugget 262 Apple Device Names APIOct 11, 2017
iOS Dev Nugget 261 Checking App Download SizeAug 23, 2017
iOS Dev Nugget 254 Paw, for Working with APIsApr 26, 2017
iOS Dev Nugget 237 mas-cliApr 19, 2017
iOS Dev Nugget 236 Look up Error CodesFeb 09, 2017
iOS Dev Nugget 226 React NativeJul 09, 2016
iOS Dev Nugget 196 Rename Refactoring for Swift CodeJul 06, 2016
iOS Dev Nugget 195 Tools of the TradeMay 06, 2016
iOS Dev Nugget 186 Injection for XcodeFeb 03, 2016
iOS Dev Nugget 173 Xcode Package Manager, AlcatrazJan 11, 2016
iOS Dev Nugget 170 HomebrewSep 07, 2015
iOS Dev Nugget 152 Lossy PNG CompressionAug 13, 2015
iOS Dev Nugget 148 Difference between CFBundleVersion and CFBundleShortVersionStringAug 07, 2015
iOS Dev Nugget 147 NSRegularExpression and NSDataDetectorJun 09, 2015
iOS Dev Nugget 139 Custom Build Configurations and Xcode SubprojectsMar 27, 2015
iOS Dev Nugget 128 Dependency Management for 3rd Party Code: Git SubmodulesMar 20, 2015
iOS Dev Nugget 127 Dependency Management for 3rd Party Code: CarthageMar 13, 2015
iOS Dev Nugget 126 Dependency Management for 3rd Party Code: CocoapodsMar 06, 2015
iOS Dev Nugget 125 View Debugging in XcodeFeb 13, 2015
iOS Dev Nugget 122 Importing Many Test Photos into iOS Simulator IIJan 23, 2015
iOS Dev Nugget 119 Ad Hoc Tethered Install Using iTunesJan 16, 2015
iOS Dev Nugget 118 Vendoring Code and Git SubmodulesNov 28, 2014
iOS Dev Nugget 111 iOS Support MatrixOct 24, 2014
iOS Dev Nugget 106 Command Line Access to Developer PortalOct 17, 2014
iOS Dev Nugget 105 Try FLEXSep 12, 2014
iOS Dev Nugget 100 Try RevealSep 05, 2014
iOS Dev Nugget 99 Try PaintCodeAug 15, 2014
iOS Dev Nugget 96 Jack, A Native App For iTunes ConnectJul 04, 2014
iOS Dev Nugget 90 Full-Text Searchable WWDC Video Text TranscriptsApr 04, 2014
iOS Dev Nugget 77 RubyMotion Tutorial For Objective C DevelopersJan 17, 2014
iOS Dev Nugget 66 JBChartView for ChartingJan 04, 2014
iOS Dev Nugget 64 Placeholder Views Using PAPlaceholderDec 27, 2013
iOS Dev Nugget 63 Update Your iOS Development ToolboxOct 18, 2013
iOS Dev Nugget 53 Try Kaleidoscope, File Comparison for MacOct 11, 2013
iOS Dev Nugget 52 Set Up Crashlytics For Ad Hoc and App Store Builds OnlyJun 21, 2013
iOS Dev Nugget 36 Use TestFlight for Ad Hoc BuildsMay 11, 2013
iOS Dev Nugget 31 3rd Party Documentation ViewersMar 10, 2013
iOS Dev Nugget 22 Try AppCodeJan 05, 2013
iOS Dev Nugget 14 Charles Web Debugging Proxy
Dec 30, 2015 by Hwee-Boon Yar
Objective-C blocks are very handy. One of the things I like to use it for is to wrap it around a flag that you want to set/reset. For e.g., we often write code like this:
[UIView animateWithDuration:2 animations:^{
    //Do something to views that you want animated

    [UIView setAnimationsEnabled:false];
    //Do something to my views, which I don't want animated
    //More
    //More more
    //More more more
    [UIView setAnimationsEnabled:true];
}];
It's sometimes useful to write a function like this:
- (void)withAnimationsDisabled:(void(^)(void))aBlock {
    [UIView setAnimationsEnabled:NO];
    aBlock();
    [UIView setAnimationsEnabled:YES];
}
You can then modify the first snippet to:
[UIView animateWithDuration:2 animations:^{
    //Do something to views that you want animated

    [self withAnimationsDisabled:^{
        //Do something to my views, which I don't want animated
        //More
        //More more
        //More more more
    }];
}];
This helps make the code read a little better and eliminates the possibility that the flag (setAnimationsEnabled: in this case) is not set to the correct value after your operation is performed. You can use this technique to manage contexts that are more complicated than a single flag: opening and closing of a database connection, opening and closing of a file, creating and releasing some resources (such as CGContext).
The same technique can be used for Swift blocks. It looks better due to Swift syntax:
UIView.animateWithDuration(2) {
    //Do something to views that you want animated

    withAnimationsDisabled {
        //Do something to my views, which I don't want animated
        //More
        //More more
        //More more more
    }
}
Have fun with blocks!
Like this post? Follow me @hboon on Twitter.
Related
Nov 03, 2018
iOS Dev Nugget 314 Checked Array SubscriptingSep 22, 2018
iOS Dev Nugget 310 Weak Reference Wrapper ClassSep 07, 2018
iOS Dev Nugget 308 Careful with early return statements in functions that return voidAug 30, 2018
iOS Dev Nugget 307 Array Out of BoundsAug 23, 2018
iOS Dev Nugget 306 Underscores in Numeric LiteralsAug 02, 2018
iOS Dev Nugget 303 Use Enums for StatesJul 21, 2018
iOS Dev Nugget 301 Print App Document Path IIJul 16, 2018
iOS Dev Nugget 300 Pipe OperatorMay 18, 2018
iOS Dev Nugget 292 for-whereMay 12, 2018
iOS Dev Nugget 291 Implicit Member ExpressionsApr 11, 2018
iOS Dev Nugget 287 Modifying a Property Which is a Struct Triggers didSetNov 02, 2017
iOS Dev Nugget 265 value type cannot have a stored property that recursively contains itSep 13, 2017
iOS Dev Nugget 257 AssertsAug 02, 2017
iOS Dev Nugget 251 Retrieving the Current View ControllerJun 28, 2017
iOS Dev Nugget 246 Mapping Swift and Obj-C Method NamesJun 14, 2017
iOS Dev Nugget 244 IteratorProtocolMay 24, 2017
iOS Dev Nugget 241 Swift Enums with LabelsMay 17, 2017
iOS Dev Nugget 240 Print an Object's Unique IdentifierMay 03, 2017
iOS Dev Nugget 238 Keep Code in Method at the Same Level of AbstractionApr 05, 2017
iOS Dev Nugget 234 #available and @availableMar 01, 2017
iOS Dev Nugget 229 PromisesJan 25, 2017
iOS Dev Nugget 224 Lazy CollectionsNov 23, 2016
iOS Dev Nugget 215 dump Instead of print for Swift StructsOct 25, 2016
iOS Dev Nugget 211 Higher Order Functions: map, filter, reduceOct 12, 2016
iOS Dev Nugget 209 Swift DeferSep 28, 2016
iOS Dev Nugget 207 Swift Nil-Coalescing OperatorSep 22, 2016
iOS Dev Nugget 206 Date doesRelativeDateFormattingSep 11, 2016
iOS Dev Nugget 205 The Never Return Type in SwiftSep 07, 2016
iOS Dev Nugget 204 Swift @autoclosureSep 02, 2016
iOS Dev Nugget 203 Swift MeasurementAug 24, 2016
iOS Dev Nugget 202 Swift Enumerations to Encode StatesAug 17, 2016
iOS Dev Nugget 201 Swift Pattern MatchingAug 10, 2016
iOS Dev Nugget 200 Swift flatMapAug 05, 2016
iOS Dev Nugget 199 Swift Talk Video SeriesJul 26, 2016
iOS Dev Nugget 198 KZPlaygroundJul 20, 2016
iOS Dev Nugget 197 App Initialization CodeJul 09, 2016
iOS Dev Nugget 196 Rename Refactoring for Swift CodeJun 24, 2016
iOS Dev Nugget 193 Result EnumerationMay 26, 2016
iOS Dev Nugget 189 Xcode's Fix All in ScopeMay 20, 2016
iOS Dev Nugget 188 SwiftLintMay 10, 2016
iOS Dev Nugget 187 Creating a Singleton Class in SwiftMay 06, 2016
iOS Dev Nugget 186 Injection for XcodeApr 27, 2016
iOS Dev Nugget 185 Disabling Content Change Animation in CATextLayerApr 20, 2016
iOS Dev Nugget 184 Async LibraryApr 12, 2016
iOS Dev Nugget 183 Quality of Service ClassesApr 02, 2016
iOS Dev Nugget 182 Tracking the swift-evolution Git RepositoryMar 26, 2016
iOS Dev Nugget 181 Swift SelectorsMar 21, 2016
iOS Dev Nugget 180 Low Power ModeMar 01, 2016
iOS Dev Nugget 177 Push Notifications Testing During DevelopmentFeb 23, 2016
iOS Dev Nugget 176 Git no-commit Pre-commit HookFeb 18, 2016
iOS Dev Nugget 175 Displaying a Popover in iPhone AppFeb 11, 2016
iOS Dev Nugget 174 View Controller Containment to Avoid Growing a Fat View Controller Base ClassJan 27, 2016
iOS Dev Nugget 172 Print App Document PathNov 11, 2015
iOS Dev Nugget 161 Read Smalltalk Best Practice PatternsOct 20, 2015
iOS Dev Nugget 158 Checking if Newer APIs Are Available In Older iOS Versions (II)Aug 17, 2015
iOS Dev Nugget 149 Timepiece, a Swift Library for Handling DatesJul 05, 2015
iOS Dev Nugget 143 Don't Forget SQLiteJul 01, 2015
iOS Dev Nugget 142 Grand Central DispatchJun 22, 2015
iOS Dev Nugget 141 Great Swift Standard Library Examples Covered in Playground (Swift 2.0)Jun 01, 2015
iOS Dev Nugget 138 Interoperability: Using Enumerations Defined In Objective-C from SwiftMay 27, 2015
iOS Dev Nugget 137 Named Tuple ElementsMay 19, 2015
iOS Dev Nugget 136 Auto Layout with CartographyMay 13, 2015
iOS Dev Nugget 135 CAShapeLayer, Animated Views and XCPShowView()Apr 29, 2015
iOS Dev Nugget 133 Dollar.swiftApr 22, 2015
iOS Dev Nugget 132 XCPCaptureValue in Swift PlaygroundsApr 14, 2015
iOS Dev Nugget 131 Running Asynchronous Code in Swift PlaygroundsApr 03, 2015
iOS Dev Nugget 129 Browsing the Swift Standard LibraryFeb 27, 2015
iOS Dev Nugget 124 performSelector:withObject:afterDelay: in SwiftFeb 20, 2015
iOS Dev Nugget 123 Using dynamicType in SwiftJan 02, 2015
iOS Dev Nugget 116 method() is unavailable: use object construction Class()
Dec 23, 2015 by Hwee-Boon Yar
Cocoa Touch makes it very easy to perform simple animations. e.g. this will move a UIView instance right.
CGRect rect = aView.frame;
rect.origin.x += 20;
[UIView animateWithDuration:0.3 animations:^{
    aView.frame = rect;
}];
With Auto Layout, if you keep in mind that Auto Layout works by letting developers define a set of constraints to calculate layout and with the system computing the actual layout frames for you using -layoutSubviews and related methods like -layoutIfNeeded, then animation with Auto Layout is simple to understand too:
someConstraint.constant = toValue;
[UIView animateWithDuration:0.3 animations:^{
    [aView.superview layoutIfNeeded];
}];
To get the equivalent of changing the frame(s) in aView.frame = rect in the first snippet, you get Cocoa Touch to do a layout pass for you using the updated constraints by calling -layoutIfNeeded within the animation block. One inconvenience is you need to keep the constraint you want to modify around. A few other important points:
- You are not restricted to modifying constraint constants. You can add/remove constraints for more elaborate animation.
- In the first snippet you assign the updated
CGRect to the frame of the view (aView) you want to modify, but in the second snippet, using Auto Layout, you'll usually want to call -layoutIfNeeded on the parent of the view. This is because the parent may use updated constraints which affect the layout of other children.
- If you want to start the animation from another state, you should update your constraints to reflect that and call
-layoutIfNeeded immediately before snippet two, so by the time the -animateWithDuration:animations: block runs the layout has already been updated to that initial state correctly.
PS: I wrote some code, pull some data from the iOS app store and wrote a post about iOS app icon colors. You might find it interesting: iOS App Icon Colors in the Year 2015. Let me know what you think.
Like this post? Follow me @hboon on Twitter.
Dec 15, 2015 by Hwee-Boon Yar
Ever set a breakpoint in a Obj-C project, run this:
(lldb) po UIScreen.mainScreen.bounds
and get:
error: property 'bounds' not found on object of type 'id'
error: 1 errors parsing expression
Annoying isn't it?
You can fix this by doing:
(lldb) expr @import UIKit
So run po UIScreen.mainScreen.bounds again, and you'd get:
(origin = (x = 0, y = 0), size = (width = 414, height = 736))
But you have to do this manually everything you start a debug session. As a good programmer and fan of automation, you can set a breakpoint and let Xcode do it for you.
- Cmd+7 to show the Breakpoints navigator
- Add a symbolic breakpoint for the symbol
UIApplicationMain
- Add an action for that breakpoint:
expr @import UIKit
- Check that so it automatically continues after evaluating actions
Now every time you run the project, commands such as po UIScreen.mainScreen.bounds will work.
Bonus nugget:
Ctrl-click on your breakpoint in the Breakpoints navigator. Choose Move BreakPoint To, and choose User. This will make the breakpoint available for every Xcode project (enabled by default).
Like this post? Follow me @hboon on Twitter.
Dec 09, 2015 by Hwee-Boon Yar
As developers, we often copy and paste to and fro the shell. So I thought I write a tiny tip that I learnt about a while back, yet not particularly specific to iOS app development. Normally you'd do something like this to copy the output of a command you ran in the shell:
do_something | pbcopy
Or to paste something:
pbpaste | do_something_else
If you define a small function in bash (e.g. you can put it in your ~/.profile):
function clip { [ -t 0 ] && pbpaste || pbcopy; }
then you can do this for copying:
do_something | clip
and pasting:
clip | do_something_else
If you use fish shell, you can define this in a file in ~/.config/fish/functions/:
function clip
    if not tty >/dev/null
        pbcopy
    else
        pbpaste
    end
end
PS: I'm not sure if tips such as this are of interest to you. If you can hit reply and let me know in a few words if you want more or less of this, it'll be much appreciated!
Like this post? Follow me @hboon on Twitter.
Related
Aug 08, 2018
iOS Dev Nugget 304 CodeRunnerNov 22, 2017
iOS Dev Nugget 267 Touch ID with sudoOct 25, 2017
iOS Dev Nugget 263 Smart Folders for Quick Access to Most Recent FilesJul 19, 2017
iOS Dev Nugget 249 App Transport Security Diagnostics with nscurlJul 05, 2017
iOS Dev Nugget 247 ASCII TableMay 31, 2017
iOS Dev Nugget 242 Finder TipsMar 15, 2017
iOS Dev Nugget 231 WhatTheFontFeb 03, 2017
iOS Dev Nugget 225 Contextual Help for Xcode Build SettingsJan 19, 2017
iOS Dev Nugget 223 Moving Your Cursor in TerminalJan 05, 2017
iOS Dev Nugget 221 macOS No Longer Remembers Your SSH PassphrasesJan 11, 2016
iOS Dev Nugget 170 Homebrew
Dec 02, 2015 by Hwee-Boon Yar
In #102, I mentioned how to create static launch images for iPhone 6 and iPhone 6 Plus (when they were released). The modern way to create launch images now, however, is to use Storyboard launch screen. It's the way to go with a few advantages over static launch images because you can create a single Storyboard launch screen that works with every device resolutions using Auto Layout. You are going to need that if you are building an iPad app, a universal app or if you build share/action extensions.
You don't need to be using storyboards or Auto Layout in your app to use a Storyboard launch screen. Here's how to create one:
- In your Xcode project, add a new file, and choose
User Interface > Launch Screen.
- Edit the launch screen. If you want to keep it simple, delete all the labels and make the background color match your initial user interface's background color.
- Add the
UILaunchStoryboardName key to your Info.plist file, with your Storyboard launch screen filename as the value
Like this post? Follow me @hboon on Twitter.
Nov 25, 2015 by Hwee-Boon Yar
In #103 Testing Localization Using Launch Arguments, we talked about using launch arguments to run your app to test your app's localization strings against specific languages. Often, when you are developing an app and laying out a screen, you don't have the localized strings for various languages ready yet. Changing layout to accommodate a label for another language later is harder and easy to miss. There's a launch argument that can help. Specify -NSDoubleLocalizedStrings YES and every string returned by NSLocalizedString will be doubled in width, effectively stimulating how localized text may look like.
Like this post? Follow me @hboon on Twitter.
Related
Apr 13, 2017
iOS Dev Nugget 235 Testing Localization Using Launch Arguments (III)Sep 15, 2015
iOS Dev Nugget 153 Shortcut to Open Log in SimulatorMay 13, 2015
iOS Dev Nugget 135 CAShapeLayer, Animated Views and XCPShowView()Mar 06, 2015
iOS Dev Nugget 125 View Debugging in XcodeFeb 13, 2015
iOS Dev Nugget 122 Importing Many Test Photos into iOS Simulator IIOct 17, 2014
iOS Dev Nugget 105 Try FLEXOct 03, 2014
iOS Dev Nugget 103 Testing Localization Using Launch ArgumentsJun 13, 2014
iOS Dev Nugget 87 What's New in iOS 8Mar 28, 2014
iOS Dev Nugget 76 Importing Many Test Photos into iOS SimulatorMay 04, 2013
iOS Dev Nugget 30 Shortcut key to toggle slow animations in the iOS simulator (part II)Apr 27, 2013
iOS Dev Nugget 29 Simulating a Custom LocationApr 12, 2013
iOS Dev Nugget 27 Two-finger touch in SimulatorMar 31, 2013
iOS Dev Nugget 25 Watch out for hotspot and in-call status bar heightMar 22, 2013
iOS Dev Nugget 24 Take Screenshots in the SimulatorJan 05, 2013
iOS Dev Nugget 14 Charles Web Debugging ProxyDec 28, 2012
iOS Dev Nugget 13 Simulating a slow cellular network with Network Link ConditionerNov 23, 2012
iOS Dev Nugget 8 Copy and paste from/to the iOS SimulatorNov 09, 2012
iOS Dev Nugget 6 Open app in Simulator with Finder
Nov 18, 2015 by Hwee-Boon Yar
Solid state drives are an awesome performance booster. But unfortunately, they are more expensive and naturally come in smaller capacities than hard disk drives. Check these directories Xcode uses and see if you can delete some stuff:
~/Library/Developer/Xcode/DerivedData/ - It's totally safe to delete directories here. Especially for projects that you no longer need. When you rebuild your project, they will be created for you.~/Library/Developer/Xcode/iOS DeviceSupport/ - a folder for each combination of iOS (physical) device you have plugged in and the iOS version you were running on it. If you have been doing iOS developer for a while, you will have accrued quite a number of these folders that you can remove. They will be re-generated for you when you plug in a device if you accidentally delete a more recent folder.
You can easily reclaim a couple of gigs to tens of gigs of space by cleaning up these 2 directories.
Like this post? Follow me @hboon on Twitter.
Related
Jul 01, 2018
iOS Dev Nugget 298 Conditional BreakpointsFeb 15, 2018
iOS Dev Nugget 279 Reclaim Disk Space by Deleting Old SimulatorsJan 31, 2018
iOS Dev Nugget 277 REPL in LLDBAug 30, 2017
iOS Dev Nugget 255 Symbolic Breakpoint to watch for View Controller DeallocationJun 21, 2017
iOS Dev Nugget 245 Show Call HierarchyMar 08, 2017
iOS Dev Nugget 230 Shortcut to Generate Quick Help DocumentationFeb 03, 2017
iOS Dev Nugget 225 Contextual Help for Xcode Build SettingsDec 29, 2016
iOS Dev Nugget 220 Don't Download Xcode from the Mac App StoreNov 08, 2016
iOS Dev Nugget 213 Download Your App Data on iOS Device for DebuggingJun 17, 2016
iOS Dev Nugget 192 Download Xcode from Downloads for Apple Developers Website Instead of Mac App StoreMay 26, 2016
iOS Dev Nugget 189 Xcode's Fix All in ScopeMar 12, 2016
iOS Dev Nugget 179 Dragging the Program CounterMar 07, 2016
iOS Dev Nugget 178 Breakpoint Actions for LoggingFeb 03, 2016
iOS Dev Nugget 173 Xcode Package Manager, Alcatraz
Nov 11, 2015 by Hwee-Boon Yar
This isn't a book about heavy design patterns. Rather, it catalogs short recipes about how you can structure your object-oriented code to be manageable and readable — both very important qualities of good code. The book is written in Smalltalk, but given that Objective C is heavily inspired by Smalltalk, the concepts in the book carries over well.
Read the book and re-read it every year. It has been a great help to me and I'm sure there's a trick or two you can pick up from it.
Like this post? Follow me @hboon on Twitter.
Related
Jul 21, 2018
iOS Dev Nugget 301 Print App Document Path IIAug 02, 2017
iOS Dev Nugget 251 Retrieving the Current View ControllerMay 03, 2017
iOS Dev Nugget 238 Keep Code in Method at the Same Level of AbstractionMar 01, 2017
iOS Dev Nugget 229 PromisesJan 25, 2017
iOS Dev Nugget 224 Lazy CollectionsJun 24, 2016
iOS Dev Nugget 193 Result EnumerationMay 26, 2016
iOS Dev Nugget 189 Xcode's Fix All in ScopeMay 20, 2016
iOS Dev Nugget 188 SwiftLintMay 10, 2016
iOS Dev Nugget 187 Creating a Singleton Class in SwiftMay 06, 2016
iOS Dev Nugget 186 Injection for XcodeApr 27, 2016
iOS Dev Nugget 185 Disabling Content Change Animation in CATextLayerApr 20, 2016
iOS Dev Nugget 184 Async LibraryApr 12, 2016
iOS Dev Nugget 183 Quality of Service ClassesApr 02, 2016
iOS Dev Nugget 182 Tracking the swift-evolution Git RepositoryMar 26, 2016
iOS Dev Nugget 181 Swift SelectorsMar 21, 2016
iOS Dev Nugget 180 Low Power ModeMar 01, 2016
iOS Dev Nugget 177 Push Notifications Testing During DevelopmentFeb 23, 2016
iOS Dev Nugget 176 Git no-commit Pre-commit HookFeb 18, 2016
iOS Dev Nugget 175 Displaying a Popover in iPhone AppFeb 11, 2016
iOS Dev Nugget 174 View Controller Containment to Avoid Growing a Fat View Controller Base ClassJan 27, 2016
iOS Dev Nugget 172 Print App Document PathDec 30, 2015
iOS Dev Nugget 168 Using Blocks to Manage ContextsOct 20, 2015
iOS Dev Nugget 158 Checking if Newer APIs Are Available In Older iOS Versions (II)
Nov 04, 2015 by Hwee-Boon Yar
When including a share or action extension in your app, you can use the NSExtensionActivationRule key in your extension's Info.plist file to specify the data types your extension is available for. If you want it to support a maximum of 1 image:
<key>NSExtension</key>
<dict>
    ...
    <key>NSExtensionAttributes</key>
    <dict>
        <key>NSExtensionActivationRule</key>
        <dict>
            <key>NSExtensionActivationSupportsImageWithMaxCount</key>
            <integer>1</integer>
        </dict>
    </dict>
    ...
</dict>
Sometimes, your filtering criteria might need to be more granular. You can use a NSPredicate string as the value of NSExtensionActivationRule instead. E.g. if we want to specific that we only want Live Photos (instead of all kinds of images), and we want exactly 1 live photo:
<key>NSExtension</key>
<dict>
...
<key>NSExtensionAttributes</key>
<dict>
<key>NSExtensionActivationRule</key>
<string>SUBQUERY (
extensionItems,
$extensionItem,
SUBQUERY (
$extensionItem.attachments,
$attachment,
ANY $attachment.registeredTypeIdentifiers UTI-CONFORMS-TO "com.apple.live-photo"
).@count == $extensionItem.attachments.@count and $extensionItem.attachments.@count == 1
).@count == 1</string>
</dict>
...
</dict>
Like this post? Follow me @hboon on Twitter.
Oct 29, 2015 by Hwee-Boon Yar
In #144 NSURLSession instead of NSURLConnection, I mentioned that we should use the NSURLSession family of classes as a replacement for NSURLConnection and used the default NSURLSessionConfiguration object in the code examples.
There are actually 3 types of NSURLSessionConfigurations available. The default, ephemeral and background sessions, created by +defaultSessionConfiguration, +ephemeralSessionConfiguration and +backgroundSessionConfigurationWithIdentifier: respectively.
The default configuration uses a shared cookie store so it is generally good for web browsing. The ephemeral session configuration uses a store that is only in-memory so it is useful for where privacy is desired. The background session is slightly different because operations using it runs in the background, and will continue running until it is completed or if the app is manually killed by the user in the task switcher.
There are two special properties that only apply to background session configurations. Setting the discretionary property hands control over when the upload/download operations should start to the system. Setting the sessionSendsLaunchEvents property resumes/launches the app in background when transfers are completed.
Like this post? Follow me @hboon on Twitter.
Oct 20, 2015 by Hwee-Boon Yar
In #41 Checking if Newer APIs Are Available In Older iOS Versions, I describe how to check if an API is available in the user's iOS version, using Objective-C. This technique is very useful for switching to alternate implementations or disabling features when your app is running on older iOS versions, yet let you take advantage of newer iOS features (and hardware).
In Swift 2.0, there's an easier and more specific way to detect iOS versions, by using #available. For example, if you want to check if the device supports 3D Touch, but want to support iOS versions earlier than 9.0, you can do this:
if #available(iOS 9.0, *) {
    available = UIScreen.mainScreen().traitCollection.forceTouchCapability == UIForceTouchCapability.Available
} else {
    available = false
}
NSLog("force touch available? \(available)")
#available is compile-time checked, so the Xcode will warn you to use #available when you try to utilize an API that isn't available in older iOS versions.
Like this post? Follow me @hboon on Twitter.
Related
Nov 03, 2018
iOS Dev Nugget 314 Checked Array SubscriptingSep 22, 2018
iOS Dev Nugget 310 Weak Reference Wrapper ClassSep 07, 2018
iOS Dev Nugget 308 Careful with early return statements in functions that return voidAug 30, 2018
iOS Dev Nugget 307 Array Out of BoundsAug 23, 2018
iOS Dev Nugget 306 Underscores in Numeric LiteralsAug 02, 2018
iOS Dev Nugget 303 Use Enums for StatesJul 21, 2018
iOS Dev Nugget 301 Print App Document Path IIJul 16, 2018
iOS Dev Nugget 300 Pipe OperatorMay 18, 2018
iOS Dev Nugget 292 for-whereMay 12, 2018
iOS Dev Nugget 291 Implicit Member ExpressionsApr 11, 2018
iOS Dev Nugget 287 Modifying a Property Which is a Struct Triggers didSetNov 02, 2017
iOS Dev Nugget 265 value type cannot have a stored property that recursively contains itSep 13, 2017
iOS Dev Nugget 257 AssertsAug 02, 2017
iOS Dev Nugget 251 Retrieving the Current View ControllerJun 28, 2017
iOS Dev Nugget 246 Mapping Swift and Obj-C Method NamesJun 14, 2017
iOS Dev Nugget 244 IteratorProtocolMay 24, 2017
iOS Dev Nugget 241 Swift Enums with LabelsMay 17, 2017
iOS Dev Nugget 240 Print an Object's Unique IdentifierMay 03, 2017
iOS Dev Nugget 238 Keep Code in Method at the Same Level of AbstractionApr 05, 2017
iOS Dev Nugget 234 #available and @availableMar 01, 2017
iOS Dev Nugget 229 PromisesJan 25, 2017
iOS Dev Nugget 224 Lazy CollectionsNov 23, 2016
iOS Dev Nugget 215 dump Instead of print for Swift StructsOct 25, 2016
iOS Dev Nugget 211 Higher Order Functions: map, filter, reduceOct 12, 2016
iOS Dev Nugget 209 Swift DeferSep 28, 2016
iOS Dev Nugget 207 Swift Nil-Coalescing OperatorSep 22, 2016
iOS Dev Nugget 206 Date doesRelativeDateFormattingSep 11, 2016
iOS Dev Nugget 205 The Never Return Type in SwiftSep 07, 2016
iOS Dev Nugget 204 Swift @autoclosureSep 02, 2016
iOS Dev Nugget 203 Swift MeasurementAug 24, 2016
iOS Dev Nugget 202 Swift Enumerations to Encode StatesAug 17, 2016
iOS Dev Nugget 201 Swift Pattern MatchingAug 10, 2016
iOS Dev Nugget 200 Swift flatMapAug 05, 2016
iOS Dev Nugget 199 Swift Talk Video SeriesJul 26, 2016
iOS Dev Nugget 198 KZPlaygroundJul 20, 2016
iOS Dev Nugget 197 App Initialization CodeJul 09, 2016
iOS Dev Nugget 196 Rename Refactoring for Swift CodeJun 24, 2016
iOS Dev Nugget 193 Result EnumerationMay 26, 2016
iOS Dev Nugget 189 Xcode's Fix All in ScopeMay 20, 2016
iOS Dev Nugget 188 SwiftLintMay 10, 2016
iOS Dev Nugget 187 Creating a Singleton Class in SwiftMay 06, 2016
iOS Dev Nugget 186 Injection for XcodeApr 27, 2016
iOS Dev Nugget 185 Disabling Content Change Animation in CATextLayerApr 20, 2016
iOS Dev Nugget 184 Async LibraryApr 12, 2016
iOS Dev Nugget 183 Quality of Service ClassesApr 02, 2016
iOS Dev Nugget 182 Tracking the swift-evolution Git RepositoryMar 26, 2016
iOS Dev Nugget 181 Swift SelectorsMar 21, 2016
iOS Dev Nugget 180 Low Power ModeMar 01, 2016
iOS Dev Nugget 177 Push Notifications Testing During DevelopmentFeb 23, 2016
iOS Dev Nugget 176 Git no-commit Pre-commit HookFeb 18, 2016
iOS Dev Nugget 175 Displaying a Popover in iPhone AppFeb 11, 2016
iOS Dev Nugget 174 View Controller Containment to Avoid Growing a Fat View Controller Base ClassJan 27, 2016
iOS Dev Nugget 172 Print App Document PathDec 30, 2015
iOS Dev Nugget 168 Using Blocks to Manage ContextsNov 11, 2015
iOS Dev Nugget 161 Read Smalltalk Best Practice PatternsAug 17, 2015
iOS Dev Nugget 149 Timepiece, a Swift Library for Handling DatesJul 05, 2015
iOS Dev Nugget 143 Don't Forget SQLiteJul 01, 2015
iOS Dev Nugget 142 Grand Central DispatchJun 22, 2015
iOS Dev Nugget 141 Great Swift Standard Library Examples Covered in Playground (Swift 2.0)Jun 01, 2015
iOS Dev Nugget 138 Interoperability: Using Enumerations Defined In Objective-C from SwiftMay 27, 2015
iOS Dev Nugget 137 Named Tuple ElementsMay 19, 2015
iOS Dev Nugget 136 Auto Layout with CartographyMay 13, 2015
iOS Dev Nugget 135 CAShapeLayer, Animated Views and XCPShowView()Apr 29, 2015
iOS Dev Nugget 133 Dollar.swiftApr 22, 2015
iOS Dev Nugget 132 XCPCaptureValue in Swift PlaygroundsApr 14, 2015
iOS Dev Nugget 131 Running Asynchronous Code in Swift PlaygroundsApr 03, 2015
iOS Dev Nugget 129 Browsing the Swift Standard LibraryFeb 27, 2015
iOS Dev Nugget 124 performSelector:withObject:afterDelay: in SwiftFeb 20, 2015
iOS Dev Nugget 123 Using dynamicType in SwiftJan 02, 2015
iOS Dev Nugget 116 method() is unavailable: use object construction Class()
Oct 11, 2015 by Hwee-Boon Yar
iOS 9 introduced 3D Touch on the iPhone 6s and 6s Plus. There are a number ways you can utilize 3D Touch in your apps, but the easiest way is with Quick Actions. In Apple's own words:
Quick Actions let users do the things they do most often, faster and in fewer steps. Many of these actions can even be done with a single press, right from the Home screen.
It's very simple to integrate. You can add one or more static entries in your Info.plist file:
<key>UIApplicationShortcutItems</key>
<array>
    <dict>
        <key>UIApplicationShortcutItemType</key>
        <string>com.example.appname.write</string>
        <key>UIApplicationShortcutItemIconType</key>
        <string>UIApplicationShortcutIconTypeCompose</string>
        <key>UIApplicationShortcutItemTitle</key>
        <string>Write</string>
    </dict>
    <dict>
        <key>UIApplicationShortcutItemType</key>
        <string>com.example.appname.postpicture</string>
        <key>UIApplicationShortcutItemIconType</key>
        <string>UIApplicationShortcutIconTypeCompose</string>
        <key>UIApplicationShortcutItemTitle</key>
        <string>Post Picture</string>
    </dict>
</array>
You then implement -application:performActionForShortcutItem:completionHandler: from UIApplicationDelegate, check for the action to handle and call completionHandler once you are done. You may also want to check -application:didFinishLaunchingWithOptions: and inspect launchOptions for the UIApplicationLaunchOptionsShortcutItemKey key to see if the app is launched from a quick action and perhaps handle things differently (e.g. returning NO, so that -application:performActionForShortcutItem:completionHandler: doesn't get called).
In addition to static shortcuts, you can add dynamic ones by assigning to the shortcutItems property of UIApplication.
Like this post? Follow me @hboon on Twitter.
Oct 07, 2015 by Hwee-Boon Yar
Many of us use -canOpenURL: in our apps. Common usage include to detect if other apps of ours have been installed by the user, or switch to another app (using -openURL:) to perform a specific task. In iOS 9, -canOpenURL: has been changed to read from a white list of URL schemes specified in your app's Info.plist file.
Note that while -canOpenURL: requires white listing, -openURL: doesn't.
To white list URL schemes, add this to your Info.plist file:
    <key>LSApplicationQueriesSchemes</key>
    <array>
        <string>someappurlscheme1</string>
        <string>someappurlscheme2</string>
        <string>someappurlscheme3</string>
    </array>
Note that you should only include the schemename part of schemename://.
Even if you don't use -canOpenURL: directly in your apps, you may be asked to white list URL schemes when you include certain third party libraries/SDKs.
Like this post? Follow me @hboon on Twitter.
Related
Aug 23, 2017
iOS Dev Nugget 254 Paw, for Working with APIsJul 19, 2017
iOS Dev Nugget 249 App Transport Security Diagnostics with nscurlFeb 22, 2017
iOS Dev Nugget 228 Recording and Playing Back Network CallsDec 22, 2016
iOS Dev Nugget 219 Test Your App with Airplane Mode enabledMar 21, 2016
iOS Dev Nugget 180 Low Power ModeSep 23, 2015
iOS Dev Nugget 154 App Transport SecurityJul 16, 2015
iOS Dev Nugget 144 NSURLSession instead of NSURLConnectionJan 24, 2014
iOS Dev Nugget 67 Simulating a slow cellular network with Network Link Conditioner on iOSJul 13, 2013
iOS Dev Nugget 39 Use NSCache Instead of NSMutableDictionary When CachingJan 05, 2013
iOS Dev Nugget 14 Charles Web Debugging ProxyDec 28, 2012
iOS Dev Nugget 13 Simulating a slow cellular network with Network Link Conditioner
Sep 28, 2015 by Hwee-Boon Yar
Introduced in iOS 8, being able to use Touch ID for your app's authentication is a very handy feature for users. This is especially nice to integrate because Touch ID has become very fast in iPhone 6s and iPhone 6s Plus (just released as of writing).
It is easy to integrate:
NSError* error;
LAContext* context = [[LAContext alloc] init];
BOOL canUseTouchID = [context canEvaluatePolicy:LAPolicyDeviceOwnerAuthenticationWithBiometrics
                        error:&error];
if (canUseTouchID) {
    [context evaluatePolicy:LAPolicyDeviceOwnerAuthenticationWithBiometrics
        localizedReason:NSLocalizedString(@"Log in with Touch ID", @"")
        reply:^(BOOL result, NSError* error) {
            if (result && !error) {
                //User authenticated, OK!
            } else {
                //Check and error
            }
        }];
} else {
    //Authenticate in another way
}
Remember to wrap Touch ID access (as well as your own code after the user is authenticated, if necessary) in the main thread and you are good to go!
Like this post? Follow me @hboon on Twitter.
Sep 23, 2015 by Hwee-Boon Yar
In iOS 9 (and OS X 10.11), the operating system requires HTTPS by default when you make any HTTP connection. This is definitely a good thing. However, there might not be time to fix up your own servers or if maybe you are connecting to a third party API that you have no control over. To workaround that, you can specify exceptions in your Info.plist file.
There's a few key-value pairs you can use for various effects. But here's the common ones.
Use NSAllowsArbitraryLoads for a complete bypass of the HTTPS requirement. Obviously, this is the last resort.
<key>NSAppTransportSecurity</key>
<dict>
    <key>NSAllowsArbitraryLoads</key>
    <true/>
</dict>
You should use NSExceptionDomains like this to specify specific domains (and whether subdomains are included) like these:
<key>NSAppTransportSecurity</key>
<dict>
    <key>NSExceptionDomains</key>
    <dict>
        <key>api.myapidomain.com</key>
        <dict>
            <key>NSExceptionAllowsInsecureHTTPLoads</key>
            <true/>
        </dict>
    </dict>
</dict>
Like this post? Follow me @hboon on Twitter.
Related
Jan 10, 2018
iOS Dev Nugget 274 Password AutoFillSep 06, 2017
iOS Dev Nugget 256 SFAuthenticationSession for Login Protocols and Single Sign OnAug 23, 2017
iOS Dev Nugget 254 Paw, for Working with APIsJul 19, 2017
iOS Dev Nugget 249 App Transport Security Diagnostics with nscurlFeb 22, 2017
iOS Dev Nugget 228 Recording and Playing Back Network CallsDec 22, 2016
iOS Dev Nugget 219 Test Your App with Airplane Mode enabledNov 28, 2016
iOS Dev Nugget 216 File Data ProtectionMar 21, 2016
iOS Dev Nugget 180 Low Power ModeOct 07, 2015
iOS Dev Nugget 156 -canOpenURL:Jul 16, 2015
iOS Dev Nugget 144 NSURLSession instead of NSURLConnectionJan 24, 2014
iOS Dev Nugget 67 Simulating a slow cellular network with Network Link Conditioner on iOSJul 13, 2013
iOS Dev Nugget 39 Use NSCache Instead of NSMutableDictionary When CachingJan 05, 2013
iOS Dev Nugget 14 Charles Web Debugging ProxyDec 28, 2012
iOS Dev Nugget 13 Simulating a slow cellular network with Network Link Conditioner
Sep 15, 2015 by Hwee-Boon Yar
We don't always remember to check for new menu items with an SDK upgrade, so here's one I have missed for a long time: while in the iOS simulator app, choose the Debug menu > Open System Log... (or hit Cmd+/) to open Console.app. Handy if you have cleared the logs in Xcode while debugging (or if you launched your app directly in the simulator).
Like this post? Follow me @hboon on Twitter.
Related
Apr 13, 2017
iOS Dev Nugget 235 Testing Localization Using Launch Arguments (III)Nov 25, 2015
iOS Dev Nugget 163 Testing Localization Using Launch Arguments (II)May 13, 2015
iOS Dev Nugget 135 CAShapeLayer, Animated Views and XCPShowView()Mar 06, 2015
iOS Dev Nugget 125 View Debugging in XcodeFeb 13, 2015
iOS Dev Nugget 122 Importing Many Test Photos into iOS Simulator IIOct 17, 2014
iOS Dev Nugget 105 Try FLEXOct 03, 2014
iOS Dev Nugget 103 Testing Localization Using Launch ArgumentsJun 13, 2014
iOS Dev Nugget 87 What's New in iOS 8Mar 28, 2014
iOS Dev Nugget 76 Importing Many Test Photos into iOS SimulatorMay 04, 2013
iOS Dev Nugget 30 Shortcut key to toggle slow animations in the iOS simulator (part II)Apr 27, 2013
iOS Dev Nugget 29 Simulating a Custom LocationApr 12, 2013
iOS Dev Nugget 27 Two-finger touch in SimulatorMar 31, 2013
iOS Dev Nugget 25 Watch out for hotspot and in-call status bar heightMar 22, 2013
iOS Dev Nugget 24 Take Screenshots in the SimulatorJan 05, 2013
iOS Dev Nugget 14 Charles Web Debugging ProxyDec 28, 2012
iOS Dev Nugget 13 Simulating a slow cellular network with Network Link ConditionerNov 23, 2012
iOS Dev Nugget 8 Copy and paste from/to the iOS SimulatorNov 09, 2012
iOS Dev Nugget 6 Open app in Simulator with Finder
Sep 07, 2015 by Hwee-Boon Yar
In #72 Slimming Down Your App, I mentioned ImageOptim for optimizing the size of your images. There is also ImageAlpha which applies lossy compression to PNG files by the same author. You can even run ImageOptim after ImageAlpha for better size reductions. This writeup by the author gives an anecdote of 44% reduction in size by using ImageAlpha before ImageOptim compared to only ImageOptim.
Like this post? Follow me @hboon on Twitter.
Related
Sep 28, 2018
iOS Dev Nugget 311 jqJul 08, 2018
iOS Dev Nugget 299 CurryingJun 01, 2018
iOS Dev Nugget 294 Core Data EditorMar 22, 2018
iOS Dev Nugget 284 Use Shell Aliases for Git commandsDec 20, 2017
iOS Dev Nugget 271 Zhi — Live Reloading Auto Layout Constraints and moreOct 18, 2017
iOS Dev Nugget 262 Apple Device Names APIAug 23, 2017
iOS Dev Nugget 254 Paw, for Working with APIsApr 26, 2017
iOS Dev Nugget 237 mas-cliApr 19, 2017
iOS Dev Nugget 236 Look up Error CodesFeb 09, 2017
iOS Dev Nugget 226 React NativeJul 09, 2016
iOS Dev Nugget 196 Rename Refactoring for Swift CodeJul 06, 2016
iOS Dev Nugget 195 Tools of the TradeMay 06, 2016
iOS Dev Nugget 186 Injection for XcodeFeb 03, 2016
iOS Dev Nugget 173 Xcode Package Manager, AlcatrazJan 11, 2016
iOS Dev Nugget 170 HomebrewJan 05, 2016
iOS Dev Nugget 169 fastlane: deliverAug 07, 2015
iOS Dev Nugget 147 NSRegularExpression and NSDataDetectorMar 06, 2015
iOS Dev Nugget 125 View Debugging in XcodeFeb 13, 2015
iOS Dev Nugget 122 Importing Many Test Photos into iOS Simulator IINov 28, 2014
iOS Dev Nugget 111 iOS Support MatrixOct 24, 2014
iOS Dev Nugget 106 Command Line Access to Developer PortalOct 17, 2014
iOS Dev Nugget 105 Try FLEXSep 12, 2014
iOS Dev Nugget 100 Try RevealSep 05, 2014
iOS Dev Nugget 99 Try PaintCodeAug 15, 2014
iOS Dev Nugget 96 Jack, A Native App For iTunes ConnectJul 04, 2014
iOS Dev Nugget 90 Full-Text Searchable WWDC Video Text TranscriptsApr 04, 2014
iOS Dev Nugget 77 RubyMotion Tutorial For Objective C DevelopersJan 17, 2014
iOS Dev Nugget 66 JBChartView for ChartingJan 04, 2014
iOS Dev Nugget 64 Placeholder Views Using PAPlaceholderDec 27, 2013
iOS Dev Nugget 63 Update Your iOS Development ToolboxOct 18, 2013
iOS Dev Nugget 53 Try Kaleidoscope, File Comparison for MacOct 11, 2013
iOS Dev Nugget 52 Set Up Crashlytics For Ad Hoc and App Store Builds OnlyJun 21, 2013
iOS Dev Nugget 36 Use TestFlight for Ad Hoc BuildsMay 11, 2013
iOS Dev Nugget 31 3rd Party Documentation ViewersMar 10, 2013
iOS Dev Nugget 22 Try AppCodeJan 05, 2013
iOS Dev Nugget 14 Charles Web Debugging Proxy
Aug 31, 2015 by Hwee-Boon Yar
In #48 Utility Library for Keychain Access, we mentioned a wrapper for Keychain access.
Since then, there's been a few more options. Both Valet from Square and skeychain from Sam Soffes work with the Keychain on both OS X and iOS.
I have personally used sskeychain for storing API keys in the keychain, but it looks like Valet is more extensive, like having support for shared access group across apps.
PS: There's an error in the code sample in #150 which I've fixed in the archives.
Like this post? Follow me @hboon on Twitter.
Related
Aug 15, 2018
iOS Dev Nugget 305 Declaring Distinct Types from General TypesJul 24, 2018
iOS Dev Nugget 302 RealmJun 09, 2018
iOS Dev Nugget 295 SwifterSwiftMay 23, 2018
iOS Dev Nugget 293 iOSSnapshotTestCase (was FBSnapshotTestCase)Mar 15, 2018
iOS Dev Nugget 283 Eureka for FormsFeb 28, 2018
iOS Dev Nugget 281 Use R.swift for Static References to Resources Like ImagesFeb 21, 2018
iOS Dev Nugget 280 Using Custom Fonts Without Updating Info.plist ManuallyDec 06, 2017
iOS Dev Nugget 269 Including Finger Touches in App Preview VideosJul 11, 2017
iOS Dev Nugget 248 In-app Native RoutingMar 22, 2017
iOS Dev Nugget 232 Shared Web Credentials: Logging Into iOS app with Password Saved with SafariMar 01, 2017
iOS Dev Nugget 229 PromisesFeb 22, 2017
iOS Dev Nugget 228 Recording and Playing Back Network CallsJan 12, 2017
iOS Dev Nugget 222 Uniquely Identifying User DevicesOct 23, 2016
iOS Dev Nugget 210 PMAlertControllerJun 03, 2016
iOS Dev Nugget 190 Quick Look Plug-in for Mobile Provisioning FilesMay 20, 2016
iOS Dev Nugget 188 SwiftLintApr 20, 2016
iOS Dev Nugget 184 Async LibraryAug 17, 2015
iOS Dev Nugget 149 Timepiece, a Swift Library for Handling DatesJul 27, 2015
iOS Dev Nugget 146 UIStackView and TZStackViewJul 21, 2015
iOS Dev Nugget 145 Listing Available FontsJul 05, 2015
iOS Dev Nugget 143 Don't Forget SQLiteJun 09, 2015
iOS Dev Nugget 139 Custom Build Configurations and Xcode SubprojectsMay 19, 2015
iOS Dev Nugget 136 Auto Layout with CartographyApr 29, 2015
iOS Dev Nugget 133 Dollar.swiftFeb 06, 2015
iOS Dev Nugget 121 InflectorKitDec 26, 2014
iOS Dev Nugget 115 Displaying Information in Settings AppDec 19, 2014
iOS Dev Nugget 114 Preview an Image for DebuggingDec 12, 2014
iOS Dev Nugget 113 GPUImage, a GPU-based Image and Video Processing FrameworkMay 30, 2014
iOS Dev Nugget 85 A More Customizable Button For Different StatesMay 02, 2014
iOS Dev Nugget 81 TMCache For In-Memory and Disk-backed CachingApr 18, 2014
iOS Dev Nugget 79 TweetBot Photo Flicking EffectMar 07, 2014
iOS Dev Nugget 73 Open Source Date Picker from SquareFeb 22, 2014
iOS Dev Nugget 71 TapJan 31, 2014
iOS Dev Nugget 68 Custom URL Schemes DirectoryDec 20, 2013
iOS Dev Nugget 62 Using PDF Instead of PNG Files for Resizable AssetsSep 20, 2013
iOS Dev Nugget 49 Wrapper to Get UIColor ComponentsSep 13, 2013
iOS Dev Nugget 48 Utility Library for Keychain AccessMay 17, 2013
iOS Dev Nugget 32 FMDB: Thin Objective C Wrapper Around SQLiteOct 06, 2012
iOS Dev Nugget 1 Easy logging of values and objects
Aug 27, 2015 by Hwee-Boon Yar
In Nugget #143 Don't Forget SQLite, we mentioned various ways of persisting data and pointed out SQLite as a very powerful tool for data storage. But besides storing natively types such as NSDictionary and NSString as plist, you can also store custom classes of your own by using subclasses of NSCoder — NSKeyedUnarchiver and NSKeyedArchiver. You can archive objects into an NSData instance and unarchive from NSData instances. There's also convenience methods so you can do:
//Write to a file
[NSKeyedArchiver archiveRootObject:someObject toFile:aPath];

//Read from a file
NSObject* someObject = [NSKeyedUnarchiver unarchiveObjectWithFile:aPath];
You just need to make sure your own classes implement the methods -initWithCoder: and -encodeWithCoder: in the NSCoding protocol.
@implementation MyClass

//... other stuff

- (id)initWithCoder:(NSCoder*)decoder {
    if (self = [super init]) {
        self.property1 = [decoder decodeObjectForKey:@"property1"];
        self.property2 = [decoder decodeObjectForKey:@"property2"];
    }
    return self;
}

- (id)encodeWithCoder:(NSCoder*)encoder {
    [encoder encodeObject:self.property1 forKey:@"property1"];
    [encoder encodeObject:self.property2 forKey:@"property2"];
}

@end
With that you can do something like this to write an object (graph) to disk:
MyClass* obj;
//Set up obj
NSDictionary* aDict = @{@"someKey":obj};
[NSKeyedArchiver archiveRootObject:aDict toFile:aPath];
This is very useful if you want to persist small bits of objects that includes instances of your own classes. Handy for caching. Alternatively you can use NSKeyedArchiver to create NSData instances and save them in plists too.
Sponsored: Learn how to make money selling your own apps. Start your app publishing business: go to LearnAppMaking.com and sign up!
Like this post? Follow me @hboon on Twitter.
Aug 17, 2015 by Hwee-Boon Yar
Between NSDate, NSCalendar, NSDateFormatter and NSDateComponents, the iOS SDK provides a powerful system to operate on date and time values. The API however is a little verbose. Naoto Kaneko wrote a set of extensions for NSDate (and a few other types such as Int and String) in Swift, called Timepiece that makes date and time manipulate easier.
Creating new dates:
let now = NSDate()
let christmas = now.change(month: 12, day: 25)
Formatting:
5.minutes.later.stringFromFormat("yyyy-MM-dd HH:mm:SS")
Parsing:
"1987-06-02".dateFromFormat("yyyy-MM-dd")
Comparison:
date < 1.year.ago
There's a Swift playground included with it, so you can check it out easily. To use it, open Timepiece.xcworkspace and then open Timepiece.playground from within the workspace.
Sponsored: Learn how to make money selling your own apps. Start your app publishing business: go to LearnAppMaking.com and sign up!
Like this post? Follow me @hboon on Twitter.
Related
Nov 03, 2018
iOS Dev Nugget 314 Checked Array SubscriptingSep 22, 2018
iOS Dev Nugget 310 Weak Reference Wrapper ClassSep 07, 2018
iOS Dev Nugget 308 Careful with early return statements in functions that return voidAug 30, 2018
iOS Dev Nugget 307 Array Out of BoundsAug 23, 2018
iOS Dev Nugget 306 Underscores in Numeric LiteralsAug 15, 2018
iOS Dev Nugget 305 Declaring Distinct Types from General TypesAug 02, 2018
iOS Dev Nugget 303 Use Enums for StatesJul 24, 2018
iOS Dev Nugget 302 RealmJul 21, 2018
iOS Dev Nugget 301 Print App Document Path IIJul 16, 2018
iOS Dev Nugget 300 Pipe OperatorJun 09, 2018
iOS Dev Nugget 295 SwifterSwiftMay 23, 2018
iOS Dev Nugget 293 iOSSnapshotTestCase (was FBSnapshotTestCase)May 18, 2018
iOS Dev Nugget 292 for-whereMay 12, 2018
iOS Dev Nugget 291 Implicit Member ExpressionsApr 11, 2018
iOS Dev Nugget 287 Modifying a Property Which is a Struct Triggers didSetMar 15, 2018
iOS Dev Nugget 283 Eureka for FormsFeb 28, 2018
iOS Dev Nugget 281 Use R.swift for Static References to Resources Like ImagesFeb 21, 2018
iOS Dev Nugget 280 Using Custom Fonts Without Updating Info.plist ManuallyDec 06, 2017
iOS Dev Nugget 269 Including Finger Touches in App Preview VideosNov 02, 2017
iOS Dev Nugget 265 value type cannot have a stored property that recursively contains itSep 13, 2017
iOS Dev Nugget 257 AssertsAug 02, 2017
iOS Dev Nugget 251 Retrieving the Current View ControllerJul 11, 2017
iOS Dev Nugget 248 In-app Native RoutingJun 28, 2017
iOS Dev Nugget 246 Mapping Swift and Obj-C Method NamesJun 14, 2017
iOS Dev Nugget 244 IteratorProtocolMay 24, 2017
iOS Dev Nugget 241 Swift Enums with LabelsMay 17, 2017
iOS Dev Nugget 240 Print an Object's Unique IdentifierApr 05, 2017
iOS Dev Nugget 234 #available and @availableMar 01, 2017
iOS Dev Nugget 229 PromisesFeb 22, 2017
iOS Dev Nugget 228 Recording and Playing Back Network CallsNov 23, 2016
iOS Dev Nugget 215 dump Instead of print for Swift StructsOct 25, 2016
iOS Dev Nugget 211 Higher Order Functions: map, filter, reduceOct 23, 2016
iOS Dev Nugget 210 PMAlertControllerOct 12, 2016
iOS Dev Nugget 209 Swift DeferSep 28, 2016
iOS Dev Nugget 207 Swift Nil-Coalescing OperatorSep 22, 2016
iOS Dev Nugget 206 Date doesRelativeDateFormattingSep 11, 2016
iOS Dev Nugget 205 The Never Return Type in SwiftSep 07, 2016
iOS Dev Nugget 204 Swift @autoclosureSep 02, 2016
iOS Dev Nugget 203 Swift MeasurementAug 24, 2016
iOS Dev Nugget 202 Swift Enumerations to Encode StatesAug 17, 2016
iOS Dev Nugget 201 Swift Pattern MatchingAug 10, 2016
iOS Dev Nugget 200 Swift flatMapAug 05, 2016
iOS Dev Nugget 199 Swift Talk Video SeriesJul 26, 2016
iOS Dev Nugget 198 KZPlaygroundJul 20, 2016
iOS Dev Nugget 197 App Initialization CodeJul 09, 2016
iOS Dev Nugget 196 Rename Refactoring for Swift CodeJun 24, 2016
iOS Dev Nugget 193 Result EnumerationJun 03, 2016
iOS Dev Nugget 190 Quick Look Plug-in for Mobile Provisioning FilesMay 20, 2016
iOS Dev Nugget 188 SwiftLintMay 10, 2016
iOS Dev Nugget 187 Creating a Singleton Class in SwiftMay 06, 2016
iOS Dev Nugget 186 Injection for XcodeApr 20, 2016
iOS Dev Nugget 184 Async LibraryApr 02, 2016
iOS Dev Nugget 182 Tracking the swift-evolution Git RepositoryMar 26, 2016
iOS Dev Nugget 181 Swift SelectorsMar 21, 2016
iOS Dev Nugget 180 Low Power ModeJan 27, 2016
iOS Dev Nugget 172 Print App Document PathDec 30, 2015
iOS Dev Nugget 168 Using Blocks to Manage ContextsOct 20, 2015
iOS Dev Nugget 158 Checking if Newer APIs Are Available In Older iOS Versions (II)Aug 31, 2015
iOS Dev Nugget 151 More Wrappers for Keychain AccessJul 27, 2015
iOS Dev Nugget 146 UIStackView and TZStackViewJul 21, 2015
iOS Dev Nugget 145 Listing Available FontsJul 05, 2015
iOS Dev Nugget 143 Don't Forget SQLiteJul 01, 2015
iOS Dev Nugget 142 Grand Central DispatchJun 22, 2015
iOS Dev Nugget 141 Great Swift Standard Library Examples Covered in Playground (Swift 2.0)Jun 09, 2015
iOS Dev Nugget 139 Custom Build Configurations and Xcode SubprojectsJun 01, 2015
iOS Dev Nugget 138 Interoperability: Using Enumerations Defined In Objective-C from SwiftMay 27, 2015
iOS Dev Nugget 137 Named Tuple ElementsMay 19, 2015
iOS Dev Nugget 136 Auto Layout with CartographyMay 13, 2015
iOS Dev Nugget 135 CAShapeLayer, Animated Views and XCPShowView()Apr 29, 2015
iOS Dev Nugget 133 Dollar.swiftApr 22, 2015
iOS Dev Nugget 132 XCPCaptureValue in Swift PlaygroundsApr 14, 2015
iOS Dev Nugget 131 Running Asynchronous Code in Swift PlaygroundsApr 03, 2015
iOS Dev Nugget 129 Browsing the Swift Standard LibraryFeb 27, 2015
iOS Dev Nugget 124 performSelector:withObject:afterDelay: in SwiftFeb 20, 2015
iOS Dev Nugget 123 Using dynamicType in SwiftFeb 06, 2015
iOS Dev Nugget 121 InflectorKitJan 02, 2015
iOS Dev Nugget 116 method() is unavailable: use object construction Class()Dec 26, 2014
iOS Dev Nugget 115 Displaying Information in Settings AppDec 19, 2014
iOS Dev Nugget 114 Preview an Image for DebuggingDec 12, 2014
iOS Dev Nugget 113 GPUImage, a GPU-based Image and Video Processing FrameworkMay 30, 2014
iOS Dev Nugget 85 A More Customizable Button For Different StatesMay 02, 2014
iOS Dev Nugget 81 TMCache For In-Memory and Disk-backed CachingApr 18, 2014
iOS Dev Nugget 79 TweetBot Photo Flicking EffectMar 07, 2014
iOS Dev Nugget 73 Open Source Date Picker from SquareFeb 22, 2014
iOS Dev Nugget 71 TapJan 31, 2014
iOS Dev Nugget 68 Custom URL Schemes DirectoryDec 20, 2013
iOS Dev Nugget 62 Using PDF Instead of PNG Files for Resizable AssetsSep 20, 2013
iOS Dev Nugget 49 Wrapper to Get UIColor ComponentsMay 17, 2013
iOS Dev Nugget 32 FMDB: Thin Objective C Wrapper Around SQLiteOct 06, 2012
iOS Dev Nugget 1 Easy logging of values and objects
Aug 13, 2015 by Hwee-Boon Yar
I wrote about this on my blog a few months ago, titled Difference between CFBundleVersion and CFBundleShortVersionString. It's simple, but confusing if you haven't been introduced to it:
Click on the Apple icon in the Mac menu bar and choose About This Mac. Click "Version 10.xxx". You should see something like this:
Version 10.10.3 (14D113c)
CFBundleShortVersionString (10.10.3) is the version number and is the version number that is public and marketed to users.
CFBundleVersion (14D113c) is the build number.
Naturally, you should increase the CFBundleVersion (build number) with every build, example for testing - TestFlight, HockeyApp.
You also (and only) increase the CFBundleShortVersionString (version number) when it's a new release, e.g. when Apple starts beta for 10.10.3, all builds should have version=10.10.3 instead of the previous 10.10.2 and all builds will have different build numbers.
Sponsored: Learn how to make money selling your own apps. Start your app publishing business: go to LearnAppMaking.com and sign up!
Like this post? Follow me @hboon on Twitter.
Aug 07, 2015 by Hwee-Boon Yar
iOS provides a NSRegularExpression class for working with regular expressions. Here's how to run a regex against a string and iterate through the matches:
NSError* error;
NSRegularExpression* regex = [NSRegularExpression regularExpressionWithPattern:@"XXX" options:NSRegularExpressionCaseInsensitive error:&error];
NSString* string = @"HelloXXXworldXXXXXX";
__block NSUInteger count = 0;
[regex enumerateMatchesInString:string options:0 range:NSMakeRange(0, [string length]) usingBlock:^(NSTextCheckingResult* match, NSMatchingFlags flags, BOOL* stop) {
    NSRange matchRange = [match range];
    NSRange range = [match rangeAtIndex:0];
    NSLog(@"range (%@, %@)", @(range.location), @(range.length));
    NSLog(@"string: %@", [string substringWithRange:range]);
}];
What's also interesting is iOS provides NSDataDetector, as a subclass of NSRegularExpression.
NSError* error;
NSDataDetector* detector = [NSDataDetector dataDetectorWithTypes:NSTextCheckingTypeLink|NSTextCheckingTypePhoneNumber error:&error];
NSString* string = @"My homepage is at https://hboon.com and my phone number is 391-165-8164";
__block NSUInteger count = 0;
[detector enumerateMatchesInString:string options:0 range:NSMakeRange(0, [string length]) usingBlock:^(NSTextCheckingResult* match, NSMatchingFlags flags, BOOL* stop){
NSRange matchRange = [match range];
if ([match resultType] == NSTextCheckingTypeLink) {
NSURL* url = [match URL];
NSLog(@"matched URL: %@", url);
} else if ([match resultType] == NSTextCheckingTypePhoneNumber) {
NSString* phoneNumber = [match phoneNumber];
NSLog(@"matched phone number: %@", phoneNumber);
}
}];
NSDataDetector comes with pre-built matching capability for dates, addresses, links, and phone numbers, so you don't have to build your own regex for them.
PS: If you want to build more complicated regular expressions, check out my app Regex for OS X that includes tools to help build and test regular expressions.
Like this post? Follow me @hboon on Twitter.
Related
Sep 28, 2018
iOS Dev Nugget 311 jqJul 08, 2018
iOS Dev Nugget 299 CurryingJun 01, 2018
iOS Dev Nugget 294 Core Data EditorMar 22, 2018
iOS Dev Nugget 284 Use Shell Aliases for Git commandsDec 20, 2017
iOS Dev Nugget 271 Zhi — Live Reloading Auto Layout Constraints and moreOct 18, 2017
iOS Dev Nugget 262 Apple Device Names APIAug 23, 2017
iOS Dev Nugget 254 Paw, for Working with APIsApr 26, 2017
iOS Dev Nugget 237 mas-cliApr 19, 2017
iOS Dev Nugget 236 Look up Error CodesFeb 09, 2017
iOS Dev Nugget 226 React NativeJul 09, 2016
iOS Dev Nugget 196 Rename Refactoring for Swift CodeJul 06, 2016
iOS Dev Nugget 195 Tools of the TradeMay 06, 2016
iOS Dev Nugget 186 Injection for XcodeFeb 03, 2016
iOS Dev Nugget 173 Xcode Package Manager, AlcatrazJan 11, 2016
iOS Dev Nugget 170 HomebrewJan 05, 2016
iOS Dev Nugget 169 fastlane: deliverSep 07, 2015
iOS Dev Nugget 152 Lossy PNG CompressionMar 06, 2015
iOS Dev Nugget 125 View Debugging in XcodeFeb 13, 2015
iOS Dev Nugget 122 Importing Many Test Photos into iOS Simulator IINov 28, 2014
iOS Dev Nugget 111 iOS Support MatrixOct 24, 2014
iOS Dev Nugget 106 Command Line Access to Developer PortalOct 17, 2014
iOS Dev Nugget 105 Try FLEXSep 12, 2014
iOS Dev Nugget 100 Try RevealSep 05, 2014
iOS Dev Nugget 99 Try PaintCodeAug 15, 2014
iOS Dev Nugget 96 Jack, A Native App For iTunes ConnectJul 04, 2014
iOS Dev Nugget 90 Full-Text Searchable WWDC Video Text TranscriptsApr 04, 2014
iOS Dev Nugget 77 RubyMotion Tutorial For Objective C DevelopersJan 17, 2014
iOS Dev Nugget 66 JBChartView for ChartingJan 04, 2014
iOS Dev Nugget 64 Placeholder Views Using PAPlaceholderDec 27, 2013
iOS Dev Nugget 63 Update Your iOS Development ToolboxOct 18, 2013
iOS Dev Nugget 53 Try Kaleidoscope, File Comparison for MacOct 11, 2013
iOS Dev Nugget 52 Set Up Crashlytics For Ad Hoc and App Store Builds OnlyJun 21, 2013
iOS Dev Nugget 36 Use TestFlight for Ad Hoc BuildsMay 11, 2013
iOS Dev Nugget 31 3rd Party Documentation ViewersMar 10, 2013
iOS Dev Nugget 22 Try AppCodeJan 05, 2013
iOS Dev Nugget 14 Charles Web Debugging Proxy
Jul 27, 2015 by Hwee-Boon Yar
iOS 9 adds UIStackView (and OS X 10.9 introduced the similar NSStackView), which makes it easier to use Auto Layout, reducing the need to create NSLayoutConstraints. In practice, you may still need to create a couple of constraints when you use UIStackView. These constraints usually has less to do with positioning views, but more for keeping them at the correct dimensions, notably for views that don't return a good value for -intrinsicContentSize.
It is really nice for layout and you really should start using it as soon as you can. Most of us wouldn't be able to support a minimum deployment target of iOS 9 any time soon, but there's a wonderful clone of UIStackView called TZStackView that you can use in place of UIStackView. It supports the same API. The only downside is TZStackView doesn't support Storyboards.
Check it out.
Like this post? Follow me @hboon on Twitter.
Related
Aug 15, 2018
iOS Dev Nugget 305 Declaring Distinct Types from General TypesJul 24, 2018
iOS Dev Nugget 302 RealmJun 09, 2018
iOS Dev Nugget 295 SwifterSwiftMay 23, 2018
iOS Dev Nugget 293 iOSSnapshotTestCase (was FBSnapshotTestCase)May 03, 2018
iOS Dev Nugget 290 Auto Layout with UIScrollViewApr 07, 2018
iOS Dev Nugget 286 Use Auto Layout for Bottom BarMar 15, 2018
iOS Dev Nugget 283 Eureka for FormsFeb 28, 2018
iOS Dev Nugget 281 Use R.swift for Static References to Resources Like ImagesFeb 21, 2018
iOS Dev Nugget 280 Using Custom Fonts Without Updating Info.plist ManuallyDec 20, 2017
iOS Dev Nugget 271 Zhi — Live Reloading Auto Layout Constraints and moreDec 06, 2017
iOS Dev Nugget 269 Including Finger Touches in App Preview VideosJul 11, 2017
iOS Dev Nugget 248 In-app Native RoutingMar 01, 2017
iOS Dev Nugget 229 PromisesFeb 22, 2017
iOS Dev Nugget 228 Recording and Playing Back Network CallsOct 23, 2016
iOS Dev Nugget 210 PMAlertControllerJun 03, 2016
iOS Dev Nugget 190 Quick Look Plug-in for Mobile Provisioning FilesMay 20, 2016
iOS Dev Nugget 188 SwiftLintApr 20, 2016
iOS Dev Nugget 184 Async LibraryJan 17, 2016
iOS Dev Nugget 171 Dynamic TypeDec 23, 2015
iOS Dev Nugget 167 Animation with Auto LayoutAug 31, 2015
iOS Dev Nugget 151 More Wrappers for Keychain AccessAug 17, 2015
iOS Dev Nugget 149 Timepiece, a Swift Library for Handling DatesJul 21, 2015
iOS Dev Nugget 145 Listing Available FontsJul 05, 2015
iOS Dev Nugget 143 Don't Forget SQLiteJun 09, 2015
iOS Dev Nugget 139 Custom Build Configurations and Xcode SubprojectsMay 19, 2015
iOS Dev Nugget 136 Auto Layout with CartographyApr 29, 2015
iOS Dev Nugget 133 Dollar.swiftFeb 06, 2015
iOS Dev Nugget 121 InflectorKitJan 09, 2015
iOS Dev Nugget 117 UIView-Encapsulated-Layout-HeightDec 26, 2014
iOS Dev Nugget 115 Displaying Information in Settings AppDec 19, 2014
iOS Dev Nugget 114 Preview an Image for DebuggingDec 12, 2014
iOS Dev Nugget 113 GPUImage, a GPU-based Image and Video Processing FrameworkOct 31, 2014
iOS Dev Nugget 107 Auto-sizing UITableViewCellsMay 30, 2014
iOS Dev Nugget 85 A More Customizable Button For Different StatesMay 02, 2014
iOS Dev Nugget 81 TMCache For In-Memory and Disk-backed CachingApr 18, 2014
iOS Dev Nugget 79 TweetBot Photo Flicking EffectMar 07, 2014
iOS Dev Nugget 73 Open Source Date Picker from SquareFeb 22, 2014
iOS Dev Nugget 71 TapJan 31, 2014
iOS Dev Nugget 68 Custom URL Schemes DirectoryDec 20, 2013
iOS Dev Nugget 62 Using PDF Instead of PNG Files for Resizable AssetsSep 20, 2013
iOS Dev Nugget 49 Wrapper to Get UIColor ComponentsMay 17, 2013
iOS Dev Nugget 32 FMDB: Thin Objective C Wrapper Around SQLiteOct 06, 2012
iOS Dev Nugget 1 Easy logging of values and objects
Jul 21, 2015 by Hwee-Boon Yar
I want to share a little snippet of Objective C code I wrote a few years ago that still comes in handy every once in a while:
NSMutableArray* fontNames = [NSMutableArray array];
for (NSString* eachFamilyName in [UIFont familyNames]) {
for (NSString* eachFontName in [UIFont fontNamesForFamilyName:eachFamilyName]) {
[fontNames addObject:@[eachFontName, eachFamilyName]];
}
}
[fontNames sortUsingFunction:fontAndFontFamilyCompare context:nil];
//Sorted list of fontNames
NSInteger fontAndFontFamilyCompare(id first, id second, void* context) {
return [[first objectAtIndex[0]] compare:[second objectAtIndex[1]]];
}
This generates a list of fonts available. You can easily wrap a UITableView around it and display samples of them. Especially handy when you want to examine what fonts are in a new OS release, or if you are adding your own fonts to your app.
Like this post? Follow me @hboon on Twitter.
Related
Aug 15, 2018
iOS Dev Nugget 305 Declaring Distinct Types from General TypesJul 24, 2018
iOS Dev Nugget 302 RealmJun 09, 2018
iOS Dev Nugget 295 SwifterSwiftMay 23, 2018
iOS Dev Nugget 293 iOSSnapshotTestCase (was FBSnapshotTestCase)Mar 15, 2018
iOS Dev Nugget 283 Eureka for FormsFeb 28, 2018
iOS Dev Nugget 281 Use R.swift for Static References to Resources Like ImagesFeb 21, 2018
iOS Dev Nugget 280 Using Custom Fonts Without Updating Info.plist ManuallyDec 06, 2017
iOS Dev Nugget 269 Including Finger Touches in App Preview VideosJul 11, 2017
iOS Dev Nugget 248 In-app Native RoutingMar 01, 2017
iOS Dev Nugget 229 PromisesFeb 22, 2017
iOS Dev Nugget 228 Recording and Playing Back Network CallsOct 23, 2016
iOS Dev Nugget 210 PMAlertControllerJun 03, 2016
iOS Dev Nugget 190 Quick Look Plug-in for Mobile Provisioning FilesMay 20, 2016
iOS Dev Nugget 188 SwiftLintApr 20, 2016
iOS Dev Nugget 184 Async LibraryAug 31, 2015
iOS Dev Nugget 151 More Wrappers for Keychain AccessAug 17, 2015
iOS Dev Nugget 149 Timepiece, a Swift Library for Handling DatesJul 27, 2015
iOS Dev Nugget 146 UIStackView and TZStackViewJul 05, 2015
iOS Dev Nugget 143 Don't Forget SQLiteJun 09, 2015
iOS Dev Nugget 139 Custom Build Configurations and Xcode SubprojectsMay 19, 2015
iOS Dev Nugget 136 Auto Layout with CartographyApr 29, 2015
iOS Dev Nugget 133 Dollar.swiftFeb 06, 2015
iOS Dev Nugget 121 InflectorKitDec 26, 2014
iOS Dev Nugget 115 Displaying Information in Settings AppDec 19, 2014
iOS Dev Nugget 114 Preview an Image for DebuggingDec 12, 2014
iOS Dev Nugget 113 GPUImage, a GPU-based Image and Video Processing FrameworkMay 30, 2014
iOS Dev Nugget 85 A More Customizable Button For Different StatesMay 02, 2014
iOS Dev Nugget 81 TMCache For In-Memory and Disk-backed CachingApr 18, 2014
iOS Dev Nugget 79 TweetBot Photo Flicking EffectMar 07, 2014
iOS Dev Nugget 73 Open Source Date Picker from SquareFeb 22, 2014
iOS Dev Nugget 71 TapJan 31, 2014
iOS Dev Nugget 68 Custom URL Schemes DirectoryDec 20, 2013
iOS Dev Nugget 62 Using PDF Instead of PNG Files for Resizable AssetsSep 20, 2013
iOS Dev Nugget 49 Wrapper to Get UIColor ComponentsMay 17, 2013
iOS Dev Nugget 32 FMDB: Thin Objective C Wrapper Around SQLiteOct 06, 2012
iOS Dev Nugget 1 Easy logging of values and objects
Jul 16, 2015 by Hwee-Boon Yar
NSURLSession was introduced along with iOS 7 as a replacement for NSURLConnection. Session 705 "What’s New in Foundation Networking" in WWDC 2013 talks in great detail about NSURLSession and the advantages of it including access to configuration on a per session basis. Here's a common example of how to use NSURLSession which you can immediately replace NSURLConnection with. Let's say you want to perform a GET on a URL and retrieve the response:
var conf = NSURLSessionConfiguration.defaultSessionConfiguration()
var session = NSURLSession(configuration: conf)
let urlString = "http://google.com"
var task = session.downloadTaskWithURL(NSURL(string: urlString)!) {url, response, error in
dispatch_async(dispatch_get_main_queue()) {
if let error = error {
//Handle error
println("error: \(error)")
} else {
var stringContents = NSString(data: NSData(contentsOfURL: url)!, encoding: NSUTF8StringEncoding)
println("results: \(stringContents)")
}
}
}
task.resume()
You create a NSURLSession instance that can be shared across request. For each request, you create a new task. You always resume() a task to run it.
The NSURLSession instance is configured via a NSURLSessionConfiguration instance. For example, if you want to restrict requests for this session to not use cellular connectivity, you can do:
conf.allowsCellularAccess = false
Or if the requests are for a JSON API that uses Basic Authentication:
let username = "some user name"
let password = "some password"
let userPasswordString = "#{username}:#{password}"
let userPasswordData = userPasswordString.dataUsingEncoding(NSUTF8StringEncoding)
let base64EncodedCredential = userPasswordData!.base64EncodedStringWithOptions(NSDataBase64EncodingOptions.Encoding64CharacterLineLength)
let authString = "Basic \(base64EncodedCredential)"
conf.HTTPAdditionalHeaders = ["Accept": "application/json", "Authorization": authString]
These configurations can all be made on a per session basis.
Like this post? Follow me @hboon on Twitter.
Related
Aug 23, 2017
iOS Dev Nugget 254 Paw, for Working with APIsJul 19, 2017
iOS Dev Nugget 249 App Transport Security Diagnostics with nscurlFeb 22, 2017
iOS Dev Nugget 228 Recording and Playing Back Network CallsDec 22, 2016
iOS Dev Nugget 219 Test Your App with Airplane Mode enabledMar 21, 2016
iOS Dev Nugget 180 Low Power ModeOct 07, 2015
iOS Dev Nugget 156 -canOpenURL:Sep 23, 2015
iOS Dev Nugget 154 App Transport SecurityJan 24, 2014
iOS Dev Nugget 67 Simulating a slow cellular network with Network Link Conditioner on iOSJul 13, 2013
iOS Dev Nugget 39 Use NSCache Instead of NSMutableDictionary When CachingJan 05, 2013
iOS Dev Nugget 14 Charles Web Debugging ProxyDec 28, 2012
iOS Dev Nugget 13 Simulating a slow cellular network with Network Link Conditioner
Jul 05, 2015 by Hwee-Boon Yar
Between Core Data, serializing dictionaries and arrays into plists, and even NSUserDefaults, we sometimes forget about a very powerful tool we have at our disposal – SQLite.
I mentioned FMDB by (Gus Mueller as a simple way of accessing SQLite using Objective C.
There's now a number of handy Swift wrappers for Objective C including SQLite.swift by Stephen Celis. It provides a pure Swift interface so you can avoid writing raw SQL directly, at the same time offering direct access to the SQLite C API so you can drop down to SQL if you needed to.
An excellent example from the README:
import SQLite
let db = Database("path/to/db.sqlite3")
let users = db["users"]
let id = Expression<Int64>("id")
let name = Expression<String?>("name")
let email = Expression<String>("email")
db.create(table: users) { t in
t.column(id, primaryKey: true)
t.column(name)
t.column(email, unique: true)
}
// CREATE TABLE "users" (
// "id" INTEGER PRIMARY KEY NOT NULL,
// "name" TEXT,
// "email" TEXT NOT NULL UNIQUE
// )
var alice: Query?
if let rowid = users.insert(name <- "Alice", email <- "alice@mac.com").rowid {
println("inserted id: \(rowid)")
// inserted id: 1
alice = users.filter(id == rowid)
}
// INSERT INTO "users" ("name", "email") VALUES ('Alice', 'alice@mac.com')
Like this post? Follow me @hboon on Twitter.
Related
Nov 03, 2018
iOS Dev Nugget 314 Checked Array SubscriptingSep 22, 2018
iOS Dev Nugget 310 Weak Reference Wrapper ClassSep 07, 2018
iOS Dev Nugget 308 Careful with early return statements in functions that return voidAug 30, 2018
iOS Dev Nugget 307 Array Out of BoundsAug 23, 2018
iOS Dev Nugget 306 Underscores in Numeric LiteralsAug 15, 2018
iOS Dev Nugget 305 Declaring Distinct Types from General TypesAug 02, 2018
iOS Dev Nugget 303 Use Enums for StatesJul 24, 2018
iOS Dev Nugget 302 RealmJul 21, 2018
iOS Dev Nugget 301 Print App Document Path IIJul 16, 2018
iOS Dev Nugget 300 Pipe OperatorJun 09, 2018
iOS Dev Nugget 295 SwifterSwiftMay 23, 2018
iOS Dev Nugget 293 iOSSnapshotTestCase (was FBSnapshotTestCase)May 18, 2018
iOS Dev Nugget 292 for-whereMay 12, 2018
iOS Dev Nugget 291 Implicit Member ExpressionsApr 11, 2018
iOS Dev Nugget 287 Modifying a Property Which is a Struct Triggers didSetMar 15, 2018
iOS Dev Nugget 283 Eureka for FormsFeb 28, 2018
iOS Dev Nugget 281 Use R.swift for Static References to Resources Like ImagesFeb 21, 2018
iOS Dev Nugget 280 Using Custom Fonts Without Updating Info.plist ManuallyDec 06, 2017
iOS Dev Nugget 269 Including Finger Touches in App Preview VideosNov 02, 2017
iOS Dev Nugget 265 value type cannot have a stored property that recursively contains itSep 13, 2017
iOS Dev Nugget 257 AssertsAug 02, 2017
iOS Dev Nugget 251 Retrieving the Current View ControllerJul 11, 2017
iOS Dev Nugget 248 In-app Native RoutingJun 28, 2017
iOS Dev Nugget 246 Mapping Swift and Obj-C Method NamesJun 14, 2017
iOS Dev Nugget 244 IteratorProtocolMay 24, 2017
iOS Dev Nugget 241 Swift Enums with LabelsMay 17, 2017
iOS Dev Nugget 240 Print an Object's Unique IdentifierApr 05, 2017
iOS Dev Nugget 234 #available and @availableMar 01, 2017
iOS Dev Nugget 229 PromisesFeb 22, 2017
iOS Dev Nugget 228 Recording and Playing Back Network CallsNov 23, 2016
iOS Dev Nugget 215 dump Instead of print for Swift StructsOct 25, 2016
iOS Dev Nugget 211 Higher Order Functions: map, filter, reduceOct 23, 2016
iOS Dev Nugget 210 PMAlertControllerOct 12, 2016
iOS Dev Nugget 209 Swift DeferSep 28, 2016
iOS Dev Nugget 207 Swift Nil-Coalescing OperatorSep 22, 2016
iOS Dev Nugget 206 Date doesRelativeDateFormattingSep 11, 2016
iOS Dev Nugget 205 The Never Return Type in SwiftSep 07, 2016
iOS Dev Nugget 204 Swift @autoclosureSep 02, 2016
iOS Dev Nugget 203 Swift MeasurementAug 24, 2016
iOS Dev Nugget 202 Swift Enumerations to Encode StatesAug 17, 2016
iOS Dev Nugget 201 Swift Pattern MatchingAug 10, 2016
iOS Dev Nugget 200 Swift flatMapAug 05, 2016
iOS Dev Nugget 199 Swift Talk Video SeriesJul 26, 2016
iOS Dev Nugget 198 KZPlaygroundJul 20, 2016
iOS Dev Nugget 197 App Initialization CodeJul 09, 2016
iOS Dev Nugget 196 Rename Refactoring for Swift CodeJun 24, 2016
iOS Dev Nugget 193 Result EnumerationJun 03, 2016
iOS Dev Nugget 190 Quick Look Plug-in for Mobile Provisioning FilesMay 20, 2016
iOS Dev Nugget 188 SwiftLintMay 10, 2016
iOS Dev Nugget 187 Creating a Singleton Class in SwiftMay 06, 2016
iOS Dev Nugget 186 Injection for XcodeApr 20, 2016
iOS Dev Nugget 184 Async LibraryApr 02, 2016
iOS Dev Nugget 182 Tracking the swift-evolution Git RepositoryMar 26, 2016
iOS Dev Nugget 181 Swift SelectorsMar 21, 2016
iOS Dev Nugget 180 Low Power ModeJan 27, 2016
iOS Dev Nugget 172 Print App Document PathDec 30, 2015
iOS Dev Nugget 168 Using Blocks to Manage ContextsOct 20, 2015
iOS Dev Nugget 158 Checking if Newer APIs Are Available In Older iOS Versions (II)Aug 31, 2015
iOS Dev Nugget 151 More Wrappers for Keychain AccessAug 17, 2015
iOS Dev Nugget 149 Timepiece, a Swift Library for Handling DatesJul 27, 2015
iOS Dev Nugget 146 UIStackView and TZStackViewJul 21, 2015
iOS Dev Nugget 145 Listing Available FontsJul 01, 2015
iOS Dev Nugget 142 Grand Central DispatchJun 22, 2015
iOS Dev Nugget 141 Great Swift Standard Library Examples Covered in Playground (Swift 2.0)Jun 09, 2015
iOS Dev Nugget 139 Custom Build Configurations and Xcode SubprojectsJun 01, 2015
iOS Dev Nugget 138 Interoperability: Using Enumerations Defined In Objective-C from SwiftMay 27, 2015
iOS Dev Nugget 137 Named Tuple ElementsMay 19, 2015
iOS Dev Nugget 136 Auto Layout with CartographyMay 13, 2015
iOS Dev Nugget 135 CAShapeLayer, Animated Views and XCPShowView()Apr 29, 2015
iOS Dev Nugget 133 Dollar.swiftApr 22, 2015
iOS Dev Nugget 132 XCPCaptureValue in Swift PlaygroundsApr 14, 2015
iOS Dev Nugget 131 Running Asynchronous Code in Swift PlaygroundsApr 03, 2015
iOS Dev Nugget 129 Browsing the Swift Standard LibraryFeb 27, 2015
iOS Dev Nugget 124 performSelector:withObject:afterDelay: in SwiftFeb 20, 2015
iOS Dev Nugget 123 Using dynamicType in SwiftFeb 06, 2015
iOS Dev Nugget 121 InflectorKitJan 02, 2015
iOS Dev Nugget 116 method() is unavailable: use object construction Class()Dec 26, 2014
iOS Dev Nugget 115 Displaying Information in Settings AppDec 19, 2014
iOS Dev Nugget 114 Preview an Image for DebuggingDec 12, 2014
iOS Dev Nugget 113 GPUImage, a GPU-based Image and Video Processing FrameworkMay 30, 2014
iOS Dev Nugget 85 A More Customizable Button For Different StatesMay 02, 2014
iOS Dev Nugget 81 TMCache For In-Memory and Disk-backed CachingApr 18, 2014
iOS Dev Nugget 79 TweetBot Photo Flicking EffectMar 07, 2014
iOS Dev Nugget 73 Open Source Date Picker from SquareFeb 22, 2014
iOS Dev Nugget 71 TapJan 31, 2014
iOS Dev Nugget 68 Custom URL Schemes DirectoryDec 20, 2013
iOS Dev Nugget 62 Using PDF Instead of PNG Files for Resizable AssetsSep 20, 2013
iOS Dev Nugget 49 Wrapper to Get UIColor ComponentsMay 17, 2013
iOS Dev Nugget 32 FMDB: Thin Objective C Wrapper Around SQLiteOct 06, 2012
iOS Dev Nugget 1 Easy logging of values and objects
Jul 01, 2015 by Hwee-Boon Yar
Grand Central Dispatch (GCD) lets you run tasks concurrently, taking advantage of multi-core processors.
For e.g. you can run some code in the main queue, asynchronously:
dispatch_async(dispatch_get_main_queue()) {
//do something in main queue
}
Or in the global, concurrent, low priority queue:
dispatch_async(dispatch_get_global_queue(DISPATCH_QUEUE_PRIORITY_LOW, 0)) {
//do something that doesn't require priority
}
You can fire off several such tasks and they will run concurrently where possible:
for i in 0..<100 {
dispatch_async(dispatch_get_global_queue(DISPATCH_QUEUE_PRIORITY_LOW, 0)) {
//do something with i
}
}
GCD also makes it easier to manage concurrent tasks. It's common to want to perform an action after every one of the concurrent tasks has completed. For e.g. maybe you have finished generating thumbnails from a batch of photos and want to zip it up and upload that zip file somewhere. You can do this using dispatch groups:
var taskGroup = dispatch_group_create()
for i in 0..<100 {
dispatch_group_enter(taskGroup) //+1
dispatch_async(dispatch_get_global_queue(DISPATCH_QUEUE_PRIORITY_LOW, 0)) {
//do something with i
dispatch_group_leave(taskGroup) //-1
}
}
dispatch_group_notify(taskGroup, dispatch_get_main_queue()) {
//Do what needs to be done in the main queue after all the tasks has to be completed
}
Think of a dispatch group as representing a counter that is initially 0. dispatch_group_enter() increments that counter by 1 and dispatch_group_leave() decrements it by 1. Once the counter goes to zero, the block passed to dispatch_group_notify() gets called on the specified queue.
As mentioned in nugget #131, add the following so you can play with this in a Swift playground:
import UIKit
import XCPlayground
XCPSetExecutionShouldContinueIndefinitely()
Like this post? Follow me @hboon on Twitter.
Related
Nov 03, 2018
iOS Dev Nugget 314 Checked Array SubscriptingSep 22, 2018
iOS Dev Nugget 310 Weak Reference Wrapper ClassSep 07, 2018
iOS Dev Nugget 308 Careful with early return statements in functions that return voidAug 30, 2018
iOS Dev Nugget 307 Array Out of BoundsAug 23, 2018
iOS Dev Nugget 306 Underscores in Numeric LiteralsAug 02, 2018
iOS Dev Nugget 303 Use Enums for StatesJul 21, 2018
iOS Dev Nugget 301 Print App Document Path IIJul 16, 2018
iOS Dev Nugget 300 Pipe OperatorMay 18, 2018
iOS Dev Nugget 292 for-whereMay 12, 2018
iOS Dev Nugget 291 Implicit Member ExpressionsApr 11, 2018
iOS Dev Nugget 287 Modifying a Property Which is a Struct Triggers didSetNov 02, 2017
iOS Dev Nugget 265 value type cannot have a stored property that recursively contains itSep 13, 2017
iOS Dev Nugget 257 AssertsAug 02, 2017
iOS Dev Nugget 251 Retrieving the Current View ControllerJun 28, 2017
iOS Dev Nugget 246 Mapping Swift and Obj-C Method NamesJun 14, 2017
iOS Dev Nugget 244 IteratorProtocolMay 24, 2017
iOS Dev Nugget 241 Swift Enums with LabelsMay 17, 2017
iOS Dev Nugget 240 Print an Object's Unique IdentifierApr 05, 2017
iOS Dev Nugget 234 #available and @availableNov 23, 2016
iOS Dev Nugget 215 dump Instead of print for Swift StructsOct 25, 2016
iOS Dev Nugget 211 Higher Order Functions: map, filter, reduceOct 12, 2016
iOS Dev Nugget 209 Swift DeferSep 28, 2016
iOS Dev Nugget 207 Swift Nil-Coalescing OperatorSep 22, 2016
iOS Dev Nugget 206 Date doesRelativeDateFormattingSep 11, 2016
iOS Dev Nugget 205 The Never Return Type in SwiftSep 07, 2016
iOS Dev Nugget 204 Swift @autoclosureSep 02, 2016
iOS Dev Nugget 203 Swift MeasurementAug 24, 2016
iOS Dev Nugget 202 Swift Enumerations to Encode StatesAug 17, 2016
iOS Dev Nugget 201 Swift Pattern MatchingAug 10, 2016
iOS Dev Nugget 200 Swift flatMapAug 05, 2016
iOS Dev Nugget 199 Swift Talk Video SeriesJul 26, 2016
iOS Dev Nugget 198 KZPlaygroundJul 20, 2016
iOS Dev Nugget 197 App Initialization CodeJul 09, 2016
iOS Dev Nugget 196 Rename Refactoring for Swift CodeJun 24, 2016
iOS Dev Nugget 193 Result EnumerationMay 20, 2016
iOS Dev Nugget 188 SwiftLintMay 10, 2016
iOS Dev Nugget 187 Creating a Singleton Class in SwiftMay 06, 2016
iOS Dev Nugget 186 Injection for XcodeApr 02, 2016
iOS Dev Nugget 182 Tracking the swift-evolution Git RepositoryMar 26, 2016
iOS Dev Nugget 181 Swift SelectorsMar 21, 2016
iOS Dev Nugget 180 Low Power ModeJan 27, 2016
iOS Dev Nugget 172 Print App Document PathDec 30, 2015
iOS Dev Nugget 168 Using Blocks to Manage ContextsOct 20, 2015
iOS Dev Nugget 158 Checking if Newer APIs Are Available In Older iOS Versions (II)Aug 17, 2015
iOS Dev Nugget 149 Timepiece, a Swift Library for Handling DatesJul 05, 2015
iOS Dev Nugget 143 Don't Forget SQLiteJun 22, 2015
iOS Dev Nugget 141 Great Swift Standard Library Examples Covered in Playground (Swift 2.0)Jun 01, 2015
iOS Dev Nugget 138 Interoperability: Using Enumerations Defined In Objective-C from SwiftMay 27, 2015
iOS Dev Nugget 137 Named Tuple ElementsMay 19, 2015
iOS Dev Nugget 136 Auto Layout with CartographyMay 13, 2015
iOS Dev Nugget 135 CAShapeLayer, Animated Views and XCPShowView()Apr 29, 2015
iOS Dev Nugget 133 Dollar.swiftApr 22, 2015
iOS Dev Nugget 132 XCPCaptureValue in Swift PlaygroundsApr 14, 2015
iOS Dev Nugget 131 Running Asynchronous Code in Swift PlaygroundsApr 03, 2015
iOS Dev Nugget 129 Browsing the Swift Standard LibraryFeb 27, 2015
iOS Dev Nugget 124 performSelector:withObject:afterDelay: in SwiftFeb 20, 2015
iOS Dev Nugget 123 Using dynamicType in SwiftJan 02, 2015
iOS Dev Nugget 116 method() is unavailable: use object construction Class()
Jun 22, 2015 by Hwee-Boon Yar
The WWDC 2015 sample code includes very good examples of Swift standard library usage in the Swift Standard Library sample. For example, there's code like how to retrieve substrings correctly:
var str = "Héllo, 🇺🇸laygr😮und!"
let range = advance(str.startIndex, 4)...advance(str.startIndex, 12)
str[range.startIndex]
str[range]
str[advance(str.startIndex, 7)]
You can find all the samples here.
Like this post? Follow me @hboon on Twitter.
Related
Nov 03, 2018
iOS Dev Nugget 314 Checked Array SubscriptingSep 22, 2018
iOS Dev Nugget 310 Weak Reference Wrapper ClassSep 07, 2018
iOS Dev Nugget 308 Careful with early return statements in functions that return voidAug 30, 2018
iOS Dev Nugget 307 Array Out of BoundsAug 23, 2018
iOS Dev Nugget 306 Underscores in Numeric LiteralsAug 02, 2018
iOS Dev Nugget 303 Use Enums for StatesJul 21, 2018
iOS Dev Nugget 301 Print App Document Path IIJul 16, 2018
iOS Dev Nugget 300 Pipe OperatorMay 18, 2018
iOS Dev Nugget 292 for-whereMay 12, 2018
iOS Dev Nugget 291 Implicit Member ExpressionsApr 11, 2018
iOS Dev Nugget 287 Modifying a Property Which is a Struct Triggers didSetNov 02, 2017
iOS Dev Nugget 265 value type cannot have a stored property that recursively contains itSep 13, 2017
iOS Dev Nugget 257 AssertsAug 02, 2017
iOS Dev Nugget 251 Retrieving the Current View ControllerJun 28, 2017
iOS Dev Nugget 246 Mapping Swift and Obj-C Method NamesJun 14, 2017
iOS Dev Nugget 244 IteratorProtocolMay 24, 2017
iOS Dev Nugget 241 Swift Enums with LabelsMay 17, 2017
iOS Dev Nugget 240 Print an Object's Unique IdentifierApr 05, 2017
iOS Dev Nugget 234 #available and @availableNov 23, 2016
iOS Dev Nugget 215 dump Instead of print for Swift StructsOct 25, 2016
iOS Dev Nugget 211 Higher Order Functions: map, filter, reduceOct 12, 2016
iOS Dev Nugget 209 Swift DeferSep 28, 2016
iOS Dev Nugget 207 Swift Nil-Coalescing OperatorSep 22, 2016
iOS Dev Nugget 206 Date doesRelativeDateFormattingSep 11, 2016
iOS Dev Nugget 205 The Never Return Type in SwiftSep 07, 2016
iOS Dev Nugget 204 Swift @autoclosureSep 02, 2016
iOS Dev Nugget 203 Swift MeasurementAug 24, 2016
iOS Dev Nugget 202 Swift Enumerations to Encode StatesAug 17, 2016
iOS Dev Nugget 201 Swift Pattern MatchingAug 10, 2016
iOS Dev Nugget 200 Swift flatMapAug 05, 2016
iOS Dev Nugget 199 Swift Talk Video SeriesJul 26, 2016
iOS Dev Nugget 198 KZPlaygroundJul 20, 2016
iOS Dev Nugget 197 App Initialization CodeJul 09, 2016
iOS Dev Nugget 196 Rename Refactoring for Swift CodeJun 24, 2016
iOS Dev Nugget 193 Result EnumerationMay 20, 2016
iOS Dev Nugget 188 SwiftLintMay 10, 2016
iOS Dev Nugget 187 Creating a Singleton Class in SwiftMay 06, 2016
iOS Dev Nugget 186 Injection for XcodeApr 02, 2016
iOS Dev Nugget 182 Tracking the swift-evolution Git RepositoryMar 26, 2016
iOS Dev Nugget 181 Swift SelectorsMar 21, 2016
iOS Dev Nugget 180 Low Power ModeJan 27, 2016
iOS Dev Nugget 172 Print App Document PathDec 30, 2015
iOS Dev Nugget 168 Using Blocks to Manage ContextsOct 20, 2015
iOS Dev Nugget 158 Checking if Newer APIs Are Available In Older iOS Versions (II)Aug 17, 2015
iOS Dev Nugget 149 Timepiece, a Swift Library for Handling DatesJul 05, 2015
iOS Dev Nugget 143 Don't Forget SQLiteJul 01, 2015
iOS Dev Nugget 142 Grand Central DispatchJun 01, 2015
iOS Dev Nugget 138 Interoperability: Using Enumerations Defined In Objective-C from SwiftMay 27, 2015
iOS Dev Nugget 137 Named Tuple ElementsMay 19, 2015
iOS Dev Nugget 136 Auto Layout with CartographyMay 13, 2015
iOS Dev Nugget 135 CAShapeLayer, Animated Views and XCPShowView()Apr 29, 2015
iOS Dev Nugget 133 Dollar.swiftApr 22, 2015
iOS Dev Nugget 132 XCPCaptureValue in Swift PlaygroundsApr 14, 2015
iOS Dev Nugget 131 Running Asynchronous Code in Swift PlaygroundsApr 03, 2015
iOS Dev Nugget 129 Browsing the Swift Standard LibraryFeb 27, 2015
iOS Dev Nugget 124 performSelector:withObject:afterDelay: in SwiftFeb 20, 2015
iOS Dev Nugget 123 Using dynamicType in SwiftJan 02, 2015
iOS Dev Nugget 116 method() is unavailable: use object construction Class()
Jun 15, 2015 by Hwee-Boon Yar
Brent Simmons — creator of NetNewsWire, Glassboard and Vesper app — has an excellent series called "How Not to Crash", featuring excellent tips such as this:
It should be extremely rare — or, better, never — that an object has a public property that is a mutable collection. Mutable collections should be internal to the object.
There are many gems in there. Go check out "How Not to Crash".
Like this post? Follow me @hboon on Twitter.
Jun 09, 2015 by Hwee-Boon Yar
If you have an Xcode project that includes another subproject and you have defined custom build (for e.g., I often define Appstore and Adhoc) configurations on top of the default Debug and Release configurations, be prepared for an error while building using custom build configurations.
What happens is Xcode will build the subproject(s) using the same build configuration name, e.g. if I build Adhoc, Xcode will try to build Adhoc for the subproject too and failing which, fallback to Release. This might not be what you want.
The easiest fix is to modify your subproject so they have the same custom build configurations.
A more elaborate method to fixing this is to use a custom build script that runs xcodebuild, passing in the -configuration switch. @raizlabs has a good write up about how to do this.
Like this post? Follow me @hboon on Twitter.
Related
Aug 15, 2018
iOS Dev Nugget 305 Declaring Distinct Types from General TypesJul 24, 2018
iOS Dev Nugget 302 RealmJun 09, 2018
iOS Dev Nugget 295 SwifterSwiftMay 23, 2018
iOS Dev Nugget 293 iOSSnapshotTestCase (was FBSnapshotTestCase)Mar 15, 2018
iOS Dev Nugget 283 Eureka for FormsFeb 28, 2018
iOS Dev Nugget 281 Use R.swift for Static References to Resources Like ImagesFeb 21, 2018
iOS Dev Nugget 280 Using Custom Fonts Without Updating Info.plist ManuallyDec 06, 2017
iOS Dev Nugget 269 Including Finger Touches in App Preview VideosOct 11, 2017
iOS Dev Nugget 261 Checking App Download SizeJul 11, 2017
iOS Dev Nugget 248 In-app Native RoutingMar 01, 2017
iOS Dev Nugget 229 PromisesFeb 22, 2017
iOS Dev Nugget 228 Recording and Playing Back Network CallsOct 23, 2016
iOS Dev Nugget 210 PMAlertControllerJun 03, 2016
iOS Dev Nugget 190 Quick Look Plug-in for Mobile Provisioning FilesMay 20, 2016
iOS Dev Nugget 188 SwiftLintApr 20, 2016
iOS Dev Nugget 184 Async LibraryJan 05, 2016
iOS Dev Nugget 169 fastlane: deliverAug 31, 2015
iOS Dev Nugget 151 More Wrappers for Keychain AccessAug 17, 2015
iOS Dev Nugget 149 Timepiece, a Swift Library for Handling DatesAug 13, 2015
iOS Dev Nugget 148 Difference between CFBundleVersion and CFBundleShortVersionStringJul 27, 2015
iOS Dev Nugget 146 UIStackView and TZStackViewJul 21, 2015
iOS Dev Nugget 145 Listing Available FontsJul 05, 2015
iOS Dev Nugget 143 Don't Forget SQLiteMay 19, 2015
iOS Dev Nugget 136 Auto Layout with CartographyApr 29, 2015
iOS Dev Nugget 133 Dollar.swiftMar 27, 2015
iOS Dev Nugget 128 Dependency Management for 3rd Party Code: Git SubmodulesMar 20, 2015
iOS Dev Nugget 127 Dependency Management for 3rd Party Code: CarthageMar 13, 2015
iOS Dev Nugget 126 Dependency Management for 3rd Party Code: CocoapodsFeb 06, 2015
iOS Dev Nugget 121 InflectorKitJan 23, 2015
iOS Dev Nugget 119 Ad Hoc Tethered Install Using iTunesJan 16, 2015
iOS Dev Nugget 118 Vendoring Code and Git SubmodulesDec 26, 2014
iOS Dev Nugget 115 Displaying Information in Settings AppDec 19, 2014
iOS Dev Nugget 114 Preview an Image for DebuggingDec 12, 2014
iOS Dev Nugget 113 GPUImage, a GPU-based Image and Video Processing FrameworkMay 30, 2014
iOS Dev Nugget 85 A More Customizable Button For Different StatesMay 02, 2014
iOS Dev Nugget 81 TMCache For In-Memory and Disk-backed CachingApr 18, 2014
iOS Dev Nugget 79 TweetBot Photo Flicking EffectMar 07, 2014
iOS Dev Nugget 73 Open Source Date Picker from SquareFeb 22, 2014
iOS Dev Nugget 71 TapJan 31, 2014
iOS Dev Nugget 68 Custom URL Schemes DirectoryDec 20, 2013
iOS Dev Nugget 62 Using PDF Instead of PNG Files for Resizable AssetsSep 20, 2013
iOS Dev Nugget 49 Wrapper to Get UIColor ComponentsMay 17, 2013
iOS Dev Nugget 32 FMDB: Thin Objective C Wrapper Around SQLiteOct 06, 2012
iOS Dev Nugget 1 Easy logging of values and objects
Jun 01, 2015 by Hwee-Boon Yar
When writing enumerations in Objective-C, you can do something like this with the NS_ENUM macro which supports specifying the prefix to be dropped:
typedef NS_ENUM(NSInteger, SomeEnumType) {
SomeEnumTypeValueOne,
SomeEnumTypeValueTwo,
SomeEnumTypeValueThree
};
In Swift, you can access them because they are imported as native Swift enumerations:
var x = SomeEnumType.Two
switch (x) {
case .One:
NSLog("One")
default:
NSLog("Something else")
}
But if you have a enumeration already defined in existing Objective-C code like this:
enum SomeEnumType {
SomeEnumTypeValueOne,
SomeEnumTypeValueTwo,
SomeEnumTypeValueThree
};
You can still use them in Swift like this:
var x = SomeEnumTypeValueOne
switch (x.value) {
case SomeEnumTypeValueOne.value:
NSLog("hello")
default:
NSLog("hey")
}
On the other hand, if you define an enumeration in Swift and want to be able to use it from Objective-C, use @objc attribute like this:
@objc enum Directions: Int {
case North
case South
case East
case West
}
which would be the equivalent of this in Objective-C:
typedef NS_ENUM(NSInteger, Directions) {
DirectionsNorth,
DirectionsSouth,
DirectionsEast,
DirectionsWest
};
Like this post? Follow me @hboon on Twitter.
Related
Nov 03, 2018
iOS Dev Nugget 314 Checked Array SubscriptingSep 22, 2018
iOS Dev Nugget 310 Weak Reference Wrapper ClassSep 07, 2018
iOS Dev Nugget 308 Careful with early return statements in functions that return voidAug 30, 2018
iOS Dev Nugget 307 Array Out of BoundsAug 23, 2018
iOS Dev Nugget 306 Underscores in Numeric LiteralsAug 02, 2018
iOS Dev Nugget 303 Use Enums for StatesJul 21, 2018
iOS Dev Nugget 301 Print App Document Path IIJul 16, 2018
iOS Dev Nugget 300 Pipe OperatorMay 18, 2018
iOS Dev Nugget 292 for-whereMay 12, 2018
iOS Dev Nugget 291 Implicit Member ExpressionsApr 11, 2018
iOS Dev Nugget 287 Modifying a Property Which is a Struct Triggers didSetNov 02, 2017
iOS Dev Nugget 265 value type cannot have a stored property that recursively contains itSep 13, 2017
iOS Dev Nugget 257 AssertsAug 02, 2017
iOS Dev Nugget 251 Retrieving the Current View ControllerJun 28, 2017
iOS Dev Nugget 246 Mapping Swift and Obj-C Method NamesJun 14, 2017
iOS Dev Nugget 244 IteratorProtocolMay 24, 2017
iOS Dev Nugget 241 Swift Enums with LabelsMay 17, 2017
iOS Dev Nugget 240 Print an Object's Unique IdentifierApr 05, 2017
iOS Dev Nugget 234 #available and @availableNov 23, 2016
iOS Dev Nugget 215 dump Instead of print for Swift StructsOct 25, 2016
iOS Dev Nugget 211 Higher Order Functions: map, filter, reduceOct 12, 2016
iOS Dev Nugget 209 Swift DeferSep 28, 2016
iOS Dev Nugget 207 Swift Nil-Coalescing OperatorSep 22, 2016
iOS Dev Nugget 206 Date doesRelativeDateFormattingSep 11, 2016
iOS Dev Nugget 205 The Never Return Type in SwiftSep 07, 2016
iOS Dev Nugget 204 Swift @autoclosureSep 02, 2016
iOS Dev Nugget 203 Swift MeasurementAug 24, 2016
iOS Dev Nugget 202 Swift Enumerations to Encode StatesAug 17, 2016
iOS Dev Nugget 201 Swift Pattern MatchingAug 10, 2016
iOS Dev Nugget 200 Swift flatMapAug 05, 2016
iOS Dev Nugget 199 Swift Talk Video SeriesJul 26, 2016
iOS Dev Nugget 198 KZPlaygroundJul 20, 2016
iOS Dev Nugget 197 App Initialization CodeJul 09, 2016
iOS Dev Nugget 196 Rename Refactoring for Swift CodeJun 24, 2016
iOS Dev Nugget 193 Result EnumerationMay 20, 2016
iOS Dev Nugget 188 SwiftLintMay 10, 2016
iOS Dev Nugget 187 Creating a Singleton Class in SwiftMay 06, 2016
iOS Dev Nugget 186 Injection for XcodeApr 02, 2016
iOS Dev Nugget 182 Tracking the swift-evolution Git RepositoryMar 26, 2016
iOS Dev Nugget 181 Swift SelectorsMar 21, 2016
iOS Dev Nugget 180 Low Power ModeJan 27, 2016
iOS Dev Nugget 172 Print App Document PathDec 30, 2015
iOS Dev Nugget 168 Using Blocks to Manage ContextsOct 20, 2015
iOS Dev Nugget 158 Checking if Newer APIs Are Available In Older iOS Versions (II)Aug 17, 2015
iOS Dev Nugget 149 Timepiece, a Swift Library for Handling DatesJul 05, 2015
iOS Dev Nugget 143 Don't Forget SQLiteJul 01, 2015
iOS Dev Nugget 142 Grand Central DispatchJun 22, 2015
iOS Dev Nugget 141 Great Swift Standard Library Examples Covered in Playground (Swift 2.0)May 27, 2015
iOS Dev Nugget 137 Named Tuple ElementsMay 19, 2015
iOS Dev Nugget 136 Auto Layout with CartographyMay 13, 2015
iOS Dev Nugget 135 CAShapeLayer, Animated Views and XCPShowView()Apr 29, 2015
iOS Dev Nugget 133 Dollar.swiftApr 22, 2015
iOS Dev Nugget 132 XCPCaptureValue in Swift PlaygroundsApr 14, 2015
iOS Dev Nugget 131 Running Asynchronous Code in Swift PlaygroundsApr 03, 2015
iOS Dev Nugget 129 Browsing the Swift Standard LibraryFeb 27, 2015
iOS Dev Nugget 124 performSelector:withObject:afterDelay: in SwiftFeb 20, 2015
iOS Dev Nugget 123 Using dynamicType in SwiftJan 02, 2015
iOS Dev Nugget 116 method() is unavailable: use object construction Class()
May 27, 2015 by Hwee-Boon Yar
Tuples are a handy Swift construct that is especially useful for functions that return multiple values. You can use it like so:
func f1() -> (Int, Int, Int) {
return (111, 222, 333)
}
var (a, b, c) = f1() //a, b, and c now stores the value 111, 222, and 333 respectively.
func f2() -> (Int, Int, Int) {
return (111, 222, 333)
}
var x = f2() //Access x.0, x.1, x.2
Or you can give the elements in the tuple a name:
func f3() -> (aa: Int, bb: Int, cc: Int) {
return (111, 222, 333)
}
var y = f3() //You can use y.aa, y.bb, y.cc (and y.0, etc still work)
Like this post? Follow me @hboon on Twitter.
Related
Nov 03, 2018
iOS Dev Nugget 314 Checked Array SubscriptingSep 22, 2018
iOS Dev Nugget 310 Weak Reference Wrapper ClassSep 07, 2018
iOS Dev Nugget 308 Careful with early return statements in functions that return voidAug 30, 2018
iOS Dev Nugget 307 Array Out of BoundsAug 23, 2018
iOS Dev Nugget 306 Underscores in Numeric LiteralsAug 02, 2018
iOS Dev Nugget 303 Use Enums for StatesJul 21, 2018
iOS Dev Nugget 301 Print App Document Path IIJul 16, 2018
iOS Dev Nugget 300 Pipe OperatorMay 18, 2018
iOS Dev Nugget 292 for-whereMay 12, 2018
iOS Dev Nugget 291 Implicit Member ExpressionsApr 11, 2018
iOS Dev Nugget 287 Modifying a Property Which is a Struct Triggers didSetNov 02, 2017
iOS Dev Nugget 265 value type cannot have a stored property that recursively contains itSep 13, 2017
iOS Dev Nugget 257 AssertsAug 02, 2017
iOS Dev Nugget 251 Retrieving the Current View ControllerJun 28, 2017
iOS Dev Nugget 246 Mapping Swift and Obj-C Method NamesJun 14, 2017
iOS Dev Nugget 244 IteratorProtocolMay 24, 2017
iOS Dev Nugget 241 Swift Enums with LabelsMay 17, 2017
iOS Dev Nugget 240 Print an Object's Unique IdentifierApr 05, 2017
iOS Dev Nugget 234 #available and @availableNov 23, 2016
iOS Dev Nugget 215 dump Instead of print for Swift StructsOct 25, 2016
iOS Dev Nugget 211 Higher Order Functions: map, filter, reduceOct 12, 2016
iOS Dev Nugget 209 Swift DeferSep 28, 2016
iOS Dev Nugget 207 Swift Nil-Coalescing OperatorSep 22, 2016
iOS Dev Nugget 206 Date doesRelativeDateFormattingSep 11, 2016
iOS Dev Nugget 205 The Never Return Type in SwiftSep 07, 2016
iOS Dev Nugget 204 Swift @autoclosureSep 02, 2016
iOS Dev Nugget 203 Swift MeasurementAug 24, 2016
iOS Dev Nugget 202 Swift Enumerations to Encode StatesAug 17, 2016
iOS Dev Nugget 201 Swift Pattern MatchingAug 10, 2016
iOS Dev Nugget 200 Swift flatMapAug 05, 2016
iOS Dev Nugget 199 Swift Talk Video SeriesJul 26, 2016
iOS Dev Nugget 198 KZPlaygroundJul 20, 2016
iOS Dev Nugget 197 App Initialization CodeJul 09, 2016
iOS Dev Nugget 196 Rename Refactoring for Swift CodeJun 24, 2016
iOS Dev Nugget 193 Result EnumerationMay 20, 2016
iOS Dev Nugget 188 SwiftLintMay 10, 2016
iOS Dev Nugget 187 Creating a Singleton Class in SwiftMay 06, 2016
iOS Dev Nugget 186 Injection for XcodeApr 02, 2016
iOS Dev Nugget 182 Tracking the swift-evolution Git RepositoryMar 26, 2016
iOS Dev Nugget 181 Swift SelectorsMar 21, 2016
iOS Dev Nugget 180 Low Power ModeJan 27, 2016
iOS Dev Nugget 172 Print App Document PathDec 30, 2015
iOS Dev Nugget 168 Using Blocks to Manage ContextsOct 20, 2015
iOS Dev Nugget 158 Checking if Newer APIs Are Available In Older iOS Versions (II)Aug 17, 2015
iOS Dev Nugget 149 Timepiece, a Swift Library for Handling DatesJul 05, 2015
iOS Dev Nugget 143 Don't Forget SQLiteJul 01, 2015
iOS Dev Nugget 142 Grand Central DispatchJun 22, 2015
iOS Dev Nugget 141 Great Swift Standard Library Examples Covered in Playground (Swift 2.0)Jun 01, 2015
iOS Dev Nugget 138 Interoperability: Using Enumerations Defined In Objective-C from SwiftMay 19, 2015
iOS Dev Nugget 136 Auto Layout with CartographyMay 13, 2015
iOS Dev Nugget 135 CAShapeLayer, Animated Views and XCPShowView()Apr 29, 2015
iOS Dev Nugget 133 Dollar.swiftApr 22, 2015
iOS Dev Nugget 132 XCPCaptureValue in Swift PlaygroundsApr 14, 2015
iOS Dev Nugget 131 Running Asynchronous Code in Swift PlaygroundsApr 03, 2015
iOS Dev Nugget 129 Browsing the Swift Standard LibraryFeb 27, 2015
iOS Dev Nugget 124 performSelector:withObject:afterDelay: in SwiftFeb 20, 2015
iOS Dev Nugget 123 Using dynamicType in SwiftJan 02, 2015
iOS Dev Nugget 116 method() is unavailable: use object construction Class()
May 19, 2015 by Hwee-Boon Yar
If you write code using Auto Layout, you will have noticed by now that the structure of the code from using NSLayoutConstraint isn't that readable once you have a few more UI elements.
Cartography by Robb Böhnke changes that by introducing a declarative manner to specify Auto Layout constraints in Swift.
This is an example given in the README:
layout(view1, view2) { view1, view2 in
view1.width == (view1.superview!.width - 50) * 0.5
view2.width == view1.width - 50
view1.height == 40
view2.height == view1.height
view1.centerX == view1.superview!.centerX
view2.centerX == view1.centerX
view1.top >= view1.superview!.top + 20
view2.top == view1.bottom + 20
}
Check it out.
If you are working with Objective C, also look at FLKAutoLayout by Florian Kugler.
Like this post? Follow me @hboon on Twitter.
Related
Nov 03, 2018
iOS Dev Nugget 314 Checked Array SubscriptingSep 22, 2018
iOS Dev Nugget 310 Weak Reference Wrapper ClassSep 07, 2018
iOS Dev Nugget 308 Careful with early return statements in functions that return voidAug 30, 2018
iOS Dev Nugget 307 Array Out of BoundsAug 23, 2018
iOS Dev Nugget 306 Underscores in Numeric LiteralsAug 15, 2018
iOS Dev Nugget 305 Declaring Distinct Types from General TypesAug 02, 2018
iOS Dev Nugget 303 Use Enums for StatesJul 24, 2018
iOS Dev Nugget 302 RealmJul 21, 2018
iOS Dev Nugget 301 Print App Document Path IIJul 16, 2018
iOS Dev Nugget 300 Pipe OperatorJun 09, 2018
iOS Dev Nugget 295 SwifterSwiftMay 23, 2018
iOS Dev Nugget 293 iOSSnapshotTestCase (was FBSnapshotTestCase)May 18, 2018
iOS Dev Nugget 292 for-whereMay 12, 2018
iOS Dev Nugget 291 Implicit Member ExpressionsApr 11, 2018
iOS Dev Nugget 287 Modifying a Property Which is a Struct Triggers didSetMar 15, 2018
iOS Dev Nugget 283 Eureka for FormsFeb 28, 2018
iOS Dev Nugget 281 Use R.swift for Static References to Resources Like ImagesFeb 21, 2018
iOS Dev Nugget 280 Using Custom Fonts Without Updating Info.plist ManuallyDec 06, 2017
iOS Dev Nugget 269 Including Finger Touches in App Preview VideosNov 02, 2017
iOS Dev Nugget 265 value type cannot have a stored property that recursively contains itSep 13, 2017
iOS Dev Nugget 257 AssertsAug 02, 2017
iOS Dev Nugget 251 Retrieving the Current View ControllerJul 11, 2017
iOS Dev Nugget 248 In-app Native RoutingJun 28, 2017
iOS Dev Nugget 246 Mapping Swift and Obj-C Method NamesJun 14, 2017
iOS Dev Nugget 244 IteratorProtocolMay 24, 2017
iOS Dev Nugget 241 Swift Enums with LabelsMay 17, 2017
iOS Dev Nugget 240 Print an Object's Unique IdentifierApr 05, 2017
iOS Dev Nugget 234 #available and @availableMar 01, 2017
iOS Dev Nugget 229 PromisesFeb 22, 2017
iOS Dev Nugget 228 Recording and Playing Back Network CallsNov 23, 2016
iOS Dev Nugget 215 dump Instead of print for Swift StructsOct 25, 2016
iOS Dev Nugget 211 Higher Order Functions: map, filter, reduceOct 23, 2016
iOS Dev Nugget 210 PMAlertControllerOct 12, 2016
iOS Dev Nugget 209 Swift DeferSep 28, 2016
iOS Dev Nugget 207 Swift Nil-Coalescing OperatorSep 22, 2016
iOS Dev Nugget 206 Date doesRelativeDateFormattingSep 11, 2016
iOS Dev Nugget 205 The Never Return Type in SwiftSep 07, 2016
iOS Dev Nugget 204 Swift @autoclosureSep 02, 2016
iOS Dev Nugget 203 Swift MeasurementAug 24, 2016
iOS Dev Nugget 202 Swift Enumerations to Encode StatesAug 17, 2016
iOS Dev Nugget 201 Swift Pattern MatchingAug 10, 2016
iOS Dev Nugget 200 Swift flatMapAug 05, 2016
iOS Dev Nugget 199 Swift Talk Video SeriesJul 26, 2016
iOS Dev Nugget 198 KZPlaygroundJul 20, 2016
iOS Dev Nugget 197 App Initialization CodeJul 09, 2016
iOS Dev Nugget 196 Rename Refactoring for Swift CodeJun 24, 2016
iOS Dev Nugget 193 Result EnumerationJun 03, 2016
iOS Dev Nugget 190 Quick Look Plug-in for Mobile Provisioning FilesMay 20, 2016
iOS Dev Nugget 188 SwiftLintMay 10, 2016
iOS Dev Nugget 187 Creating a Singleton Class in SwiftMay 06, 2016
iOS Dev Nugget 186 Injection for XcodeApr 20, 2016
iOS Dev Nugget 184 Async LibraryApr 02, 2016
iOS Dev Nugget 182 Tracking the swift-evolution Git RepositoryMar 26, 2016
iOS Dev Nugget 181 Swift SelectorsMar 21, 2016
iOS Dev Nugget 180 Low Power ModeJan 27, 2016
iOS Dev Nugget 172 Print App Document PathDec 30, 2015
iOS Dev Nugget 168 Using Blocks to Manage ContextsOct 20, 2015
iOS Dev Nugget 158 Checking if Newer APIs Are Available In Older iOS Versions (II)Aug 31, 2015
iOS Dev Nugget 151 More Wrappers for Keychain AccessAug 17, 2015
iOS Dev Nugget 149 Timepiece, a Swift Library for Handling DatesJul 27, 2015
iOS Dev Nugget 146 UIStackView and TZStackViewJul 21, 2015
iOS Dev Nugget 145 Listing Available FontsJul 05, 2015
iOS Dev Nugget 143 Don't Forget SQLiteJul 01, 2015
iOS Dev Nugget 142 Grand Central DispatchJun 22, 2015
iOS Dev Nugget 141 Great Swift Standard Library Examples Covered in Playground (Swift 2.0)Jun 09, 2015
iOS Dev Nugget 139 Custom Build Configurations and Xcode SubprojectsJun 01, 2015
iOS Dev Nugget 138 Interoperability: Using Enumerations Defined In Objective-C from SwiftMay 27, 2015
iOS Dev Nugget 137 Named Tuple ElementsMay 13, 2015
iOS Dev Nugget 135 CAShapeLayer, Animated Views and XCPShowView()Apr 29, 2015
iOS Dev Nugget 133 Dollar.swiftApr 22, 2015
iOS Dev Nugget 132 XCPCaptureValue in Swift PlaygroundsApr 14, 2015
iOS Dev Nugget 131 Running Asynchronous Code in Swift PlaygroundsApr 03, 2015
iOS Dev Nugget 129 Browsing the Swift Standard LibraryFeb 27, 2015
iOS Dev Nugget 124 performSelector:withObject:afterDelay: in SwiftFeb 20, 2015
iOS Dev Nugget 123 Using dynamicType in SwiftFeb 06, 2015
iOS Dev Nugget 121 InflectorKitJan 02, 2015
iOS Dev Nugget 116 method() is unavailable: use object construction Class()Dec 26, 2014
iOS Dev Nugget 115 Displaying Information in Settings AppDec 19, 2014
iOS Dev Nugget 114 Preview an Image for DebuggingDec 12, 2014
iOS Dev Nugget 113 GPUImage, a GPU-based Image and Video Processing FrameworkMay 30, 2014
iOS Dev Nugget 85 A More Customizable Button For Different StatesMay 02, 2014
iOS Dev Nugget 81 TMCache For In-Memory and Disk-backed CachingApr 18, 2014
iOS Dev Nugget 79 TweetBot Photo Flicking EffectMar 07, 2014
iOS Dev Nugget 73 Open Source Date Picker from SquareFeb 22, 2014
iOS Dev Nugget 71 TapJan 31, 2014
iOS Dev Nugget 68 Custom URL Schemes DirectoryDec 20, 2013
iOS Dev Nugget 62 Using PDF Instead of PNG Files for Resizable AssetsSep 20, 2013
iOS Dev Nugget 49 Wrapper to Get UIColor ComponentsMay 17, 2013
iOS Dev Nugget 32 FMDB: Thin Objective C Wrapper Around SQLiteOct 06, 2012
iOS Dev Nugget 1 Easy logging of values and objects
May 13, 2015 by Hwee-Boon Yar
It's easy to forget that UIViews are backed by CALayers and the interesting things you can do with CALayers and CALayer subclasses. One of those — CAShapeLayer — lets you draw Bezier splines. So you essentially create a UIBezierPath instance and assign it to the CAShapeLayer instance, configuring how you want it to be displayed, such as fillColor, and strokeColor. For e.g. the following playground code will draw a square with a dotted outline and animate drawing the outline:
import UIKit
import XCPlayground
XCPSetExecutionShouldContinueIndefinitely()
var path = UIBezierPath(rect: CGRectMake(50, 50, 100, 100))
var layer = CAShapeLayer()
layer.path = path.CGPath
layer.fillColor = UIColor.clearColor().CGColor
layer.strokeColor = UIColor.blueColor().CGColor
layer.lineWidth = 2
layer.lineDashPattern = [10, 3]
var animation = CABasicAnimation(keyPath: "strokeEnd")
animation.duration = 3
animation.fromValue = 0
animation.toValue = 1
layer.addAnimation(animation, forKey:"whatever")
layer.strokeEnd = 1
var v = UIView(frame: CGRectMake(0, 0, 200, 200))
v.backgroundColor = .whiteColor()
v.layer.addSublayer(layer)
XCPShowView("layer animating", v)
There's an issue though. If you paste the code into a Playground, you'll notice that the square doesn't animate. You might also see this error:
MyPlayground[98066:1375145] Error sending deferral props: 0x10000003
Notice the use of XCPSetExecutionShouldContinueIndefinitely(). In addition to that, you'll have to enable Run in Full Simulator in the Playground's inspector (View > Utilities > Show File Inspector). This is mentioned in Xcode's release notes. Once you do that, re-run the playground and it should work.
Also note the use of XCPShowView() which displays the view live. If you only inspect the value of v, you will only see a snapshot and hence not see the animation.
Like this post? Follow me @hboon on Twitter.
Related
Nov 03, 2018
iOS Dev Nugget 314 Checked Array SubscriptingSep 22, 2018
iOS Dev Nugget 310 Weak Reference Wrapper ClassSep 07, 2018
iOS Dev Nugget 308 Careful with early return statements in functions that return voidAug 30, 2018
iOS Dev Nugget 307 Array Out of BoundsAug 23, 2018
iOS Dev Nugget 306 Underscores in Numeric LiteralsAug 02, 2018
iOS Dev Nugget 303 Use Enums for StatesJul 21, 2018
iOS Dev Nugget 301 Print App Document Path IIJul 16, 2018
iOS Dev Nugget 300 Pipe OperatorMay 18, 2018
iOS Dev Nugget 292 for-whereMay 12, 2018
iOS Dev Nugget 291 Implicit Member ExpressionsApr 11, 2018
iOS Dev Nugget 287 Modifying a Property Which is a Struct Triggers didSetNov 02, 2017
iOS Dev Nugget 265 value type cannot have a stored property that recursively contains itSep 13, 2017
iOS Dev Nugget 257 AssertsAug 02, 2017
iOS Dev Nugget 251 Retrieving the Current View ControllerJun 28, 2017
iOS Dev Nugget 246 Mapping Swift and Obj-C Method NamesJun 14, 2017
iOS Dev Nugget 244 IteratorProtocolMay 24, 2017
iOS Dev Nugget 241 Swift Enums with LabelsMay 17, 2017
iOS Dev Nugget 240 Print an Object's Unique IdentifierApr 13, 2017
iOS Dev Nugget 235 Testing Localization Using Launch Arguments (III)Apr 05, 2017
iOS Dev Nugget 234 #available and @availableNov 23, 2016
iOS Dev Nugget 215 dump Instead of print for Swift StructsOct 25, 2016
iOS Dev Nugget 211 Higher Order Functions: map, filter, reduceOct 12, 2016
iOS Dev Nugget 209 Swift DeferSep 28, 2016
iOS Dev Nugget 207 Swift Nil-Coalescing OperatorSep 22, 2016
iOS Dev Nugget 206 Date doesRelativeDateFormattingSep 11, 2016
iOS Dev Nugget 205 The Never Return Type in SwiftSep 07, 2016
iOS Dev Nugget 204 Swift @autoclosureSep 02, 2016
iOS Dev Nugget 203 Swift MeasurementAug 24, 2016
iOS Dev Nugget 202 Swift Enumerations to Encode StatesAug 17, 2016
iOS Dev Nugget 201 Swift Pattern MatchingAug 10, 2016
iOS Dev Nugget 200 Swift flatMapAug 05, 2016
iOS Dev Nugget 199 Swift Talk Video SeriesJul 26, 2016
iOS Dev Nugget 198 KZPlaygroundJul 20, 2016
iOS Dev Nugget 197 App Initialization CodeJul 09, 2016
iOS Dev Nugget 196 Rename Refactoring for Swift CodeJun 24, 2016
iOS Dev Nugget 193 Result EnumerationMay 20, 2016
iOS Dev Nugget 188 SwiftLintMay 10, 2016
iOS Dev Nugget 187 Creating a Singleton Class in SwiftMay 06, 2016
iOS Dev Nugget 186 Injection for XcodeApr 02, 2016
iOS Dev Nugget 182 Tracking the swift-evolution Git RepositoryMar 26, 2016
iOS Dev Nugget 181 Swift SelectorsMar 21, 2016
iOS Dev Nugget 180 Low Power ModeJan 27, 2016
iOS Dev Nugget 172 Print App Document PathDec 30, 2015
iOS Dev Nugget 168 Using Blocks to Manage ContextsNov 25, 2015
iOS Dev Nugget 163 Testing Localization Using Launch Arguments (II)Oct 20, 2015
iOS Dev Nugget 158 Checking if Newer APIs Are Available In Older iOS Versions (II)Sep 15, 2015
iOS Dev Nugget 153 Shortcut to Open Log in SimulatorAug 17, 2015
iOS Dev Nugget 149 Timepiece, a Swift Library for Handling DatesJul 05, 2015
iOS Dev Nugget 143 Don't Forget SQLiteJul 01, 2015
iOS Dev Nugget 142 Grand Central DispatchJun 22, 2015
iOS Dev Nugget 141 Great Swift Standard Library Examples Covered in Playground (Swift 2.0)Jun 01, 2015
iOS Dev Nugget 138 Interoperability: Using Enumerations Defined In Objective-C from SwiftMay 27, 2015
iOS Dev Nugget 137 Named Tuple ElementsMay 19, 2015
iOS Dev Nugget 136 Auto Layout with CartographyApr 29, 2015
iOS Dev Nugget 133 Dollar.swiftApr 22, 2015
iOS Dev Nugget 132 XCPCaptureValue in Swift PlaygroundsApr 14, 2015
iOS Dev Nugget 131 Running Asynchronous Code in Swift PlaygroundsApr 03, 2015
iOS Dev Nugget 129 Browsing the Swift Standard LibraryMar 06, 2015
iOS Dev Nugget 125 View Debugging in XcodeFeb 27, 2015
iOS Dev Nugget 124 performSelector:withObject:afterDelay: in SwiftFeb 20, 2015
iOS Dev Nugget 123 Using dynamicType in SwiftFeb 13, 2015
iOS Dev Nugget 122 Importing Many Test Photos into iOS Simulator IIJan 02, 2015
iOS Dev Nugget 116 method() is unavailable: use object construction Class()Oct 17, 2014
iOS Dev Nugget 105 Try FLEXOct 03, 2014
iOS Dev Nugget 103 Testing Localization Using Launch ArgumentsJun 13, 2014
iOS Dev Nugget 87 What's New in iOS 8Mar 28, 2014
iOS Dev Nugget 76 Importing Many Test Photos into iOS SimulatorMay 04, 2013
iOS Dev Nugget 30 Shortcut key to toggle slow animations in the iOS simulator (part II)Apr 27, 2013
iOS Dev Nugget 29 Simulating a Custom LocationApr 12, 2013
iOS Dev Nugget 27 Two-finger touch in SimulatorMar 31, 2013
iOS Dev Nugget 25 Watch out for hotspot and in-call status bar heightMar 22, 2013
iOS Dev Nugget 24 Take Screenshots in the SimulatorJan 05, 2013
iOS Dev Nugget 14 Charles Web Debugging ProxyDec 28, 2012
iOS Dev Nugget 13 Simulating a slow cellular network with Network Link ConditionerNov 23, 2012
iOS Dev Nugget 8 Copy and paste from/to the iOS SimulatorNov 09, 2012
iOS Dev Nugget 6 Open app in Simulator with Finder
May 04, 2015 by Hwee-Boon Yar
Swift is still very new, but all kinds of interesting libraries are being created around it. Dollar is a great example, providing useful functional programming language helpers. There are 2 parts to the library — Dollar is purely functional and Cent includes extension to built-in classes. The GitHub repository has many examples, but here's a few highlights:
The Swift equivalent for Objective C's isKindOfClass: is the is operator.
You can do:
if obj is UIView {
//do something
} else {
//do something else
}
If you are going to use obj, you might as well do:
if let v = obj as? UIView {
//do something with v
} else {
//do something else
}
You can use is and as? in the same way to test for protocols.
Like this post? Follow me @hboon on Twitter.
Apr 29, 2015 by Hwee-Boon Yar
Swift is still very new, but all kinds of interesting libraries are being created around it. Dollar is a great example, providing useful functional programming language helpers. There are 2 parts to the library — Dollar is purely functional and Cent includes extension to built-in classes. The GitHub repository has many examples, but here's a few highlights:
$.difference([1, 2, 3, 4, 5], [5, 2, 10])
> [1, 3, 4]
$.flatten([[[3], 4], 5]) as Int[]
> [3, 4, 5]
let arr = [["age": 20], ["age": 30], ["age": 40]]
$.pluck(arr, value: "age")
> [20, 30, 40]
let fibMemo = $.memoize { (fib: (Int -> Int), val: Int) -> Int in
return val == 1 || val == 0 ? 1 : fib(val - 1) + fib(val - 2)
}
let x = fibMemo(5)
var beatle = Car(name: "Fusca")
$.tap(beatle, {$0.name = "Beatle"}).color = "Blue"
Like this post? Follow me @hboon on Twitter.
Related
Nov 03, 2018
iOS Dev Nugget 314 Checked Array SubscriptingSep 22, 2018
iOS Dev Nugget 310 Weak Reference Wrapper ClassSep 07, 2018
iOS Dev Nugget 308 Careful with early return statements in functions that return voidAug 30, 2018
iOS Dev Nugget 307 Array Out of BoundsAug 23, 2018
iOS Dev Nugget 306 Underscores in Numeric LiteralsAug 15, 2018
iOS Dev Nugget 305 Declaring Distinct Types from General TypesAug 02, 2018
iOS Dev Nugget 303 Use Enums for StatesJul 24, 2018
iOS Dev Nugget 302 RealmJul 21, 2018
iOS Dev Nugget 301 Print App Document Path IIJul 16, 2018
iOS Dev Nugget 300 Pipe OperatorJun 09, 2018
iOS Dev Nugget 295 SwifterSwiftMay 23, 2018
iOS Dev Nugget 293 iOSSnapshotTestCase (was FBSnapshotTestCase)May 18, 2018
iOS Dev Nugget 292 for-whereMay 12, 2018
iOS Dev Nugget 291 Implicit Member ExpressionsApr 11, 2018
iOS Dev Nugget 287 Modifying a Property Which is a Struct Triggers didSetMar 15, 2018
iOS Dev Nugget 283 Eureka for FormsFeb 28, 2018
iOS Dev Nugget 281 Use R.swift for Static References to Resources Like ImagesFeb 21, 2018
iOS Dev Nugget 280 Using Custom Fonts Without Updating Info.plist ManuallyDec 06, 2017
iOS Dev Nugget 269 Including Finger Touches in App Preview VideosNov 02, 2017
iOS Dev Nugget 265 value type cannot have a stored property that recursively contains itSep 13, 2017
iOS Dev Nugget 257 AssertsAug 02, 2017
iOS Dev Nugget 251 Retrieving the Current View ControllerJul 11, 2017
iOS Dev Nugget 248 In-app Native RoutingJun 28, 2017
iOS Dev Nugget 246 Mapping Swift and Obj-C Method NamesJun 14, 2017
iOS Dev Nugget 244 IteratorProtocolMay 24, 2017
iOS Dev Nugget 241 Swift Enums with LabelsMay 17, 2017
iOS Dev Nugget 240 Print an Object's Unique IdentifierApr 05, 2017
iOS Dev Nugget 234 #available and @availableMar 01, 2017
iOS Dev Nugget 229 PromisesFeb 22, 2017
iOS Dev Nugget 228 Recording and Playing Back Network CallsNov 23, 2016
iOS Dev Nugget 215 dump Instead of print for Swift StructsOct 25, 2016
iOS Dev Nugget 211 Higher Order Functions: map, filter, reduceOct 23, 2016
iOS Dev Nugget 210 PMAlertControllerOct 12, 2016
iOS Dev Nugget 209 Swift DeferSep 28, 2016
iOS Dev Nugget 207 Swift Nil-Coalescing OperatorSep 22, 2016
iOS Dev Nugget 206 Date doesRelativeDateFormattingSep 11, 2016
iOS Dev Nugget 205 The Never Return Type in SwiftSep 07, 2016
iOS Dev Nugget 204 Swift @autoclosureSep 02, 2016
iOS Dev Nugget 203 Swift MeasurementAug 24, 2016
iOS Dev Nugget 202 Swift Enumerations to Encode StatesAug 17, 2016
iOS Dev Nugget 201 Swift Pattern MatchingAug 10, 2016
iOS Dev Nugget 200 Swift flatMapAug 05, 2016
iOS Dev Nugget 199 Swift Talk Video SeriesJul 26, 2016
iOS Dev Nugget 198 KZPlaygroundJul 20, 2016
iOS Dev Nugget 197 App Initialization CodeJul 09, 2016
iOS Dev Nugget 196 Rename Refactoring for Swift CodeJun 24, 2016
iOS Dev Nugget 193 Result EnumerationJun 03, 2016
iOS Dev Nugget 190 Quick Look Plug-in for Mobile Provisioning FilesMay 20, 2016
iOS Dev Nugget 188 SwiftLintMay 10, 2016
iOS Dev Nugget 187 Creating a Singleton Class in SwiftMay 06, 2016
iOS Dev Nugget 186 Injection for XcodeApr 20, 2016
iOS Dev Nugget 184 Async LibraryApr 02, 2016
iOS Dev Nugget 182 Tracking the swift-evolution Git RepositoryMar 26, 2016
iOS Dev Nugget 181 Swift SelectorsMar 21, 2016
iOS Dev Nugget 180 Low Power ModeJan 27, 2016
iOS Dev Nugget 172 Print App Document PathDec 30, 2015
iOS Dev Nugget 168 Using Blocks to Manage ContextsOct 20, 2015
iOS Dev Nugget 158 Checking if Newer APIs Are Available In Older iOS Versions (II)Aug 31, 2015
iOS Dev Nugget 151 More Wrappers for Keychain AccessAug 17, 2015
iOS Dev Nugget 149 Timepiece, a Swift Library for Handling DatesJul 27, 2015
iOS Dev Nugget 146 UIStackView and TZStackViewJul 21, 2015
iOS Dev Nugget 145 Listing Available FontsJul 05, 2015
iOS Dev Nugget 143 Don't Forget SQLiteJul 01, 2015
iOS Dev Nugget 142 Grand Central DispatchJun 22, 2015
iOS Dev Nugget 141 Great Swift Standard Library Examples Covered in Playground (Swift 2.0)Jun 09, 2015
iOS Dev Nugget 139 Custom Build Configurations and Xcode SubprojectsJun 01, 2015
iOS Dev Nugget 138 Interoperability: Using Enumerations Defined In Objective-C from SwiftMay 27, 2015
iOS Dev Nugget 137 Named Tuple ElementsMay 19, 2015
iOS Dev Nugget 136 Auto Layout with CartographyMay 13, 2015
iOS Dev Nugget 135 CAShapeLayer, Animated Views and XCPShowView()Apr 22, 2015
iOS Dev Nugget 132 XCPCaptureValue in Swift PlaygroundsApr 14, 2015
iOS Dev Nugget 131 Running Asynchronous Code in Swift PlaygroundsApr 03, 2015
iOS Dev Nugget 129 Browsing the Swift Standard LibraryFeb 27, 2015
iOS Dev Nugget 124 performSelector:withObject:afterDelay: in SwiftFeb 20, 2015
iOS Dev Nugget 123 Using dynamicType in SwiftFeb 06, 2015
iOS Dev Nugget 121 InflectorKitJan 02, 2015
iOS Dev Nugget 116 method() is unavailable: use object construction Class()Dec 26, 2014
iOS Dev Nugget 115 Displaying Information in Settings AppDec 19, 2014
iOS Dev Nugget 114 Preview an Image for DebuggingDec 12, 2014
iOS Dev Nugget 113 GPUImage, a GPU-based Image and Video Processing FrameworkMay 30, 2014
iOS Dev Nugget 85 A More Customizable Button For Different StatesMay 02, 2014
iOS Dev Nugget 81 TMCache For In-Memory and Disk-backed CachingApr 18, 2014
iOS Dev Nugget 79 TweetBot Photo Flicking EffectMar 07, 2014
iOS Dev Nugget 73 Open Source Date Picker from SquareFeb 22, 2014
iOS Dev Nugget 71 TapJan 31, 2014
iOS Dev Nugget 68 Custom URL Schemes DirectoryDec 20, 2013
iOS Dev Nugget 62 Using PDF Instead of PNG Files for Resizable AssetsSep 20, 2013
iOS Dev Nugget 49 Wrapper to Get UIColor ComponentsMay 17, 2013
iOS Dev Nugget 32 FMDB: Thin Objective C Wrapper Around SQLiteOct 06, 2012
iOS Dev Nugget 1 Easy logging of values and objects
Apr 22, 2015 by Hwee-Boon Yar
In #131 Running Asynchronous Code in Swift Playgrounds, we wrote about importing XCPlayground and calling XCPSetExecutionShouldContinueIndefinitely() so the asynchronous code can be tested in playgrounds.
We know that when running code such as these in a loop, you can mouse over the line "i" and click the Quick Look button or Show Result button to see the progression of i's value over time.
for i in 1...100 {
if i % 2 == 0 {
i
}
}
Another way to do this is to use the XCPCaptureValue() function in XCPlayground.
for i in 1...100 {
if i % 2 == 0 {
XCPCaptureValue("a label", i)
}
}
The same graph showing the progression of i's value over time will appear in the Assistant editor (Cmd+Opt+Enter). While it's similar to using Quick Look in this simple case, it's much more flexible since you can pass in any value to be logged in the 2nd parameter. The 1st parameter is used as the title of the graph. Values with the same title are logged to the same graph.
Like this post? Follow me @hboon on Twitter.
Related
Nov 03, 2018
iOS Dev Nugget 314 Checked Array SubscriptingSep 22, 2018
iOS Dev Nugget 310 Weak Reference Wrapper ClassSep 07, 2018
iOS Dev Nugget 308 Careful with early return statements in functions that return voidAug 30, 2018
iOS Dev Nugget 307 Array Out of BoundsAug 23, 2018
iOS Dev Nugget 306 Underscores in Numeric LiteralsAug 02, 2018
iOS Dev Nugget 303 Use Enums for StatesJul 21, 2018
iOS Dev Nugget 301 Print App Document Path IIJul 16, 2018
iOS Dev Nugget 300 Pipe OperatorMay 18, 2018
iOS Dev Nugget 292 for-whereMay 12, 2018
iOS Dev Nugget 291 Implicit Member ExpressionsApr 11, 2018
iOS Dev Nugget 287 Modifying a Property Which is a Struct Triggers didSetNov 02, 2017
iOS Dev Nugget 265 value type cannot have a stored property that recursively contains itSep 13, 2017
iOS Dev Nugget 257 AssertsAug 02, 2017
iOS Dev Nugget 251 Retrieving the Current View ControllerJun 28, 2017
iOS Dev Nugget 246 Mapping Swift and Obj-C Method NamesJun 14, 2017
iOS Dev Nugget 244 IteratorProtocolMay 24, 2017
iOS Dev Nugget 241 Swift Enums with LabelsMay 17, 2017
iOS Dev Nugget 240 Print an Object's Unique IdentifierApr 05, 2017
iOS Dev Nugget 234 #available and @availableNov 23, 2016
iOS Dev Nugget 215 dump Instead of print for Swift StructsOct 25, 2016
iOS Dev Nugget 211 Higher Order Functions: map, filter, reduceOct 12, 2016
iOS Dev Nugget 209 Swift DeferSep 28, 2016
iOS Dev Nugget 207 Swift Nil-Coalescing OperatorSep 22, 2016
iOS Dev Nugget 206 Date doesRelativeDateFormattingSep 11, 2016
iOS Dev Nugget 205 The Never Return Type in SwiftSep 07, 2016
iOS Dev Nugget 204 Swift @autoclosureSep 02, 2016
iOS Dev Nugget 203 Swift MeasurementAug 24, 2016
iOS Dev Nugget 202 Swift Enumerations to Encode StatesAug 17, 2016
iOS Dev Nugget 201 Swift Pattern MatchingAug 10, 2016
iOS Dev Nugget 200 Swift flatMapAug 05, 2016
iOS Dev Nugget 199 Swift Talk Video SeriesJul 26, 2016
iOS Dev Nugget 198 KZPlaygroundJul 20, 2016
iOS Dev Nugget 197 App Initialization CodeJul 09, 2016
iOS Dev Nugget 196 Rename Refactoring for Swift CodeJun 24, 2016
iOS Dev Nugget 193 Result EnumerationMay 20, 2016
iOS Dev Nugget 188 SwiftLintMay 10, 2016
iOS Dev Nugget 187 Creating a Singleton Class in SwiftMay 06, 2016
iOS Dev Nugget 186 Injection for XcodeApr 02, 2016
iOS Dev Nugget 182 Tracking the swift-evolution Git RepositoryMar 26, 2016
iOS Dev Nugget 181 Swift SelectorsMar 21, 2016
iOS Dev Nugget 180 Low Power ModeJan 27, 2016
iOS Dev Nugget 172 Print App Document PathDec 30, 2015
iOS Dev Nugget 168 Using Blocks to Manage ContextsOct 20, 2015
iOS Dev Nugget 158 Checking if Newer APIs Are Available In Older iOS Versions (II)Aug 17, 2015
iOS Dev Nugget 149 Timepiece, a Swift Library for Handling DatesJul 05, 2015
iOS Dev Nugget 143 Don't Forget SQLiteJul 01, 2015
iOS Dev Nugget 142 Grand Central DispatchJun 22, 2015
iOS Dev Nugget 141 Great Swift Standard Library Examples Covered in Playground (Swift 2.0)Jun 01, 2015
iOS Dev Nugget 138 Interoperability: Using Enumerations Defined In Objective-C from SwiftMay 27, 2015
iOS Dev Nugget 137 Named Tuple ElementsMay 19, 2015
iOS Dev Nugget 136 Auto Layout with CartographyMay 13, 2015
iOS Dev Nugget 135 CAShapeLayer, Animated Views and XCPShowView()Apr 29, 2015
iOS Dev Nugget 133 Dollar.swiftApr 14, 2015
iOS Dev Nugget 131 Running Asynchronous Code in Swift PlaygroundsApr 03, 2015
iOS Dev Nugget 129 Browsing the Swift Standard LibraryFeb 27, 2015
iOS Dev Nugget 124 performSelector:withObject:afterDelay: in SwiftFeb 20, 2015
iOS Dev Nugget 123 Using dynamicType in SwiftJan 02, 2015
iOS Dev Nugget 116 method() is unavailable: use object construction Class()
Apr 14, 2015 by Hwee-Boon Yar
Swift Playgrounds are an invaluable tool for both learning Swift and exploring APIs. One thing that isn't obvious is by default, a playground will stop running when its top-level code is done. i.e. asynchronous code like this will not run like you expect:
import UIKit
var u = NSURL(string: "http://google.com")
var r: NSURLRequest = NSMutableURLRequest(URL: u!)
NSURLConnection.sendAsynchronousRequest(r,
queue: NSOperationQueue.currentQueue()!) { response, data, error in
NSLog("hello") //This wouldn't print
}
In order for it to work, add the following:
import XCPlayground
XCPSetExecutionShouldContinueIndefinitely()
XCPSetExecutionShouldContinueIndefinitely() keeps the playground running for as long as the timeline's timeout, which defaults to 30 seconds (configurable at the bottom of the playground)
Like this post? Follow me @hboon on Twitter.
Related
Nov 03, 2018
iOS Dev Nugget 314 Checked Array SubscriptingSep 22, 2018
iOS Dev Nugget 310 Weak Reference Wrapper ClassSep 07, 2018
iOS Dev Nugget 308 Careful with early return statements in functions that return voidAug 30, 2018
iOS Dev Nugget 307 Array Out of BoundsAug 23, 2018
iOS Dev Nugget 306 Underscores in Numeric LiteralsAug 02, 2018
iOS Dev Nugget 303 Use Enums for StatesJul 21, 2018
iOS Dev Nugget 301 Print App Document Path IIJul 16, 2018
iOS Dev Nugget 300 Pipe OperatorMay 18, 2018
iOS Dev Nugget 292 for-whereMay 12, 2018
iOS Dev Nugget 291 Implicit Member ExpressionsApr 11, 2018
iOS Dev Nugget 287 Modifying a Property Which is a Struct Triggers didSetNov 02, 2017
iOS Dev Nugget 265 value type cannot have a stored property that recursively contains itSep 13, 2017
iOS Dev Nugget 257 AssertsAug 02, 2017
iOS Dev Nugget 251 Retrieving the Current View ControllerJun 28, 2017
iOS Dev Nugget 246 Mapping Swift and Obj-C Method NamesJun 14, 2017
iOS Dev Nugget 244 IteratorProtocolMay 24, 2017
iOS Dev Nugget 241 Swift Enums with LabelsMay 17, 2017
iOS Dev Nugget 240 Print an Object's Unique IdentifierApr 05, 2017
iOS Dev Nugget 234 #available and @availableNov 23, 2016
iOS Dev Nugget 215 dump Instead of print for Swift StructsOct 25, 2016
iOS Dev Nugget 211 Higher Order Functions: map, filter, reduceOct 12, 2016
iOS Dev Nugget 209 Swift DeferSep 28, 2016
iOS Dev Nugget 207 Swift Nil-Coalescing OperatorSep 22, 2016
iOS Dev Nugget 206 Date doesRelativeDateFormattingSep 11, 2016
iOS Dev Nugget 205 The Never Return Type in SwiftSep 07, 2016
iOS Dev Nugget 204 Swift @autoclosureSep 02, 2016
iOS Dev Nugget 203 Swift MeasurementAug 24, 2016
iOS Dev Nugget 202 Swift Enumerations to Encode StatesAug 17, 2016
iOS Dev Nugget 201 Swift Pattern MatchingAug 10, 2016
iOS Dev Nugget 200 Swift flatMapAug 05, 2016
iOS Dev Nugget 199 Swift Talk Video SeriesJul 26, 2016
iOS Dev Nugget 198 KZPlaygroundJul 20, 2016
iOS Dev Nugget 197 App Initialization CodeJul 09, 2016
iOS Dev Nugget 196 Rename Refactoring for Swift CodeJun 24, 2016
iOS Dev Nugget 193 Result EnumerationMay 20, 2016
iOS Dev Nugget 188 SwiftLintMay 10, 2016
iOS Dev Nugget 187 Creating a Singleton Class in SwiftMay 06, 2016
iOS Dev Nugget 186 Injection for XcodeApr 02, 2016
iOS Dev Nugget 182 Tracking the swift-evolution Git RepositoryMar 26, 2016
iOS Dev Nugget 181 Swift SelectorsMar 21, 2016
iOS Dev Nugget 180 Low Power ModeJan 27, 2016
iOS Dev Nugget 172 Print App Document PathDec 30, 2015
iOS Dev Nugget 168 Using Blocks to Manage ContextsOct 20, 2015
iOS Dev Nugget 158 Checking if Newer APIs Are Available In Older iOS Versions (II)Aug 17, 2015
iOS Dev Nugget 149 Timepiece, a Swift Library for Handling DatesJul 05, 2015
iOS Dev Nugget 143 Don't Forget SQLiteJul 01, 2015
iOS Dev Nugget 142 Grand Central DispatchJun 22, 2015
iOS Dev Nugget 141 Great Swift Standard Library Examples Covered in Playground (Swift 2.0)Jun 01, 2015
iOS Dev Nugget 138 Interoperability: Using Enumerations Defined In Objective-C from SwiftMay 27, 2015
iOS Dev Nugget 137 Named Tuple ElementsMay 19, 2015
iOS Dev Nugget 136 Auto Layout with CartographyMay 13, 2015
iOS Dev Nugget 135 CAShapeLayer, Animated Views and XCPShowView()Apr 29, 2015
iOS Dev Nugget 133 Dollar.swiftApr 22, 2015
iOS Dev Nugget 132 XCPCaptureValue in Swift PlaygroundsApr 03, 2015
iOS Dev Nugget 129 Browsing the Swift Standard LibraryFeb 27, 2015
iOS Dev Nugget 124 performSelector:withObject:afterDelay: in SwiftFeb 20, 2015
iOS Dev Nugget 123 Using dynamicType in SwiftJan 02, 2015
iOS Dev Nugget 116 method() is unavailable: use object construction Class()
Apr 05, 2015 by Hwee-Boon Yar
I encountered this peculiar problem where I would launch Xcode with an existing project open and it would go into never-ending beachball. Even all the usual clearing of caches, didn't fix it.
rm -rf ~/Library/Developer/Xcode/DerivedData/ ~/Library/Caches/com.apple.dt.Xcode ~/Library/Preferences/com.apple.Xcode.plist
I finally stumbled on something that work. I noticed that Project Navigator isn't correctly displaying the version control indicator beside every file and the entries that do appear are random each time I restart Xcode (and it beachballs). This was a fairly large project with many files in git.
Turns out disabling Source Control in Xcode Preferences fixed it. I use git from the command line so that worked out fine for me.
Like this post? Follow me @hboon on Twitter.
Apr 03, 2015 by Hwee-Boon Yar
Many built-in Swift functions aren't documented in The Swift Programming Language book. For a more comprehensive list, you can do this:
- Type a known Swift function in a Swift source code file, e.g.
swap
- Cmd-click on the function name
Like this post? Follow me @hboon on Twitter.
Related
Nov 03, 2018
iOS Dev Nugget 314 Checked Array SubscriptingSep 22, 2018
iOS Dev Nugget 310 Weak Reference Wrapper ClassSep 07, 2018
iOS Dev Nugget 308 Careful with early return statements in functions that return voidAug 30, 2018
iOS Dev Nugget 307 Array Out of BoundsAug 23, 2018
iOS Dev Nugget 306 Underscores in Numeric LiteralsAug 02, 2018
iOS Dev Nugget 303 Use Enums for StatesJul 21, 2018
iOS Dev Nugget 301 Print App Document Path IIJul 16, 2018
iOS Dev Nugget 300 Pipe OperatorMay 18, 2018
iOS Dev Nugget 292 for-whereMay 12, 2018
iOS Dev Nugget 291 Implicit Member ExpressionsApr 11, 2018
iOS Dev Nugget 287 Modifying a Property Which is a Struct Triggers didSetNov 02, 2017
iOS Dev Nugget 265 value type cannot have a stored property that recursively contains itSep 13, 2017
iOS Dev Nugget 257 AssertsAug 02, 2017
iOS Dev Nugget 251 Retrieving the Current View ControllerJun 28, 2017
iOS Dev Nugget 246 Mapping Swift and Obj-C Method NamesJun 14, 2017
iOS Dev Nugget 244 IteratorProtocolMay 24, 2017
iOS Dev Nugget 241 Swift Enums with LabelsMay 17, 2017
iOS Dev Nugget 240 Print an Object's Unique IdentifierApr 05, 2017
iOS Dev Nugget 234 #available and @availableNov 23, 2016
iOS Dev Nugget 215 dump Instead of print for Swift StructsOct 25, 2016
iOS Dev Nugget 211 Higher Order Functions: map, filter, reduceOct 12, 2016
iOS Dev Nugget 209 Swift DeferSep 28, 2016
iOS Dev Nugget 207 Swift Nil-Coalescing OperatorSep 22, 2016
iOS Dev Nugget 206 Date doesRelativeDateFormattingSep 11, 2016
iOS Dev Nugget 205 The Never Return Type in SwiftSep 07, 2016
iOS Dev Nugget 204 Swift @autoclosureSep 02, 2016
iOS Dev Nugget 203 Swift MeasurementAug 24, 2016
iOS Dev Nugget 202 Swift Enumerations to Encode StatesAug 17, 2016
iOS Dev Nugget 201 Swift Pattern MatchingAug 10, 2016
iOS Dev Nugget 200 Swift flatMapAug 05, 2016
iOS Dev Nugget 199 Swift Talk Video SeriesJul 26, 2016
iOS Dev Nugget 198 KZPlaygroundJul 20, 2016
iOS Dev Nugget 197 App Initialization CodeJul 09, 2016
iOS Dev Nugget 196 Rename Refactoring for Swift CodeJun 24, 2016
iOS Dev Nugget 193 Result EnumerationMay 20, 2016
iOS Dev Nugget 188 SwiftLintMay 10, 2016
iOS Dev Nugget 187 Creating a Singleton Class in SwiftMay 06, 2016
iOS Dev Nugget 186 Injection for XcodeApr 02, 2016
iOS Dev Nugget 182 Tracking the swift-evolution Git RepositoryMar 26, 2016
iOS Dev Nugget 181 Swift SelectorsMar 21, 2016
iOS Dev Nugget 180 Low Power ModeJan 27, 2016
iOS Dev Nugget 172 Print App Document PathDec 30, 2015
iOS Dev Nugget 168 Using Blocks to Manage ContextsOct 20, 2015
iOS Dev Nugget 158 Checking if Newer APIs Are Available In Older iOS Versions (II)Aug 17, 2015
iOS Dev Nugget 149 Timepiece, a Swift Library for Handling DatesJul 05, 2015
iOS Dev Nugget 143 Don't Forget SQLiteJul 01, 2015
iOS Dev Nugget 142 Grand Central DispatchJun 22, 2015
iOS Dev Nugget 141 Great Swift Standard Library Examples Covered in Playground (Swift 2.0)Jun 01, 2015
iOS Dev Nugget 138 Interoperability: Using Enumerations Defined In Objective-C from SwiftMay 27, 2015
iOS Dev Nugget 137 Named Tuple ElementsMay 19, 2015
iOS Dev Nugget 136 Auto Layout with CartographyMay 13, 2015
iOS Dev Nugget 135 CAShapeLayer, Animated Views and XCPShowView()Apr 29, 2015
iOS Dev Nugget 133 Dollar.swiftApr 22, 2015
iOS Dev Nugget 132 XCPCaptureValue in Swift PlaygroundsApr 14, 2015
iOS Dev Nugget 131 Running Asynchronous Code in Swift PlaygroundsFeb 27, 2015
iOS Dev Nugget 124 performSelector:withObject:afterDelay: in SwiftFeb 20, 2015
iOS Dev Nugget 123 Using dynamicType in SwiftJan 02, 2015
iOS Dev Nugget 116 method() is unavailable: use object construction Class()
Mar 27, 2015 by Hwee-Boon Yar
In #126 and #127, I mentioned CocoaPods's a third way, which is to vendor the code directly using Git Submodules (or a similar feature in other version control systems). Like Carthage, it is less intrusive and requires more work than using Cocoapods, but most third party code should work with this approach, and there are a few other benefits:
- you can easily step into and debug the 3rd party code you are vendoring.
- you can apply your own fixes – hopefully before submitting them upstream to the maintainer.
- you can use the latest upstream version even if it hasn't been released as a (Cocoa)pod.
- depending on how the 3rd party code is structured, you may be able to pick and choose the parts that you need.
Here's how to use it, assuming your project is already managed by Git:
-
Create a vendor/ directory.
mkdir vendor
-
Add the 3rd party code as a submodule:
git submodule add https://github.com/AFNetworking/AFNetworking.git vendor/AFNetworking
-
Drag the folders/files that you need into your Xcode project.
-
Commit your changes to your Xcode project as well as the submodule.
-
Make changes to the submodule or run git pull origin master to get upstream updates.
You then iterate through steps 2-5 during development.
An important note to working with 3rd party code is not to drop it directly into your Git repository and checking them in. This will make it hard to keep up with changes from upstream.
Like this post? Follow me @hboon on Twitter.
Mar 20, 2015 by Hwee-Boon Yar
In #126, I mentioned CocoaPods. There is a newer alternative tool for 3rd party code dependency management called Carthage.
The developers described it as:
"CocoaPods (by default) automatically creates and updates an Xcode workspace for your application and all dependencies. Carthage builds framework binaries using xcodebuild, but leaves the responsibility of integrating them up to the user. CocoaPods’ approach is easier to use, while Carthage’s is flexible and unintrusive."
There are a few key differences between Carthage and CocoaPods:
- Carthage only supports dynamic frameworks. So the third party code must have targets to build dynamic frameworks. It also means that your project has to support iOS 8 and newer only.
- Carthage doesn't have a centralized ecosystem like CocoaPods, so there is no central repository or list of 3rd party modules/repositories that are supported. You are on your own to find the code that you want and create a target to build a dynamic framework if it doesn't already support that.
- Carthage is less intrusive. You get to use and maintain your own
.xcodeproj.
Here's how to use it:
-
Install Carthage:
Download and run Carthage.pkg or use homebrew: brew install carthage
-
Create a Cartfile that lists the frameworks you want to use:
github "ReactiveCocoa/ReactiveCocoa" >= 2.3.1
github "jspahrsummers/libextobjc" == 0.4.1
-
Run:
carthage update
-
Drag and drop the built frameworks in Carthage/Checkouts into your Xcode project.
You then iterate through steps 2-4 during development.
Like this post? Follow me @hboon on Twitter.
Mar 13, 2015 by Hwee-Boon Yar
It's common to explicitly include open source code in iOS (or OS X) development. Cocoapods is a dependency manager that lets you track dependencies on 3rd party code, which in Cocoapods terminology, is known as pods, as well as update an Xcode workspace — which wraps around your Xcode project file – so all you need to do is the following:
-
Install cocoapods if you haven't:
sudo gem install cocoapods
-
Create a Podfile in your Xcode project directory:
pod init
-
Update the Podfile to list which pod(s) and version you would like to use:
source 'https://github.com/CocoaPods/Specs.git'
platform :ios, '8.0'
use_frameworks!
pod 'AFNetworking', '~> 2.5'
pod 'ORStackView', '~> 2.0'
pod 'SwiftyJSON', '~> 2.1'
-
Install the dependencies:
pod install
-
Open the .workspace file instead of .xcodeproj file.
-
Import dependencies like this:
import <AFNetworking/AFNetworking.h>
You then iterate through steps 3-6 during development and never use the .xcodeproj file again.
You can search for available pods at Cocoapods as well as for additional documentation.
Like this post? Follow me @hboon on Twitter.
Mar 06, 2015 by Hwee-Boon Yar
I wrote about Reveal app back in issue #100. In Xcode 6, we have a similar feature. You can enable it by running the app in the simulator and then going to Debug > View Debugging > Capture View Hierarchy. It's fairly intuitive, and can help to very quickly highlight layout issues in your code.
Here's a doc from Apple that explains how to use it.
Like this post? Follow me @hboon on Twitter.
Related
Sep 28, 2018
iOS Dev Nugget 311 jqJul 08, 2018
iOS Dev Nugget 299 CurryingJun 01, 2018
iOS Dev Nugget 294 Core Data EditorMar 22, 2018
iOS Dev Nugget 284 Use Shell Aliases for Git commandsDec 20, 2017
iOS Dev Nugget 271 Zhi — Live Reloading Auto Layout Constraints and moreOct 18, 2017
iOS Dev Nugget 262 Apple Device Names APIAug 23, 2017
iOS Dev Nugget 254 Paw, for Working with APIsApr 26, 2017
iOS Dev Nugget 237 mas-cliApr 19, 2017
iOS Dev Nugget 236 Look up Error CodesApr 13, 2017
iOS Dev Nugget 235 Testing Localization Using Launch Arguments (III)Feb 09, 2017
iOS Dev Nugget 226 React NativeJul 09, 2016
iOS Dev Nugget 196 Rename Refactoring for Swift CodeJul 06, 2016
iOS Dev Nugget 195 Tools of the TradeMay 06, 2016
iOS Dev Nugget 186 Injection for XcodeFeb 03, 2016
iOS Dev Nugget 173 Xcode Package Manager, AlcatrazJan 11, 2016
iOS Dev Nugget 170 HomebrewJan 05, 2016
iOS Dev Nugget 169 fastlane: deliverNov 25, 2015
iOS Dev Nugget 163 Testing Localization Using Launch Arguments (II)Sep 15, 2015
iOS Dev Nugget 153 Shortcut to Open Log in SimulatorSep 07, 2015
iOS Dev Nugget 152 Lossy PNG CompressionAug 07, 2015
iOS Dev Nugget 147 NSRegularExpression and NSDataDetectorMay 13, 2015
iOS Dev Nugget 135 CAShapeLayer, Animated Views and XCPShowView()Feb 13, 2015
iOS Dev Nugget 122 Importing Many Test Photos into iOS Simulator IINov 28, 2014
iOS Dev Nugget 111 iOS Support MatrixOct 24, 2014
iOS Dev Nugget 106 Command Line Access to Developer PortalOct 17, 2014
iOS Dev Nugget 105 Try FLEXOct 03, 2014
iOS Dev Nugget 103 Testing Localization Using Launch ArgumentsSep 12, 2014
iOS Dev Nugget 100 Try RevealSep 05, 2014
iOS Dev Nugget 99 Try PaintCodeAug 15, 2014
iOS Dev Nugget 96 Jack, A Native App For iTunes ConnectJul 04, 2014
iOS Dev Nugget 90 Full-Text Searchable WWDC Video Text TranscriptsJun 13, 2014
iOS Dev Nugget 87 What's New in iOS 8Apr 04, 2014
iOS Dev Nugget 77 RubyMotion Tutorial For Objective C DevelopersMar 28, 2014
iOS Dev Nugget 76 Importing Many Test Photos into iOS SimulatorJan 17, 2014
iOS Dev Nugget 66 JBChartView for ChartingJan 04, 2014
iOS Dev Nugget 64 Placeholder Views Using PAPlaceholderDec 27, 2013
iOS Dev Nugget 63 Update Your iOS Development ToolboxOct 18, 2013
iOS Dev Nugget 53 Try Kaleidoscope, File Comparison for MacOct 11, 2013
iOS Dev Nugget 52 Set Up Crashlytics For Ad Hoc and App Store Builds OnlyJun 21, 2013
iOS Dev Nugget 36 Use TestFlight for Ad Hoc BuildsMay 11, 2013
iOS Dev Nugget 31 3rd Party Documentation ViewersMay 04, 2013
iOS Dev Nugget 30 Shortcut key to toggle slow animations in the iOS simulator (part II)Apr 27, 2013
iOS Dev Nugget 29 Simulating a Custom LocationApr 12, 2013
iOS Dev Nugget 27 Two-finger touch in SimulatorMar 31, 2013
iOS Dev Nugget 25 Watch out for hotspot and in-call status bar heightMar 22, 2013
iOS Dev Nugget 24 Take Screenshots in the SimulatorMar 10, 2013
iOS Dev Nugget 22 Try AppCodeJan 05, 2013
iOS Dev Nugget 14 Charles Web Debugging ProxyDec 28, 2012
iOS Dev Nugget 13 Simulating a slow cellular network with Network Link ConditionerNov 23, 2012
iOS Dev Nugget 8 Copy and paste from/to the iOS SimulatorNov 09, 2012
iOS Dev Nugget 6 Open app in Simulator with Finder
Feb 27, 2015 by Hwee-Boon Yar
-performSelector:withObject:afterDelay: isn't available in Swift. Generally, it's a bad idea to use -performSelector: and it's variants, but there are exceptions, especially since not all code ends up in production. I find it particularly helpful during development to use it to auto-navigate to the screen I am currently working on. Courtesy of Stack Overflow, in Swift, we can use dispatch_time() to build something similar.
func delay(delay:Double, closure:()->()) {
dispatch_after(
dispatch_time(DISPATCH_TIME_NOW, Int64(delay * Double(NSEC_PER_SEC))),
dispatch_get_main_queue(),
closure)
}
and call it like this:
delay(0.7) {
//do something here
}
Like this post? Follow me @hboon on Twitter.
Related
Nov 03, 2018
iOS Dev Nugget 314 Checked Array SubscriptingSep 22, 2018
iOS Dev Nugget 310 Weak Reference Wrapper ClassSep 07, 2018
iOS Dev Nugget 308 Careful with early return statements in functions that return voidAug 30, 2018
iOS Dev Nugget 307 Array Out of BoundsAug 23, 2018
iOS Dev Nugget 306 Underscores in Numeric LiteralsAug 02, 2018
iOS Dev Nugget 303 Use Enums for StatesJul 21, 2018
iOS Dev Nugget 301 Print App Document Path IIJul 16, 2018
iOS Dev Nugget 300 Pipe OperatorMay 18, 2018
iOS Dev Nugget 292 for-whereMay 12, 2018
iOS Dev Nugget 291 Implicit Member ExpressionsApr 11, 2018
iOS Dev Nugget 287 Modifying a Property Which is a Struct Triggers didSetNov 02, 2017
iOS Dev Nugget 265 value type cannot have a stored property that recursively contains itSep 13, 2017
iOS Dev Nugget 257 AssertsAug 02, 2017
iOS Dev Nugget 251 Retrieving the Current View ControllerJun 28, 2017
iOS Dev Nugget 246 Mapping Swift and Obj-C Method NamesJun 14, 2017
iOS Dev Nugget 244 IteratorProtocolMay 24, 2017
iOS Dev Nugget 241 Swift Enums with LabelsMay 17, 2017
iOS Dev Nugget 240 Print an Object's Unique IdentifierApr 05, 2017
iOS Dev Nugget 234 #available and @availableNov 23, 2016
iOS Dev Nugget 215 dump Instead of print for Swift StructsOct 25, 2016
iOS Dev Nugget 211 Higher Order Functions: map, filter, reduceOct 12, 2016
iOS Dev Nugget 209 Swift DeferSep 28, 2016
iOS Dev Nugget 207 Swift Nil-Coalescing OperatorSep 22, 2016
iOS Dev Nugget 206 Date doesRelativeDateFormattingSep 11, 2016
iOS Dev Nugget 205 The Never Return Type in SwiftSep 07, 2016
iOS Dev Nugget 204 Swift @autoclosureSep 02, 2016
iOS Dev Nugget 203 Swift MeasurementAug 24, 2016
iOS Dev Nugget 202 Swift Enumerations to Encode StatesAug 17, 2016
iOS Dev Nugget 201 Swift Pattern MatchingAug 10, 2016
iOS Dev Nugget 200 Swift flatMapAug 05, 2016
iOS Dev Nugget 199 Swift Talk Video SeriesJul 26, 2016
iOS Dev Nugget 198 KZPlaygroundJul 20, 2016
iOS Dev Nugget 197 App Initialization CodeJul 09, 2016
iOS Dev Nugget 196 Rename Refactoring for Swift CodeJun 24, 2016
iOS Dev Nugget 193 Result EnumerationMay 20, 2016
iOS Dev Nugget 188 SwiftLintMay 10, 2016
iOS Dev Nugget 187 Creating a Singleton Class in SwiftMay 06, 2016
iOS Dev Nugget 186 Injection for XcodeApr 02, 2016
iOS Dev Nugget 182 Tracking the swift-evolution Git RepositoryMar 26, 2016
iOS Dev Nugget 181 Swift SelectorsMar 21, 2016
iOS Dev Nugget 180 Low Power ModeJan 27, 2016
iOS Dev Nugget 172 Print App Document PathDec 30, 2015
iOS Dev Nugget 168 Using Blocks to Manage ContextsOct 20, 2015
iOS Dev Nugget 158 Checking if Newer APIs Are Available In Older iOS Versions (II)Aug 17, 2015
iOS Dev Nugget 149 Timepiece, a Swift Library for Handling DatesJul 05, 2015
iOS Dev Nugget 143 Don't Forget SQLiteJul 01, 2015
iOS Dev Nugget 142 Grand Central DispatchJun 22, 2015
iOS Dev Nugget 141 Great Swift Standard Library Examples Covered in Playground (Swift 2.0)Jun 01, 2015
iOS Dev Nugget 138 Interoperability: Using Enumerations Defined In Objective-C from SwiftMay 27, 2015
iOS Dev Nugget 137 Named Tuple ElementsMay 19, 2015
iOS Dev Nugget 136 Auto Layout with CartographyMay 13, 2015
iOS Dev Nugget 135 CAShapeLayer, Animated Views and XCPShowView()Apr 29, 2015
iOS Dev Nugget 133 Dollar.swiftApr 22, 2015
iOS Dev Nugget 132 XCPCaptureValue in Swift PlaygroundsApr 14, 2015
iOS Dev Nugget 131 Running Asynchronous Code in Swift PlaygroundsApr 03, 2015
iOS Dev Nugget 129 Browsing the Swift Standard LibraryFeb 20, 2015
iOS Dev Nugget 123 Using dynamicType in SwiftJan 02, 2015
iOS Dev Nugget 116 method() is unavailable: use object construction Class()
Feb 20, 2015 by Hwee-Boon Yar
A quick tip this week. If you have been using the object_getClassName() function when using Objective C to print out the class of an object, you can use dynamicType to do it in Swift:
var s = "abc"
println("class name: \(s.dynamicType)")
In addition, you can use dynamicType to create a new instance of the class:
var type = s.dynamicType
var anotherInstance = type() //Like String()
Like this post? Follow me @hboon on Twitter.
Related
Nov 03, 2018
iOS Dev Nugget 314 Checked Array SubscriptingSep 22, 2018
iOS Dev Nugget 310 Weak Reference Wrapper ClassSep 07, 2018
iOS Dev Nugget 308 Careful with early return statements in functions that return voidAug 30, 2018
iOS Dev Nugget 307 Array Out of BoundsAug 23, 2018
iOS Dev Nugget 306 Underscores in Numeric LiteralsAug 02, 2018
iOS Dev Nugget 303 Use Enums for StatesJul 21, 2018
iOS Dev Nugget 301 Print App Document Path IIJul 16, 2018
iOS Dev Nugget 300 Pipe OperatorMay 18, 2018
iOS Dev Nugget 292 for-whereMay 12, 2018
iOS Dev Nugget 291 Implicit Member ExpressionsApr 11, 2018
iOS Dev Nugget 287 Modifying a Property Which is a Struct Triggers didSetNov 02, 2017
iOS Dev Nugget 265 value type cannot have a stored property that recursively contains itSep 13, 2017
iOS Dev Nugget 257 AssertsAug 02, 2017
iOS Dev Nugget 251 Retrieving the Current View ControllerJun 28, 2017
iOS Dev Nugget 246 Mapping Swift and Obj-C Method NamesJun 14, 2017
iOS Dev Nugget 244 IteratorProtocolMay 24, 2017
iOS Dev Nugget 241 Swift Enums with LabelsMay 17, 2017
iOS Dev Nugget 240 Print an Object's Unique IdentifierApr 05, 2017
iOS Dev Nugget 234 #available and @availableNov 23, 2016
iOS Dev Nugget 215 dump Instead of print for Swift StructsOct 25, 2016
iOS Dev Nugget 211 Higher Order Functions: map, filter, reduceOct 12, 2016
iOS Dev Nugget 209 Swift DeferSep 28, 2016
iOS Dev Nugget 207 Swift Nil-Coalescing OperatorSep 22, 2016
iOS Dev Nugget 206 Date doesRelativeDateFormattingSep 11, 2016
iOS Dev Nugget 205 The Never Return Type in SwiftSep 07, 2016
iOS Dev Nugget 204 Swift @autoclosureSep 02, 2016
iOS Dev Nugget 203 Swift MeasurementAug 24, 2016
iOS Dev Nugget 202 Swift Enumerations to Encode StatesAug 17, 2016
iOS Dev Nugget 201 Swift Pattern MatchingAug 10, 2016
iOS Dev Nugget 200 Swift flatMapAug 05, 2016
iOS Dev Nugget 199 Swift Talk Video SeriesJul 26, 2016
iOS Dev Nugget 198 KZPlaygroundJul 20, 2016
iOS Dev Nugget 197 App Initialization CodeJul 09, 2016
iOS Dev Nugget 196 Rename Refactoring for Swift CodeJun 24, 2016
iOS Dev Nugget 193 Result EnumerationMay 20, 2016
iOS Dev Nugget 188 SwiftLintMay 10, 2016
iOS Dev Nugget 187 Creating a Singleton Class in SwiftMay 06, 2016
iOS Dev Nugget 186 Injection for XcodeApr 02, 2016
iOS Dev Nugget 182 Tracking the swift-evolution Git RepositoryMar 26, 2016
iOS Dev Nugget 181 Swift SelectorsMar 21, 2016
iOS Dev Nugget 180 Low Power ModeJan 27, 2016
iOS Dev Nugget 172 Print App Document PathDec 30, 2015
iOS Dev Nugget 168 Using Blocks to Manage ContextsOct 20, 2015
iOS Dev Nugget 158 Checking if Newer APIs Are Available In Older iOS Versions (II)Aug 17, 2015
iOS Dev Nugget 149 Timepiece, a Swift Library for Handling DatesJul 05, 2015
iOS Dev Nugget 143 Don't Forget SQLiteJul 01, 2015
iOS Dev Nugget 142 Grand Central DispatchJun 22, 2015
iOS Dev Nugget 141 Great Swift Standard Library Examples Covered in Playground (Swift 2.0)Jun 01, 2015
iOS Dev Nugget 138 Interoperability: Using Enumerations Defined In Objective-C from SwiftMay 27, 2015
iOS Dev Nugget 137 Named Tuple ElementsMay 19, 2015
iOS Dev Nugget 136 Auto Layout with CartographyMay 13, 2015
iOS Dev Nugget 135 CAShapeLayer, Animated Views and XCPShowView()Apr 29, 2015
iOS Dev Nugget 133 Dollar.swiftApr 22, 2015
iOS Dev Nugget 132 XCPCaptureValue in Swift PlaygroundsApr 14, 2015
iOS Dev Nugget 131 Running Asynchronous Code in Swift PlaygroundsApr 03, 2015
iOS Dev Nugget 129 Browsing the Swift Standard LibraryFeb 27, 2015
iOS Dev Nugget 124 performSelector:withObject:afterDelay: in SwiftJan 02, 2015
iOS Dev Nugget 116 method() is unavailable: use object construction Class()
Feb 13, 2015 by Hwee-Boon Yar
In #76: Importing Many Test Photos into iOS Simulator, I wrote about how you can built custom iOS apps to bulk load photos into the simulator. There is another way to do this. The simctl utility that comes with your Xcode installation lets you control the iOS simulator. Unless you have added it to your path, you'll have to use the full path to refer to it.
If you run it without any arguments, it will show you the commands available:
$ /Applications/Xcode.app/Contents/Developer/Platforms/iPhoneSimulator.platform/Developer/usr/bin/simctl
Usage: simctl [--noxpc] [--set <set path>] <subcommand> ... | help [subcommand]
Command line utility to control the iOS Simulator
For subcommands that require a <device> argument, you may specify a device UDID
or the special "booted" string which will cause simctl to pick a booted device.
If multiple devices are booted when the "booted" device is selected, simctl
will choose one of them.
Subcommands:
create Create a new device.
delete Delete a device.
erase Erase a device's contents and settings.
boot Boot a device.
shutdown Shutdown a device.
rename Rename a device.
getenv Print an environment variable from a running device.
openurl Open a URL in a device.
addphoto Add a photo to the photo library of a device.
install Install an app on a device.
uninstall Uninstall an app from a device.
launch Launch an application by identifier on a device.
spawn Spawn a process on a device.
list List available devices, device types, or runtimes.
notify_post Post a darwin notification on a device.
icloud_sync Trigger iCloud sync on a device.
help Prints the usage for a given subcommand.
E.g. simctl list devices will list the simulators you have installed:
$ /Applications/Xcode.app/Contents/Developer/Platforms/iPhoneSimulator.platform/Developer/usr/bin/simctl list devices
== Devices ==
-- iOS 7.0 --
-- iOS 7.1 --
iPhone 4s-7.1 (CD87A880-494C-44C8-AF94-D316EB391BB6) (Shutdown)
iPhone 5 (B937671C-5C95-4978-8425-C5EEA1849001) (Shutdown)
iPhone 5s (F6CB1E39-A871-4044-92B7-3B1D92C64649) (Shutdown)
iPad 2 (FF3F0C5E-FB6B-452C-BB6C-4226503EB287) (Shutdown)
iPad Retina (6FE5DDD4-5899-44BD-B5BA-2E476800AC62) (Shutdown)
iPad Air (402BBCCF-750F-4962-872C-74AC447E757D) (Shutdown)
-- iOS 8.1 --
iPhone 4s (17484BC7-1DDE-4C9D-B678-A55ECAE86D50) (Shutdown)
iPhone 5 (FD3A2930-DA6E-4316-B6AA-9EE8925D3780) (Shutdown)
iPhone 5s (1979F6BD-0DC8-4B1D-A400-DEBB5B2A476A) (Booted)
iPhone 6 Plus (6EB44A5F-ACCD-4751-B84C-C1904D18CE7D) (Shutdown)
iPhone 6 (C9E7226E-7E34-470C-A76F-9EA153C15FFD) (Shutdown)
iPad 2 (69447CBA-98F4-4624-A2D5-B521F966BC63) (Shutdown)
iPad Retina (C90AA28D-405E-451A-B857-1CA0F52EC7DB) (Shutdown)
iPad Air (4F8A5BF9-418B-43B0-B92C-80C8493653FF) (Shutdown)
Resizable iPhone (E953192F-3EBA-432F-B6A9-B060BB5E599C) (Shutdown)
Resizable iPad (F1D962E3-CF33-432A-8B57-18B48A02CA02) (Shutdown)
What we are interested here is the addphoto command, like so:
$ /Applications/Xcode.app/Contents/Developer/Platforms/iPhoneSimulator.platform/Developer/usr/bin/simctl addphoto "1979F6BD-0DC8-4B1D-A400-DEBB5B2A476A" ~/Desktop/some-photo1.jpg
The simulator has to be running for addphoto to work. You can easily script this to bulk load multiple photos.
In fact, I built a command line tool to do it, see ios-simtool.
Like this post? Follow me @hboon on Twitter.
Related
Sep 28, 2018
iOS Dev Nugget 311 jqJul 08, 2018
iOS Dev Nugget 299 CurryingJun 01, 2018
iOS Dev Nugget 294 Core Data EditorMar 22, 2018
iOS Dev Nugget 284 Use Shell Aliases for Git commandsDec 20, 2017
iOS Dev Nugget 271 Zhi — Live Reloading Auto Layout Constraints and moreOct 18, 2017
iOS Dev Nugget 262 Apple Device Names APIAug 23, 2017
iOS Dev Nugget 254 Paw, for Working with APIsApr 26, 2017
iOS Dev Nugget 237 mas-cliApr 19, 2017
iOS Dev Nugget 236 Look up Error CodesApr 13, 2017
iOS Dev Nugget 235 Testing Localization Using Launch Arguments (III)Feb 09, 2017
iOS Dev Nugget 226 React NativeJul 09, 2016
iOS Dev Nugget 196 Rename Refactoring for Swift CodeJul 06, 2016
iOS Dev Nugget 195 Tools of the TradeMay 06, 2016
iOS Dev Nugget 186 Injection for XcodeFeb 03, 2016
iOS Dev Nugget 173 Xcode Package Manager, AlcatrazJan 11, 2016
iOS Dev Nugget 170 HomebrewJan 05, 2016
iOS Dev Nugget 169 fastlane: deliverNov 25, 2015
iOS Dev Nugget 163 Testing Localization Using Launch Arguments (II)Sep 15, 2015
iOS Dev Nugget 153 Shortcut to Open Log in SimulatorSep 07, 2015
iOS Dev Nugget 152 Lossy PNG CompressionAug 07, 2015
iOS Dev Nugget 147 NSRegularExpression and NSDataDetectorMay 13, 2015
iOS Dev Nugget 135 CAShapeLayer, Animated Views and XCPShowView()Mar 06, 2015
iOS Dev Nugget 125 View Debugging in XcodeNov 28, 2014
iOS Dev Nugget 111 iOS Support MatrixOct 24, 2014
iOS Dev Nugget 106 Command Line Access to Developer PortalOct 17, 2014
iOS Dev Nugget 105 Try FLEXOct 03, 2014
iOS Dev Nugget 103 Testing Localization Using Launch ArgumentsSep 12, 2014
iOS Dev Nugget 100 Try RevealSep 05, 2014
iOS Dev Nugget 99 Try PaintCodeAug 15, 2014
iOS Dev Nugget 96 Jack, A Native App For iTunes ConnectJul 04, 2014
iOS Dev Nugget 90 Full-Text Searchable WWDC Video Text TranscriptsJun 13, 2014
iOS Dev Nugget 87 What's New in iOS 8Apr 04, 2014
iOS Dev Nugget 77 RubyMotion Tutorial For Objective C DevelopersMar 28, 2014
iOS Dev Nugget 76 Importing Many Test Photos into iOS SimulatorJan 17, 2014
iOS Dev Nugget 66 JBChartView for ChartingJan 04, 2014
iOS Dev Nugget 64 Placeholder Views Using PAPlaceholderDec 27, 2013
iOS Dev Nugget 63 Update Your iOS Development ToolboxOct 18, 2013
iOS Dev Nugget 53 Try Kaleidoscope, File Comparison for MacOct 11, 2013
iOS Dev Nugget 52 Set Up Crashlytics For Ad Hoc and App Store Builds OnlyJun 21, 2013
iOS Dev Nugget 36 Use TestFlight for Ad Hoc BuildsMay 11, 2013
iOS Dev Nugget 31 3rd Party Documentation ViewersMay 04, 2013
iOS Dev Nugget 30 Shortcut key to toggle slow animations in the iOS simulator (part II)Apr 27, 2013
iOS Dev Nugget 29 Simulating a Custom LocationApr 12, 2013
iOS Dev Nugget 27 Two-finger touch in SimulatorMar 31, 2013
iOS Dev Nugget 25 Watch out for hotspot and in-call status bar heightMar 22, 2013
iOS Dev Nugget 24 Take Screenshots in the SimulatorMar 10, 2013
iOS Dev Nugget 22 Try AppCodeJan 05, 2013
iOS Dev Nugget 14 Charles Web Debugging ProxyDec 28, 2012
iOS Dev Nugget 13 Simulating a slow cellular network with Network Link ConditionerNov 23, 2012
iOS Dev Nugget 8 Copy and paste from/to the iOS SimulatorNov 09, 2012
iOS Dev Nugget 6 Open app in Simulator with Finder
Feb 06, 2015 by Hwee-Boon Yar
When presenting text to users, it's often convenient to be able to automatically switch between singular and plural forms of words. InflectorKit from Mattt Thompson helps you do that.
Sample code included:
#import "NSString+InflectorKit.h"
for (NSString *singular in @[@"person", @"tomato", @"matrix", @"octopus", @"fish"]) {
NSLog(@"%@: %@", singular, [singular pluralizedString]);
}
or:
for (NSString *plural in @[@"people", @"tomatoes", @"matrices", @"octopi", @"fish"]) {
NSLog(@"%@: %@", plural, [plural singularizedString]);
}
Like this post? Follow me @hboon on Twitter.
Related
Aug 15, 2018
iOS Dev Nugget 305 Declaring Distinct Types from General TypesJul 24, 2018
iOS Dev Nugget 302 RealmJun 09, 2018
iOS Dev Nugget 295 SwifterSwiftMay 23, 2018
iOS Dev Nugget 293 iOSSnapshotTestCase (was FBSnapshotTestCase)Mar 15, 2018
iOS Dev Nugget 283 Eureka for FormsFeb 28, 2018
iOS Dev Nugget 281 Use R.swift for Static References to Resources Like ImagesFeb 21, 2018
iOS Dev Nugget 280 Using Custom Fonts Without Updating Info.plist ManuallyDec 06, 2017
iOS Dev Nugget 269 Including Finger Touches in App Preview VideosJul 11, 2017
iOS Dev Nugget 248 In-app Native RoutingMar 01, 2017
iOS Dev Nugget 229 PromisesFeb 22, 2017
iOS Dev Nugget 228 Recording and Playing Back Network CallsOct 23, 2016
iOS Dev Nugget 210 PMAlertControllerJun 03, 2016
iOS Dev Nugget 190 Quick Look Plug-in for Mobile Provisioning FilesMay 20, 2016
iOS Dev Nugget 188 SwiftLintApr 20, 2016
iOS Dev Nugget 184 Async LibraryAug 31, 2015
iOS Dev Nugget 151 More Wrappers for Keychain AccessAug 17, 2015
iOS Dev Nugget 149 Timepiece, a Swift Library for Handling DatesJul 27, 2015
iOS Dev Nugget 146 UIStackView and TZStackViewJul 21, 2015
iOS Dev Nugget 145 Listing Available FontsJul 05, 2015
iOS Dev Nugget 143 Don't Forget SQLiteJun 09, 2015
iOS Dev Nugget 139 Custom Build Configurations and Xcode SubprojectsMay 19, 2015
iOS Dev Nugget 136 Auto Layout with CartographyApr 29, 2015
iOS Dev Nugget 133 Dollar.swiftDec 26, 2014
iOS Dev Nugget 115 Displaying Information in Settings AppDec 19, 2014
iOS Dev Nugget 114 Preview an Image for DebuggingDec 12, 2014
iOS Dev Nugget 113 GPUImage, a GPU-based Image and Video Processing FrameworkMay 30, 2014
iOS Dev Nugget 85 A More Customizable Button For Different StatesMay 02, 2014
iOS Dev Nugget 81 TMCache For In-Memory and Disk-backed CachingApr 18, 2014
iOS Dev Nugget 79 TweetBot Photo Flicking EffectMar 07, 2014
iOS Dev Nugget 73 Open Source Date Picker from SquareFeb 22, 2014
iOS Dev Nugget 71 TapJan 31, 2014
iOS Dev Nugget 68 Custom URL Schemes DirectoryDec 20, 2013
iOS Dev Nugget 62 Using PDF Instead of PNG Files for Resizable AssetsSep 20, 2013
iOS Dev Nugget 49 Wrapper to Get UIColor ComponentsMay 17, 2013
iOS Dev Nugget 32 FMDB: Thin Objective C Wrapper Around SQLiteOct 06, 2012
iOS Dev Nugget 1 Easy logging of values and objects
Jan 30, 2015 by Hwee-Boon Yar
Prior to iOS 8, if you wanted to run JavaScript on a UIWebView and process the results in native code (ObjC, Swift, etc), you'd have to use -stringByEvaluatingJavaScriptFromString: doing the following:
NSString* resultAsAString = [webView stringByEvaluatingJavaScriptFromString:@"
//1. Process
//2. Serialize into string
//3. return string
"];
//4. Convert resultAsAString from NSString into native objects (NSArray, NSDictionary, NSString int, etc)
//5. Finally process
You needed to do your own serializing into string in JavaScript and then unserialize it again in native code, converting the data into native objects!
With iOS 8, however, you can use WKWebView and do this:
[webView evaluateJavaScript:@"
//1. Process
//2. Return results in JavaScript primitives
" completionHandler:^{
//3. Process (the results are automatically converted into NSArray, NSDictionary, NSString, int, etc already)
}]
WKWebView automatically does the type conversion for you and the JavaScript evaluation is asynchronous.
There's a lot more to WKWebView than performance improvements. A good way to start is to check out WKUserScript and how you can attach your own JavaScript at document load start and end time to customize the page you are loading.
Like this post? Follow me @hboon on Twitter.
Jan 23, 2015 by Hwee-Boon Yar
Occasionally, it might be useful to perform a tethered install for an app build onto your iOS device rather than over the internet using a tool like TestFlight or HockeyApp. Maybe you have no connectivity, or perhaps you want to test an app store build.
You can do this by building as usual and using your ad hoc build profile. Then doing the following:
- Drag the IPA file into My Apps section in iTunes.
- Plug in your iOS device.
- Drag the app to the left section of iTunes and an icon representing your iOS device will appear. Drop the app over it.
The app should install onto your device. If it doesn’t, you might have to delete the existing build on your device first.
Like this post? Follow me @hboon on Twitter.
Related
Feb 21, 2018
iOS Dev Nugget 280 Using Custom Fonts Without Updating Info.plist ManuallyOct 11, 2017
iOS Dev Nugget 261 Checking App Download SizeJan 05, 2016
iOS Dev Nugget 169 fastlane: deliverAug 13, 2015
iOS Dev Nugget 148 Difference between CFBundleVersion and CFBundleShortVersionStringJun 09, 2015
iOS Dev Nugget 139 Custom Build Configurations and Xcode SubprojectsMar 27, 2015
iOS Dev Nugget 128 Dependency Management for 3rd Party Code: Git SubmodulesMar 20, 2015
iOS Dev Nugget 127 Dependency Management for 3rd Party Code: CarthageMar 13, 2015
iOS Dev Nugget 126 Dependency Management for 3rd Party Code: CocoapodsJan 16, 2015
iOS Dev Nugget 118 Vendoring Code and Git SubmodulesFeb 16, 2014
iOS Dev Nugget 70 Updates to Previous IssuesJun 21, 2013
iOS Dev Nugget 36 Use TestFlight for Ad Hoc BuildsDec 07, 2012
iOS Dev Nugget 10 Write Synchronously to Campfire Room for Debugging
Jan 16, 2015 by Hwee-Boon Yar
There are lots of wonderful open source code living on GitHub (and elsewhere) that you can plug into your projects. If you are using them but aren't vendoring those code in your project with Git submodules (or similar functionality), you should.
Put simply, vendoring is saving those 3rd party code into your source repository under a specific directory (often vendor/). This helps so dependencies on a specific version of a 3rd party library are tracked correctly with your project's source code.
When you vendor, if you use Git, you should always use git submodules instead of just copying and pasting the 3rd party code into vendor/libraryA/. i.e. do:
cd projectName/
git submodule add https://github.com/square/objc-TimesSquare.git vendor/objc-TimesSquare
and not:
git clone https://github.com/square/objc-TimesSquare.git
cp -R objc-TimesSquare projectName/vendor/
If you aren't using Git, other source code version control system should have similar functionality. This way, the history of the 3rd party code is preserved, and you can easily update to a newer version of the library and update that dependency in your project.
Of course, vendoring applies to internal shared libraries that you or your team develop too.
Like this post? Follow me @hboon on Twitter.
Jan 09, 2015 by Hwee-Boon Yar
If you are using Auto Layout and haven't been using Auto-sizing UITableViewCells with your UITableViews, you should.
You might notice an error about not being able to simultaneously satisfy constraints, and something like this appears in the list of constraints:
"<NSLayoutConstraint:0x11eb07d50 'UIView-Encapsulated-Layout-Height' V:[UITableViewCellContentView:0x1191f53c0(50)]>"
Chances are setting the priority for the constraint you add governing the cell's height to UILayoutPriorityDefaultHigh will fix it. It appears that that constraint is set by Auto Layout to enforce the calculated height, but it might clash with your own constraint. My guess is while it should give the same result, it sometimes doesn't due to floating point representation being imprecise.
Like this post? Follow me @hboon on Twitter.
Related
Oct 26, 2018
iOS Dev Nugget 313 Showing a Full Height UITableViewJun 18, 2018
iOS Dev Nugget 296 Strange UITableView Jumping Behavior when ReloadingMay 03, 2018
iOS Dev Nugget 290 Auto Layout with UIScrollViewApr 07, 2018
iOS Dev Nugget 286 Use Auto Layout for Bottom BarDec 20, 2017
iOS Dev Nugget 271 Zhi — Live Reloading Auto Layout Constraints and moreJan 17, 2016
iOS Dev Nugget 171 Dynamic TypeDec 23, 2015
iOS Dev Nugget 167 Animation with Auto LayoutJul 27, 2015
iOS Dev Nugget 146 UIStackView and TZStackViewOct 31, 2014
iOS Dev Nugget 107 Auto-sizing UITableViewCellsJun 27, 2014
iOS Dev Nugget 89 When to Deselect Table View CellJun 06, 2014
iOS Dev Nugget 86 Using UITableView -registerClass:forCellReuseIdentifier: with UITableViewCellSep 27, 2013
iOS Dev Nugget 50 UITableView -registerClassforCellReuseIdentifier:
Jan 02, 2015 by Hwee-Boon Yar
This is the first Swift-related tip I am writing! Starting with this issue, I'll be covering both Swift and Objective C.
When you use Objective C code from Swift, you might notice an error like:
manager() is unavailable: use object construction SomeManager()
This happens if you have a class like this:
@interface SomeManager : NSObject
+ (instancetype)manager;
@end
+manager is likely meant to return a singleton and you were trying to call the equivalent of Objective C:
SomeManager* m = [SomeManager manager];
with:
var m = SomeManager.manager()
which triggers the error message. Using this as suggested by the error message will probably run, but it is wrong since it just creates an object by calling init():
var m = SomeManager()
This happens because of an interoperability feature of Swift for initialization which does some method name parsing based around naming conventions. Basically given an Objective C class like:
@interface SomeManager : NSObject
- (instancetype)initWithName:(NSString*)name;
- (instancetype)initWithName:(NSString*)name height:(int)aNumber;
@end
you can do the following in Objective C:
SomeManager* m1 = [[SomeManager alloc] initWithName:@"some name"];
SomeManager* m2 = [[SomeManager alloc] initWithName:@"another name" height:123];
Swift interoperability will let you do:
var m1 = SomeManager(name: "some name")
var m2 = SomeManager(name: "some name", height: 123)
You can see this with UIView's -initWithFrame: method.
In addition, Swift interoperability for initializers work for factory methods too, so given this Objective C class:
@interface SomeManager : NSObject
+ (instancetype)managerWithName:(NSString*)name;
+ (instancetype)managerWithName:(NSString*)name height:(int)aNumber;
@end
you can do the following in Objective C:
SomeManager* m1 = [SomeManager managerWithName:@"some name"];
SomeManager* m2 = [SomeManager managerWithName:@"another name" height:123];
Swift interoperability will let you do the following too:
var m1 = SomeManager(name: "some name")
var m2 = SomeManager(name: "some name", height: 123)
Unfortunately, if you have a class method that accepts no arguments like the +manager class method we talked about at the start of this tip, it can't be called directly from Swift. You'll need to create an Objective C class extension with a class method that wraps around it, that doesn't adhere to the naming convention. e.g.
@interface SomeManager (SwiftInterop)
+ (instancetype)singleton; //or some appropriate name
@end
@implementation SomeManager(SwiftInterop)
+ (instancetype)singleton {
return [self manager];
}
@end
then you can call +singleton from Swift instead.
Like this post? Follow me @hboon on Twitter.
Related
Nov 03, 2018
iOS Dev Nugget 314 Checked Array SubscriptingSep 22, 2018
iOS Dev Nugget 310 Weak Reference Wrapper ClassSep 07, 2018
iOS Dev Nugget 308 Careful with early return statements in functions that return voidAug 30, 2018
iOS Dev Nugget 307 Array Out of BoundsAug 23, 2018
iOS Dev Nugget 306 Underscores in Numeric LiteralsAug 02, 2018
iOS Dev Nugget 303 Use Enums for StatesJul 21, 2018
iOS Dev Nugget 301 Print App Document Path IIJul 16, 2018
iOS Dev Nugget 300 Pipe OperatorMay 18, 2018
iOS Dev Nugget 292 for-whereMay 12, 2018
iOS Dev Nugget 291 Implicit Member ExpressionsApr 11, 2018
iOS Dev Nugget 287 Modifying a Property Which is a Struct Triggers didSetNov 02, 2017
iOS Dev Nugget 265 value type cannot have a stored property that recursively contains itSep 13, 2017
iOS Dev Nugget 257 AssertsAug 02, 2017
iOS Dev Nugget 251 Retrieving the Current View ControllerJun 28, 2017
iOS Dev Nugget 246 Mapping Swift and Obj-C Method NamesJun 14, 2017
iOS Dev Nugget 244 IteratorProtocolMay 24, 2017
iOS Dev Nugget 241 Swift Enums with LabelsMay 17, 2017
iOS Dev Nugget 240 Print an Object's Unique IdentifierApr 05, 2017
iOS Dev Nugget 234 #available and @availableNov 23, 2016
iOS Dev Nugget 215 dump Instead of print for Swift StructsOct 25, 2016
iOS Dev Nugget 211 Higher Order Functions: map, filter, reduceOct 12, 2016
iOS Dev Nugget 209 Swift DeferSep 28, 2016
iOS Dev Nugget 207 Swift Nil-Coalescing OperatorSep 22, 2016
iOS Dev Nugget 206 Date doesRelativeDateFormattingSep 11, 2016
iOS Dev Nugget 205 The Never Return Type in SwiftSep 07, 2016
iOS Dev Nugget 204 Swift @autoclosureSep 02, 2016
iOS Dev Nugget 203 Swift MeasurementAug 24, 2016
iOS Dev Nugget 202 Swift Enumerations to Encode StatesAug 17, 2016
iOS Dev Nugget 201 Swift Pattern MatchingAug 10, 2016
iOS Dev Nugget 200 Swift flatMapAug 05, 2016
iOS Dev Nugget 199 Swift Talk Video SeriesJul 26, 2016
iOS Dev Nugget 198 KZPlaygroundJul 20, 2016
iOS Dev Nugget 197 App Initialization CodeJul 09, 2016
iOS Dev Nugget 196 Rename Refactoring for Swift CodeJun 24, 2016
iOS Dev Nugget 193 Result EnumerationMay 20, 2016
iOS Dev Nugget 188 SwiftLintMay 10, 2016
iOS Dev Nugget 187 Creating a Singleton Class in SwiftMay 06, 2016
iOS Dev Nugget 186 Injection for XcodeApr 02, 2016
iOS Dev Nugget 182 Tracking the swift-evolution Git RepositoryMar 26, 2016
iOS Dev Nugget 181 Swift SelectorsMar 21, 2016
iOS Dev Nugget 180 Low Power ModeJan 27, 2016
iOS Dev Nugget 172 Print App Document PathDec 30, 2015
iOS Dev Nugget 168 Using Blocks to Manage ContextsOct 20, 2015
iOS Dev Nugget 158 Checking if Newer APIs Are Available In Older iOS Versions (II)Aug 17, 2015
iOS Dev Nugget 149 Timepiece, a Swift Library for Handling DatesJul 05, 2015
iOS Dev Nugget 143 Don't Forget SQLiteJul 01, 2015
iOS Dev Nugget 142 Grand Central DispatchJun 22, 2015
iOS Dev Nugget 141 Great Swift Standard Library Examples Covered in Playground (Swift 2.0)Jun 01, 2015
iOS Dev Nugget 138 Interoperability: Using Enumerations Defined In Objective-C from SwiftMay 27, 2015
iOS Dev Nugget 137 Named Tuple ElementsMay 19, 2015
iOS Dev Nugget 136 Auto Layout with CartographyMay 13, 2015
iOS Dev Nugget 135 CAShapeLayer, Animated Views and XCPShowView()Apr 29, 2015
iOS Dev Nugget 133 Dollar.swiftApr 22, 2015
iOS Dev Nugget 132 XCPCaptureValue in Swift PlaygroundsApr 14, 2015
iOS Dev Nugget 131 Running Asynchronous Code in Swift PlaygroundsApr 03, 2015
iOS Dev Nugget 129 Browsing the Swift Standard LibraryFeb 27, 2015
iOS Dev Nugget 124 performSelector:withObject:afterDelay: in SwiftFeb 20, 2015
iOS Dev Nugget 123 Using dynamicType in Swift
Dec 26, 2014 by Hwee-Boon Yar
Since the first public release of the iOS SDK, developers have been able to display preferences in the Settings app for our 3rd-party apps. This also presents a good outlet to display information that isn't of much use within the app itself such as app version number, acknowledgments and open source code attributions.
Create a Settings Bundle (via Xcode or manually create a folder and rename it to have the .bundle file extension) and have Root.plist as:
<?xml version="1.0" encoding="UTF-8"?>
<!DOCTYPE plist PUBLIC "-//Apple//DTD PLIST 1.0//EN" "http://www.apple.com/DTDs/PropertyList-1.0.dtd">
<plist version="1.0">
<dict>
<key>PreferenceSpecifiers</key>
<array>
<dict>
<key>Title</key>
<string>About</string>
<key>Type</key>
<string>PSGroupSpecifier</string>
</dict>
<dict>
<key>DefaultValue</key>
<string>1.0</string>
<key>Key</key>
<string>AppVersion</string>
<key>Title</key>
<string>Version</string>
<key>Type</key>
<string>PSTitleValueSpecifier</string>
</dict>
<dict>
<key>File</key>
<string> Acknowledgments </string>
<key>Title</key>
<string>Acknowledgments</string>
<key>Type</key>
<string>PSChildPaneSpecifier</string>
</dict>
</array>
<key>StringsTable</key>
<string>Root</string>
</dict>
</plist>
It also refers to Acknowledgments.plist:
<?xml version="1.0" encoding="UTF-8"?>
<!DOCTYPE plist PUBLIC "-//Apple//DTD PLIST 1.0//EN" "http://www.apple.com/DTDs/PropertyList-1.0.dtd">
<plist version="1.0">
<dict>
<key>StringsTable</key>
<string>Root</string>
<key>Title</key>
<string>Acknowledgments</string>
<key>PreferenceSpecifiers</key>
<array>
<dict>
<key>Type</key>
<string>PSGroupSpecifier</string>
<key>FooterText</key>
<string>Acknowledgments and attribution goes here. Remember you can localize this</string>
</dict>
</array>
</dict>
</plist>
Like this post? Follow me @hboon on Twitter.
Related
Aug 15, 2018
iOS Dev Nugget 305 Declaring Distinct Types from General TypesJul 24, 2018
iOS Dev Nugget 302 RealmJun 09, 2018
iOS Dev Nugget 295 SwifterSwiftMay 23, 2018
iOS Dev Nugget 293 iOSSnapshotTestCase (was FBSnapshotTestCase)Mar 15, 2018
iOS Dev Nugget 283 Eureka for FormsFeb 28, 2018
iOS Dev Nugget 281 Use R.swift for Static References to Resources Like ImagesFeb 21, 2018
iOS Dev Nugget 280 Using Custom Fonts Without Updating Info.plist ManuallyDec 06, 2017
iOS Dev Nugget 269 Including Finger Touches in App Preview VideosJul 11, 2017
iOS Dev Nugget 248 In-app Native RoutingMar 01, 2017
iOS Dev Nugget 229 PromisesFeb 22, 2017
iOS Dev Nugget 228 Recording and Playing Back Network CallsOct 23, 2016
iOS Dev Nugget 210 PMAlertControllerJun 03, 2016
iOS Dev Nugget 190 Quick Look Plug-in for Mobile Provisioning FilesMay 20, 2016
iOS Dev Nugget 188 SwiftLintApr 20, 2016
iOS Dev Nugget 184 Async LibraryAug 31, 2015
iOS Dev Nugget 151 More Wrappers for Keychain AccessAug 17, 2015
iOS Dev Nugget 149 Timepiece, a Swift Library for Handling DatesJul 27, 2015
iOS Dev Nugget 146 UIStackView and TZStackViewJul 21, 2015
iOS Dev Nugget 145 Listing Available FontsJul 05, 2015
iOS Dev Nugget 143 Don't Forget SQLiteJun 09, 2015
iOS Dev Nugget 139 Custom Build Configurations and Xcode SubprojectsMay 19, 2015
iOS Dev Nugget 136 Auto Layout with CartographyApr 29, 2015
iOS Dev Nugget 133 Dollar.swiftFeb 06, 2015
iOS Dev Nugget 121 InflectorKitDec 19, 2014
iOS Dev Nugget 114 Preview an Image for DebuggingDec 12, 2014
iOS Dev Nugget 113 GPUImage, a GPU-based Image and Video Processing FrameworkMay 30, 2014
iOS Dev Nugget 85 A More Customizable Button For Different StatesMay 02, 2014
iOS Dev Nugget 81 TMCache For In-Memory and Disk-backed CachingApr 18, 2014
iOS Dev Nugget 79 TweetBot Photo Flicking EffectMar 07, 2014
iOS Dev Nugget 73 Open Source Date Picker from SquareFeb 22, 2014
iOS Dev Nugget 71 TapJan 31, 2014
iOS Dev Nugget 68 Custom URL Schemes DirectoryDec 20, 2013
iOS Dev Nugget 62 Using PDF Instead of PNG Files for Resizable AssetsSep 20, 2013
iOS Dev Nugget 49 Wrapper to Get UIColor ComponentsMay 17, 2013
iOS Dev Nugget 32 FMDB: Thin Objective C Wrapper Around SQLiteOct 06, 2012
iOS Dev Nugget 1 Easy logging of values and objects
Dec 19, 2014 by Hwee-Boon Yar
Here's a simple, yet handy piece of code that has helped me many times over the years. It allows you to display an image on the iOS screen for debugging purposes. For example, if I let user pick a photo from their photo library and do some processing with it, during development, I might want to see if the result is correct, I can just run:
UIImage* img;// Image after processing
[img showGlobally];
And the image will be displayed. Tap on it to hide it. While newer versions of Xcode has the ability to inspect images in the debugger, this trick is still invaluable when you are on the device. e.g. you could hook it up to shake to display the image just processed, as part of your debugging toolset.
Here's the implementation:
@interface UIImage(UIImage_debug)
- (void)showGlobally;
@end
@implementation UIImage(UIImage_debug)
- (void)showGlobally {
UIView* parent = [[[UIApplication sharedApplication] delegate] window];
UIButton* btn = [UIButton buttonWithType:UIButtonTypeCustom];
[btn setImage:self forState:UIControlStateNormal];
btn.frame = parent.bounds;
[btn addTarget:btn action:@selector(removeFromSuperview) forControlEvents:UIControlEventTouchUpInside];
btn.backgroundColor = [UIColor blackColor];
btn.center = CGPointMake(parent.frame.size.width/2, parent.frame.size.height/2);
[parent addSubview:btn];
}
@end
Like this post? Follow me @hboon on Twitter.
Related
Aug 15, 2018
iOS Dev Nugget 305 Declaring Distinct Types from General TypesJul 24, 2018
iOS Dev Nugget 302 RealmJun 09, 2018
iOS Dev Nugget 295 SwifterSwiftMay 23, 2018
iOS Dev Nugget 293 iOSSnapshotTestCase (was FBSnapshotTestCase)Mar 15, 2018
iOS Dev Nugget 283 Eureka for FormsFeb 28, 2018
iOS Dev Nugget 281 Use R.swift for Static References to Resources Like ImagesFeb 21, 2018
iOS Dev Nugget 280 Using Custom Fonts Without Updating Info.plist ManuallyDec 06, 2017
iOS Dev Nugget 269 Including Finger Touches in App Preview VideosJul 11, 2017
iOS Dev Nugget 248 In-app Native RoutingMar 01, 2017
iOS Dev Nugget 229 PromisesFeb 22, 2017
iOS Dev Nugget 228 Recording and Playing Back Network CallsOct 23, 2016
iOS Dev Nugget 210 PMAlertControllerJun 03, 2016
iOS Dev Nugget 190 Quick Look Plug-in for Mobile Provisioning FilesMay 20, 2016
iOS Dev Nugget 188 SwiftLintApr 20, 2016
iOS Dev Nugget 184 Async LibraryAug 31, 2015
iOS Dev Nugget 151 More Wrappers for Keychain AccessAug 17, 2015
iOS Dev Nugget 149 Timepiece, a Swift Library for Handling DatesJul 27, 2015
iOS Dev Nugget 146 UIStackView and TZStackViewJul 21, 2015
iOS Dev Nugget 145 Listing Available FontsJul 05, 2015
iOS Dev Nugget 143 Don't Forget SQLiteJun 09, 2015
iOS Dev Nugget 139 Custom Build Configurations and Xcode SubprojectsMay 19, 2015
iOS Dev Nugget 136 Auto Layout with CartographyApr 29, 2015
iOS Dev Nugget 133 Dollar.swiftFeb 06, 2015
iOS Dev Nugget 121 InflectorKitDec 26, 2014
iOS Dev Nugget 115 Displaying Information in Settings AppDec 12, 2014
iOS Dev Nugget 113 GPUImage, a GPU-based Image and Video Processing FrameworkSep 19, 2014
iOS Dev Nugget 101 Asset CatalogMay 30, 2014
iOS Dev Nugget 85 A More Customizable Button For Different StatesMay 23, 2014
iOS Dev Nugget 84 One More Thing About +imageWithContentsOfFile: vs. +imageNamed:May 02, 2014
iOS Dev Nugget 81 TMCache For In-Memory and Disk-backed CachingApr 24, 2014
iOS Dev Nugget 80 Switching UIStatusBarStyle Based on UIImage ShownApr 18, 2014
iOS Dev Nugget 79 TweetBot Photo Flicking EffectMar 07, 2014
iOS Dev Nugget 73 Open Source Date Picker from SquareFeb 22, 2014
iOS Dev Nugget 71 TapJan 31, 2014
iOS Dev Nugget 68 Custom URL Schemes DirectoryDec 20, 2013
iOS Dev Nugget 62 Using PDF Instead of PNG Files for Resizable AssetsSep 20, 2013
iOS Dev Nugget 49 Wrapper to Get UIColor ComponentsSep 06, 2013
iOS Dev Nugget 47 Generating Copies of an Image With Different ColorsJun 08, 2013
iOS Dev Nugget 34 When do you use UIImage's +imageWithContentsOfFile: over +imageNamed:?May 17, 2013
iOS Dev Nugget 32 FMDB: Thin Objective C Wrapper Around SQLiteOct 06, 2012
iOS Dev Nugget 1 Easy logging of values and objects
Dec 12, 2014 by Hwee-Boon Yar
I have been doing some work on image filters recently and Brad Larson's GPUImage has been great for that. GPUImage provides a framework and built-in building blocks for creating image and video filters, utilizing OpenGL ES 2.0 (thus running on the GPU) underneath.
For a quick demo of what it allows you to do, check out the FilterShowcase sample project.
Like this post? Follow me @hboon on Twitter.
Related
Aug 15, 2018
iOS Dev Nugget 305 Declaring Distinct Types from General TypesJul 24, 2018
iOS Dev Nugget 302 RealmJun 09, 2018
iOS Dev Nugget 295 SwifterSwiftMay 23, 2018
iOS Dev Nugget 293 iOSSnapshotTestCase (was FBSnapshotTestCase)Mar 15, 2018
iOS Dev Nugget 283 Eureka for FormsFeb 28, 2018
iOS Dev Nugget 281 Use R.swift for Static References to Resources Like ImagesFeb 21, 2018
iOS Dev Nugget 280 Using Custom Fonts Without Updating Info.plist ManuallyDec 06, 2017
iOS Dev Nugget 269 Including Finger Touches in App Preview VideosJul 11, 2017
iOS Dev Nugget 248 In-app Native RoutingMar 01, 2017
iOS Dev Nugget 229 PromisesFeb 22, 2017
iOS Dev Nugget 228 Recording and Playing Back Network CallsOct 23, 2016
iOS Dev Nugget 210 PMAlertControllerJun 03, 2016
iOS Dev Nugget 190 Quick Look Plug-in for Mobile Provisioning FilesMay 20, 2016
iOS Dev Nugget 188 SwiftLintApr 20, 2016
iOS Dev Nugget 184 Async LibraryAug 31, 2015
iOS Dev Nugget 151 More Wrappers for Keychain AccessAug 17, 2015
iOS Dev Nugget 149 Timepiece, a Swift Library for Handling DatesJul 27, 2015
iOS Dev Nugget 146 UIStackView and TZStackViewJul 21, 2015
iOS Dev Nugget 145 Listing Available FontsJul 05, 2015
iOS Dev Nugget 143 Don't Forget SQLiteJun 09, 2015
iOS Dev Nugget 139 Custom Build Configurations and Xcode SubprojectsMay 19, 2015
iOS Dev Nugget 136 Auto Layout with CartographyApr 29, 2015
iOS Dev Nugget 133 Dollar.swiftFeb 06, 2015
iOS Dev Nugget 121 InflectorKitDec 26, 2014
iOS Dev Nugget 115 Displaying Information in Settings AppDec 19, 2014
iOS Dev Nugget 114 Preview an Image for DebuggingMay 30, 2014
iOS Dev Nugget 85 A More Customizable Button For Different StatesMay 02, 2014
iOS Dev Nugget 81 TMCache For In-Memory and Disk-backed CachingApr 18, 2014
iOS Dev Nugget 79 TweetBot Photo Flicking EffectMar 07, 2014
iOS Dev Nugget 73 Open Source Date Picker from SquareFeb 22, 2014
iOS Dev Nugget 71 TapJan 31, 2014
iOS Dev Nugget 68 Custom URL Schemes DirectoryDec 20, 2013
iOS Dev Nugget 62 Using PDF Instead of PNG Files for Resizable AssetsSep 20, 2013
iOS Dev Nugget 49 Wrapper to Get UIColor ComponentsMay 17, 2013
iOS Dev Nugget 32 FMDB: Thin Objective C Wrapper Around SQLiteOct 06, 2012
iOS Dev Nugget 1 Easy logging of values and objects
Dec 05, 2014 by Hwee-Boon Yar
Trouble remembering format specifiers for numbers in NSLog, etc? Check out this neat trick from Brent Simmons:
NSLog(@"t: %@", @([d2 timeIntervalSinceDate:d]));
Basically, covert them to NSNumber using @() and use the format specifier %@, which is for objects.
Like this post? Follow me @hboon on Twitter.
Nov 28, 2014 by Hwee-Boon Yar
Short one this week. iOS Support Matrix is a handy graphic listing every major iOS release and which devices are supported. Includes a downloadable PDF at the bottom.
Like this post? Follow me @hboon on Twitter.
Related
Sep 28, 2018
iOS Dev Nugget 311 jqJul 08, 2018
iOS Dev Nugget 299 CurryingJun 01, 2018
iOS Dev Nugget 294 Core Data EditorMar 22, 2018
iOS Dev Nugget 284 Use Shell Aliases for Git commandsDec 20, 2017
iOS Dev Nugget 271 Zhi — Live Reloading Auto Layout Constraints and moreOct 18, 2017
iOS Dev Nugget 262 Apple Device Names APIAug 23, 2017
iOS Dev Nugget 254 Paw, for Working with APIsApr 26, 2017
iOS Dev Nugget 237 mas-cliApr 19, 2017
iOS Dev Nugget 236 Look up Error CodesFeb 09, 2017
iOS Dev Nugget 226 React NativeJul 09, 2016
iOS Dev Nugget 196 Rename Refactoring for Swift CodeJul 06, 2016
iOS Dev Nugget 195 Tools of the TradeMay 06, 2016
iOS Dev Nugget 186 Injection for XcodeFeb 03, 2016
iOS Dev Nugget 173 Xcode Package Manager, AlcatrazJan 11, 2016
iOS Dev Nugget 170 HomebrewJan 05, 2016
iOS Dev Nugget 169 fastlane: deliverSep 07, 2015
iOS Dev Nugget 152 Lossy PNG CompressionAug 07, 2015
iOS Dev Nugget 147 NSRegularExpression and NSDataDetectorMar 06, 2015
iOS Dev Nugget 125 View Debugging in XcodeFeb 13, 2015
iOS Dev Nugget 122 Importing Many Test Photos into iOS Simulator IIOct 24, 2014
iOS Dev Nugget 106 Command Line Access to Developer PortalOct 17, 2014
iOS Dev Nugget 105 Try FLEXSep 12, 2014
iOS Dev Nugget 100 Try RevealSep 05, 2014
iOS Dev Nugget 99 Try PaintCodeAug 15, 2014
iOS Dev Nugget 96 Jack, A Native App For iTunes ConnectJul 04, 2014
iOS Dev Nugget 90 Full-Text Searchable WWDC Video Text TranscriptsApr 04, 2014
iOS Dev Nugget 77 RubyMotion Tutorial For Objective C DevelopersJan 17, 2014
iOS Dev Nugget 66 JBChartView for ChartingJan 04, 2014
iOS Dev Nugget 64 Placeholder Views Using PAPlaceholderDec 27, 2013
iOS Dev Nugget 63 Update Your iOS Development ToolboxOct 18, 2013
iOS Dev Nugget 53 Try Kaleidoscope, File Comparison for MacOct 11, 2013
iOS Dev Nugget 52 Set Up Crashlytics For Ad Hoc and App Store Builds OnlyJun 21, 2013
iOS Dev Nugget 36 Use TestFlight for Ad Hoc BuildsMay 11, 2013
iOS Dev Nugget 31 3rd Party Documentation ViewersMar 10, 2013
iOS Dev Nugget 22 Try AppCodeJan 05, 2013
iOS Dev Nugget 14 Charles Web Debugging Proxy
Nov 21, 2014 by Hwee-Boon Yar
Sometimes given a photo, you want to (1) generate a smaller version of the photo and (2) crop it so it has a specific dimension, preserving it's aspect ratio and display the photo. The code to do this separately isn't difficult and there are many versions of it available online.
So you can either do:
(1) Crop then
(2) Resize
or
(2) Resize then
(1) Crop
Intuitively, it might seem there isn't much of a difference, but if you factor in the fact that iPhones (as of iPhone 6 Plus) can shoot panoramas as big as 43 megapixels or ~11-12 MB, choosing the right approach reduces the chance of crashing due to running out of memory.
With some profiling, you'll find that generally, it's better to do:
(2) Resize then
(1) Crop
You can't always do a resize, skip the crop, utilizing contentMode=contentUIViewContentModeScaleAspectFill because you might want to process the result, say with a mask.
Like this post? Follow me @hboon on Twitter.
Nov 14, 2014 by Hwee-Boon Yar
Caleb Davenport has a great post on using UIKeyCommand to implement hardware keyboard shortcuts (now a broken link).
Beside its intended use, UIKeyCommand also presents a great way for you to add debugging shortcuts — that you remove when you ship — to your app. For example, you can assign a shortcut to print out the model details of your current screen or to run -exerciseAmbiguityInLayout if you use Auto Layout.
#ifdef DEBUG
//Subclass of UIResponder
- (BOOL)canBecomeFirstResponder {
return YES;
}
- (NSArray *)keyCommands {
return @[
[UIKeyCommand keyCommandWithInput:@"+" modifierFlags:0 action:@selector(callExerciseAmbiguityInLayoutRecursively)],
[UIKeyCommand keyCommandWithInput:@"-" modifierFlags:0 action:@selector(displayModelData)],
];
}
#endif
Like this post? Follow me @hboon on Twitter.
Nov 07, 2014 by Hwee-Boon Yar
A quick tip for developing extensions in iOS 8:
When developing iOS action extensions and today widgets, I'm finding that it's sometimes useful – where possible – to set up your app to launch your extension's view controller as your app's root view controller with a few hard-wired mock inputs so you can develop your extension faster than if it was launched as an extension.
You can check the extensionContext property of your root view controller. If it's nil, you are running in the app.
Like this post? Follow me @hboon on Twitter.
Oct 31, 2014 by Hwee-Boon Yar
One simple and extremely helpful improvement introduced in iOS 8 SDK is the auto-sizing of UITableViewCells. Prior to iOS 8, if you had a UITableView that has cells with varying heights, you'd have to implement UITableViewDelegate's -tableView:heightForRowAtIndexPath: and return a height based on -systemLayoutSizeFittingSize:, potentially caching the heights yourself.
In iOS 8, this becomes much easier if you do the following:
- Use Auto Layout for your UITableViewCell (subclass).
- Set UITableView.rowHeight = UITableViewAutomaticDimension
- Set UITableView.estimatedRowHeight or implement -tableView:estimatedHeightForRowAtIndexPath:
You don't (and shouldn't) implement -tableView:heightForRowAtIndexPath: anymore!
Like this post? Follow me @hboon on Twitter.
Related
Oct 26, 2018
iOS Dev Nugget 313 Showing a Full Height UITableViewJun 18, 2018
iOS Dev Nugget 296 Strange UITableView Jumping Behavior when ReloadingMay 03, 2018
iOS Dev Nugget 290 Auto Layout with UIScrollViewApr 07, 2018
iOS Dev Nugget 286 Use Auto Layout for Bottom BarDec 20, 2017
iOS Dev Nugget 271 Zhi — Live Reloading Auto Layout Constraints and moreJan 17, 2016
iOS Dev Nugget 171 Dynamic TypeDec 23, 2015
iOS Dev Nugget 167 Animation with Auto LayoutJul 27, 2015
iOS Dev Nugget 146 UIStackView and TZStackViewJan 09, 2015
iOS Dev Nugget 117 UIView-Encapsulated-Layout-HeightJun 27, 2014
iOS Dev Nugget 89 When to Deselect Table View CellJun 06, 2014
iOS Dev Nugget 86 Using UITableView -registerClass:forCellReuseIdentifier: with UITableViewCellSep 27, 2013
iOS Dev Nugget 50 UITableView -registerClassforCellReuseIdentifier:
Oct 24, 2014 by Hwee-Boon Yar
In #96: Jack, A Native App For iTunes Connect, I mentioned Apple's Transporter command line tool which lets you upload content to iTunes Connect for app submission. If you need command line access to the iOS developer portal for managing certificates, app identifiers, devices and provisioning profiles, check out Cupertino from @mattt. It's available for install as a Ruby gem:
gem install cupertino
Optional login with:
ios login
List your app identifiers:
ios app_ids:list
It's really handy for example when you want to add a couple of new device identifiers to several provisioning profiles.
Check out the README for more details.
Like this post? Follow me @hboon on Twitter.
Related
Sep 28, 2018
iOS Dev Nugget 311 jqJul 08, 2018
iOS Dev Nugget 299 CurryingJun 01, 2018
iOS Dev Nugget 294 Core Data EditorMar 22, 2018
iOS Dev Nugget 284 Use Shell Aliases for Git commandsDec 20, 2017
iOS Dev Nugget 271 Zhi — Live Reloading Auto Layout Constraints and moreOct 18, 2017
iOS Dev Nugget 262 Apple Device Names APIAug 23, 2017
iOS Dev Nugget 254 Paw, for Working with APIsApr 26, 2017
iOS Dev Nugget 237 mas-cliApr 19, 2017
iOS Dev Nugget 236 Look up Error CodesFeb 09, 2017
iOS Dev Nugget 226 React NativeJul 09, 2016
iOS Dev Nugget 196 Rename Refactoring for Swift CodeJul 06, 2016
iOS Dev Nugget 195 Tools of the TradeMay 06, 2016
iOS Dev Nugget 186 Injection for XcodeFeb 03, 2016
iOS Dev Nugget 173 Xcode Package Manager, AlcatrazJan 11, 2016
iOS Dev Nugget 170 HomebrewJan 05, 2016
iOS Dev Nugget 169 fastlane: deliverSep 07, 2015
iOS Dev Nugget 152 Lossy PNG CompressionAug 07, 2015
iOS Dev Nugget 147 NSRegularExpression and NSDataDetectorMar 06, 2015
iOS Dev Nugget 125 View Debugging in XcodeFeb 13, 2015
iOS Dev Nugget 122 Importing Many Test Photos into iOS Simulator IINov 28, 2014
iOS Dev Nugget 111 iOS Support MatrixOct 17, 2014
iOS Dev Nugget 105 Try FLEXSep 12, 2014
iOS Dev Nugget 100 Try RevealSep 05, 2014
iOS Dev Nugget 99 Try PaintCodeAug 15, 2014
iOS Dev Nugget 96 Jack, A Native App For iTunes ConnectJul 04, 2014
iOS Dev Nugget 90 Full-Text Searchable WWDC Video Text TranscriptsApr 04, 2014
iOS Dev Nugget 77 RubyMotion Tutorial For Objective C DevelopersJan 17, 2014
iOS Dev Nugget 66 JBChartView for ChartingJan 04, 2014
iOS Dev Nugget 64 Placeholder Views Using PAPlaceholderDec 27, 2013
iOS Dev Nugget 63 Update Your iOS Development ToolboxOct 18, 2013
iOS Dev Nugget 53 Try Kaleidoscope, File Comparison for MacOct 11, 2013
iOS Dev Nugget 52 Set Up Crashlytics For Ad Hoc and App Store Builds OnlyJun 21, 2013
iOS Dev Nugget 36 Use TestFlight for Ad Hoc BuildsMay 11, 2013
iOS Dev Nugget 31 3rd Party Documentation ViewersMar 10, 2013
iOS Dev Nugget 22 Try AppCodeJan 05, 2013
iOS Dev Nugget 14 Charles Web Debugging Proxy
Oct 17, 2014 by Hwee-Boon Yar
In #100, I mentioned Reveal which provides a web browser-like development tool, that lets you examine and manipulate your app's view hierarchy.
Flipboard has also open sourced FLEX, a debugging tool that serves a similar purpose, but runs in-app, so it's possible to rig your app so that when you are testing it on your device — it works in the simulator too – and spot something wrong, you can bring up the toolbar and examine your views.
Check it out!
Like this post? Follow me @hboon on Twitter.
Related
Sep 28, 2018
iOS Dev Nugget 311 jqJul 08, 2018
iOS Dev Nugget 299 CurryingJun 01, 2018
iOS Dev Nugget 294 Core Data EditorMar 22, 2018
iOS Dev Nugget 284 Use Shell Aliases for Git commandsDec 20, 2017
iOS Dev Nugget 271 Zhi — Live Reloading Auto Layout Constraints and moreOct 18, 2017
iOS Dev Nugget 262 Apple Device Names APIAug 23, 2017
iOS Dev Nugget 254 Paw, for Working with APIsApr 26, 2017
iOS Dev Nugget 237 mas-cliApr 19, 2017
iOS Dev Nugget 236 Look up Error CodesApr 13, 2017
iOS Dev Nugget 235 Testing Localization Using Launch Arguments (III)Feb 09, 2017
iOS Dev Nugget 226 React NativeJul 09, 2016
iOS Dev Nugget 196 Rename Refactoring for Swift CodeJul 06, 2016
iOS Dev Nugget 195 Tools of the TradeMay 06, 2016
iOS Dev Nugget 186 Injection for XcodeFeb 03, 2016
iOS Dev Nugget 173 Xcode Package Manager, AlcatrazJan 11, 2016
iOS Dev Nugget 170 HomebrewJan 05, 2016
iOS Dev Nugget 169 fastlane: deliverNov 25, 2015
iOS Dev Nugget 163 Testing Localization Using Launch Arguments (II)Sep 15, 2015
iOS Dev Nugget 153 Shortcut to Open Log in SimulatorSep 07, 2015
iOS Dev Nugget 152 Lossy PNG CompressionAug 07, 2015
iOS Dev Nugget 147 NSRegularExpression and NSDataDetectorMay 13, 2015
iOS Dev Nugget 135 CAShapeLayer, Animated Views and XCPShowView()Mar 06, 2015
iOS Dev Nugget 125 View Debugging in XcodeFeb 13, 2015
iOS Dev Nugget 122 Importing Many Test Photos into iOS Simulator IINov 28, 2014
iOS Dev Nugget 111 iOS Support MatrixOct 24, 2014
iOS Dev Nugget 106 Command Line Access to Developer PortalOct 03, 2014
iOS Dev Nugget 103 Testing Localization Using Launch ArgumentsSep 12, 2014
iOS Dev Nugget 100 Try RevealSep 05, 2014
iOS Dev Nugget 99 Try PaintCodeAug 15, 2014
iOS Dev Nugget 96 Jack, A Native App For iTunes ConnectJul 04, 2014
iOS Dev Nugget 90 Full-Text Searchable WWDC Video Text TranscriptsJun 13, 2014
iOS Dev Nugget 87 What's New in iOS 8Apr 04, 2014
iOS Dev Nugget 77 RubyMotion Tutorial For Objective C DevelopersMar 28, 2014
iOS Dev Nugget 76 Importing Many Test Photos into iOS SimulatorJan 17, 2014
iOS Dev Nugget 66 JBChartView for ChartingJan 04, 2014
iOS Dev Nugget 64 Placeholder Views Using PAPlaceholderDec 27, 2013
iOS Dev Nugget 63 Update Your iOS Development ToolboxOct 18, 2013
iOS Dev Nugget 53 Try Kaleidoscope, File Comparison for MacOct 11, 2013
iOS Dev Nugget 52 Set Up Crashlytics For Ad Hoc and App Store Builds OnlyJun 21, 2013
iOS Dev Nugget 36 Use TestFlight for Ad Hoc BuildsMay 11, 2013
iOS Dev Nugget 31 3rd Party Documentation ViewersMay 04, 2013
iOS Dev Nugget 30 Shortcut key to toggle slow animations in the iOS simulator (part II)Apr 27, 2013
iOS Dev Nugget 29 Simulating a Custom LocationApr 12, 2013
iOS Dev Nugget 27 Two-finger touch in SimulatorMar 31, 2013
iOS Dev Nugget 25 Watch out for hotspot and in-call status bar heightMar 22, 2013
iOS Dev Nugget 24 Take Screenshots in the SimulatorMar 10, 2013
iOS Dev Nugget 22 Try AppCodeJan 05, 2013
iOS Dev Nugget 14 Charles Web Debugging ProxyDec 28, 2012
iOS Dev Nugget 13 Simulating a slow cellular network with Network Link ConditionerNov 23, 2012
iOS Dev Nugget 8 Copy and paste from/to the iOS SimulatorNov 09, 2012
iOS Dev Nugget 6 Open app in Simulator with Finder
Oct 10, 2014 by Hwee-Boon Yar
In #20 Do not hardcode keyboard height, we talked about not hardcoding the keyboard height when we resize views in response to keyboard showing or hiding. This is especially important since we have keyboards of varying heights for a long time now. However, we hardcoded the animation parameters in the sample code. This is fragile and can be broken especially across iOS upgrades. However, this can be improved easily.
Just read the values for the animation duration and animation curve from the userInfo property of the notification with the keys UIKeyboardAnimationDurationUserInfoKey and UIKeyboardAnimationCurveUserInfoKey respectively and use them in the animation calls. Remember to do this both when the keyword is appearing and disappearing.
So you would have something like:
[UIView animateWithDuration:aNotification.userInfo[UIKeyboardAnimationDurationUserInfoKey] delay:0 options:aNotification.userInfo[UIKeyboardAnimationCurveUserInfoKey] animations:^{
//Make your changes here
} completion:nil];
Like this post? Follow me @hboon on Twitter.
Oct 03, 2014 by Hwee-Boon Yar
App localization is important, but tedious to test. One quick way is test localizations in the simulator, using launch arguments. In Xcode, click on Edit Scheme > Run > Arguments and add the following to Arguments Passed On Launch:
-AppleLanguages (en)
Replace en with the localization (zh, es, etc) you want to test e.g.
Simplified Chinese:
-AppleLanguages (zh)
German:
-AppleLanguages (de)
French:
-AppleLanguages (fr)
Like this post? Follow me @hboon on Twitter.
Related
Apr 13, 2017
iOS Dev Nugget 235 Testing Localization Using Launch Arguments (III)Nov 25, 2015
iOS Dev Nugget 163 Testing Localization Using Launch Arguments (II)Sep 15, 2015
iOS Dev Nugget 153 Shortcut to Open Log in SimulatorMay 13, 2015
iOS Dev Nugget 135 CAShapeLayer, Animated Views and XCPShowView()Mar 06, 2015
iOS Dev Nugget 125 View Debugging in XcodeFeb 13, 2015
iOS Dev Nugget 122 Importing Many Test Photos into iOS Simulator IIOct 17, 2014
iOS Dev Nugget 105 Try FLEXJun 13, 2014
iOS Dev Nugget 87 What's New in iOS 8Mar 28, 2014
iOS Dev Nugget 76 Importing Many Test Photos into iOS SimulatorMay 04, 2013
iOS Dev Nugget 30 Shortcut key to toggle slow animations in the iOS simulator (part II)Apr 27, 2013
iOS Dev Nugget 29 Simulating a Custom LocationApr 12, 2013
iOS Dev Nugget 27 Two-finger touch in SimulatorMar 31, 2013
iOS Dev Nugget 25 Watch out for hotspot and in-call status bar heightMar 22, 2013
iOS Dev Nugget 24 Take Screenshots in the SimulatorJan 05, 2013
iOS Dev Nugget 14 Charles Web Debugging ProxyDec 28, 2012
iOS Dev Nugget 13 Simulating a slow cellular network with Network Link ConditionerNov 23, 2012
iOS Dev Nugget 8 Copy and paste from/to the iOS SimulatorNov 09, 2012
iOS Dev Nugget 6 Open app in Simulator with Finder
Sep 26, 2014 by Hwee-Boon Yar
With the release of the iPhone 6 and iPhone 6 Plus, there are 2 more iOS device screen resolutions – 375x667pts and 414x736pts respectively. When you run an app built for iPhone on the iPhone 6 and iPhone Plus, be it on the device or simulator, your app will see the resolution of 320x568pts unless you supply launch images of the correct size. If you look at most of the apps at this time of writing (the iPhone 6 and iPhone 6 Plus is only a few days old), the blown up apps work because of this behavior. While they look better than the 2x mode in iPad, the blown up status bar and keyboard is a dead-giveaway. Here's what you need to do to make your apps run at their native resolution:
- Include launch images called
Default-667h@2x.png and Default-736h@3x.png.
-
Update your info.plist to include the UILaunchImages key. Here's a sample including the common combinations:
UILaunchImages
UILaunchImageSize
{320, 480}
UILaunchImageName
Default-480h
UILaunchImageMinimumOSVersion
7.0
UILaunchImageOrientation
Portrait
UILaunchImageSize
{320, 568}
UILaunchImageName
Default-568h
UILaunchImageMinimumOSVersion
7.0
UILaunchImageOrientation
Portrait
UILaunchImageSize
{375, 667}
UILaunchImageName
Default-667h
UILaunchImageMinimumOSVersion
8.0
UILaunchImageOrientation
Portrait
UILaunchImageSize
{414, 736}
UILaunchImageName
Default-736h
UILaunchImageMinimumOSVersion
8.0
UILaunchImageOrientation
Portrait
UILaunchImageSize
{768, 1024}
UILaunchImageName
Default
UILaunchImageMinimumOSVersion
7.0
UILaunchImageOrientation
Portrait
When you rebuild and run your apps, you'll see that they now report the native resolution.
Like this post? Follow me @hboon on Twitter.
Sep 19, 2014 by Hwee-Boon Yar
In a nutshell, Asset Catalogs lets you manage image assets — app icons, launch images and image — you use in your app.
There isn't anything that you absolutely need to use Asset Catalogs for. But there's a few advantages to using Asset Catalogs:
- By grouping image assets into image sets, it is slightly easier to navigate your images.
- Image assets now support vector PDFs. You create a PDF — with dimensions suitable for 1x — and drop it into a image set, say, saveButton. i.e., you don't have to specify @2x or @3x versions in that image set. During build time, Xcode will automatically generate 1x, 2x and 3x images — i.e. the equivalent of saveButton.png, saveButton@2x.png and saveButton@3x.png automatically. You only need to write [UIImage imageNamed:@"saveButton"], and it will automatically pick up the right version. Note that Xcode generate static versions of the files during build time, so you can't expect to stretch the images in your code and expect it to still have high resolution. (It's different for OS X though, the vector version is actually preserved).
- The slice tool (In Xcode, click on an image set in an asset catalog and choose Editor > Show Slicing) is very useful for specifying how you slice an image. Your designer can create full sized versions of an image and you can specify the cap inset in Xcode.
If you haven't been using Asset Catalogs, now is a good time to start.
Like this post? Follow me @hboon on Twitter.
Sep 12, 2014 by Hwee-Boon Yar
It's been a busy week, so I'm going to leave you with another tool recommendation – Reveal.
One of the most powerful functionality available to Web developers through tools such as Firebug and WebKit Inspector is being able to inspect the DOM.
Reveal app provides that functionality for iOS apps. I have been working on an iOS app with a fairly elaborate UI composed of a deep UIView structure. Reveal app helps incredibly in examining the view hierarchy, especially with things like finding out which is that rogue view which is showing up when it shouldn't.
There's a 30 day trial available.
Like this post? Follow me @hboon on Twitter.
Related
Sep 28, 2018
iOS Dev Nugget 311 jqJul 08, 2018
iOS Dev Nugget 299 CurryingJun 01, 2018
iOS Dev Nugget 294 Core Data EditorMar 22, 2018
iOS Dev Nugget 284 Use Shell Aliases for Git commandsDec 20, 2017
iOS Dev Nugget 271 Zhi — Live Reloading Auto Layout Constraints and moreOct 18, 2017
iOS Dev Nugget 262 Apple Device Names APIAug 23, 2017
iOS Dev Nugget 254 Paw, for Working with APIsApr 26, 2017
iOS Dev Nugget 237 mas-cliApr 19, 2017
iOS Dev Nugget 236 Look up Error CodesFeb 09, 2017
iOS Dev Nugget 226 React NativeJul 09, 2016
iOS Dev Nugget 196 Rename Refactoring for Swift CodeJul 06, 2016
iOS Dev Nugget 195 Tools of the TradeMay 06, 2016
iOS Dev Nugget 186 Injection for XcodeFeb 03, 2016
iOS Dev Nugget 173 Xcode Package Manager, AlcatrazJan 11, 2016
iOS Dev Nugget 170 HomebrewJan 05, 2016
iOS Dev Nugget 169 fastlane: deliverSep 07, 2015
iOS Dev Nugget 152 Lossy PNG CompressionAug 07, 2015
iOS Dev Nugget 147 NSRegularExpression and NSDataDetectorMar 06, 2015
iOS Dev Nugget 125 View Debugging in XcodeFeb 13, 2015
iOS Dev Nugget 122 Importing Many Test Photos into iOS Simulator IINov 28, 2014
iOS Dev Nugget 111 iOS Support MatrixOct 24, 2014
iOS Dev Nugget 106 Command Line Access to Developer PortalOct 17, 2014
iOS Dev Nugget 105 Try FLEXSep 05, 2014
iOS Dev Nugget 99 Try PaintCodeAug 15, 2014
iOS Dev Nugget 96 Jack, A Native App For iTunes ConnectJul 04, 2014
iOS Dev Nugget 90 Full-Text Searchable WWDC Video Text TranscriptsApr 04, 2014
iOS Dev Nugget 77 RubyMotion Tutorial For Objective C DevelopersJan 17, 2014
iOS Dev Nugget 66 JBChartView for ChartingJan 04, 2014
iOS Dev Nugget 64 Placeholder Views Using PAPlaceholderDec 27, 2013
iOS Dev Nugget 63 Update Your iOS Development ToolboxOct 18, 2013
iOS Dev Nugget 53 Try Kaleidoscope, File Comparison for MacOct 11, 2013
iOS Dev Nugget 52 Set Up Crashlytics For Ad Hoc and App Store Builds OnlyJun 21, 2013
iOS Dev Nugget 36 Use TestFlight for Ad Hoc BuildsMay 11, 2013
iOS Dev Nugget 31 3rd Party Documentation ViewersMar 10, 2013
iOS Dev Nugget 22 Try AppCodeJan 05, 2013
iOS Dev Nugget 14 Charles Web Debugging Proxy
Sep 05, 2014 by Hwee-Boon Yar
If you develop intricate user interfaces, you should check out PaintCode.
In a nutshell, it converts drawings of UI elements you make with it into code.
There's a trial version available or you can purchase it on the app stor]
Like this post? Follow me @hboon on Twitter.
Related
Sep 28, 2018
iOS Dev Nugget 311 jqJul 08, 2018
iOS Dev Nugget 299 CurryingJun 01, 2018
iOS Dev Nugget 294 Core Data EditorMar 22, 2018
iOS Dev Nugget 284 Use Shell Aliases for Git commandsDec 20, 2017
iOS Dev Nugget 271 Zhi — Live Reloading Auto Layout Constraints and moreOct 18, 2017
iOS Dev Nugget 262 Apple Device Names APIAug 23, 2017
iOS Dev Nugget 254 Paw, for Working with APIsApr 26, 2017
iOS Dev Nugget 237 mas-cliApr 19, 2017
iOS Dev Nugget 236 Look up Error CodesFeb 09, 2017
iOS Dev Nugget 226 React NativeJul 09, 2016
iOS Dev Nugget 196 Rename Refactoring for Swift CodeJul 06, 2016
iOS Dev Nugget 195 Tools of the TradeMay 06, 2016
iOS Dev Nugget 186 Injection for XcodeFeb 03, 2016
iOS Dev Nugget 173 Xcode Package Manager, AlcatrazJan 11, 2016
iOS Dev Nugget 170 HomebrewJan 05, 2016
iOS Dev Nugget 169 fastlane: deliverSep 07, 2015
iOS Dev Nugget 152 Lossy PNG CompressionAug 07, 2015
iOS Dev Nugget 147 NSRegularExpression and NSDataDetectorMar 06, 2015
iOS Dev Nugget 125 View Debugging in XcodeFeb 13, 2015
iOS Dev Nugget 122 Importing Many Test Photos into iOS Simulator IINov 28, 2014
iOS Dev Nugget 111 iOS Support MatrixOct 24, 2014
iOS Dev Nugget 106 Command Line Access to Developer PortalOct 17, 2014
iOS Dev Nugget 105 Try FLEXSep 12, 2014
iOS Dev Nugget 100 Try RevealAug 15, 2014
iOS Dev Nugget 96 Jack, A Native App For iTunes ConnectJul 04, 2014
iOS Dev Nugget 90 Full-Text Searchable WWDC Video Text TranscriptsApr 04, 2014
iOS Dev Nugget 77 RubyMotion Tutorial For Objective C DevelopersJan 17, 2014
iOS Dev Nugget 66 JBChartView for ChartingJan 04, 2014
iOS Dev Nugget 64 Placeholder Views Using PAPlaceholderDec 27, 2013
iOS Dev Nugget 63 Update Your iOS Development ToolboxOct 18, 2013
iOS Dev Nugget 53 Try Kaleidoscope, File Comparison for MacOct 11, 2013
iOS Dev Nugget 52 Set Up Crashlytics For Ad Hoc and App Store Builds OnlyJun 21, 2013
iOS Dev Nugget 36 Use TestFlight for Ad Hoc BuildsMay 11, 2013
iOS Dev Nugget 31 3rd Party Documentation ViewersMar 10, 2013
iOS Dev Nugget 22 Try AppCodeJan 05, 2013
iOS Dev Nugget 14 Charles Web Debugging Proxy
Aug 29, 2014 by Hwee-Boon Yar
Did you know that you can type to filter in the Xcode Jump Bar?
This is the Jump Bar:

And if you type while the Jump Bar is visible, it starts filtering:

Like this post? Follow me @hboon on Twitter.
Aug 22, 2014 by Hwee-Boon Yar
Sometimes, it's useful to be able to check which version of the app the user purchased. E.g. you might want to know if the user has purchased v1.3 and earlier of your app because you are adding a new feature but want to make it available as an IAP for new users but free for users who have bought the app earlier. You can do this with the Receipt Validation APIs introduced in iOS 7 by pulling the Original Application Version from the receipt. The process can be a little daunting, but libraries such as RMStore wrapped it up nicely.
With RMStore, you can do:
[[RMStore defaultStore] refreshReceiptOnSuccess:^{
RMAppReceipt* receipt = [RMAppReceipt bundleReceipt];
NSLog(@"originalAppVersion: %@", receipt.originalAppVersion);
} failure:^(NSError *error) {
//Something went wrong
}]
Like this post? Follow me @hboon on Twitter.
Aug 15, 2014 by Hwee-Boon Yar
Apple has a command-line tool called Transporter which bulk downloads and uploads meta data for your apps (i.e. a limited form of iTunes Connect).
If you are a prolific developer with many apps, Jack is a convenient OS X app built on-top of Transporter, so you can compose and upload your iOS and OS X app descriptions in a native OS X app offline and publish when you are ready.
Like this post? Follow me @hboon on Twitter.
Related
Sep 28, 2018
iOS Dev Nugget 311 jqJul 08, 2018
iOS Dev Nugget 299 CurryingJun 01, 2018
iOS Dev Nugget 294 Core Data EditorMar 22, 2018
iOS Dev Nugget 284 Use Shell Aliases for Git commandsDec 20, 2017
iOS Dev Nugget 271 Zhi — Live Reloading Auto Layout Constraints and moreOct 18, 2017
iOS Dev Nugget 262 Apple Device Names APIAug 23, 2017
iOS Dev Nugget 254 Paw, for Working with APIsApr 26, 2017
iOS Dev Nugget 237 mas-cliApr 19, 2017
iOS Dev Nugget 236 Look up Error CodesFeb 09, 2017
iOS Dev Nugget 226 React NativeJul 09, 2016
iOS Dev Nugget 196 Rename Refactoring for Swift CodeJul 06, 2016
iOS Dev Nugget 195 Tools of the TradeMay 06, 2016
iOS Dev Nugget 186 Injection for XcodeFeb 03, 2016
iOS Dev Nugget 173 Xcode Package Manager, AlcatrazJan 11, 2016
iOS Dev Nugget 170 HomebrewJan 05, 2016
iOS Dev Nugget 169 fastlane: deliverSep 07, 2015
iOS Dev Nugget 152 Lossy PNG CompressionAug 07, 2015
iOS Dev Nugget 147 NSRegularExpression and NSDataDetectorMar 06, 2015
iOS Dev Nugget 125 View Debugging in XcodeFeb 13, 2015
iOS Dev Nugget 122 Importing Many Test Photos into iOS Simulator IINov 28, 2014
iOS Dev Nugget 111 iOS Support MatrixOct 24, 2014
iOS Dev Nugget 106 Command Line Access to Developer PortalOct 17, 2014
iOS Dev Nugget 105 Try FLEXSep 12, 2014
iOS Dev Nugget 100 Try RevealSep 05, 2014
iOS Dev Nugget 99 Try PaintCodeJul 04, 2014
iOS Dev Nugget 90 Full-Text Searchable WWDC Video Text TranscriptsApr 04, 2014
iOS Dev Nugget 77 RubyMotion Tutorial For Objective C DevelopersJan 17, 2014
iOS Dev Nugget 66 JBChartView for ChartingJan 04, 2014
iOS Dev Nugget 64 Placeholder Views Using PAPlaceholderDec 27, 2013
iOS Dev Nugget 63 Update Your iOS Development ToolboxOct 18, 2013
iOS Dev Nugget 53 Try Kaleidoscope, File Comparison for MacOct 11, 2013
iOS Dev Nugget 52 Set Up Crashlytics For Ad Hoc and App Store Builds OnlyJun 21, 2013
iOS Dev Nugget 36 Use TestFlight for Ad Hoc BuildsMay 11, 2013
iOS Dev Nugget 31 3rd Party Documentation ViewersMar 10, 2013
iOS Dev Nugget 22 Try AppCodeJan 05, 2013
iOS Dev Nugget 14 Charles Web Debugging Proxy
Aug 08, 2014 by Hwee-Boon Yar
Blocks are a wonderful construct in ObjC and in certain cases, can help reduce boilerplate code. A good example is the BlocksKit library which adds block-based interfaces to Cocoa and Cocoa Touch classes.
Let's look at how you would normally use an UIAlertView. You show it by:
- (void)someFunc {
UIAlertView* alertView = [[UIAlertView alloc] initWithTitle:@"Title" message:@"Message" delegate:self cancelButtonTitle:@"Cancel" otherButtonTitles:@"Go", nil];
//alertView.tag = SOME_TAG; //Probably set a tag value if you are showing more than one alert view if the UIAlertView delegate is responsible for more than one UIAlertView
[alertView show];
}
And the delegate:
- (void)alertView:(UIAlertView*)alertView clickedButtonAtIndex:(NSInteger)buttonIndex {
//check alertView.tag if this delegate is responsible for more than one UIAlertView
if (buttonIndex != alertView.cancelButtonIndex) {
//Do something
}
}
Note that the code will get messier if the delegate has to handle more than one UIAlertView.
With BlocksKit, you'd do:
- (void)someFunc {
[UIAlertView showAlertViewWithTitle:@"Title" message:@"Message" cancelButtonTitle:@"Cancel" otherButtonTitles:@[@"Go"] handler:^(UIAlertView* alertView, NSInteger buttonIndex) {
if (buttonIndex != alertView.cancelButtonIndex) {
//Do something
}
}];
}
You don't have to implement the UIAlertViewDelegate and the handling code is localized to where the UIAlertView is shown.
BlocksKit contains lots of gems like this, such as NSDictionary+BlocksKit.h which adds Smalltalk-style selectors, such as -each:, -select:, -reject: to NSDictionary.
Check it out.
Like this post? Follow me @hboon on Twitter.
Aug 01, 2014 by Hwee-Boon Yar
In #42: #valueForKey on NSArrays, I described how you can use -valueForKey: on NSArray instances as a quick way to collect the property of every element in an array. There's more. If you look at the doc for NSKeyValueCoding protocol, you'll find this gem -valueForKeyPath:. You can do stuff like:
NSArray* managerLastNames = [departments valueForKeyPath:@"manager.lastName"];
and it will retrieve every department's manager's last name.
If you have an employees property that is an array, this will retrieve every employees last names, with the array structure preserved.
NSArray* employeeLastNames = [departments valueForKeyPath:@"employees.lastName"];
This works even if you have multiple layers of array properties.
Like this post? Follow me @hboon on Twitter.
Jul 25, 2014 by Hwee-Boon Yar
Objective C is a superset of the C programming language created by adding Smalltalk-style messaging support to C. Many programmers who come to Objective C without a good foundation of C don't have a good grasp of C pointers. When we write something like:
int i = 3;
i stores the value 3 at a position (address) somewhere in computer memory. This address is decided by the system and for clarity, we'll write it in hexadecimal. Let's say this address is 0x02. This means that if we look at the memory at location 0x02, we will see the value 3 stored in it.

int j = i;
The assignment operator copies the value of the right hand side to the left hand side. Thus, j has the value 3 too. This value of j (3) is stored in a different address – and let's say the address is 0x08 – than was used for storing the value of i (also 3).

int* k = &i;
k is a pointer. And &i refers to the address of i (i.e. 0x02). k's value is 0x02, since the assignment operator copies the value of the right hand side to the left hand side. i.e. k's value is an address (0x02). And let's say k's value itself is stored at address 0x12.

int m = *k;
*k is the syntax to read the value stored at the address represented by k's value. Because 3 is the value stored in the address 0x02 (k's value), m becomes 3. And let's say the value of m is stored at the address 0x16.

So you can now recognize that as Objective C programmers, we have always dealt with pointers:
UIViewController* vc = [UIViewController new];
vc is a pointer to a` UIViewController instance.
Which is why after running this:
UIViewController* anotherVC = vc;
Both vc and anotherVC refers to the same UIViewController. Because they are both pointers pointing to the same address which stores the UIViewController instance (or "value").
Indirection is a useful technique for changing the value of objects directly by writing to its address. i.e. this code:
*k = 9;
Will change the value at the address (0x02) stored by k. Since 0x02 is the address used by i, you will find that the value of i has changed from 3 to 9.

There isn't a limit to the number of levels of indirection. i.e. you can have a pointer to a pointer to a pointer to an int (or float, etc), but it can get harder to reason. 2 level of indirection is fairly common though, for example, NSFileManager has instance methods that uses this:
- (BOOL)createDirectoryAtPath:(NSString*)path
withIntermediateDirectories:(BOOL)createIntermediates
attributes:(NSDictionary*)attributes
error:(NSError**)error;
Notice that error is a pointer to a pointer to an NSError instance. You use the API with code like this:
NSError* error;
BOOL success = [[NSFileManager defaultManager]
createDirectoryAtPath:somePath
withIntermediateDirectories:YES
attributes:nil
error:&error];
//do something with error
This works because you pass in the address of error (with &error) – which is the address of the memory storing the address of the memory storing the value of NSError.
If you read about C, you might come across the terms "pass by value" and "pass by reference". Basically, pass by reference happens when you use pointers. Since you refer (hence reference) to the same value.
Like this post? Follow me @hboon on Twitter.
Jul 18, 2014 by Hwee-Boon Yar
Ever wanted to show some notification or information label briefly overlaid on the status bar (like Mailbox app) or navigation bar area?
CRToast is a library that lets you do that. There's an animatics on the page that gives a good idea of what it does.
Sample code included:
NSDictionary *options = @{
kCRToastTextKey : @"Hello World!",
kCRToastTextAlignmentKey : @(NSTextAlignmentCenter),
kCRToastBackgroundColorKey : [UIColor redColor],
kCRToastAnimationInTypeKey : @(CRToastAnimationTypeGravity),
kCRToastAnimationOutTypeKey : @(CRToastAnimationTypeGravity),
kCRToastAnimationInDirectionKey : @(CRToastAnimationDirectionLeft),
kCRToastAnimationOutDirectionKey : @(CRToastAnimationDirectionRight)
};
[CRToastManager showNotificationWithOptions:options
completionBlock:^{
NSLog(@"Completed");
}];
It’s short and direct.
Like this post? Follow me @hboon on Twitter.
Jul 11, 2014 by Hwee-Boon Yar
In an app, you might have the same action available in several UIViewController or UIView that is triggered via a user tapping on a button. For e.g. there might be multiple places in your app with a “Send Feedback” button or a reveal menu button. You might have code like this:
@implementation SomeViewController1
- (void)setUp {
[btn addTarget:self action:@selector(menuTapped) forControlEvents:UIControlEventTouchUpInside];
}
- (void)menuTapped {
//Many
//lines
//of
//code to set up and display menu
}
@end
@implementation SomeViewController2
- (void)setUp {
[btn addTarget:self action:@selector(menuTapped) forControlEvents:UIControlEventTouchUpInside];
}
- (void)menuTapped {
//Many
//lines
//of
//code to set up and display menu
}
@end
After repeating this in a few classes, you decided that duplicate code is bad, so you refactor it into:
@implementation SomeViewController1
- (void)setUp {
[btn addTarget:self action:@selector(menuTapped) forControlEvents:UIControlEventTouchUpInside];
}
- (void)menuTapped {
[[UIApplication sharedApplication] menuTapped];
}
@end
@implementation SomeViewController2
- (void)setUp {
[btn addTarget:self action:@selector(menuTapped) forControlEvents:UIControlEventTouchUpInside];
}
- (void)menuTapped {
[[UIApplication sharedApplication] menuTapped];
}
@end
@interface AppDelegate : NSObject
@implementation AppDelegate
- (void)menuTapped {
//Many
//lines
//of
//code to set up and display menu
}
@end
You move the common logic of setting up and display the menu into the AppDelegate class and cut down on duplicate logic.
However, touch events are propagated upwards the responder chain if the target is nil and the responder chain ends with the UIApplication delegate. So, if we pass nil instead of self as the target when setting up the action on UIButton, the event will ultimately be propagated to our UIApplication delegate.
@implementation SomeViewController1
- (void)setUp {
[btn addTarget:nil action:@selector(menuTapped) forControlEvents:UIControlEventTouchUpInside];
}
@end
@implementation SomeViewController2
- (void)setUp {
[btn addTarget:nil action:@selector(menuTapped) forControlEvents:UIControlEventTouchUpInside];
}
@end
@interface AppDelegate : NSObject
@end
@implementation AppDelegate
- (void)menuTapped {
//Many
//lines
//of
//code to set up and display menu
}
@end
We end up with shorter and less code.
Check out the developer docs for more details on how events are delivered
The responder chain ends with the UIApplication delegate only when the delegate inherits from UIResponder. Recent versions of Xcode creates projects with the delegate inheriting from UIResponder. If you have an existing project that was created using an old version of Xcode, you will need to change it yourself.
Like this post? Follow me @hboon on Twitter.
Jul 04, 2014 by Hwee-Boon Yar
In #87: What's New in iOS 8;">WWDC videos, though gives a more complete coverage of what is available.
But what if you want to search through the videos quickly? There's a resource for that! Check out ASCIIwwdc by Mattt Thompson. It hosts full-text searchable text transcripts of the WWDC videos for 2010 to 2014.
Like this post? Follow me @hboon on Twitter.
Related
Sep 28, 2018
iOS Dev Nugget 311 jqJul 08, 2018
iOS Dev Nugget 299 CurryingJun 01, 2018
iOS Dev Nugget 294 Core Data EditorMar 22, 2018
iOS Dev Nugget 284 Use Shell Aliases for Git commandsDec 20, 2017
iOS Dev Nugget 271 Zhi — Live Reloading Auto Layout Constraints and moreOct 18, 2017
iOS Dev Nugget 262 Apple Device Names APIAug 23, 2017
iOS Dev Nugget 254 Paw, for Working with APIsApr 26, 2017
iOS Dev Nugget 237 mas-cliApr 19, 2017
iOS Dev Nugget 236 Look up Error CodesFeb 09, 2017
iOS Dev Nugget 226 React NativeJul 09, 2016
iOS Dev Nugget 196 Rename Refactoring for Swift CodeJul 06, 2016
iOS Dev Nugget 195 Tools of the TradeMay 06, 2016
iOS Dev Nugget 186 Injection for XcodeFeb 03, 2016
iOS Dev Nugget 173 Xcode Package Manager, AlcatrazJan 11, 2016
iOS Dev Nugget 170 HomebrewJan 05, 2016
iOS Dev Nugget 169 fastlane: deliverSep 07, 2015
iOS Dev Nugget 152 Lossy PNG CompressionAug 07, 2015
iOS Dev Nugget 147 NSRegularExpression and NSDataDetectorMar 06, 2015
iOS Dev Nugget 125 View Debugging in XcodeFeb 13, 2015
iOS Dev Nugget 122 Importing Many Test Photos into iOS Simulator IINov 28, 2014
iOS Dev Nugget 111 iOS Support MatrixOct 24, 2014
iOS Dev Nugget 106 Command Line Access to Developer PortalOct 17, 2014
iOS Dev Nugget 105 Try FLEXSep 12, 2014
iOS Dev Nugget 100 Try RevealSep 05, 2014
iOS Dev Nugget 99 Try PaintCodeAug 15, 2014
iOS Dev Nugget 96 Jack, A Native App For iTunes ConnectApr 04, 2014
iOS Dev Nugget 77 RubyMotion Tutorial For Objective C DevelopersJan 17, 2014
iOS Dev Nugget 66 JBChartView for ChartingJan 04, 2014
iOS Dev Nugget 64 Placeholder Views Using PAPlaceholderDec 27, 2013
iOS Dev Nugget 63 Update Your iOS Development ToolboxOct 18, 2013
iOS Dev Nugget 53 Try Kaleidoscope, File Comparison for MacOct 11, 2013
iOS Dev Nugget 52 Set Up Crashlytics For Ad Hoc and App Store Builds OnlyJun 21, 2013
iOS Dev Nugget 36 Use TestFlight for Ad Hoc BuildsMay 11, 2013
iOS Dev Nugget 31 3rd Party Documentation ViewersMar 10, 2013
iOS Dev Nugget 22 Try AppCodeJan 05, 2013
iOS Dev Nugget 14 Charles Web Debugging Proxy
Jun 27, 2014 by Hwee-Boon Yar
We often want to let users tap on a UITableViewCell and then push a view controller onto the navigation controller. A straightforward way is to do this:
@implementation MyViewController
- (void)tableView:(UITableView*)aTableView didSelectRowAtIndexPath:(NSIndexPath*)indexPath {
[aTableView deselectRowAtIndexPath:indexPath animated:YES];
[self.navigationController pushViewController:[SomeOtherViewController new] animated:YES];
}
@end
This works, but if you launch the Settings app, tap on a cell to push a view controller and then pan the view controller to reveal the previous view controller, you'll notice the cell selection (General in the screenshot) animates nicely as you pan. The implementation above doesn't produce that effect.
We can of course create this more polished effect. The trick is to not call -deselectRowAtIndexPath:animated: immediately in -tableView:didSelectRowAtIndexPath: when you are going to push a view controller. And then perform the deselection in -viewWillAppear. You'll end up with:
@implementation MyViewController
- (void)viewWillAppear:(BOOL)animated {
[super viewWillAppear:animated];
[self.tableView deselectRowAtIndexPath:[self.tableView indexPathForSelectedRow] animated:animated];
}
- (void)tableView:(UITableView*)aTableView didSelectRowAtIndexPath:(NSIndexPath*)indexPath {
//If you have cells that don't trigger pushing a view controller,
//you'll still want conditionally deselect those here
//[aTableView deselectRowAtIndexPath:indexPath animated:YES];
[self.navigationController pushViewController:[SomeOtherViewController new] animated:YES];
}
@end
If you use UITableViewController or subclass it, you will already get the implementation in -viewWillAppear for free if the clearsSelectionOnViewWillAppear property is set to YES. You will still need to call -deselectRowAtIndexPath:animated: for those case when you don't push a view controller though.
Like this post? Follow me @hboon on Twitter.
Jun 20, 2014 by Hwee-Boon Yar
In #83: Match Status Bar Style in Launch Screen With Your App’s, I described how you can tweak Info.plist so the status bar shown when your app is launched matches the initial state of your app. What if you want to hide the status bar instead?
You can do it by editing your app’s Info.plist, adding a property called “Status bar is initially hidden” and selecting YES from the value dropdown.
Like this post? Follow me @hboon on Twitter.
Jun 13, 2014 by Hwee-Boon Yar
WWDC was just last week and there are many resources online which you can refer to for details about the new APIs. In this issue, I'll list the items I think are particularly important and useful for sharing (with your peers, designers, managers, customers) for discussion purposes.
User Interface
Adaptive UI
- There is a paradigm shift in how apps running on different screen sizes and orientation are supported. APIs have been updated so that UI is laid out based on size classes (regular vs. compact) for the height and width of the current orientation. In short, it is generally easier to write a universal app that supports for iPhone and iPad, and in different device orientations.
- The orientation-related methods in
UIViewController to handle rotation are now deprecated
Other UI-related classes that has been updated
- Presenting view controllers has been tweaked to support adaptive user interfaces
UISearchController replaces UISearchDisplayControllerUIAlertController replaces UIActionSheet` andUIAlertView`UIVisualEffect supports applying blurring (or vibrancy) effects on view hierarchies. This is the dynamic complement to doing static blurs by creating a screenshot and blurring the screenshot.- New support for changing the size and hiding of bars (like the navigation bar and toolbar in Safari)
New Frameworks
Extensions
There are several types of extensions available including:
- Sharing sheets (think like sharing via email or Facebook)
- Photo editing extensions that allow editing of photos in Photos app
- Actions. Action extensions allow editing an app’s content. Example a Safari extension will have access to the DOM, allow translation of the current web page (think about the demo translation extension where you can pull the DOM, translate and replace the DOM with the translated version)
- Document Picker allows apps to open content from other storage services such as Box and Dropbox
- Widgets (a.k.a. Today extensions) can be installed into Notification Center. (like the Stock widget)
- Custom keyboards allow users to install a keyboard replacement
Cloud Kit
An Apple-hosted data cloud storage API supporting both small records and BLOB data types, with generous free quotas. Note that it's a cloud storage API and offers no persistence on the app side, and currently has no API exposed for writing third-party wrappers (e.g. for use in a server-side app)
Local Authentication Framework
Apps can now access Touch ID for authentication using the Local Authentication framework
Document Picker
Access content in cloud storage (see Extensions) and other apps' sandbox.
Handoff
This lets iOS apps broadcast metadata about the content which the the user is working on, so the user can continue working on the same document or task after moving to the corresponding OS X Yosemite app and vice versa.
Others
- Photos framework replaces the Assets Library framework
- AV Kit replaces Media Player
- Scene Kit for 3D graphics
- Health Kit for managing health-related information
- Home Kit for communicating with and controlling connected devices in a user's home
- Metal for low-overhead access to GPU
APIs with Significant Changes
Camera
Manual controls for manipulating camera focus, white balance and exposure in the camera is now exposed
Notifications
- Notifications can now have actions attached to them. E.g. you can allow users to mark a TODO item as done straight from the notification.
- Registration for notifications has changed.
- Apps can now check if notifications has been enabled
- Push payload size limit has now been increased from 256 bytes to 2kb payload size
Settings
- There is now an API to open an app’s settings screen in the Settings app
- App settings screen now aggregate other settings regarding the app such as Notifications and permission to use cellular data.
StoreKit Supports Affiliate and Campaign Tokens
SKStoreProductViewController now supports affiliate token and campaign token
Core Location
Core Location now determines which (building) floor the device is on
Tools
iTunes Connect & App Store
- Analytics of app store page views, as well as conversion rate from views to app downloads
- TestFlight with a limit of public 1000 users (not devices) and an additional 25 internal beta testers. Public beta builds needs to go through beta approval.
- Crash analytics
- App bundles, each up to 10 apps with a single price can be created, with a “complete my bundle” functionality
- Video preview of up to 30 secs can be including alongside the screenshots
Xcode & Simulator
- There is now a view debugger built into Xcode for examining view hierarchies at runtime
- Xcode now supports both iPhone and iPad in a single Storyboard
- Storyboards now supports previewing custom views
- The iOS simulator has a resizable iOS device to help in testing app layouts
Like this post? Follow me @hboon on Twitter.
Related
Dec 06, 2017
iOS Dev Nugget 269 Including Finger Touches in App Preview VideosOct 11, 2017
iOS Dev Nugget 261 Checking App Download SizeApr 13, 2017
iOS Dev Nugget 235 Testing Localization Using Launch Arguments (III)Nov 25, 2015
iOS Dev Nugget 163 Testing Localization Using Launch Arguments (II)Sep 15, 2015
iOS Dev Nugget 153 Shortcut to Open Log in SimulatorMay 13, 2015
iOS Dev Nugget 135 CAShapeLayer, Animated Views and XCPShowView()Mar 06, 2015
iOS Dev Nugget 125 View Debugging in XcodeFeb 13, 2015
iOS Dev Nugget 122 Importing Many Test Photos into iOS Simulator IIOct 17, 2014
iOS Dev Nugget 105 Try FLEXOct 03, 2014
iOS Dev Nugget 103 Testing Localization Using Launch ArgumentsJul 11, 2014
iOS Dev Nugget 91 Using Event Delivery Responder Chain for Global ActionsMay 16, 2014
iOS Dev Nugget 83 Match Status Bar Style in Launch Screen With Your App'sMar 28, 2014
iOS Dev Nugget 76 Importing Many Test Photos into iOS SimulatorFeb 28, 2014
iOS Dev Nugget 72 Slimming Down Your AppNov 09, 2013
iOS Dev Nugget 56 Using Affiliate Links to Track Your App DownloadsMay 04, 2013
iOS Dev Nugget 30 Shortcut key to toggle slow animations in the iOS simulator (part II)Apr 27, 2013
iOS Dev Nugget 29 Simulating a Custom LocationApr 12, 2013
iOS Dev Nugget 27 Two-finger touch in SimulatorMar 31, 2013
iOS Dev Nugget 25 Watch out for hotspot and in-call status bar heightMar 22, 2013
iOS Dev Nugget 24 Take Screenshots in the SimulatorMar 16, 2013
iOS Dev Nugget 23 Use the Delegation PatternJan 05, 2013
iOS Dev Nugget 14 Charles Web Debugging ProxyDec 28, 2012
iOS Dev Nugget 13 Simulating a slow cellular network with Network Link ConditionerNov 23, 2012
iOS Dev Nugget 8 Copy and paste from/to the iOS SimulatorNov 09, 2012
iOS Dev Nugget 6 Open app in Simulator with Finder
Jun 06, 2014 by Hwee-Boon Yar
In #50: UITableView -registerClass:forCellReuseIdentifier:, I wrote about using UITableView -registerClass:forCellReuseIdentifier:. But if you use UITableView, you wouldn't be able to use any style other than UITableViewCellStyleDefault. The only way to work around it is to implement a subclass for each style you want to use and pass them to -registerClass:forCellReuseIdentifier: instead. E.g. to use UITableViewCell with UITableViewCellStyleSubtitle, do this:
@interface TableViewCellStyleSubtitle : UITableViewCell
@end
@implementation TableViewCellStyleSubtitle
- (id)initWithStyle:(UITableViewCellStyle)style reuseIdentifier:(NSString*)reuseIdentifier {
//Hardcoded to UITableViewCellStyleSubtitle
if (self = [super initWithStyle:UITableViewCellStyleSubtitle reuseIdentifier:reuseIdentifier]) {
}
return self;
}
@end
and then use it like this:
[self.tableView registerClass:[TableViewCellStyleSubtitle class] forCellReuseIdentifier:@"Some Identifier"];
Like this post? Follow me @hboon on Twitter.
May 30, 2014 by Hwee-Boon Yar
Sometimes you'll have a button and want to set a different background color depending on its state. Or even completely change the button's look using a custom view depending on its state. That's where CMDAwesomeButton (by @calebd) comes in.
It's a subclass of UIButton with a key method:
- (void)setValue:(id)value forKeyPath:(NSString *)keyPath state:(UIControlState)state;
So you can do something like:
CMDAwesomeButton* btn = [CMDAwesomeButton new];
[btn setValue:aColor forKeyPath:@"backgroundColor" state:UIControlStateNormal];
[btn setValue:anotherColor forKeyPath:@"backgroundColor" state:UIControlStateHighlighted];
Note that -setValue:forKeyPath:state: accepts a key path as its 2nd argument, so you can do way more sophisticated things with CMDAwesomeButton. For an example, the README for CMDAwesomeButton shows an example of how to use Sam Soffes's SAMGradientView with it to create a button with a gradient background.
CMDAwesomeButton *gradientButton = [CMDAwesomeButton new];
SAMgradientView *gradientView = [SAMGradientView new];
gradientView.backgroundColor = [UIColor clearColor];
gradientButton.backgroundView = gradientView;
[gradientButton setValue:@[
[UIColor colorWithRed:0.145 green:0.769 blue:0.757 alpha:1.000],
[UIColor colorWithRed:0.196 green:0.678 blue:0.800 alpha:1.000]
] forKeyPath:@"backgroundView.gradientColors" state:UIControlStateNormal];
[gradientButton setValue:@[
[UIColor colorWithRed:0.145 green:0.769 blue:0.757 alpha:0.5],
[UIColor colorWithRed:0.196 green:0.678 blue:0.800 alpha:0.5]
] forKeyPath:@"backgroundView.gradientColors" state:UIControlStateHighlighted];
Like this post? Follow me @hboon on Twitter.
Related
Aug 15, 2018
iOS Dev Nugget 305 Declaring Distinct Types from General TypesJul 24, 2018
iOS Dev Nugget 302 RealmJun 09, 2018
iOS Dev Nugget 295 SwifterSwiftMay 23, 2018
iOS Dev Nugget 293 iOSSnapshotTestCase (was FBSnapshotTestCase)Mar 15, 2018
iOS Dev Nugget 283 Eureka for FormsFeb 28, 2018
iOS Dev Nugget 281 Use R.swift for Static References to Resources Like ImagesFeb 21, 2018
iOS Dev Nugget 280 Using Custom Fonts Without Updating Info.plist ManuallyDec 06, 2017
iOS Dev Nugget 269 Including Finger Touches in App Preview VideosJul 11, 2017
iOS Dev Nugget 248 In-app Native RoutingMar 01, 2017
iOS Dev Nugget 229 PromisesFeb 22, 2017
iOS Dev Nugget 228 Recording and Playing Back Network CallsOct 23, 2016
iOS Dev Nugget 210 PMAlertControllerJun 03, 2016
iOS Dev Nugget 190 Quick Look Plug-in for Mobile Provisioning FilesMay 20, 2016
iOS Dev Nugget 188 SwiftLintApr 20, 2016
iOS Dev Nugget 184 Async LibraryAug 31, 2015
iOS Dev Nugget 151 More Wrappers for Keychain AccessAug 17, 2015
iOS Dev Nugget 149 Timepiece, a Swift Library for Handling DatesJul 27, 2015
iOS Dev Nugget 146 UIStackView and TZStackViewJul 21, 2015
iOS Dev Nugget 145 Listing Available FontsJul 05, 2015
iOS Dev Nugget 143 Don't Forget SQLiteJun 09, 2015
iOS Dev Nugget 139 Custom Build Configurations and Xcode SubprojectsMay 19, 2015
iOS Dev Nugget 136 Auto Layout with CartographyApr 29, 2015
iOS Dev Nugget 133 Dollar.swiftFeb 06, 2015
iOS Dev Nugget 121 InflectorKitDec 26, 2014
iOS Dev Nugget 115 Displaying Information in Settings AppDec 19, 2014
iOS Dev Nugget 114 Preview an Image for DebuggingDec 12, 2014
iOS Dev Nugget 113 GPUImage, a GPU-based Image and Video Processing FrameworkJul 11, 2014
iOS Dev Nugget 91 Using Event Delivery Responder Chain for Global ActionsMay 02, 2014
iOS Dev Nugget 81 TMCache For In-Memory and Disk-backed CachingApr 18, 2014
iOS Dev Nugget 79 TweetBot Photo Flicking EffectMar 21, 2014
iOS Dev Nugget 75 UIButton Not Triggering ActionMar 07, 2014
iOS Dev Nugget 73 Open Source Date Picker from SquareFeb 22, 2014
iOS Dev Nugget 71 TapJan 31, 2014
iOS Dev Nugget 68 Custom URL Schemes DirectoryDec 20, 2013
iOS Dev Nugget 62 Using PDF Instead of PNG Files for Resizable AssetsSep 20, 2013
iOS Dev Nugget 49 Wrapper to Get UIColor ComponentsMay 17, 2013
iOS Dev Nugget 32 FMDB: Thin Objective C Wrapper Around SQLiteOct 06, 2012
iOS Dev Nugget 1 Easy logging of values and objects
May 23, 2014 by Hwee-Boon Yar
In #34: When do you use UIImage's +imageWithContentsOfFile: over +imageNamed:?, I mentioned the primary difference between UIImage +imageWithContentsOfFile and +imageNamed:. There is another difference, when using +imageNamed:, iOS will automatically search for the correct version of the image that is optimized for the platform, e.g. loading fileName@x.png if you had specify fileName.png when running on a device with retina display. On the other hand, with +imageWithContentsOfFile:, you have to specific the filename explicitly. iOS will not make any guesses to the proper variation of the filename to use.
Bonus nugget: the file extension is optional when using +imageNamed: with a .png file. i.e. [UIImage imageNamed:@"filename"] and [UIImage imageNamed:@"filename.png"] works the same way.
Like this post? Follow me @hboon on Twitter.
May 16, 2014 by Hwee-Boon Yar
Since iOS 7, the following methods have been introduced in UIViewController so you can control the status bar on a per-View Controller basis:
- (BOOL)prefersStatusBarHidden
- (UIStatusBarAnimation)preferredStatusBarUpdateAnimation
- (void)setNeedsStatusBarAppearanceUpdate
- (UIStatusBarStyle)preferredStatusBarStyle
-preferredStatusBarStyle is commonly used. Since there's a slight pause at the launch screen (showing Default.png and its variations), you'll want to make sure the status bar style used in the launch screen matches your app's initial screen's.
You can do this by editing your app's Info.plist, adding a property called Status bar style (UIStatusBarStyle) and instead of selecting a value from the drop down, type UIStatusBarStyleLightContent or UIStatusBarStyleDefault yourself.
Like this post? Follow me @hboon on Twitter.
May 09, 2014 by Hwee-Boon Yar
For iOS development using Objective C, you will be familiar with #import which are a better version of #include, basically, skipping the need for include guards, which prevent including the same header file recursively.
#import and #include work the same, simple way – the preprocessor inserts the contents of the imported header files into the files at the point of the #import statements. This can lead to longer compile times as multiple headers are imported by many other files (and hence duplicated). Pre-compiled headers is a way to address this problem, basically, by caching commonly included header files. However, you need to manually maintain your pre-compiled header configuration, and if there’s only one group of people in the world who shouldn’t like to do things manually, that’s programmers.
Hence we have @import and modules.
You #import header files like this:
#import <UIKit/UIKit.h>
Using @import, you would do it like:
@import UIKit;
The one downside of modules is it only works for frameworks provided by Apple. But there are several advantages over #import-ing Apple frameworks:
- Syntactically, it’s fewer characters to type.
- @imports also automatically include the framework when linked so you don’t have to manually add the framework to your project target’s Build Phases, “Link Binary With Libraries” section.
- Building projects become faster.
- Lastly, once modules are enabled in your Xcode settings – under Build Settings, search for modules – #import statements for Apple frameworks are transparently treated as @imports.
Newer Xcode projects are created with modules enabled. For older Xcode projects, you’ll need to go into your project settings to enable module support.
Actually that’s not true, if you manually write Module maps, they’ll work too.
Like this post? Follow me @hboon on Twitter.
May 02, 2014 by Hwee-Boon Yar
In #39: Use NSCache Instead of NSMutableDictionary When Caching, we mentioned using NSCache for caching. Sometimes, you want a caching system that persists across app restarts, e.g. downloaded photo thumbnails.
TMCache, an open source library from Tumblr that is disk-backed, and the objects stored only need to conform to NSCoding (so everything that goes into plists, such as NSArray, NSDictionary, NSString, NSNumber, UIImage, NSData, already works).
Writing:
[[TMCache sharedCache] setObject:anImage forKey:@"someImage" block:nil];
Reading:
[[TMCache sharedCache] objectForKey:@"someImage"
block:^(TMCache* cache, NSString* key, id object) {
UIImage* image = (UIImage*)object;
}];
Like this post? Follow me @hboon on Twitter.
Related
Aug 15, 2018
iOS Dev Nugget 305 Declaring Distinct Types from General TypesJul 24, 2018
iOS Dev Nugget 302 RealmJun 09, 2018
iOS Dev Nugget 295 SwifterSwiftMay 23, 2018
iOS Dev Nugget 293 iOSSnapshotTestCase (was FBSnapshotTestCase)Mar 15, 2018
iOS Dev Nugget 283 Eureka for FormsFeb 28, 2018
iOS Dev Nugget 281 Use R.swift for Static References to Resources Like ImagesFeb 21, 2018
iOS Dev Nugget 280 Using Custom Fonts Without Updating Info.plist ManuallyDec 06, 2017
iOS Dev Nugget 269 Including Finger Touches in App Preview VideosJul 11, 2017
iOS Dev Nugget 248 In-app Native RoutingMar 01, 2017
iOS Dev Nugget 229 PromisesFeb 22, 2017
iOS Dev Nugget 228 Recording and Playing Back Network CallsOct 23, 2016
iOS Dev Nugget 210 PMAlertControllerJun 03, 2016
iOS Dev Nugget 190 Quick Look Plug-in for Mobile Provisioning FilesMay 20, 2016
iOS Dev Nugget 188 SwiftLintApr 20, 2016
iOS Dev Nugget 184 Async LibraryAug 31, 2015
iOS Dev Nugget 151 More Wrappers for Keychain AccessAug 17, 2015
iOS Dev Nugget 149 Timepiece, a Swift Library for Handling DatesJul 27, 2015
iOS Dev Nugget 146 UIStackView and TZStackViewJul 21, 2015
iOS Dev Nugget 145 Listing Available FontsJul 05, 2015
iOS Dev Nugget 143 Don't Forget SQLiteJun 09, 2015
iOS Dev Nugget 139 Custom Build Configurations and Xcode SubprojectsMay 19, 2015
iOS Dev Nugget 136 Auto Layout with CartographyApr 29, 2015
iOS Dev Nugget 133 Dollar.swiftFeb 06, 2015
iOS Dev Nugget 121 InflectorKitDec 26, 2014
iOS Dev Nugget 115 Displaying Information in Settings AppDec 19, 2014
iOS Dev Nugget 114 Preview an Image for DebuggingDec 12, 2014
iOS Dev Nugget 113 GPUImage, a GPU-based Image and Video Processing FrameworkSep 19, 2014
iOS Dev Nugget 101 Asset CatalogMay 30, 2014
iOS Dev Nugget 85 A More Customizable Button For Different StatesMay 23, 2014
iOS Dev Nugget 84 One More Thing About +imageWithContentsOfFile: vs. +imageNamed:Apr 24, 2014
iOS Dev Nugget 80 Switching UIStatusBarStyle Based on UIImage ShownApr 18, 2014
iOS Dev Nugget 79 TweetBot Photo Flicking EffectMar 07, 2014
iOS Dev Nugget 73 Open Source Date Picker from SquareFeb 22, 2014
iOS Dev Nugget 71 TapJan 31, 2014
iOS Dev Nugget 68 Custom URL Schemes DirectoryDec 20, 2013
iOS Dev Nugget 62 Using PDF Instead of PNG Files for Resizable AssetsSep 20, 2013
iOS Dev Nugget 49 Wrapper to Get UIColor ComponentsSep 06, 2013
iOS Dev Nugget 47 Generating Copies of an Image With Different ColorsJun 08, 2013
iOS Dev Nugget 34 When do you use UIImage's +imageWithContentsOfFile: over +imageNamed:?May 17, 2013
iOS Dev Nugget 32 FMDB: Thin Objective C Wrapper Around SQLiteOct 06, 2012
iOS Dev Nugget 1 Easy logging of values and objects
Apr 24, 2014 by Hwee-Boon Yar
Ever built an app which displays photos and can’t decide which is the best UIStatusBarStyle to use, because there isn’t one that will work with every photo?
Max Howell (who wrote Homebrew) has 2 Cocoapods that will help with that:
Combining them, you can use the luminance of the UIImage instance to figure out whether UIStatusBarStyleLightContent or UIStatusBarStyleDefault is more appropriate:
#import "UIImage+AverageColor.h"
#import "UIColor+PerceivedLuminance.h"
@implementation MyViewController
- (UIStatusBarStyle)preferredStatusBarStyle {
return self.topImageView.image.averageColor.perceivedLuminance > 0.5
? UIStatusBarStyleLightContent
: UIStatusBarStyleDefault;
}
@end
Try it out.
Like this post? Follow me @hboon on Twitter.
Apr 18, 2014 by Hwee-Boon Yar
With UIKit Dynamics, it's easier than ever to make springy user interface such as the one shown when flicking to dismiss a photo in the popular TweetBot app from Tapbots.
Just set up the animator and a UISnapBehavior which snaps the photo (in the example code below, the _cardView) back into place when flicked.
Most of the code lies in the UIPanGestureRecognizer's delegate method.
//ivars, somewhere
/*
CGPoint _centerWhenStartDragging;
UIAttachmentBehavior* _dragBehavior;
UIDynamicAnimator* _animator;
UISnapBehavior* _snapBehavior;
UIView* _cardView;
*/
- (void)setUp {
UIPanGestureRecognizer* panGestureRecognizer =
[[UIPanGestureRecognizer alloc] initWithTarget:self action:@selector(dragged:)];
panGestureRecognizer.minimumNumberOfTouches = 1;
panGestureRecognizer.maximumNumberOfTouches = 1;
[self addGestureRecognizer:panGestureRecognizer];
_animator = [[UIDynamicAnimator alloc] initWithReferenceView:self];
_snapBehavior = [[UISnapBehavior alloc] initWithItem:_cardView snapToPoint:self.center];
_snapBehavior.damping = 0.7;
[@animator addBehavior:_snapBehavior];
}
- (void)dragged:(UIPanGestureRecognizer*)aGestureRecognizer {
CGPoint ptInCard = [aGestureRecognizer locationInView:_cardView];
CGPoint ptInView = [aGestureRecognizer locationInView:self];
switch (aGestureRecognizer.state) {
case UIGestureRecognizerStateBegan:
_centerWhenStartDragging = _cardView.center;
UIOffset offset = UIOffsetMake(ptInCard.x -
_cardView.frame.size.width/2, ptInCard.y - _cardView.frame.size.height/2);
//The anchor and the offset refers to the same point, where the finger is
_dragBehavior = [[UIAttachmentBehavior alloc] initWithItem:_cardView
offsetFromCenter:offset attachedToAnchor:ptInView];
[_animator addBehavior:_dragBehavior];
break;
case UIGestureRecognizerStateChanged:
//Keep the anchor as where the finger is
_dragBehavior.anchorPoint = ptInView;
break;
case UIGestureRecognizerStateEnded:
[_animator removeBehavior:_dragBehavior];
_dragBehavior = nil;
CGGloat diff = (_cardView.center.x - _centerWhenStartDragging.x)*(_cardView.center.x - _centerWhenStartDragging.x) +
(_cardView.center.y - _centerWhenStartDragging.y)*(_cardView.center.y - _centerWhenStartDragging.y);
CGPoint velocity = [aGestureRecognizer velocityInView:self];
//Magic number, can be tweaked
if (diff > 60*60 && [self flickTowardsCornersOfScreen:velocity pt:ptInView]) {
_animator.removeBehavior(_snapBehavior);
_snapBehavior = nil;
UIDynamicItemBehavior* dynamic =
[[UIDynamicItemBehavior alloc] initWithItems:@[_cardView]];
[dynamic addLinearVelocity:velocity/10 forItem:_cardView];
dynamic.action = ^{
if (!CGRectIntersectsRect(bounds, _cardView.frame)) {
[self dismiss];
}
};
[_animator addBehavior:dynamic];
//add a little gravity so it accelerates off the screen
//(in case user gesture was slow)
UIGravityBehavior* gravity =
[[UIGravityBehavior alloc] initWithItems:@[_cardView]];
gravity.magnitude = 0.2;
gravity.gravityDirection = CGVectorMake(velocity.x, velocity.y);
[_animator addBehavior:gravity];
} else {
NSLog("snap automatically");
}
break;
default:
break;
}
}
Briefly:
When UIGestureRecognizerStateBegan, you remember where the user tapped to start dragging/flicking, and set up a UIAttachmentBehavior that follows the user's finger.
When UIGestureRecognizerStateChanged, you update the drag behavior to follow the user's finger.
When UIGestureRecognizerStateEnded, you dismiss cardView if the user has flicked fast enough towards the corners of the screen, adding a gravity to it so cardView moves fast enough. If the user haven't flicked hard enough or towards the edge of the screen, just allow cardView to snap back to its original position.
Jared Sinclair wrote and open sourced view controller that does this in a similar manner called JTSImageViewController. Check it out.
Like this post? Follow me @hboon on Twitter.
Related
Aug 15, 2018
iOS Dev Nugget 305 Declaring Distinct Types from General TypesJul 24, 2018
iOS Dev Nugget 302 RealmJun 09, 2018
iOS Dev Nugget 295 SwifterSwiftMay 23, 2018
iOS Dev Nugget 293 iOSSnapshotTestCase (was FBSnapshotTestCase)Mar 15, 2018
iOS Dev Nugget 283 Eureka for FormsFeb 28, 2018
iOS Dev Nugget 281 Use R.swift for Static References to Resources Like ImagesFeb 21, 2018
iOS Dev Nugget 280 Using Custom Fonts Without Updating Info.plist ManuallyDec 06, 2017
iOS Dev Nugget 269 Including Finger Touches in App Preview VideosJul 11, 2017
iOS Dev Nugget 248 In-app Native RoutingMar 01, 2017
iOS Dev Nugget 229 PromisesFeb 22, 2017
iOS Dev Nugget 228 Recording and Playing Back Network CallsOct 23, 2016
iOS Dev Nugget 210 PMAlertControllerJun 03, 2016
iOS Dev Nugget 190 Quick Look Plug-in for Mobile Provisioning FilesMay 20, 2016
iOS Dev Nugget 188 SwiftLintApr 20, 2016
iOS Dev Nugget 184 Async LibraryAug 31, 2015
iOS Dev Nugget 151 More Wrappers for Keychain AccessAug 17, 2015
iOS Dev Nugget 149 Timepiece, a Swift Library for Handling DatesJul 27, 2015
iOS Dev Nugget 146 UIStackView and TZStackViewJul 21, 2015
iOS Dev Nugget 145 Listing Available FontsJul 05, 2015
iOS Dev Nugget 143 Don't Forget SQLiteJun 09, 2015
iOS Dev Nugget 139 Custom Build Configurations and Xcode SubprojectsMay 19, 2015
iOS Dev Nugget 136 Auto Layout with CartographyApr 29, 2015
iOS Dev Nugget 133 Dollar.swiftFeb 06, 2015
iOS Dev Nugget 121 InflectorKitDec 26, 2014
iOS Dev Nugget 115 Displaying Information in Settings AppDec 19, 2014
iOS Dev Nugget 114 Preview an Image for DebuggingDec 12, 2014
iOS Dev Nugget 113 GPUImage, a GPU-based Image and Video Processing FrameworkMay 30, 2014
iOS Dev Nugget 85 A More Customizable Button For Different StatesMay 02, 2014
iOS Dev Nugget 81 TMCache For In-Memory and Disk-backed CachingMar 07, 2014
iOS Dev Nugget 73 Open Source Date Picker from SquareFeb 22, 2014
iOS Dev Nugget 71 TapJan 31, 2014
iOS Dev Nugget 68 Custom URL Schemes DirectoryDec 20, 2013
iOS Dev Nugget 62 Using PDF Instead of PNG Files for Resizable AssetsSep 20, 2013
iOS Dev Nugget 49 Wrapper to Get UIColor ComponentsMay 17, 2013
iOS Dev Nugget 32 FMDB: Thin Objective C Wrapper Around SQLiteOct 06, 2012
iOS Dev Nugget 1 Easy logging of values and objects
Apr 11, 2014 by Hwee-Boon Yar
In Objective C, there are 2 primary ways of informing an observing object that an event has happened and that the observing object can/should perform an action related to it. They are the delegate pattern used everywhere in the Cocoa Touch frameworks (look for properties called delegate or dataSource that uses a protocol) as well as notifications such as UIKeyboardWillShowNotification.
Sometimes either of them can be used. A good rule of thumb I defer to is if there needs to be 1 or possibly multiple observers. If it is always zero or one interested object observing for the event, and the observing object ”owns” the other object (such as when one view controller presents another, the former ”owns” the latter), you will usually want to use a delegate. If there might be multiple objects interested in updates, e.g. multiple view controllers refreshing when an object has changed, post notifications.
Note also that, if you require a response to complete the process, you'll have to use a delegate such as MFMailComposeViewControllerDelegate#mailComposeController:didFinishWithResult:error: requiring the delegate to dismiss the view controller.
Like this post? Follow me @hboon on Twitter.
Apr 04, 2014 by Hwee-Boon Yar
While most of us develop our apps using Objective C and Xcode, there's always utility in investigating other tools. RubyMotion stands out among other alternative toolkits for developing iOS (and OS X) apps because it generates native code and support the use of existing Objective C libraries.
I wrote a tutorial for Objective C developers who want to pick up RubyMotion. It doesn't focus on Ruby idioms, but more as a quick introduction to the differences in tooling and language.
From the intro:
RubyMotion is a great alternative to writing iOS (and OS X) apps with Objective C. Many RubyMotion users seem to come from Ruby backgrounds and are new to iOS development. On the other hand, some are Objective C developers with little or no Ruby experience who wants to pick up RubyMotion. This tutorial is for the latter group and gives examples for iOS. The same principles and tools apply for OS X development.
Check out RubyMotion Tutorial for Objective C Developers
Like this post? Follow me @hboon on Twitter.
Related
Sep 28, 2018
iOS Dev Nugget 311 jqJul 08, 2018
iOS Dev Nugget 299 CurryingJun 01, 2018
iOS Dev Nugget 294 Core Data EditorMar 22, 2018
iOS Dev Nugget 284 Use Shell Aliases for Git commandsDec 20, 2017
iOS Dev Nugget 271 Zhi — Live Reloading Auto Layout Constraints and moreOct 18, 2017
iOS Dev Nugget 262 Apple Device Names APIAug 23, 2017
iOS Dev Nugget 254 Paw, for Working with APIsApr 26, 2017
iOS Dev Nugget 237 mas-cliApr 19, 2017
iOS Dev Nugget 236 Look up Error CodesFeb 09, 2017
iOS Dev Nugget 226 React NativeJul 09, 2016
iOS Dev Nugget 196 Rename Refactoring for Swift CodeJul 06, 2016
iOS Dev Nugget 195 Tools of the TradeMay 06, 2016
iOS Dev Nugget 186 Injection for XcodeFeb 03, 2016
iOS Dev Nugget 173 Xcode Package Manager, AlcatrazJan 11, 2016
iOS Dev Nugget 170 HomebrewJan 05, 2016
iOS Dev Nugget 169 fastlane: deliverSep 07, 2015
iOS Dev Nugget 152 Lossy PNG CompressionAug 07, 2015
iOS Dev Nugget 147 NSRegularExpression and NSDataDetectorMar 06, 2015
iOS Dev Nugget 125 View Debugging in XcodeFeb 13, 2015
iOS Dev Nugget 122 Importing Many Test Photos into iOS Simulator IINov 28, 2014
iOS Dev Nugget 111 iOS Support MatrixOct 24, 2014
iOS Dev Nugget 106 Command Line Access to Developer PortalOct 17, 2014
iOS Dev Nugget 105 Try FLEXSep 12, 2014
iOS Dev Nugget 100 Try RevealSep 05, 2014
iOS Dev Nugget 99 Try PaintCodeAug 15, 2014
iOS Dev Nugget 96 Jack, A Native App For iTunes ConnectJul 04, 2014
iOS Dev Nugget 90 Full-Text Searchable WWDC Video Text TranscriptsJan 17, 2014
iOS Dev Nugget 66 JBChartView for ChartingJan 04, 2014
iOS Dev Nugget 64 Placeholder Views Using PAPlaceholderDec 27, 2013
iOS Dev Nugget 63 Update Your iOS Development ToolboxOct 18, 2013
iOS Dev Nugget 53 Try Kaleidoscope, File Comparison for MacOct 11, 2013
iOS Dev Nugget 52 Set Up Crashlytics For Ad Hoc and App Store Builds OnlyJun 21, 2013
iOS Dev Nugget 36 Use TestFlight for Ad Hoc BuildsMay 11, 2013
iOS Dev Nugget 31 3rd Party Documentation ViewersMar 10, 2013
iOS Dev Nugget 22 Try AppCodeJan 05, 2013
iOS Dev Nugget 14 Charles Web Debugging Proxy
Mar 28, 2014 by Hwee-Boon Yar
Sometimes you want to have some (or lots) of test photos on your simulator. But if you don’t want to press, hold and tap Save Image a dozen or a few hundred times, here are 2 quick ways to add photos, both by building and running a custom app on the simulator:
For obvious reasons, don’t run this on an actual device with PhotoStream enabled.
Like this post? Follow me @hboon on Twitter.
Related
Apr 13, 2017
iOS Dev Nugget 235 Testing Localization Using Launch Arguments (III)Nov 25, 2015
iOS Dev Nugget 163 Testing Localization Using Launch Arguments (II)Sep 15, 2015
iOS Dev Nugget 153 Shortcut to Open Log in SimulatorMay 13, 2015
iOS Dev Nugget 135 CAShapeLayer, Animated Views and XCPShowView()Mar 06, 2015
iOS Dev Nugget 125 View Debugging in XcodeFeb 13, 2015
iOS Dev Nugget 122 Importing Many Test Photos into iOS Simulator IIOct 17, 2014
iOS Dev Nugget 105 Try FLEXOct 03, 2014
iOS Dev Nugget 103 Testing Localization Using Launch ArgumentsJun 13, 2014
iOS Dev Nugget 87 What's New in iOS 8May 04, 2013
iOS Dev Nugget 30 Shortcut key to toggle slow animations in the iOS simulator (part II)Apr 27, 2013
iOS Dev Nugget 29 Simulating a Custom LocationApr 12, 2013
iOS Dev Nugget 27 Two-finger touch in SimulatorMar 31, 2013
iOS Dev Nugget 25 Watch out for hotspot and in-call status bar heightMar 22, 2013
iOS Dev Nugget 24 Take Screenshots in the SimulatorJan 05, 2013
iOS Dev Nugget 14 Charles Web Debugging ProxyDec 28, 2012
iOS Dev Nugget 13 Simulating a slow cellular network with Network Link ConditionerNov 23, 2012
iOS Dev Nugget 8 Copy and paste from/to the iOS SimulatorNov 09, 2012
iOS Dev Nugget 6 Open app in Simulator with Finder
Mar 21, 2014 by Hwee-Boon Yar
Sometimes, you'll have a UIButton (or a UIControl subclass) that doesn't trigger its action.
A quick tip! Check its frame and userInteractionEnabled property. If it looks good, check the parent's. Chances are one of them is either too small or userInteractionEnabled is set to NO.
Like this post? Follow me @hboon on Twitter.
Mar 14, 2014 by Hwee-Boon Yar
Many of us use Xcode for iOS (and OS X) development. While it isn't the best code editor, it is steadily improving and certain features can stay hidden if you don't track releases carefully.
For e.g. one of the more useful autocompletion that Xcode can perform is when you implement a protocol. For example, if you implement UITableViewDelegate in your class:
@interface MyClass : NSObject<UITableViewDelegate>
@end
@implementation MyClass
//type below here
@end
When you place your cursor below the comment “type below here” and type “-table”, it should – if not, hit Ctrl-space – show a list of methods you can implement according to the protocols you have implemented.
Nifty?
Like this post? Follow me @hboon on Twitter.
Mar 07, 2014 by Hwee-Boon Yar
Ever want to include a date picker in your app but don't like how UIDatePicker – and more generally, UIPickerView – looks?
Square has a gorgeous and open source monthly calendar picker available. There's a write up on it including sample code:
CGRect frame = self.parentViewController.view.bounds;
self.view = [[TSQCalendarView alloc] initWithFrame:frame];
self.calendarView.firstDate = [NSDate date];
self.calendarView.lastDate = [[NSDate date] dateByAddingTimeInterval:60 * 60 * 24 * 279.5]; // approximately 279.5 days in the future
self.calendarView.delegate = self;
Bonus: there's even an equivalent Android version available.
Like this post? Follow me @hboon on Twitter.
Related
Aug 15, 2018
iOS Dev Nugget 305 Declaring Distinct Types from General TypesJul 24, 2018
iOS Dev Nugget 302 RealmJun 09, 2018
iOS Dev Nugget 295 SwifterSwiftMay 23, 2018
iOS Dev Nugget 293 iOSSnapshotTestCase (was FBSnapshotTestCase)Mar 15, 2018
iOS Dev Nugget 283 Eureka for FormsFeb 28, 2018
iOS Dev Nugget 281 Use R.swift for Static References to Resources Like ImagesFeb 21, 2018
iOS Dev Nugget 280 Using Custom Fonts Without Updating Info.plist ManuallyDec 06, 2017
iOS Dev Nugget 269 Including Finger Touches in App Preview VideosJul 11, 2017
iOS Dev Nugget 248 In-app Native RoutingMar 01, 2017
iOS Dev Nugget 229 PromisesFeb 22, 2017
iOS Dev Nugget 228 Recording and Playing Back Network CallsOct 23, 2016
iOS Dev Nugget 210 PMAlertControllerJun 03, 2016
iOS Dev Nugget 190 Quick Look Plug-in for Mobile Provisioning FilesMay 20, 2016
iOS Dev Nugget 188 SwiftLintApr 20, 2016
iOS Dev Nugget 184 Async LibraryAug 31, 2015
iOS Dev Nugget 151 More Wrappers for Keychain AccessAug 17, 2015
iOS Dev Nugget 149 Timepiece, a Swift Library for Handling DatesJul 27, 2015
iOS Dev Nugget 146 UIStackView and TZStackViewJul 21, 2015
iOS Dev Nugget 145 Listing Available FontsJul 05, 2015
iOS Dev Nugget 143 Don't Forget SQLiteJun 09, 2015
iOS Dev Nugget 139 Custom Build Configurations and Xcode SubprojectsMay 19, 2015
iOS Dev Nugget 136 Auto Layout with CartographyApr 29, 2015
iOS Dev Nugget 133 Dollar.swiftFeb 06, 2015
iOS Dev Nugget 121 InflectorKitDec 26, 2014
iOS Dev Nugget 115 Displaying Information in Settings AppDec 19, 2014
iOS Dev Nugget 114 Preview an Image for DebuggingDec 12, 2014
iOS Dev Nugget 113 GPUImage, a GPU-based Image and Video Processing FrameworkMay 30, 2014
iOS Dev Nugget 85 A More Customizable Button For Different StatesMay 02, 2014
iOS Dev Nugget 81 TMCache For In-Memory and Disk-backed CachingApr 18, 2014
iOS Dev Nugget 79 TweetBot Photo Flicking EffectFeb 22, 2014
iOS Dev Nugget 71 TapJan 31, 2014
iOS Dev Nugget 68 Custom URL Schemes DirectoryDec 20, 2013
iOS Dev Nugget 62 Using PDF Instead of PNG Files for Resizable AssetsSep 20, 2013
iOS Dev Nugget 49 Wrapper to Get UIColor ComponentsMay 17, 2013
iOS Dev Nugget 32 FMDB: Thin Objective C Wrapper Around SQLiteOct 06, 2012
iOS Dev Nugget 1 Easy logging of values and objects
Feb 28, 2014 by Hwee-Boon Yar
In the earlier days, it was important to make sure your iOS app is less than 20 MB because that was the limit iOS imposed on cellular downloads from the App store. As time goes by, the limit has been increased to 100 MB. But not everyone has a fast connection and 100 MB can take a long time to download on certain cellular connections. The creators of Clear, Realmac Software wrote a nice post on Slimming down your App Store submissions that details a few approaches to shrink down your app size.
It's a great read. I just want to add that ImageOptim is a wonderful and easy-to-use utility that always optimizes even better than Xcode. You can also use it on graphic assets for your websites.
Like this post? Follow me @hboon on Twitter.
Feb 22, 2014 by Hwee-Boon Yar
In Ruby, there is a very useful function called tap, that “taps” into method calls and run your code without interfering with the method chain. There is an Objective C port called NSObject-Tap.
Here's how you might write some initialization code without using tap:
Person* person = [[Person alloc] init];
person.name = @"Your Name";
person.age = 20;
person.address = @"Kyoto, Japan";
And with NSObject-Tap:
Person* person = [[[Person alloc] init] tap:^(Person *p) {
p.name = @"Your Name";
p.age = 20;
p.address = @"Kyoto, Japan";
}];
-tap: runs the block passing in self and returns self again so you can add -tap: calls into a method chain easily. It can help to reduce the need for certain local variables as well as shorten code.
There's also a -tapp method that prints out itself like so:
NSString* helloWorld = [[@"Hello, world!" tapp] uppercaseString];
Similar to -tap:, -tapp can be chained because it returns self.
Like this post? Follow me @hboon on Twitter.
Related
Aug 15, 2018
iOS Dev Nugget 305 Declaring Distinct Types from General TypesJul 24, 2018
iOS Dev Nugget 302 RealmJun 09, 2018
iOS Dev Nugget 295 SwifterSwiftMay 23, 2018
iOS Dev Nugget 293 iOSSnapshotTestCase (was FBSnapshotTestCase)Mar 15, 2018
iOS Dev Nugget 283 Eureka for FormsFeb 28, 2018
iOS Dev Nugget 281 Use R.swift for Static References to Resources Like ImagesFeb 21, 2018
iOS Dev Nugget 280 Using Custom Fonts Without Updating Info.plist ManuallyDec 06, 2017
iOS Dev Nugget 269 Including Finger Touches in App Preview VideosJul 11, 2017
iOS Dev Nugget 248 In-app Native RoutingMar 01, 2017
iOS Dev Nugget 229 PromisesFeb 22, 2017
iOS Dev Nugget 228 Recording and Playing Back Network CallsOct 23, 2016
iOS Dev Nugget 210 PMAlertControllerJun 03, 2016
iOS Dev Nugget 190 Quick Look Plug-in for Mobile Provisioning FilesMay 20, 2016
iOS Dev Nugget 188 SwiftLintApr 20, 2016
iOS Dev Nugget 184 Async LibraryAug 31, 2015
iOS Dev Nugget 151 More Wrappers for Keychain AccessAug 17, 2015
iOS Dev Nugget 149 Timepiece, a Swift Library for Handling DatesJul 27, 2015
iOS Dev Nugget 146 UIStackView and TZStackViewJul 21, 2015
iOS Dev Nugget 145 Listing Available FontsJul 05, 2015
iOS Dev Nugget 143 Don't Forget SQLiteJun 09, 2015
iOS Dev Nugget 139 Custom Build Configurations and Xcode SubprojectsMay 19, 2015
iOS Dev Nugget 136 Auto Layout with CartographyApr 29, 2015
iOS Dev Nugget 133 Dollar.swiftFeb 06, 2015
iOS Dev Nugget 121 InflectorKitDec 26, 2014
iOS Dev Nugget 115 Displaying Information in Settings AppDec 19, 2014
iOS Dev Nugget 114 Preview an Image for DebuggingDec 12, 2014
iOS Dev Nugget 113 GPUImage, a GPU-based Image and Video Processing FrameworkMay 30, 2014
iOS Dev Nugget 85 A More Customizable Button For Different StatesMay 02, 2014
iOS Dev Nugget 81 TMCache For In-Memory and Disk-backed CachingApr 18, 2014
iOS Dev Nugget 79 TweetBot Photo Flicking EffectMar 07, 2014
iOS Dev Nugget 73 Open Source Date Picker from SquareJan 31, 2014
iOS Dev Nugget 68 Custom URL Schemes DirectoryDec 20, 2013
iOS Dev Nugget 62 Using PDF Instead of PNG Files for Resizable AssetsSep 20, 2013
iOS Dev Nugget 49 Wrapper to Get UIColor ComponentsMay 17, 2013
iOS Dev Nugget 32 FMDB: Thin Objective C Wrapper Around SQLiteOct 06, 2012
iOS Dev Nugget 1 Easy logging of values and objects
Feb 16, 2014 by Hwee-Boon Yar
Like this post? Follow me @hboon on Twitter.
Feb 08, 2014 by Hwee-Boon Yar
As both iOS app developers and users, here's a very useful link: Apple System Status. It shows the status of each Apple public-facing service. For e.g. you can see if iMessage is working. Pass it along to your users and customers.
Like this post? Follow me @hboon on Twitter.
Jan 31, 2014 by Hwee-Boon Yar
Many developers expose their apps' functionality through custom URL schemes. The built-in Maps.app is a good example, allowing other apps to open up the app displaying a specific location. handleOpenURL, maintained by @Magnatron, is a directory of custom URL schemes. You can look up the URL schemes supported by other apps as well as register those supported by your apps.
Like this post? Follow me @hboon on Twitter.
Related
Aug 15, 2018
iOS Dev Nugget 305 Declaring Distinct Types from General TypesJul 24, 2018
iOS Dev Nugget 302 RealmJun 09, 2018
iOS Dev Nugget 295 SwifterSwiftMay 23, 2018
iOS Dev Nugget 293 iOSSnapshotTestCase (was FBSnapshotTestCase)Mar 15, 2018
iOS Dev Nugget 283 Eureka for FormsFeb 28, 2018
iOS Dev Nugget 281 Use R.swift for Static References to Resources Like ImagesFeb 21, 2018
iOS Dev Nugget 280 Using Custom Fonts Without Updating Info.plist ManuallyDec 06, 2017
iOS Dev Nugget 269 Including Finger Touches in App Preview VideosJul 11, 2017
iOS Dev Nugget 248 In-app Native RoutingMar 01, 2017
iOS Dev Nugget 229 PromisesFeb 22, 2017
iOS Dev Nugget 228 Recording and Playing Back Network CallsOct 23, 2016
iOS Dev Nugget 210 PMAlertControllerJun 03, 2016
iOS Dev Nugget 190 Quick Look Plug-in for Mobile Provisioning FilesMay 20, 2016
iOS Dev Nugget 188 SwiftLintApr 20, 2016
iOS Dev Nugget 184 Async LibraryAug 31, 2015
iOS Dev Nugget 151 More Wrappers for Keychain AccessAug 17, 2015
iOS Dev Nugget 149 Timepiece, a Swift Library for Handling DatesJul 27, 2015
iOS Dev Nugget 146 UIStackView and TZStackViewJul 21, 2015
iOS Dev Nugget 145 Listing Available FontsJul 05, 2015
iOS Dev Nugget 143 Don't Forget SQLiteJun 09, 2015
iOS Dev Nugget 139 Custom Build Configurations and Xcode SubprojectsMay 19, 2015
iOS Dev Nugget 136 Auto Layout with CartographyApr 29, 2015
iOS Dev Nugget 133 Dollar.swiftFeb 06, 2015
iOS Dev Nugget 121 InflectorKitDec 26, 2014
iOS Dev Nugget 115 Displaying Information in Settings AppDec 19, 2014
iOS Dev Nugget 114 Preview an Image for DebuggingDec 12, 2014
iOS Dev Nugget 113 GPUImage, a GPU-based Image and Video Processing FrameworkMay 30, 2014
iOS Dev Nugget 85 A More Customizable Button For Different StatesMay 02, 2014
iOS Dev Nugget 81 TMCache For In-Memory and Disk-backed CachingApr 18, 2014
iOS Dev Nugget 79 TweetBot Photo Flicking EffectMar 07, 2014
iOS Dev Nugget 73 Open Source Date Picker from SquareFeb 22, 2014
iOS Dev Nugget 71 TapDec 20, 2013
iOS Dev Nugget 62 Using PDF Instead of PNG Files for Resizable AssetsSep 20, 2013
iOS Dev Nugget 49 Wrapper to Get UIColor ComponentsMay 17, 2013
iOS Dev Nugget 32 FMDB: Thin Objective C Wrapper Around SQLiteOct 06, 2012
iOS Dev Nugget 1 Easy logging of values and objects
Jan 24, 2014 by Hwee-Boon Yar
In Issue #13, I mentioned installing and using Network Link Conditioner on OS X to simulate a slow and unstable network connection.
iOS has a similar functionality. If you haven't, you'll need to plug in your iOS device to your Mac and go to Xcode and mark the device as "Use for Development". After that, when you open Settings.app on your iOS device, you'll see that there is a "Developer" menu between the social network accounts and other app settings. Tap "Developer" and you'll be able to configure Network Link Conditioner. Now you can run the same test on the actual device.
Like this post? Follow me @hboon on Twitter.
Related
Aug 23, 2017
iOS Dev Nugget 254 Paw, for Working with APIsJul 19, 2017
iOS Dev Nugget 249 App Transport Security Diagnostics with nscurlFeb 22, 2017
iOS Dev Nugget 228 Recording and Playing Back Network CallsDec 22, 2016
iOS Dev Nugget 219 Test Your App with Airplane Mode enabledMar 21, 2016
iOS Dev Nugget 180 Low Power ModeOct 07, 2015
iOS Dev Nugget 156 -canOpenURL:Sep 23, 2015
iOS Dev Nugget 154 App Transport SecurityJul 16, 2015
iOS Dev Nugget 144 NSURLSession instead of NSURLConnectionJul 13, 2013
iOS Dev Nugget 39 Use NSCache Instead of NSMutableDictionary When CachingJan 05, 2013
iOS Dev Nugget 14 Charles Web Debugging ProxyDec 28, 2012
iOS Dev Nugget 13 Simulating a slow cellular network with Network Link Conditioner
Jan 17, 2014 by Hwee-Boon Yar
JBChartView is a charting library for both line and bar graphs, open sourced by Jawbone. As a user of Jawbone UP and their iOS app, this looks like a great way to generate gorgeous graphs.
Like this post? Follow me @hboon on Twitter.
Related
Sep 28, 2018
iOS Dev Nugget 311 jqJul 08, 2018
iOS Dev Nugget 299 CurryingJun 01, 2018
iOS Dev Nugget 294 Core Data EditorMar 22, 2018
iOS Dev Nugget 284 Use Shell Aliases for Git commandsDec 20, 2017
iOS Dev Nugget 271 Zhi — Live Reloading Auto Layout Constraints and moreOct 18, 2017
iOS Dev Nugget 262 Apple Device Names APIAug 23, 2017
iOS Dev Nugget 254 Paw, for Working with APIsApr 26, 2017
iOS Dev Nugget 237 mas-cliApr 19, 2017
iOS Dev Nugget 236 Look up Error CodesFeb 09, 2017
iOS Dev Nugget 226 React NativeJul 09, 2016
iOS Dev Nugget 196 Rename Refactoring for Swift CodeJul 06, 2016
iOS Dev Nugget 195 Tools of the TradeMay 06, 2016
iOS Dev Nugget 186 Injection for XcodeFeb 03, 2016
iOS Dev Nugget 173 Xcode Package Manager, AlcatrazJan 11, 2016
iOS Dev Nugget 170 HomebrewJan 05, 2016
iOS Dev Nugget 169 fastlane: deliverSep 07, 2015
iOS Dev Nugget 152 Lossy PNG CompressionAug 07, 2015
iOS Dev Nugget 147 NSRegularExpression and NSDataDetectorMar 06, 2015
iOS Dev Nugget 125 View Debugging in XcodeFeb 13, 2015
iOS Dev Nugget 122 Importing Many Test Photos into iOS Simulator IINov 28, 2014
iOS Dev Nugget 111 iOS Support MatrixOct 24, 2014
iOS Dev Nugget 106 Command Line Access to Developer PortalOct 17, 2014
iOS Dev Nugget 105 Try FLEXSep 12, 2014
iOS Dev Nugget 100 Try RevealSep 05, 2014
iOS Dev Nugget 99 Try PaintCodeAug 15, 2014
iOS Dev Nugget 96 Jack, A Native App For iTunes ConnectJul 04, 2014
iOS Dev Nugget 90 Full-Text Searchable WWDC Video Text TranscriptsApr 04, 2014
iOS Dev Nugget 77 RubyMotion Tutorial For Objective C DevelopersJan 04, 2014
iOS Dev Nugget 64 Placeholder Views Using PAPlaceholderDec 27, 2013
iOS Dev Nugget 63 Update Your iOS Development ToolboxOct 18, 2013
iOS Dev Nugget 53 Try Kaleidoscope, File Comparison for MacOct 11, 2013
iOS Dev Nugget 52 Set Up Crashlytics For Ad Hoc and App Store Builds OnlyJun 21, 2013
iOS Dev Nugget 36 Use TestFlight for Ad Hoc BuildsMay 11, 2013
iOS Dev Nugget 31 3rd Party Documentation ViewersMar 10, 2013
iOS Dev Nugget 22 Try AppCodeJan 05, 2013
iOS Dev Nugget 14 Charles Web Debugging Proxy
Jan 10, 2014 by Hwee-Boon Yar
In Apple's iOS 7 Tech Talks, the class NSURLComponents was mentioned. It's a very useful utility for manipulating URLs (examples taken and modified from Apple):
NSURLComponents* components = [[NSURLComponents alloc] init];
components.scheme = @"https";
components.user = @"pmarcos";
components.password = @"seecret";
components.host = @"example.com";
components.path = @"/site/doc.html";
components.fragment = @"section3";
NSURL* url = components.url;
and:
NSURLComponents* components = [NSURLComponents componentsWithString:@"https://pmarcos:seecret@example.com/site/doc.html#section3"];
components.password = @"changed";
NSURL* secretPigFaceURL = components.URL;
//https://pmarcos:changed@example.com/site/doc.html#section3
At the time of writing, there are no docs for NSURLComponents, so you'll have to refer to the NSURL.h header file.
Download the iOS 7 Tech Talks videos and slides.
Like this post? Follow me @hboon on Twitter.
Jan 04, 2014 by Hwee-Boon Yar
If you are like me, you have probably implementing complex screens by stubbing it with subviews of different background colors. That wasn't fun.
There's a way better method: PAPlaceholder also shows you the edges of the subview and you can also use the UIViewController subclass provided if you want to use it with UIViewController contains like UITabBarController. It's also available as a Cocoapod.
Like this post? Follow me @hboon on Twitter.
Related
Sep 28, 2018
iOS Dev Nugget 311 jqJul 08, 2018
iOS Dev Nugget 299 CurryingJun 01, 2018
iOS Dev Nugget 294 Core Data EditorMar 22, 2018
iOS Dev Nugget 284 Use Shell Aliases for Git commandsDec 20, 2017
iOS Dev Nugget 271 Zhi — Live Reloading Auto Layout Constraints and moreOct 18, 2017
iOS Dev Nugget 262 Apple Device Names APIAug 23, 2017
iOS Dev Nugget 254 Paw, for Working with APIsApr 26, 2017
iOS Dev Nugget 237 mas-cliApr 19, 2017
iOS Dev Nugget 236 Look up Error CodesFeb 09, 2017
iOS Dev Nugget 226 React NativeJul 09, 2016
iOS Dev Nugget 196 Rename Refactoring for Swift CodeJul 06, 2016
iOS Dev Nugget 195 Tools of the TradeMay 06, 2016
iOS Dev Nugget 186 Injection for XcodeFeb 03, 2016
iOS Dev Nugget 173 Xcode Package Manager, AlcatrazJan 11, 2016
iOS Dev Nugget 170 HomebrewJan 05, 2016
iOS Dev Nugget 169 fastlane: deliverSep 07, 2015
iOS Dev Nugget 152 Lossy PNG CompressionAug 07, 2015
iOS Dev Nugget 147 NSRegularExpression and NSDataDetectorMar 06, 2015
iOS Dev Nugget 125 View Debugging in XcodeFeb 13, 2015
iOS Dev Nugget 122 Importing Many Test Photos into iOS Simulator IINov 28, 2014
iOS Dev Nugget 111 iOS Support MatrixOct 24, 2014
iOS Dev Nugget 106 Command Line Access to Developer PortalOct 17, 2014
iOS Dev Nugget 105 Try FLEXSep 12, 2014
iOS Dev Nugget 100 Try RevealSep 05, 2014
iOS Dev Nugget 99 Try PaintCodeAug 15, 2014
iOS Dev Nugget 96 Jack, A Native App For iTunes ConnectJul 04, 2014
iOS Dev Nugget 90 Full-Text Searchable WWDC Video Text TranscriptsApr 04, 2014
iOS Dev Nugget 77 RubyMotion Tutorial For Objective C DevelopersJan 17, 2014
iOS Dev Nugget 66 JBChartView for ChartingDec 27, 2013
iOS Dev Nugget 63 Update Your iOS Development ToolboxOct 18, 2013
iOS Dev Nugget 53 Try Kaleidoscope, File Comparison for MacOct 11, 2013
iOS Dev Nugget 52 Set Up Crashlytics For Ad Hoc and App Store Builds OnlyJun 21, 2013
iOS Dev Nugget 36 Use TestFlight for Ad Hoc BuildsMay 11, 2013
iOS Dev Nugget 31 3rd Party Documentation ViewersMar 10, 2013
iOS Dev Nugget 22 Try AppCodeJan 05, 2013
iOS Dev Nugget 14 Charles Web Debugging Proxy
Dec 27, 2013 by Hwee-Boon Yar
I hope everyone is having fun over the holiday season. It's a good time to update your toolbox:
We all know how important screenshots on the app store are for marketing purposes. Status Magic lets you add perfect status bars to your screenshots.
As a new major version of iOS is released, we'll often want to take advantage of new APIs and still support older versions of iOS at the same time. This means a lot of if-else checking for API availability, but this can lead to runtime crashes if we just missed one of these. Deploymate helps to identify them as well as deprecated/obsolete API use. It's well worth the cost of a expedited review.
Like this post? Follow me @hboon on Twitter.
Related
Sep 28, 2018
iOS Dev Nugget 311 jqJul 08, 2018
iOS Dev Nugget 299 CurryingJun 01, 2018
iOS Dev Nugget 294 Core Data EditorMar 22, 2018
iOS Dev Nugget 284 Use Shell Aliases for Git commandsDec 20, 2017
iOS Dev Nugget 271 Zhi — Live Reloading Auto Layout Constraints and moreOct 18, 2017
iOS Dev Nugget 262 Apple Device Names APIAug 23, 2017
iOS Dev Nugget 254 Paw, for Working with APIsApr 26, 2017
iOS Dev Nugget 237 mas-cliApr 19, 2017
iOS Dev Nugget 236 Look up Error CodesFeb 09, 2017
iOS Dev Nugget 226 React NativeJul 09, 2016
iOS Dev Nugget 196 Rename Refactoring for Swift CodeJul 06, 2016
iOS Dev Nugget 195 Tools of the TradeMay 06, 2016
iOS Dev Nugget 186 Injection for XcodeFeb 03, 2016
iOS Dev Nugget 173 Xcode Package Manager, AlcatrazJan 11, 2016
iOS Dev Nugget 170 HomebrewJan 05, 2016
iOS Dev Nugget 169 fastlane: deliverSep 07, 2015
iOS Dev Nugget 152 Lossy PNG CompressionAug 07, 2015
iOS Dev Nugget 147 NSRegularExpression and NSDataDetectorMar 06, 2015
iOS Dev Nugget 125 View Debugging in XcodeFeb 13, 2015
iOS Dev Nugget 122 Importing Many Test Photos into iOS Simulator IINov 28, 2014
iOS Dev Nugget 111 iOS Support MatrixOct 24, 2014
iOS Dev Nugget 106 Command Line Access to Developer PortalOct 17, 2014
iOS Dev Nugget 105 Try FLEXSep 12, 2014
iOS Dev Nugget 100 Try RevealSep 05, 2014
iOS Dev Nugget 99 Try PaintCodeAug 15, 2014
iOS Dev Nugget 96 Jack, A Native App For iTunes ConnectJul 04, 2014
iOS Dev Nugget 90 Full-Text Searchable WWDC Video Text TranscriptsApr 04, 2014
iOS Dev Nugget 77 RubyMotion Tutorial For Objective C DevelopersJan 17, 2014
iOS Dev Nugget 66 JBChartView for ChartingJan 04, 2014
iOS Dev Nugget 64 Placeholder Views Using PAPlaceholderOct 18, 2013
iOS Dev Nugget 53 Try Kaleidoscope, File Comparison for MacOct 11, 2013
iOS Dev Nugget 52 Set Up Crashlytics For Ad Hoc and App Store Builds OnlyJun 21, 2013
iOS Dev Nugget 36 Use TestFlight for Ad Hoc BuildsMay 11, 2013
iOS Dev Nugget 31 3rd Party Documentation ViewersMar 10, 2013
iOS Dev Nugget 22 Try AppCodeJan 05, 2013
iOS Dev Nugget 14 Charles Web Debugging Proxy
Dec 20, 2013 by Hwee-Boon Yar
For certain apps such as those that let you pick an app-provided image and then let the user resize and rotate them, it's helpful to keep the asset as a PDF instead of rasterized PNGs. Since the user can resize them, sometimes you will want to have different resolutions of the same image. Doing this with rasterized PNGs is both time-consuming and takes up more space. If you save them as vectors in PDF files, you can convert them into UIImage instances at run time, with the appropriate size. Nigel Timothy Barber's UIImage-PDF lets you convert – at runtime – PDFs to UIImages:
UIImage* img = [UIImage imageWithPDFNamed:@"some-pdf.pdf" fitSize:CGSizeMake(600, 600)];
//Do something with img
Check it out.
Like this post? Follow me @hboon on Twitter.
Related
Aug 15, 2018
iOS Dev Nugget 305 Declaring Distinct Types from General TypesJul 24, 2018
iOS Dev Nugget 302 RealmJun 09, 2018
iOS Dev Nugget 295 SwifterSwiftMay 23, 2018
iOS Dev Nugget 293 iOSSnapshotTestCase (was FBSnapshotTestCase)Mar 15, 2018
iOS Dev Nugget 283 Eureka for FormsFeb 28, 2018
iOS Dev Nugget 281 Use R.swift for Static References to Resources Like ImagesFeb 21, 2018
iOS Dev Nugget 280 Using Custom Fonts Without Updating Info.plist ManuallyDec 06, 2017
iOS Dev Nugget 269 Including Finger Touches in App Preview VideosJul 11, 2017
iOS Dev Nugget 248 In-app Native RoutingMar 01, 2017
iOS Dev Nugget 229 PromisesFeb 22, 2017
iOS Dev Nugget 228 Recording and Playing Back Network CallsOct 23, 2016
iOS Dev Nugget 210 PMAlertControllerJun 03, 2016
iOS Dev Nugget 190 Quick Look Plug-in for Mobile Provisioning FilesMay 20, 2016
iOS Dev Nugget 188 SwiftLintApr 20, 2016
iOS Dev Nugget 184 Async LibraryAug 31, 2015
iOS Dev Nugget 151 More Wrappers for Keychain AccessAug 17, 2015
iOS Dev Nugget 149 Timepiece, a Swift Library for Handling DatesJul 27, 2015
iOS Dev Nugget 146 UIStackView and TZStackViewJul 21, 2015
iOS Dev Nugget 145 Listing Available FontsJul 05, 2015
iOS Dev Nugget 143 Don't Forget SQLiteJun 09, 2015
iOS Dev Nugget 139 Custom Build Configurations and Xcode SubprojectsMay 19, 2015
iOS Dev Nugget 136 Auto Layout with CartographyApr 29, 2015
iOS Dev Nugget 133 Dollar.swiftFeb 06, 2015
iOS Dev Nugget 121 InflectorKitDec 26, 2014
iOS Dev Nugget 115 Displaying Information in Settings AppDec 19, 2014
iOS Dev Nugget 114 Preview an Image for DebuggingDec 12, 2014
iOS Dev Nugget 113 GPUImage, a GPU-based Image and Video Processing FrameworkMay 30, 2014
iOS Dev Nugget 85 A More Customizable Button For Different StatesMay 02, 2014
iOS Dev Nugget 81 TMCache For In-Memory and Disk-backed CachingApr 18, 2014
iOS Dev Nugget 79 TweetBot Photo Flicking EffectMar 07, 2014
iOS Dev Nugget 73 Open Source Date Picker from SquareFeb 22, 2014
iOS Dev Nugget 71 TapJan 31, 2014
iOS Dev Nugget 68 Custom URL Schemes DirectorySep 20, 2013
iOS Dev Nugget 49 Wrapper to Get UIColor ComponentsMay 17, 2013
iOS Dev Nugget 32 FMDB: Thin Objective C Wrapper Around SQLiteOct 06, 2012
iOS Dev Nugget 1 Easy logging of values and objects
Dec 13, 2013 by Hwee-Boon Yar
The what?
We sometimes write code like:
NSString* someValue;
//...
NSString* val;
if (someValue) {
val = someValue;
} else {
val = @"some default";
}
or similarly, using the tenary operator:
NSString* someValue;
//...
NSString* val = someValue? someValue: @"some default";
You can leave out the middle operand of the tenary operator like this and it'll work as before:
NSString* someValue;
//...
NSString* val = someValue?: @"some default";
This special form of the tenary operator is known as the null coalescing operator in some languages.
Like this post? Follow me @hboon on Twitter.
Dec 07, 2013 by Hwee-Boon Yar
instancetype is an Objective C keyword that is meant to be used as a method return type representing the type of the current (sub)class. Generally, you'd want to use it in constructor-type methods. It's preferable to returning id or the specific class so that it works nicely without requiring casting or giving up type-checking. E.g.
@interface MyClass : NSObject
+ (MyClass)myClassWithValue1:(NSString*)aString;
+ (id)myClassWithValue2:(NSString*)aString;
+ (instancetype)myClassWithValue3:(NSString*)aString;
@end
@interface MySubClass : MyClass
@end
If you call +myClassWithValue1: when working with MySubClass, you'd need to cast it back to MySubClass. If you use myClassWithValue2:, you loose type checking. If you use myClassWithValue3, you get the best of both worlds.
Like this post? Follow me @hboon on Twitter.
Nov 30, 2013 by Hwee-Boon Yar
Sometimes when you are on your device and you want to zoom in on an app to look at it's UI. You can do it easily by enabling zoom. Go to Settings app > General > Accessibility > Accessibility Shortcut (at the bottom) and choose Zoom.
You can then triple-tap the home button to toggle zoom mode on/off. When zoom is on, drag three fingers to pan the screen and double-tap three fingers and drag to change zoom level.
Like this post? Follow me @hboon on Twitter.
Nov 23, 2013 by Hwee-Boon Yar
A follow-up to tip #26 Do not prompt user to enable push notifications immediately, here's a few steps for how to implement push notifications in your app:
The class implementing UIApplicationDelegate has to implement:
-application:didRegisterForRemoteNotificationsWithDeviceToken: to handle when registration is successful, e.g. you'd want to store the device token alongside a user account on your server and pass the token to APNS every time you initiate a push.-application:didFailToRegisterForRemoteNotificationsWithError: to handle when registration fails. Check the NSError* object.-application:didReceiveRemoteNotification: OR -application:didReceiveRemoteNotification:fetchCompletionHandler: to handle when a notification is received while the app is running, be it in the foreground or background.-application:willFinishLaunchingWithOptions: to handle when the app receives a push while it is not running. Check the dictionary for the UIApplicationLaunchOptionsRemoteNotificationKey key.
Like this post? Follow me @hboon on Twitter.
Nov 16, 2013 by Hwee-Boon Yar
In Xcode 5, you can make your comments appear in the Xcode opt-click pop-up help by using 3 slashes (///) instead of 2.
Example, you'd normally write:
//This comment has 2 slashes
- (void)logout;
Instead, you write:
///This comment has 3 slashes
- (void)logout;
This is especially helpful if you judiciously document your header files.
Like this post? Follow me @hboon on Twitter.
Nov 09, 2013 by Hwee-Boon Yar
You have written an incredibly well-design app and released it to the world, doing your usual marketing, posting to social media, review sites, getting friends and colleagues and friends of friends to post links to your app.
How do you know which channel is promoting your app effectively? A simple trick is to sign up for Apple's iTunes affiliate program. The key is not in earning the affiliate commission, but the link tracking functionality which affiliate links gives you.
For example, the link for the game Minecraft for iOS is https://itunes.apple.com/us/app/minecraft-pocket-edition/id479516143?mt=8&at=10l4TP&ct=iosdev [1]. Note the key-value for at and ct. The value for at is my affiliate code and the value of ct (campaign token) is what I use to track when the link is clicked. You have to always use the affiliate code that is linked to your account and use a different value of ct (make up something, up to 40 characters long) depending on where you are going to use the link.
So sign up and begin tracking your iOS app store links.
[1] See what I did there? Now I can track if people click on my link to Minecraft from this newsletter. It works even for apps which I didn't write.
Like this post? Follow me @hboon on Twitter.
Nov 01, 2013 by Hwee-Boon Yar
Related to #11 Use Automatic Reference Counting (ARC),
I've seen people mention that it is very tedious to add -fno-objc-arc (and similarly -fobjc-arc) flags to multiple source files in Xcode.
Here's 2 nice tricks related to this: While editing your project settings, looking at the list of source files under the Build Phases tab, you can type in the text box to filter files. In addition, you can cmd-click to select multiple files in the list and then double click any of them, enter the flags once and hit return to apply it to all selected files.
Like this post? Follow me @hboon on Twitter.
Oct 25, 2013 by Hwee-Boon Yar
As I've written in previous tips – #7 and #12 – pragmas are useful for helping organize code and suppress certain compiler warnings. A warning you sometimes want to suppress is the “Unused Variable” warning. Sometimes you write code where you want to store the result in a local variable, but may not actually use the variable right now (perhaps it is only used in debugging code?).
BOOL result = [[NSFileManager defaultManager] createFileAtPath:aPathString contents:UIImageJPEGRepresentation(anImage, 0.7) attributes:nil];
#pragma unused(result)
The single line of code will trigger a Unused Variable warning with Xcode. By adding the #pragma after the line where the variable is declared, you will suppress the warning, including that you knowingly created the unused variable.
Like this post? Follow me @hboon on Twitter.
Oct 18, 2013 by Hwee-Boon Yar
As a software developer, you'll at least occasionally need to run diffs between source code and image files, you'll want to check out Kaleidoscope by Black Pixel.
You can also configure it to be launched as the difftool when using git, mercurial and several version control systems.
There's a 15-day trial available and you can purchase it at the Mac App Stor]
Like this post? Follow me @hboon on Twitter.
Related
Sep 28, 2018
iOS Dev Nugget 311 jqJul 08, 2018
iOS Dev Nugget 299 CurryingJun 01, 2018
iOS Dev Nugget 294 Core Data EditorMar 22, 2018
iOS Dev Nugget 284 Use Shell Aliases for Git commandsDec 20, 2017
iOS Dev Nugget 271 Zhi — Live Reloading Auto Layout Constraints and moreOct 18, 2017
iOS Dev Nugget 262 Apple Device Names APIAug 23, 2017
iOS Dev Nugget 254 Paw, for Working with APIsApr 26, 2017
iOS Dev Nugget 237 mas-cliApr 19, 2017
iOS Dev Nugget 236 Look up Error CodesFeb 09, 2017
iOS Dev Nugget 226 React NativeJul 09, 2016
iOS Dev Nugget 196 Rename Refactoring for Swift CodeJul 06, 2016
iOS Dev Nugget 195 Tools of the TradeMay 06, 2016
iOS Dev Nugget 186 Injection for XcodeFeb 03, 2016
iOS Dev Nugget 173 Xcode Package Manager, AlcatrazJan 11, 2016
iOS Dev Nugget 170 HomebrewJan 05, 2016
iOS Dev Nugget 169 fastlane: deliverSep 07, 2015
iOS Dev Nugget 152 Lossy PNG CompressionAug 07, 2015
iOS Dev Nugget 147 NSRegularExpression and NSDataDetectorMar 06, 2015
iOS Dev Nugget 125 View Debugging in XcodeFeb 13, 2015
iOS Dev Nugget 122 Importing Many Test Photos into iOS Simulator IINov 28, 2014
iOS Dev Nugget 111 iOS Support MatrixOct 24, 2014
iOS Dev Nugget 106 Command Line Access to Developer PortalOct 17, 2014
iOS Dev Nugget 105 Try FLEXSep 12, 2014
iOS Dev Nugget 100 Try RevealSep 05, 2014
iOS Dev Nugget 99 Try PaintCodeAug 15, 2014
iOS Dev Nugget 96 Jack, A Native App For iTunes ConnectJul 04, 2014
iOS Dev Nugget 90 Full-Text Searchable WWDC Video Text TranscriptsApr 04, 2014
iOS Dev Nugget 77 RubyMotion Tutorial For Objective C DevelopersJan 17, 2014
iOS Dev Nugget 66 JBChartView for ChartingJan 04, 2014
iOS Dev Nugget 64 Placeholder Views Using PAPlaceholderDec 27, 2013
iOS Dev Nugget 63 Update Your iOS Development ToolboxOct 11, 2013
iOS Dev Nugget 52 Set Up Crashlytics For Ad Hoc and App Store Builds OnlyJun 21, 2013
iOS Dev Nugget 36 Use TestFlight for Ad Hoc BuildsMay 11, 2013
iOS Dev Nugget 31 3rd Party Documentation ViewersMar 10, 2013
iOS Dev Nugget 22 Try AppCodeJan 05, 2013
iOS Dev Nugget 14 Charles Web Debugging Proxy
Oct 11, 2013 by Hwee-Boon Yar
Crashlytics is an excellent and free tool for developers to capture crash logs when our apps crash both during testing or production.
Once you have Crashlytics integrated into your Xcode project, it will try to upload to its servers every time you create a build, including debug builds. I like to do frequent builds especially when I am testing features or screen layouts that I'm not familiar with. Having Crashlytics attempt to upload every time can put a drain on battery power and network bandwidth (if tethering).
To make Crashlytics ignore debug builds, in your Run Script phase for running Crashlytics, instead of doing:
./Crashlytics.framework/run <app id>
Use this instead:
if [ "$CONFIGURATION" != "Debug" ]; then
./Crashlytics.framework/run <app id>
fi
Make sure the string "Debug" matches the Build Configuration you want to ignore.
Like this post? Follow me @hboon on Twitter.
Related
Sep 28, 2018
iOS Dev Nugget 311 jqJul 08, 2018
iOS Dev Nugget 299 CurryingJun 01, 2018
iOS Dev Nugget 294 Core Data EditorMar 22, 2018
iOS Dev Nugget 284 Use Shell Aliases for Git commandsDec 20, 2017
iOS Dev Nugget 271 Zhi — Live Reloading Auto Layout Constraints and moreOct 18, 2017
iOS Dev Nugget 262 Apple Device Names APIAug 23, 2017
iOS Dev Nugget 254 Paw, for Working with APIsApr 26, 2017
iOS Dev Nugget 237 mas-cliApr 19, 2017
iOS Dev Nugget 236 Look up Error CodesFeb 09, 2017
iOS Dev Nugget 226 React NativeJul 09, 2016
iOS Dev Nugget 196 Rename Refactoring for Swift CodeJul 06, 2016
iOS Dev Nugget 195 Tools of the TradeMay 06, 2016
iOS Dev Nugget 186 Injection for XcodeFeb 03, 2016
iOS Dev Nugget 173 Xcode Package Manager, AlcatrazJan 11, 2016
iOS Dev Nugget 170 HomebrewJan 05, 2016
iOS Dev Nugget 169 fastlane: deliverSep 07, 2015
iOS Dev Nugget 152 Lossy PNG CompressionAug 07, 2015
iOS Dev Nugget 147 NSRegularExpression and NSDataDetectorMar 06, 2015
iOS Dev Nugget 125 View Debugging in XcodeFeb 13, 2015
iOS Dev Nugget 122 Importing Many Test Photos into iOS Simulator IINov 28, 2014
iOS Dev Nugget 111 iOS Support MatrixOct 24, 2014
iOS Dev Nugget 106 Command Line Access to Developer PortalOct 17, 2014
iOS Dev Nugget 105 Try FLEXSep 12, 2014
iOS Dev Nugget 100 Try RevealSep 05, 2014
iOS Dev Nugget 99 Try PaintCodeAug 15, 2014
iOS Dev Nugget 96 Jack, A Native App For iTunes ConnectJul 04, 2014
iOS Dev Nugget 90 Full-Text Searchable WWDC Video Text TranscriptsApr 04, 2014
iOS Dev Nugget 77 RubyMotion Tutorial For Objective C DevelopersJan 17, 2014
iOS Dev Nugget 66 JBChartView for ChartingJan 04, 2014
iOS Dev Nugget 64 Placeholder Views Using PAPlaceholderDec 27, 2013
iOS Dev Nugget 63 Update Your iOS Development ToolboxOct 18, 2013
iOS Dev Nugget 53 Try Kaleidoscope, File Comparison for MacJun 21, 2013
iOS Dev Nugget 36 Use TestFlight for Ad Hoc BuildsMay 11, 2013
iOS Dev Nugget 31 3rd Party Documentation ViewersMar 10, 2013
iOS Dev Nugget 22 Try AppCodeJan 05, 2013
iOS Dev Nugget 14 Charles Web Debugging Proxy
Oct 04, 2013 by Hwee-Boon Yar
When using UINavigationController and pushing view controllers, you'll often want to use a custom back button by implementing your own custom view (usually a UIButton) and assigning it to the navigation item's leftBarButtonItem property. Or you might just want to keep the default back button and want to do something additional when user taps back, such as playing a sound effect by implementing -navigationController:animationControllerForOperation:fromViewController:toViewController: of UINavigationControllerDelegate. In iOS 7, you'll find that both approaches still work except that the default swipe right from left edge of screen gesture to go back stops working. All you need to do is the following to fix it:
UINavigationController* nc;
//something
nc.interactivePopGestureRecognizer.delegate = (id<UIGestureRecognizerDelegate>)self;
You don't have to implement any methods from the UIGestureRecognizerDelegate protocol.
Like this post? Follow me @hboon on Twitter.
Sep 27, 2013 by Hwee-Boon Yar
In iOS 6, 2 new methods -registerClass:forCellReuseIdentifier: and -dequeueReusableCellWithIdentifier:forIndexPath: were added to UITableView.
Prior to this, you would write code like the following when you need a UITableView cell instance:
- (UITableViewCell*)tableView:(UITableView*)aTableView cellForRowAtIndexPath:(NSIndexPath*)indexPath {
NSString* cellIdentifier = @"MyTableViewCellIdentifier";
UITableViewCell* cell = aTableView.dequeueReusableCellWithIdentifier(cellIdentifier)
if (!cell) {
cell = [[UITableView alloc] initWithStyle:UITableViewCellStyleDefault reuseIdentifier:cellIdentifier];
}
//config cell
return cell;
}
Starting with iOS 6, you can do this instead:
- (void)viewDidLoad {
[super viewDidLoad];
NSString* cellIdentifier = @"MyTableViewCellIdentifier";
[self.tableView registerClass:[UITableViewCell class] forCellReuseIdentifier:cellIdentifier];
}
- (UITableViewCell*)tableView:(UITableView*)aTableView cellForRowAtIndexPath:(NSIndexPath*)indexPath {
NSString* cellIdentifier = @"MyTableViewCellIdentifier";
UITableViewCell* cell = aTableView.dequeueReusableCellWithIdentifier(cellIdentifier, forIndexPath:indexPath)
//config cell. cell is always non-nil and the cell will have the correct height as returned by -tableView:heightForRowAtIndexPath:.
return cell;
}
-dequeueReusableCellWithIdentifier:forIndexPath: always return a valid cell so we can skip the nil check. The cell will also have the correct height as returned by -tableView.heightForRowAtIndexPath:
Note that using this, all cells created will have the style UITableViewCellStyleDefault unless we use a UITableViewCell subclass.
Like this post? Follow me @hboon on Twitter.
Sep 20, 2013 by Hwee-Boon Yar
While working with UIColor instances, you might want to extract the individual red, green and blue components. UIColor provides the method -getRed:green:blue:alpha: to do this, but it's a little tedious. I wrote a few extensions methods that wraps around this so you can call -moComponents and get the components as an array or -moRed, -moGreen, -moBlue and -moAlpha separately,
UIColor* someColor; //Get the color from somewhere.
NSLog(@"Red: %f Green: %f Blue: %f alpha: %f", [someColor moRed], [someColor moGreen], [someColor moBlue], [someColor moAlpha]);
You can find the additions on github here and here.
Like this post? Follow me @hboon on Twitter.
Related
Aug 15, 2018
iOS Dev Nugget 305 Declaring Distinct Types from General TypesJul 24, 2018
iOS Dev Nugget 302 RealmJun 09, 2018
iOS Dev Nugget 295 SwifterSwiftMay 23, 2018
iOS Dev Nugget 293 iOSSnapshotTestCase (was FBSnapshotTestCase)Mar 15, 2018
iOS Dev Nugget 283 Eureka for FormsFeb 28, 2018
iOS Dev Nugget 281 Use R.swift for Static References to Resources Like ImagesFeb 21, 2018
iOS Dev Nugget 280 Using Custom Fonts Without Updating Info.plist ManuallyDec 06, 2017
iOS Dev Nugget 269 Including Finger Touches in App Preview VideosJul 11, 2017
iOS Dev Nugget 248 In-app Native RoutingMar 01, 2017
iOS Dev Nugget 229 PromisesFeb 22, 2017
iOS Dev Nugget 228 Recording and Playing Back Network CallsOct 23, 2016
iOS Dev Nugget 210 PMAlertControllerJun 03, 2016
iOS Dev Nugget 190 Quick Look Plug-in for Mobile Provisioning FilesMay 20, 2016
iOS Dev Nugget 188 SwiftLintApr 20, 2016
iOS Dev Nugget 184 Async LibraryAug 31, 2015
iOS Dev Nugget 151 More Wrappers for Keychain AccessAug 17, 2015
iOS Dev Nugget 149 Timepiece, a Swift Library for Handling DatesJul 27, 2015
iOS Dev Nugget 146 UIStackView and TZStackViewJul 21, 2015
iOS Dev Nugget 145 Listing Available FontsJul 05, 2015
iOS Dev Nugget 143 Don't Forget SQLiteJun 09, 2015
iOS Dev Nugget 139 Custom Build Configurations and Xcode SubprojectsMay 19, 2015
iOS Dev Nugget 136 Auto Layout with CartographyApr 29, 2015
iOS Dev Nugget 133 Dollar.swiftFeb 06, 2015
iOS Dev Nugget 121 InflectorKitDec 26, 2014
iOS Dev Nugget 115 Displaying Information in Settings AppDec 19, 2014
iOS Dev Nugget 114 Preview an Image for DebuggingDec 12, 2014
iOS Dev Nugget 113 GPUImage, a GPU-based Image and Video Processing FrameworkMay 30, 2014
iOS Dev Nugget 85 A More Customizable Button For Different StatesMay 02, 2014
iOS Dev Nugget 81 TMCache For In-Memory and Disk-backed CachingApr 18, 2014
iOS Dev Nugget 79 TweetBot Photo Flicking EffectMar 07, 2014
iOS Dev Nugget 73 Open Source Date Picker from SquareFeb 22, 2014
iOS Dev Nugget 71 TapJan 31, 2014
iOS Dev Nugget 68 Custom URL Schemes DirectoryDec 20, 2013
iOS Dev Nugget 62 Using PDF Instead of PNG Files for Resizable AssetsMay 17, 2013
iOS Dev Nugget 32 FMDB: Thin Objective C Wrapper Around SQLiteOct 06, 2012
iOS Dev Nugget 1 Easy logging of values and objects
Sep 13, 2013 by Hwee-Boon Yar
It's not advisable to store sensitive information, especially passwords in NSUserDefaults or as plain text files. These information should be stored in the Keychain.
However, the Keychain API is a little harder to use than it should be, and several libraries have been written to wrap around it. Lockbox from Mark Granoff provides a clean API for storing and retrieving items to the Keychain. It also provides convenience methods to store other data types such as NSDate, NSArray and NSSet into the Keychain.
Like this post? Follow me @hboon on Twitter.
Sep 06, 2013 by Hwee-Boon Yar
Sometimes you'll want to generate several versions of the same image with different colors. For example you might want to generate images for different states of a button or perhaps your app allows users to pick their own colors for certain icon-like images. You can do it easily with UIImage categories from Matt Gemmell. For e.g., to generate a version in red, you can do:
UIImage* newImage = [originalImage imageTintedWithColor:[UIColor redColor]];
Like this post? Follow me @hboon on Twitter.
Aug 31, 2013 by Hwee-Boon Yar
Xcode has excellent instrumentation tools for profiling your code. But sometimes you want to compare the performance of 2 versions of the same code performing the same task. Here's a bit of code I use to print out how long it takes to run a block of code:
void moTime1(void(^block)(void), NSString* s) {
NSDate* start = [NSDate date];
block();
NSLog(@"%@ %f", s, [[NSDate date] timeIntervalSinceDate:start]);
}
Here's how you use it to compare the performance of 2 pieces of code:
moTime1(^{
runVersion1();
}, @"version 1");
moTime1(^{
runVersion2();
}, @"version 2");
And it should print something like:
> version 1 0.100000
> version 2 0.001000
While not terribly accurate, you can see at a glance that version 2 is 2 orders of magnitude faster.
Like this post? Follow me @hboon on Twitter.
Aug 23, 2013 by Hwee-Boon Yar
xScope is a wonderful utility that runs on OS X. It provides a set of tools that includes letting you measure what's on screen, set up vertical and horizontal lines for alignment and magnify parts of the user interface you are working on.
I often use it to zoom in to check colors as well as alignment as I'm developing on the simulator.
You can buy xScope from the Mac App Store. There's also a trial version available.
Like this post? Follow me @hboon on Twitter.
Aug 17, 2013 by Hwee-Boon Yar
We want to keep our mobile apps as small as possible to improve download time, stay within the cellular download limit (where possible) as well as reduce memory footprint. But sometimes, in a project, there tends to be duplicated images or even unused images leftover from previous development cycles. How nice would it be if there's a way to automatically find them?
Slender does just that. Trial available at Slender's web site. Check it out.
Like this post? Follow me @hboon on Twitter.
Aug 09, 2013 by Hwee-Boon Yar
Sometimes you want to retrieve an image file's properties but don't need to display (and hence read) the image itself. This is particularly important if you need to retrieve the properties of many image files, as reading the whole file into memory takes time and resources. You can access the image properties using the Image I/O framework:
#import <ImageIO/ImageIO.h>
//...
//Some path
NSString* path = [[[NSBundle mainBundle] resourcePath] stringByAppendingPathComponent:@"back-btn.png"];
NSURL* imageFileURL = [NSURL fileURLWithPath:path];
CGImageSourceRef imageSource = CGImageSourceCreateWithURL((__bridge CFURLRef)imageFileURL, NULL);
if (imageSource) {
NSDictionary* options = @{(NSString*)kCGImageSourceShouldCache:@NO};
CFDictionaryRef imageProperties = CGImageSourceCopyPropertiesAtIndex(imageSource, 0, (__bridge CFDictionaryRef)options);
if (imageProperties) {
NSLog( @"properties: %@", imageProperties);
CFRelease(imageProperties);
}
} else {
NSLog(@" Error loading image");
}
Courtesy of Accessing Image Properties Without Loading the Image into Memory (slightly modified, modernized)
Like this post? Follow me @hboon on Twitter.
Aug 02, 2013 by Hwee-Boon Yar
Often, you'll write code like:
NSMutableArray* names = [NSMutableArray array];
for (SomeObject* each in someArray) {
[names addObject:each.someNameProperty];
}
You can shorten it to:
NSArray* names = [someArray valueForKey:@"someNameProperty"];
Like this post? Follow me @hboon on Twitter.
Jul 26, 2013 by Hwee-Boon Yar
Sometimes you want to support older iOS versions and want to disable or hide a certain feature when it relies on APIs that are only available in newer iOS versions. In this case, you can't rely on conditional compilation since the same executable has to support multiple iOS versions.
You'll need to configure your project's deployment target to the oldest version of iOS you are supporting and at run time, check if the class or function exists and fall back to a different code path. For example, if you are supporting both iOS 5 and iOS 6 and want to make use of the class SKStoreProductViewController (which is only available in iOS 6 and newer), you'd write:
if ([SKStoreProductViewController class])) {
// Class is supported
SKStoreProductViewController *storeController = [[SKStoreProductViewController alloc] init];
//Do something with it
} else {
// Class not available. Unless the class is removed in future versions of iOS, this is likely iOS 5 or earlier
}
If a class doesn't support this check, you can fall back to this check instead:
if (NSClassFromString(@"SKStoreProductViewController")) {
} else {
}
You can do similar checks for methods and C functions with:
//Check if method is available
if ([UIImagePickerController instancesRespondToSelector:@selector(availableCaptureModesForCameraDevice:)]) {
} else {
}
//Check if function is available
if (UIGraphicsBeginImageContextWithOptions) {
} else {
}
See the SDK Compatibility Guide for more details.
Like this post? Follow me @hboon on Twitter.
Jul 19, 2013 by Hwee-Boon Yar
Blocks are wonderful and in many cases lead to shorter code, e.g. reducing callback and multithreading code. But it's also easy to create retain cycles when you use blocks, causing memory to be unnecessarily retained. Retain cycles happen when — in the simplest and most common case, two — objects keep strong references to each other such that they can't be freed even when the objects aren't used anymore.
-someMethod1 will cause a retain cycle. The block refers to self (an instance of SomeClass) and will retain a strong reference to the instance of SomeClass, which also retains a strong reference to the block. -someMethod2 is the correct way to write the code. It breaks the retain cycle by forcing the block to only access a weak reference to the instance of SomeClass.
@interface SomeClass()
@property (nonatomic,strong) MyClass* obj;
@end
@implementation SomeClass
- (void)someMethod1 {
self.obj = [MyClass new];
self.obj.block = ^{
//use self
};
}
- (void)someMethod2 {
self.obj = [MyClass new];
__weak typeof(self) weakself = self;
self.obj.block = ^{
//use weakself instead of self
};
}
@end
Current versions of Xcode (4.6.2 as of writing) warns about this, but it is useful to know especially to be able to look out for more complicated cases where the compiler cannot detect this.
Like this post? Follow me @hboon on Twitter.
Jul 13, 2013 by Hwee-Boon Yar
Often you'll want to cache objects in your app. You might do it for many reasons such as avoiding expensive calculations or to reducing unnecessary network access. If you are using NSMutableDictionary for this, you'll definitely want to look into NSCache for caches.
The key benefit of NSCache over NSMutableDictionary when used as a cache is the former will automatically evict objects from itself appropriately when there's low memory pressure.
Using NSCache is easy. If you don't use subscript-indexing syntax for NSDictionary/NSMutableDictionary, you'll cover almost all cases by just replacing NSMutableDictionary with NSCache.
If you use subscript-indexing, you can add the following extension:
@interface NSCache(NSCache_extension)
- (id)objectForKeyedSubscript:(id)key;
- (void)setObject:(id)object forKeyedSubscript:(id<NSCopying>)key;
@end
@implementation NSCache(NSCache_extension)
- (id)objectForKeyedSubscript:(id)key {
return [self objectForKey:key];
}
- (void)setObject:(id)object forKeyedSubscript:(id<NSCopying>)key {
[self setObject:object forKey:key];
}
@end
Like this post? Follow me @hboon on Twitter.
Related
Aug 23, 2017
iOS Dev Nugget 254 Paw, for Working with APIsJul 19, 2017
iOS Dev Nugget 249 App Transport Security Diagnostics with nscurlFeb 22, 2017
iOS Dev Nugget 228 Recording and Playing Back Network CallsDec 22, 2016
iOS Dev Nugget 219 Test Your App with Airplane Mode enabledMar 21, 2016
iOS Dev Nugget 180 Low Power ModeOct 07, 2015
iOS Dev Nugget 156 -canOpenURL:Sep 23, 2015
iOS Dev Nugget 154 App Transport SecurityJul 16, 2015
iOS Dev Nugget 144 NSURLSession instead of NSURLConnectionJan 24, 2014
iOS Dev Nugget 67 Simulating a slow cellular network with Network Link Conditioner on iOSJan 05, 2013
iOS Dev Nugget 14 Charles Web Debugging ProxyDec 28, 2012
iOS Dev Nugget 13 Simulating a slow cellular network with Network Link Conditioner
Jul 05, 2013 by Hwee-Boon Yar
It's common to tweak your @2x images. You might not want to spend double the effort to tweak the normal version of your images especially when you know that you might be tweaking them again. If you install ImageMagick[1], here's 2 handy commands that will help you generate the normal version of the images from your @2x version. Be careful they override any existing normal images. In a terminal, cd to your project directory and run:
find . -name "*@2x.png" | xargs mogrify -format PNG32 -resize 50%
find . -name "*@2x.PNG32" | sed -e "p;s/@2x.PNG32/.png/" | xargs -n2 mv
[1] You can install ImageMagick using Homebrew.
Like this post? Follow me @hboon on Twitter.
Jun 29, 2013 by Hwee-Boon Yar
I'm sharing one of my most used function. It's just Wil Shipley's IsEmpty() renamed.
static inline BOOL moIsEmpty(id thing) {
return thing == nil ||
thing == [NSNull null] ||
([thing respondsToSelector:@selector(length)] && [(NSData*)thing length] == 0) ||
([thing respondsToSelector:@selector(count)] && [(NSArray*)thing count] == 0);
}
Just put this into a header file and anytime you want to check if a container/string is empty — nil, [NSNull null], empty string, a container with no elements — you use moIsEmpty().
Also a convenience function wrapping it:
static inline BOOL moNotEmpty(id thing) {
return !moIsEmpty(thing);
}
Like this post? Follow me @hboon on Twitter.
Jun 21, 2013 by Hwee-Boon Yar
If you haven't used TestFlight, you should start immediately. It lets you distribute ad hoc builds easily to testers. You only need to archive in Xcode and a TestFlight helper app will prompt you to enter release notes as well as who should be given access to the build. Forget about managing your own FTP and HTTP servers or upgrading plist files for your own hosted ad hoc builds. Testers click in an email and download your test build.
Did I mention it's free to use?
Like this post? Follow me @hboon on Twitter.
Related
Sep 28, 2018
iOS Dev Nugget 311 jqJul 08, 2018
iOS Dev Nugget 299 CurryingJun 01, 2018
iOS Dev Nugget 294 Core Data EditorMar 22, 2018
iOS Dev Nugget 284 Use Shell Aliases for Git commandsDec 20, 2017
iOS Dev Nugget 271 Zhi — Live Reloading Auto Layout Constraints and moreOct 18, 2017
iOS Dev Nugget 262 Apple Device Names APIAug 23, 2017
iOS Dev Nugget 254 Paw, for Working with APIsApr 26, 2017
iOS Dev Nugget 237 mas-cliApr 19, 2017
iOS Dev Nugget 236 Look up Error CodesFeb 09, 2017
iOS Dev Nugget 226 React NativeJul 09, 2016
iOS Dev Nugget 196 Rename Refactoring for Swift CodeJul 06, 2016
iOS Dev Nugget 195 Tools of the TradeMay 06, 2016
iOS Dev Nugget 186 Injection for XcodeFeb 03, 2016
iOS Dev Nugget 173 Xcode Package Manager, AlcatrazJan 11, 2016
iOS Dev Nugget 170 HomebrewJan 05, 2016
iOS Dev Nugget 169 fastlane: deliverSep 07, 2015
iOS Dev Nugget 152 Lossy PNG CompressionAug 07, 2015
iOS Dev Nugget 147 NSRegularExpression and NSDataDetectorMar 06, 2015
iOS Dev Nugget 125 View Debugging in XcodeFeb 13, 2015
iOS Dev Nugget 122 Importing Many Test Photos into iOS Simulator IIJan 23, 2015
iOS Dev Nugget 119 Ad Hoc Tethered Install Using iTunesNov 28, 2014
iOS Dev Nugget 111 iOS Support MatrixOct 24, 2014
iOS Dev Nugget 106 Command Line Access to Developer PortalOct 17, 2014
iOS Dev Nugget 105 Try FLEXSep 12, 2014
iOS Dev Nugget 100 Try RevealSep 05, 2014
iOS Dev Nugget 99 Try PaintCodeAug 15, 2014
iOS Dev Nugget 96 Jack, A Native App For iTunes ConnectJul 04, 2014
iOS Dev Nugget 90 Full-Text Searchable WWDC Video Text TranscriptsApr 04, 2014
iOS Dev Nugget 77 RubyMotion Tutorial For Objective C DevelopersFeb 16, 2014
iOS Dev Nugget 70 Updates to Previous IssuesJan 17, 2014
iOS Dev Nugget 66 JBChartView for ChartingJan 04, 2014
iOS Dev Nugget 64 Placeholder Views Using PAPlaceholderDec 27, 2013
iOS Dev Nugget 63 Update Your iOS Development ToolboxOct 18, 2013
iOS Dev Nugget 53 Try Kaleidoscope, File Comparison for MacOct 11, 2013
iOS Dev Nugget 52 Set Up Crashlytics For Ad Hoc and App Store Builds OnlyMay 11, 2013
iOS Dev Nugget 31 3rd Party Documentation ViewersMar 10, 2013
iOS Dev Nugget 22 Try AppCodeJan 05, 2013
iOS Dev Nugget 14 Charles Web Debugging ProxyDec 07, 2012
iOS Dev Nugget 10 Write Synchronously to Campfire Room for Debugging
Jun 14, 2013 by Hwee-Boon Yar
Often, you might only support portrait orientation in an app, especially for a v1. However, you'd still want to think about about how your views and controls resize, especially both vertically and if there are right margins.
Autoresizing for a view controller's view (or a subview that should have the same size as it's parent view) is important because it not only helps you when you want to target a taller device (e.g. when iPhone 5 was just released) as well as when you want to handle changes in height due to status bar, in-call indicator bar, change of device orientation and showing and hiding of different keyboards.
Generally, you'd want to do this for views that occupy the screen:
UIView* bigView = [[UIView alloc] initWithFrame:[UIScreen mainScreen]];
bigView.autoresizingMask = UIViewAutoresizingFlexibleWidth | UIViewAutoresizingFlexibleHeight;
For a control that is right aligned (with a right margin of 5pts), you probably want something like:
UILabel* label = [[UILabel alloc] initWithFrame:CGRectMake(0, 100, 100, 20)];
label.autoresizingMask = UIViewAutoresizingFlexibleLeftMargin;
label.moRight = self.moWidth - 5;
-moRight and moWidth are category extensions I added to UIView for convenience. You can find them at here on GitHub.
Like this post? Follow me @hboon on Twitter.
Jun 08, 2013 by Hwee-Boon Yar
The key difference between +imageWithContentsOfFile: and +imageNamed: is the former always read the specified file from the filesystem for every call whereas the latter checks a system-maintained cache and only reads from the filesystem when it isn't available in the cache. So generally, you'd want to load images used in your UI with +imageNamed: and use +imageWithContentsOfFile: for images that are not repeatedly used within the app to improve the performance and memory footprint of your app.
Like this post? Follow me @hboon on Twitter.
May 31, 2013 by Hwee-Boon Yar
Most version 1.0 of apps aren't localized. But you can still make it much easier for you to add localization support later. Instead of using string values directly, just wrap them with calls to NSLocalizedString(). E.g.
label1.text = @"Hello world";
label2.text = [NSString stringWithFormat:@"Name: %@", name];
becomes:
label1.text = NSLocalizedString(@"Hello world", nil);
label2.text = [NSString stringWithFormat:NSLocalizedString(@"Name: %@", nil), name];
They wouldn't do anything when you only support one language, but cuts down on a lot of effort doing search and replace later when you want to localize your app in future version.
Like this post? Follow me @hboon on Twitter.
May 17, 2013 by Hwee-Boon Yar
If you aren't a fan of Core Data but would still like to use SQLite as your primary data store for iOS apps, check out FMDB. If you just want direct SQL access over a clean API, FMDB is perfect.
Like this post? Follow me @hboon on Twitter.
Related
Aug 15, 2018
iOS Dev Nugget 305 Declaring Distinct Types from General TypesJul 24, 2018
iOS Dev Nugget 302 RealmJun 09, 2018
iOS Dev Nugget 295 SwifterSwiftMay 23, 2018
iOS Dev Nugget 293 iOSSnapshotTestCase (was FBSnapshotTestCase)Mar 15, 2018
iOS Dev Nugget 283 Eureka for FormsFeb 28, 2018
iOS Dev Nugget 281 Use R.swift for Static References to Resources Like ImagesFeb 21, 2018
iOS Dev Nugget 280 Using Custom Fonts Without Updating Info.plist ManuallyDec 06, 2017
iOS Dev Nugget 269 Including Finger Touches in App Preview VideosJul 11, 2017
iOS Dev Nugget 248 In-app Native RoutingMar 01, 2017
iOS Dev Nugget 229 PromisesFeb 22, 2017
iOS Dev Nugget 228 Recording and Playing Back Network CallsOct 23, 2016
iOS Dev Nugget 210 PMAlertControllerJun 03, 2016
iOS Dev Nugget 190 Quick Look Plug-in for Mobile Provisioning FilesMay 20, 2016
iOS Dev Nugget 188 SwiftLintApr 20, 2016
iOS Dev Nugget 184 Async LibraryAug 31, 2015
iOS Dev Nugget 151 More Wrappers for Keychain AccessAug 17, 2015
iOS Dev Nugget 149 Timepiece, a Swift Library for Handling DatesJul 27, 2015
iOS Dev Nugget 146 UIStackView and TZStackViewJul 21, 2015
iOS Dev Nugget 145 Listing Available FontsJul 05, 2015
iOS Dev Nugget 143 Don't Forget SQLiteJun 09, 2015
iOS Dev Nugget 139 Custom Build Configurations and Xcode SubprojectsMay 19, 2015
iOS Dev Nugget 136 Auto Layout with CartographyApr 29, 2015
iOS Dev Nugget 133 Dollar.swiftFeb 06, 2015
iOS Dev Nugget 121 InflectorKitDec 26, 2014
iOS Dev Nugget 115 Displaying Information in Settings AppDec 19, 2014
iOS Dev Nugget 114 Preview an Image for DebuggingDec 12, 2014
iOS Dev Nugget 113 GPUImage, a GPU-based Image and Video Processing FrameworkMay 30, 2014
iOS Dev Nugget 85 A More Customizable Button For Different StatesMay 02, 2014
iOS Dev Nugget 81 TMCache For In-Memory and Disk-backed CachingApr 18, 2014
iOS Dev Nugget 79 TweetBot Photo Flicking EffectMar 07, 2014
iOS Dev Nugget 73 Open Source Date Picker from SquareFeb 22, 2014
iOS Dev Nugget 71 TapJan 31, 2014
iOS Dev Nugget 68 Custom URL Schemes DirectoryDec 20, 2013
iOS Dev Nugget 62 Using PDF Instead of PNG Files for Resizable AssetsSep 20, 2013
iOS Dev Nugget 49 Wrapper to Get UIColor ComponentsOct 06, 2012
iOS Dev Nugget 1 Easy logging of values and objects
May 11, 2013 by Hwee-Boon Yar
The Xcode documentation viewer is ridiculously slow for searching (it's pretty fast if you click through from the Xcode editor), even on a machine with SSD.
There are 3rd-party replacements such as Dash (Nagware with IAP purchase) and Ingredients (free and open source). Both are great, so check them out.
PS: If you find this newsletter helpful, please forward it to your colleagues who might find them useful too.
Like this post? Follow me @hboon on Twitter.
Related
Sep 28, 2018
iOS Dev Nugget 311 jqJul 08, 2018
iOS Dev Nugget 299 CurryingJun 01, 2018
iOS Dev Nugget 294 Core Data EditorMar 22, 2018
iOS Dev Nugget 284 Use Shell Aliases for Git commandsDec 20, 2017
iOS Dev Nugget 271 Zhi — Live Reloading Auto Layout Constraints and moreOct 18, 2017
iOS Dev Nugget 262 Apple Device Names APIAug 23, 2017
iOS Dev Nugget 254 Paw, for Working with APIsApr 26, 2017
iOS Dev Nugget 237 mas-cliApr 19, 2017
iOS Dev Nugget 236 Look up Error CodesFeb 09, 2017
iOS Dev Nugget 226 React NativeJul 09, 2016
iOS Dev Nugget 196 Rename Refactoring for Swift CodeJul 06, 2016
iOS Dev Nugget 195 Tools of the TradeMay 06, 2016
iOS Dev Nugget 186 Injection for XcodeFeb 03, 2016
iOS Dev Nugget 173 Xcode Package Manager, AlcatrazJan 11, 2016
iOS Dev Nugget 170 HomebrewJan 05, 2016
iOS Dev Nugget 169 fastlane: deliverSep 07, 2015
iOS Dev Nugget 152 Lossy PNG CompressionAug 07, 2015
iOS Dev Nugget 147 NSRegularExpression and NSDataDetectorMar 06, 2015
iOS Dev Nugget 125 View Debugging in XcodeFeb 13, 2015
iOS Dev Nugget 122 Importing Many Test Photos into iOS Simulator IINov 28, 2014
iOS Dev Nugget 111 iOS Support MatrixOct 24, 2014
iOS Dev Nugget 106 Command Line Access to Developer PortalOct 17, 2014
iOS Dev Nugget 105 Try FLEXSep 12, 2014
iOS Dev Nugget 100 Try RevealSep 05, 2014
iOS Dev Nugget 99 Try PaintCodeAug 15, 2014
iOS Dev Nugget 96 Jack, A Native App For iTunes ConnectJul 04, 2014
iOS Dev Nugget 90 Full-Text Searchable WWDC Video Text TranscriptsApr 04, 2014
iOS Dev Nugget 77 RubyMotion Tutorial For Objective C DevelopersJan 17, 2014
iOS Dev Nugget 66 JBChartView for ChartingJan 04, 2014
iOS Dev Nugget 64 Placeholder Views Using PAPlaceholderDec 27, 2013
iOS Dev Nugget 63 Update Your iOS Development ToolboxOct 18, 2013
iOS Dev Nugget 53 Try Kaleidoscope, File Comparison for MacOct 11, 2013
iOS Dev Nugget 52 Set Up Crashlytics For Ad Hoc and App Store Builds OnlyJun 21, 2013
iOS Dev Nugget 36 Use TestFlight for Ad Hoc BuildsMar 10, 2013
iOS Dev Nugget 22 Try AppCodeJan 05, 2013
iOS Dev Nugget 14 Charles Web Debugging Proxy
May 04, 2013 by Hwee-Boon Yar
There are 2 separate slow animations you can toggle. (1) Press the shift key thrice while at the home screen and it affects the home screen animation — i.e. when you tap on the home screen and your app is animated to take over the screen, as well as when your app is running and you tap the home screen and the app is minimized — and the more well-known scenario is (2) when you tap the shift key thrice while your app is running. The latter affects animations in the app itself.
Like this post? Follow me @hboon on Twitter.
Related
Apr 13, 2017
iOS Dev Nugget 235 Testing Localization Using Launch Arguments (III)Nov 25, 2015
iOS Dev Nugget 163 Testing Localization Using Launch Arguments (II)Sep 15, 2015
iOS Dev Nugget 153 Shortcut to Open Log in SimulatorMay 13, 2015
iOS Dev Nugget 135 CAShapeLayer, Animated Views and XCPShowView()Mar 06, 2015
iOS Dev Nugget 125 View Debugging in XcodeFeb 13, 2015
iOS Dev Nugget 122 Importing Many Test Photos into iOS Simulator IIOct 17, 2014
iOS Dev Nugget 105 Try FLEXOct 03, 2014
iOS Dev Nugget 103 Testing Localization Using Launch ArgumentsJun 13, 2014
iOS Dev Nugget 87 What's New in iOS 8Mar 28, 2014
iOS Dev Nugget 76 Importing Many Test Photos into iOS SimulatorApr 27, 2013
iOS Dev Nugget 29 Simulating a Custom LocationApr 12, 2013
iOS Dev Nugget 27 Two-finger touch in SimulatorMar 31, 2013
iOS Dev Nugget 25 Watch out for hotspot and in-call status bar heightMar 22, 2013
iOS Dev Nugget 24 Take Screenshots in the SimulatorJan 05, 2013
iOS Dev Nugget 14 Charles Web Debugging ProxyDec 28, 2012
iOS Dev Nugget 13 Simulating a slow cellular network with Network Link ConditionerNov 23, 2012
iOS Dev Nugget 8 Copy and paste from/to the iOS SimulatorNov 09, 2012
iOS Dev Nugget 6 Open app in Simulator with Finder
Apr 27, 2013 by Hwee-Boon Yar
When testing out location services, it is often useful to be able to simulate a particular location. This is especially important when you want to display a zoomed-in map and want to make sure that it works generally well for different parts of the world. The iOS simulator lets you enter a latitude-longitude pair at Debug > Location > Custom Location...
Like this post? Follow me @hboon on Twitter.
Related
Apr 13, 2017
iOS Dev Nugget 235 Testing Localization Using Launch Arguments (III)Nov 25, 2015
iOS Dev Nugget 163 Testing Localization Using Launch Arguments (II)Sep 15, 2015
iOS Dev Nugget 153 Shortcut to Open Log in SimulatorMay 13, 2015
iOS Dev Nugget 135 CAShapeLayer, Animated Views and XCPShowView()Mar 06, 2015
iOS Dev Nugget 125 View Debugging in XcodeFeb 13, 2015
iOS Dev Nugget 122 Importing Many Test Photos into iOS Simulator IIOct 17, 2014
iOS Dev Nugget 105 Try FLEXOct 03, 2014
iOS Dev Nugget 103 Testing Localization Using Launch ArgumentsJun 13, 2014
iOS Dev Nugget 87 What's New in iOS 8Mar 28, 2014
iOS Dev Nugget 76 Importing Many Test Photos into iOS SimulatorMay 04, 2013
iOS Dev Nugget 30 Shortcut key to toggle slow animations in the iOS simulator (part II)Apr 12, 2013
iOS Dev Nugget 27 Two-finger touch in SimulatorMar 31, 2013
iOS Dev Nugget 25 Watch out for hotspot and in-call status bar heightMar 22, 2013
iOS Dev Nugget 24 Take Screenshots in the SimulatorJan 05, 2013
iOS Dev Nugget 14 Charles Web Debugging ProxyDec 28, 2012
iOS Dev Nugget 13 Simulating a slow cellular network with Network Link ConditionerNov 23, 2012
iOS Dev Nugget 8 Copy and paste from/to the iOS SimulatorNov 09, 2012
iOS Dev Nugget 6 Open app in Simulator with Finder
Apr 20, 2013 by Hwee-Boon Yar
iOS 6 supports delta updates and you can take advantage of it to reduce the download size as well as time users spend to download updates of your app.
- Do not make unnecessary modifications to files.
- Keep content that is frequently changed separate from those that aren't.
Like this post? Follow me @hboon on Twitter.
Apr 12, 2013 by Hwee-Boon Yar
I suppose this is the developer's equivalent to tapping the status bar to scroll to top. Not many people seem to know about this:
With your mouse cursor over the simulator, hold alt to simulate 2-fingers. Move your cursor to place the “fingers” and then click to tap. With alt down, hold shift to lock the distance between the 2-fingers. You can effectively make pinch in and out actions on the simulator.
Like this post? Follow me @hboon on Twitter.
Related
Apr 13, 2017
iOS Dev Nugget 235 Testing Localization Using Launch Arguments (III)Nov 25, 2015
iOS Dev Nugget 163 Testing Localization Using Launch Arguments (II)Sep 15, 2015
iOS Dev Nugget 153 Shortcut to Open Log in SimulatorMay 13, 2015
iOS Dev Nugget 135 CAShapeLayer, Animated Views and XCPShowView()Mar 06, 2015
iOS Dev Nugget 125 View Debugging in XcodeFeb 13, 2015
iOS Dev Nugget 122 Importing Many Test Photos into iOS Simulator IIOct 17, 2014
iOS Dev Nugget 105 Try FLEXOct 03, 2014
iOS Dev Nugget 103 Testing Localization Using Launch ArgumentsJun 13, 2014
iOS Dev Nugget 87 What's New in iOS 8Mar 28, 2014
iOS Dev Nugget 76 Importing Many Test Photos into iOS SimulatorMay 04, 2013
iOS Dev Nugget 30 Shortcut key to toggle slow animations in the iOS simulator (part II)Apr 27, 2013
iOS Dev Nugget 29 Simulating a Custom LocationMar 31, 2013
iOS Dev Nugget 25 Watch out for hotspot and in-call status bar heightMar 22, 2013
iOS Dev Nugget 24 Take Screenshots in the SimulatorJan 05, 2013
iOS Dev Nugget 14 Charles Web Debugging ProxyDec 28, 2012
iOS Dev Nugget 13 Simulating a slow cellular network with Network Link ConditionerNov 23, 2012
iOS Dev Nugget 8 Copy and paste from/to the iOS SimulatorNov 09, 2012
iOS Dev Nugget 6 Open app in Simulator with Finder
Apr 05, 2013 by Hwee-Boon Yar
Many code samples — including Apple's — puts the call to -registerForRemoteNotificationTypes in -application:didFinishLaunchingWithOptions: and that's what many developers end up doing.
For many apps, the app has not yet have a chance to establish its value to the user. So there's a good chance the user will not enable push notifications if the prompt appears the first time the app launches.
Consider showing the prompt only after the user does a certain action such as having walked through a walkthrough screen, or at least describe to the user why it would be good for them to enable push notifications for this app.
It's good practice though to call -registerForRemoteNotificationTypes for each subsequent launch to make sure you always get the latest user device token (since the user might have upgraded to a new device and restored from iTunes backup), so you probably still want to add the call to -registerForRemoteNotificationTypes in -application:didFinishLaunchingWithOptions:, just make sure to not do it for new users.
Like this post? Follow me @hboon on Twitter.
Mar 31, 2013 by Hwee-Boon Yar
When your iPhone is acting as a Wi-Fi hotspot or there is an ongoing phone call, iOS will show a status bar right below the standard status bar at the top. iOS will automatically resize the current view's height to compensate. Your app needs to be ready to handle this by setting the autoresizingMask property of your views appropriately. You can simulate the appearance of the in-call status bar in the simulator using Hardware > Toggle In-Call Status Bar.
Like this post? Follow me @hboon on Twitter.
Related
Apr 13, 2017
iOS Dev Nugget 235 Testing Localization Using Launch Arguments (III)Nov 25, 2015
iOS Dev Nugget 163 Testing Localization Using Launch Arguments (II)Sep 15, 2015
iOS Dev Nugget 153 Shortcut to Open Log in SimulatorMay 13, 2015
iOS Dev Nugget 135 CAShapeLayer, Animated Views and XCPShowView()Mar 06, 2015
iOS Dev Nugget 125 View Debugging in XcodeFeb 13, 2015
iOS Dev Nugget 122 Importing Many Test Photos into iOS Simulator IIOct 17, 2014
iOS Dev Nugget 105 Try FLEXOct 03, 2014
iOS Dev Nugget 103 Testing Localization Using Launch ArgumentsJun 13, 2014
iOS Dev Nugget 87 What's New in iOS 8Mar 28, 2014
iOS Dev Nugget 76 Importing Many Test Photos into iOS SimulatorMay 04, 2013
iOS Dev Nugget 30 Shortcut key to toggle slow animations in the iOS simulator (part II)Apr 27, 2013
iOS Dev Nugget 29 Simulating a Custom LocationApr 12, 2013
iOS Dev Nugget 27 Two-finger touch in SimulatorMar 22, 2013
iOS Dev Nugget 24 Take Screenshots in the SimulatorJan 05, 2013
iOS Dev Nugget 14 Charles Web Debugging ProxyDec 28, 2012
iOS Dev Nugget 13 Simulating a slow cellular network with Network Link ConditionerNov 23, 2012
iOS Dev Nugget 8 Copy and paste from/to the iOS SimulatorNov 09, 2012
iOS Dev Nugget 6 Open app in Simulator with Finder
Mar 22, 2013 by Hwee-Boon Yar
Short nugget this week:
Did you know you can take screenshots (without the chrome) in the simulator with File > Save Screen Shot?
Like this post? Follow me @hboon on Twitter.
Related
Apr 13, 2017
iOS Dev Nugget 235 Testing Localization Using Launch Arguments (III)Nov 25, 2015
iOS Dev Nugget 163 Testing Localization Using Launch Arguments (II)Sep 15, 2015
iOS Dev Nugget 153 Shortcut to Open Log in SimulatorMay 13, 2015
iOS Dev Nugget 135 CAShapeLayer, Animated Views and XCPShowView()Mar 06, 2015
iOS Dev Nugget 125 View Debugging in XcodeFeb 13, 2015
iOS Dev Nugget 122 Importing Many Test Photos into iOS Simulator IIOct 17, 2014
iOS Dev Nugget 105 Try FLEXOct 03, 2014
iOS Dev Nugget 103 Testing Localization Using Launch ArgumentsJun 13, 2014
iOS Dev Nugget 87 What's New in iOS 8Mar 28, 2014
iOS Dev Nugget 76 Importing Many Test Photos into iOS SimulatorMay 04, 2013
iOS Dev Nugget 30 Shortcut key to toggle slow animations in the iOS simulator (part II)Apr 27, 2013
iOS Dev Nugget 29 Simulating a Custom LocationApr 12, 2013
iOS Dev Nugget 27 Two-finger touch in SimulatorMar 31, 2013
iOS Dev Nugget 25 Watch out for hotspot and in-call status bar heightJan 05, 2013
iOS Dev Nugget 14 Charles Web Debugging ProxyDec 28, 2012
iOS Dev Nugget 13 Simulating a slow cellular network with Network Link ConditionerNov 23, 2012
iOS Dev Nugget 8 Copy and paste from/to the iOS SimulatorNov 09, 2012
iOS Dev Nugget 6 Open app in Simulator with Finder
Mar 16, 2013 by Hwee-Boon Yar
When create new classes, especially UIView and UIViewController subclasses, make use of the Delegation design pattern as much as possible to reduce dependencies. The iOS SDK makes heavy use of it so you can find examples everywhere. For example. UIAlertView has a complimentary UIAlertViewDelegate protocol and MFMailComposeViewController has a complimentary MFMailComposeViewControllerDelegate protocol. Let the caller of your custom class be the delegate by implementing it's delegation protocol. Let's say you are creating a view controller class that pops up to let the user configure some properties. The view controller might have a Done and Cancel button. It should look like:
@interface ConfigurePropertiesViewController : UIViewController
@property (nonatomic,weak) id<ConfigurePropertiesViewControllerDelegate> delegate;
@end
@protocol ConfigurePropertiesViewControllerDelegate
- (void)configurePropertiesViewController:(ConfigurePropertiesViewController*)aViewController didFinishWithInfo:(NSDictionary*)aDictionary;
- (void)configurePropertiesViewControllerDidCancel:(ConfigurePropertiesViewController*)aViewController;
@end
@implementation ConfigurePropertiesViewController
- (void)userTappedDone {
NSDictionary* info;
//some code to generate properties and stored into info
[self.delegate configurePropertiesViewController:self didFinishWithInfo:info];
}
- (void)userTappedCancel {
[self.delegate configurePropertiesViewControllerDidCancel:self];
}
//...Other code for ConfigurePropertiesViewController
@end
The calling code for ConfigurePropertiesViewController will implement ConfigurePropertiesViewControllerDelegate protocol as well as the 2 functions -configurePropertiesViewController:didFinishWithInfo: and -configurePropertiesViewControllerDidCancel:, in both functions, dismissing the view controller and in the former, make use of the data stored in the NSDictionary instance.
This helps to create clean, malleable code.
Like this post? Follow me @hboon on Twitter.
Mar 10, 2013 by Hwee-Boon Yar
This week's tip is only 3 words — “Try JetBrains AppCode”.
It's a wonderful Xcode replacement. I use MacVim as my editor and only use Xcode for build and project file management, but I still keep a copy of AppCode around, ocassionally running it to fix or refactor stuff.
If you have any doubts over AppCode, see Why AppCode is Nice.
Like this post? Follow me @hboon on Twitter.
Related
Sep 28, 2018
iOS Dev Nugget 311 jqJul 08, 2018
iOS Dev Nugget 299 CurryingJun 01, 2018
iOS Dev Nugget 294 Core Data EditorMar 22, 2018
iOS Dev Nugget 284 Use Shell Aliases for Git commandsDec 20, 2017
iOS Dev Nugget 271 Zhi — Live Reloading Auto Layout Constraints and moreOct 18, 2017
iOS Dev Nugget 262 Apple Device Names APIAug 23, 2017
iOS Dev Nugget 254 Paw, for Working with APIsApr 26, 2017
iOS Dev Nugget 237 mas-cliApr 19, 2017
iOS Dev Nugget 236 Look up Error CodesFeb 09, 2017
iOS Dev Nugget 226 React NativeJul 09, 2016
iOS Dev Nugget 196 Rename Refactoring for Swift CodeJul 06, 2016
iOS Dev Nugget 195 Tools of the TradeMay 06, 2016
iOS Dev Nugget 186 Injection for XcodeFeb 03, 2016
iOS Dev Nugget 173 Xcode Package Manager, AlcatrazJan 11, 2016
iOS Dev Nugget 170 HomebrewJan 05, 2016
iOS Dev Nugget 169 fastlane: deliverSep 07, 2015
iOS Dev Nugget 152 Lossy PNG CompressionAug 07, 2015
iOS Dev Nugget 147 NSRegularExpression and NSDataDetectorMar 06, 2015
iOS Dev Nugget 125 View Debugging in XcodeFeb 13, 2015
iOS Dev Nugget 122 Importing Many Test Photos into iOS Simulator IINov 28, 2014
iOS Dev Nugget 111 iOS Support MatrixOct 24, 2014
iOS Dev Nugget 106 Command Line Access to Developer PortalOct 17, 2014
iOS Dev Nugget 105 Try FLEXSep 12, 2014
iOS Dev Nugget 100 Try RevealSep 05, 2014
iOS Dev Nugget 99 Try PaintCodeAug 15, 2014
iOS Dev Nugget 96 Jack, A Native App For iTunes ConnectJul 04, 2014
iOS Dev Nugget 90 Full-Text Searchable WWDC Video Text TranscriptsApr 04, 2014
iOS Dev Nugget 77 RubyMotion Tutorial For Objective C DevelopersJan 17, 2014
iOS Dev Nugget 66 JBChartView for ChartingJan 04, 2014
iOS Dev Nugget 64 Placeholder Views Using PAPlaceholderDec 27, 2013
iOS Dev Nugget 63 Update Your iOS Development ToolboxOct 18, 2013
iOS Dev Nugget 53 Try Kaleidoscope, File Comparison for MacOct 11, 2013
iOS Dev Nugget 52 Set Up Crashlytics For Ad Hoc and App Store Builds OnlyJun 21, 2013
iOS Dev Nugget 36 Use TestFlight for Ad Hoc BuildsMay 11, 2013
iOS Dev Nugget 31 3rd Party Documentation ViewersJan 05, 2013
iOS Dev Nugget 14 Charles Web Debugging Proxy
Mar 01, 2013 by Hwee-Boon Yar
Apple's iOS Human Interface Guidelines states the dimensions for launch image for each screen dimension. While iPads have 2 launch image for portrait and landscape, iPhones and iPod touch only have 1 for each screen size. Specifically for pre-iPhone 5 retina devices, only create 640x960 and 320x480. You should not create a launch image with the dimensions 640x920 or 320x460. If you do, and the user launch the app with the in-call (or tether) indicator on, you will notice that the middle of the launch image will be squashed. It's especially obvious if you have a logo or words at the center of your launch image.
Like this post? Follow me @hboon on Twitter.
Feb 22, 2013 by Hwee-Boon Yar
When the user taps on a text field and the keyboard appears, sometimes people write code such as the following to resize their view:
#define KEYBOARD_HEIGHT 216
self.tableView.moHeight -= KEYBOARD_HEIGHT;
self.textView.moTop -= KEYBOARD_HEIGHT;
Don't do that! Keyboard height can be different for different languages and input methods. Instead do this (and with a dash of animation):
//Do this earlier, eg. in -initWithFrame:
[[NSNotificationCenter defaultCenter] addObserver:self selector:@selector(keyboardWillShow:) name:UIKeyboardWillShowNotification object:nil];
-(void)keyboardWillShow:(NSNotification*)aNotification {
CGRect keyboardBounds;
[[aNotification.userInfo valueForKey:UIKeyboardFrameEndUserInfoKey] getValue:&keyboardBounds];
[UIView animateWithDuration:0.3 delay:0 options:UIViewAnimationOptionBeginFromCurrentState animations:^{
self.tableView.moHeight -= keyboardBounds.size.height;
self.textView.moTop -= keyboardBounds.size.height;
} completion:NULL];
}
(The moHeight and moTop are just convenience properties I have added to avoid dealing directly with CGRect).
Like this post? Follow me @hboon on Twitter.
Feb 15, 2013 by Hwee-Boon Yar
Xcode comes with the excellent Clang static analyzer. It helps to automatically find bugs such as memory leaks as well as unused variables.
Run it with the menu Product > Analyze. Use it!
Like this post? Follow me @hboon on Twitter.
Feb 08, 2013 by Hwee-Boon Yar
Don't you wish it's easier to create UIColor instances?
#define MO_RGBCOLOR(r,g,b) [UIColor colorWithRed:r/255.0 green:g/255.0 blue:b/255.0 alpha:1]
#define MO_RGBCOLOR1(c) [UIColor colorWithRed:c/255.0 green:c/255.0 blue:c/255.0 alpha:1]
#define MO_RGBACOLOR(r,g,b,a) [UIColor colorWithRed:r/255.0 green:g/255.0 blue:b/255.0 alpha:a]
You use them like:
UIColor* quiteRed = MO_RGBCOLOR(250, 0, 0);
UIColor* grayish = MO_RGBCOLOR1(30);
UIColor* transparentBlue = MO_RGBACOLOR(0, 0, 200, 0.5);
Like this post? Follow me @hboon on Twitter.
Feb 01, 2013 by Hwee-Boon Yar
Most projects need a singleton class or two. Even though it's mostly copy and paste, don't you wish they are easier to create?
Here's how:
@interface MyClass : NSObject
+ (MyClass*)sharedInstance;
@end
@implementation MyClass
+ (MyClass*)sharedInstance {
DEFINE_SHARED_INSTANCE_USING_BLOCK(^{
return [[self alloc] init];
});
}
@end
The code above make use of the following macro:
#define DEFINE_SHARED_INSTANCE_USING_BLOCK(block) \
static dispatch_once_t pred = 0; \
__strong static id _sharedObject = nil; \
dispatch_once(&pred, ^{ \
_sharedObject = block(); \
}); \
return _sharedObject;
The macro is courtesy of: https://gist.github.com/1057420
Like this post? Follow me @hboon on Twitter.
Jan 18, 2013 by Hwee-Boon Yar
Every tip I've written so far have been about what to do. Here's something that you shouldn't do:
Do not attempt to override methods of an existing class with a category method. You wouldn't know if it will work because the method you are trying to replace might actually have been implemented as a category method. In this case, you can't be sure that your version will only be loaded after the original.
Like this post? Follow me @hboon on Twitter.
Jan 11, 2013 by Hwee-Boon Yar
The Xcode debugger is very powerful and in some cases seemingly arcane if you are unfamiliar with it. But there are a few very useful things you should use it for. Set a breakpoint by clicking in the gutter along the desired line of code. When code execution pauses at the breakpoint, and you see the debugger prompt appear (lldb), you can type various commands into it. These 2 are very handy and easy to use:
po <expression evaluating to an object>
print <expression evaluating to a native type>
e.g.
po [[obj someFunction] anotherFunction]
print i*3
Sometimes you may need to cast to the correct return type to work, e.g.
print (int)i*3
Type help to see more details.
Like this post? Follow me @hboon on Twitter.
Jan 05, 2013 by Hwee-Boon Yar
Last week, I mentioned Apple's Network Link Conditioner as a testing tool.
Charles Web Debugging Proxy is a third-party debugging tool that is extremely important if you write apps that communicate with server APIs. When you start Charles, it automatically fires up a proxy server and modifies your OS X proxy server settings to point to it. Continue running your iOS app in the simulator and you will be able to monitor HTTP(s) requests in Charles.
There is a free trial available, so check it out.
Like this post? Follow me @hboon on Twitter.
Related
Sep 28, 2018
iOS Dev Nugget 311 jqJul 08, 2018
iOS Dev Nugget 299 CurryingJun 01, 2018
iOS Dev Nugget 294 Core Data EditorMar 22, 2018
iOS Dev Nugget 284 Use Shell Aliases for Git commandsDec 20, 2017
iOS Dev Nugget 271 Zhi — Live Reloading Auto Layout Constraints and moreOct 18, 2017
iOS Dev Nugget 262 Apple Device Names APIAug 23, 2017
iOS Dev Nugget 254 Paw, for Working with APIsJul 19, 2017
iOS Dev Nugget 249 App Transport Security Diagnostics with nscurlApr 26, 2017
iOS Dev Nugget 237 mas-cliApr 19, 2017
iOS Dev Nugget 236 Look up Error CodesApr 13, 2017
iOS Dev Nugget 235 Testing Localization Using Launch Arguments (III)Feb 22, 2017
iOS Dev Nugget 228 Recording and Playing Back Network CallsFeb 09, 2017
iOS Dev Nugget 226 React NativeDec 22, 2016
iOS Dev Nugget 219 Test Your App with Airplane Mode enabledJul 09, 2016
iOS Dev Nugget 196 Rename Refactoring for Swift CodeJul 06, 2016
iOS Dev Nugget 195 Tools of the TradeMay 06, 2016
iOS Dev Nugget 186 Injection for XcodeMar 21, 2016
iOS Dev Nugget 180 Low Power ModeFeb 03, 2016
iOS Dev Nugget 173 Xcode Package Manager, AlcatrazJan 11, 2016
iOS Dev Nugget 170 HomebrewJan 05, 2016
iOS Dev Nugget 169 fastlane: deliverNov 25, 2015
iOS Dev Nugget 163 Testing Localization Using Launch Arguments (II)Oct 07, 2015
iOS Dev Nugget 156 -canOpenURL:Sep 23, 2015
iOS Dev Nugget 154 App Transport SecuritySep 15, 2015
iOS Dev Nugget 153 Shortcut to Open Log in SimulatorSep 07, 2015
iOS Dev Nugget 152 Lossy PNG CompressionAug 07, 2015
iOS Dev Nugget 147 NSRegularExpression and NSDataDetectorJul 16, 2015
iOS Dev Nugget 144 NSURLSession instead of NSURLConnectionMay 13, 2015
iOS Dev Nugget 135 CAShapeLayer, Animated Views and XCPShowView()Mar 06, 2015
iOS Dev Nugget 125 View Debugging in XcodeFeb 13, 2015
iOS Dev Nugget 122 Importing Many Test Photos into iOS Simulator IINov 28, 2014
iOS Dev Nugget 111 iOS Support MatrixOct 24, 2014
iOS Dev Nugget 106 Command Line Access to Developer PortalOct 17, 2014
iOS Dev Nugget 105 Try FLEXOct 03, 2014
iOS Dev Nugget 103 Testing Localization Using Launch ArgumentsSep 12, 2014
iOS Dev Nugget 100 Try RevealSep 05, 2014
iOS Dev Nugget 99 Try PaintCodeAug 15, 2014
iOS Dev Nugget 96 Jack, A Native App For iTunes ConnectJul 04, 2014
iOS Dev Nugget 90 Full-Text Searchable WWDC Video Text TranscriptsJun 13, 2014
iOS Dev Nugget 87 What's New in iOS 8Apr 04, 2014
iOS Dev Nugget 77 RubyMotion Tutorial For Objective C DevelopersMar 28, 2014
iOS Dev Nugget 76 Importing Many Test Photos into iOS SimulatorJan 24, 2014
iOS Dev Nugget 67 Simulating a slow cellular network with Network Link Conditioner on iOSJan 17, 2014
iOS Dev Nugget 66 JBChartView for ChartingJan 04, 2014
iOS Dev Nugget 64 Placeholder Views Using PAPlaceholderDec 27, 2013
iOS Dev Nugget 63 Update Your iOS Development ToolboxOct 18, 2013
iOS Dev Nugget 53 Try Kaleidoscope, File Comparison for MacOct 11, 2013
iOS Dev Nugget 52 Set Up Crashlytics For Ad Hoc and App Store Builds OnlyJul 13, 2013
iOS Dev Nugget 39 Use NSCache Instead of NSMutableDictionary When CachingJun 21, 2013
iOS Dev Nugget 36 Use TestFlight for Ad Hoc BuildsMay 11, 2013
iOS Dev Nugget 31 3rd Party Documentation ViewersMay 04, 2013
iOS Dev Nugget 30 Shortcut key to toggle slow animations in the iOS simulator (part II)Apr 27, 2013
iOS Dev Nugget 29 Simulating a Custom LocationApr 12, 2013
iOS Dev Nugget 27 Two-finger touch in SimulatorMar 31, 2013
iOS Dev Nugget 25 Watch out for hotspot and in-call status bar heightMar 22, 2013
iOS Dev Nugget 24 Take Screenshots in the SimulatorMar 10, 2013
iOS Dev Nugget 22 Try AppCodeDec 28, 2012
iOS Dev Nugget 13 Simulating a slow cellular network with Network Link ConditionerNov 23, 2012
iOS Dev Nugget 8 Copy and paste from/to the iOS SimulatorNov 09, 2012
iOS Dev Nugget 6 Open app in Simulator with Finder
Dec 28, 2012 by Hwee-Boon Yar
It's crucial to test your apps against a slow cellular network. This affects how well your app performs and if it even works. For example, it is a common problem for apps to block when accessing the network. This problem is hidden on a fast connection.
Network Link Conditioner slows down your machine's network connection so you can test your app in the iOS simulator thoroughly. To install Network Link Conditioner with the latest version of Xcode (v4.5 as of writing), go to Xcode Menu, choose Open Developer Tool > More Developer Tools. This should bring you to Apple's developer portal where you can download a set of tools including Network Link Conditioner.
Once it's installed, it appears as a panel in System Preferences. Select the profile “Edge, Lossy Network” and switch it on. Voilà!
Like this post? Follow me @hboon on Twitter.
Related
Aug 23, 2017
iOS Dev Nugget 254 Paw, for Working with APIsJul 19, 2017
iOS Dev Nugget 249 App Transport Security Diagnostics with nscurlApr 13, 2017
iOS Dev Nugget 235 Testing Localization Using Launch Arguments (III)Feb 22, 2017
iOS Dev Nugget 228 Recording and Playing Back Network CallsDec 22, 2016
iOS Dev Nugget 219 Test Your App with Airplane Mode enabledMar 21, 2016
iOS Dev Nugget 180 Low Power ModeNov 25, 2015
iOS Dev Nugget 163 Testing Localization Using Launch Arguments (II)Oct 07, 2015
iOS Dev Nugget 156 -canOpenURL:Sep 23, 2015
iOS Dev Nugget 154 App Transport SecuritySep 15, 2015
iOS Dev Nugget 153 Shortcut to Open Log in SimulatorJul 16, 2015
iOS Dev Nugget 144 NSURLSession instead of NSURLConnectionMay 13, 2015
iOS Dev Nugget 135 CAShapeLayer, Animated Views and XCPShowView()Mar 06, 2015
iOS Dev Nugget 125 View Debugging in XcodeFeb 13, 2015
iOS Dev Nugget 122 Importing Many Test Photos into iOS Simulator IIOct 17, 2014
iOS Dev Nugget 105 Try FLEXOct 03, 2014
iOS Dev Nugget 103 Testing Localization Using Launch ArgumentsJun 13, 2014
iOS Dev Nugget 87 What's New in iOS 8Mar 28, 2014
iOS Dev Nugget 76 Importing Many Test Photos into iOS SimulatorJan 24, 2014
iOS Dev Nugget 67 Simulating a slow cellular network with Network Link Conditioner on iOSJul 13, 2013
iOS Dev Nugget 39 Use NSCache Instead of NSMutableDictionary When CachingMay 04, 2013
iOS Dev Nugget 30 Shortcut key to toggle slow animations in the iOS simulator (part II)Apr 27, 2013
iOS Dev Nugget 29 Simulating a Custom LocationApr 12, 2013
iOS Dev Nugget 27 Two-finger touch in SimulatorMar 31, 2013
iOS Dev Nugget 25 Watch out for hotspot and in-call status bar heightMar 22, 2013
iOS Dev Nugget 24 Take Screenshots in the SimulatorJan 05, 2013
iOS Dev Nugget 14 Charles Web Debugging ProxyNov 23, 2012
iOS Dev Nugget 8 Copy and paste from/to the iOS SimulatorNov 09, 2012
iOS Dev Nugget 6 Open app in Simulator with Finder
Dec 22, 2012 by Hwee-Boon Yar
Other than suppressing compiler warnings with #pragma, it is very useful to organize codes by using #pragma marks as section headers and dividers.
For example, like this:
@implementation SomeClass
#pragma mark Accessors
//Code...
#pragma mark Overridden SomeParentClass
//Code...
The #pragma marks are displayed in bold in Xcode when you browse the list of methods, letting you group code for specific purposes together. You can also use the following to draw a line in the list of methods.
#pragma mark -
Like this post? Follow me @hboon on Twitter.
Dec 14, 2012 by Hwee-Boon Yar
There's no good reason to start a project that doesn't use Automatic Reference Counting. Your code ends up being shorter and less prone to leaks and crashes. If you have libraries or older code that doesn't use ARC, add the compilation flag -fno-objc-arc for that implementation file. In Xcode, you can do this by going to the build target and choosing Build Phases > Compile Sources, paste in -fno-objc-arc to Compiler Flags. Tip: you can select multiple files and double click them to modify compiler flags for all of them.
Like this post? Follow me @hboon on Twitter.
Dec 07, 2012 by Hwee-Boon Yar
Sometimes you get mysterious crashes in your ad hoc build (and not on your debug builds) and aren't getting any luck with crash logs.
Go the old fashioned way with prints by using this function to write to a Campfire room synchronously and sprinkling calls to it liberally to identify where the app crashes.
Like this post? Follow me @hboon on Twitter.
Nov 30, 2012 by Hwee-Boon Yar
import is a preprocessor mechanism in Objective C (as well as C and C++). When file A #import file B, B is basically copy and pasted into A and processed. When you have many unnecessary #import statements, building an app can take longer than it needs to.
Use @class statements to declare classes where possible in your header files (.h) and put #import statements in your implementation files (.m) instead.
This applies to #include too.
Like this post? Follow me @hboon on Twitter.
Nov 23, 2012 by Hwee-Boon Yar
Did you know you can copy and paste from/to the iOS simulator?
To paste into the simulator, switch to the simulator, press Cmd+V and the content in the OS X clipboard will be placed in the iOS clipboard. Now tap any text field in the current app in simulator and paste like usual. Similarly, Cmd+C to copy from the iOS clipboard to OS X clipboard
Like this post? Follow me @hboon on Twitter.
Related
Apr 13, 2017
iOS Dev Nugget 235 Testing Localization Using Launch Arguments (III)Nov 25, 2015
iOS Dev Nugget 163 Testing Localization Using Launch Arguments (II)Sep 15, 2015
iOS Dev Nugget 153 Shortcut to Open Log in SimulatorMay 13, 2015
iOS Dev Nugget 135 CAShapeLayer, Animated Views and XCPShowView()Mar 06, 2015
iOS Dev Nugget 125 View Debugging in XcodeFeb 13, 2015
iOS Dev Nugget 122 Importing Many Test Photos into iOS Simulator IIOct 17, 2014
iOS Dev Nugget 105 Try FLEXOct 03, 2014
iOS Dev Nugget 103 Testing Localization Using Launch ArgumentsJun 13, 2014
iOS Dev Nugget 87 What's New in iOS 8Mar 28, 2014
iOS Dev Nugget 76 Importing Many Test Photos into iOS SimulatorMay 04, 2013
iOS Dev Nugget 30 Shortcut key to toggle slow animations in the iOS simulator (part II)Apr 27, 2013
iOS Dev Nugget 29 Simulating a Custom LocationApr 12, 2013
iOS Dev Nugget 27 Two-finger touch in SimulatorMar 31, 2013
iOS Dev Nugget 25 Watch out for hotspot and in-call status bar heightMar 22, 2013
iOS Dev Nugget 24 Take Screenshots in the SimulatorJan 05, 2013
iOS Dev Nugget 14 Charles Web Debugging ProxyDec 28, 2012
iOS Dev Nugget 13 Simulating a slow cellular network with Network Link ConditionerNov 09, 2012
iOS Dev Nugget 6 Open app in Simulator with Finder
Nov 16, 2012 by Hwee-Boon Yar
Ever gotten warnings such as "PerformSelector may cause a leak because its selector is unknown" when you send -performSelector:withObject: with the selector as a variable (that you know will contain a valid selector)? That's where #pragma is very useful. Do this to disable the warning for a specific chunk of code:
#pragma clang diagnostic push
#pragma clang diagnostic ignored "-Warc-performSelector-leaks"
[self.proxiedTarget performSelector:someSelectorVar withObject:obj];
#pragma clang diagnostic pop
Like this post? Follow me @hboon on Twitter.
Nov 09, 2012 by Hwee-Boon Yar
opensim is an excellent tool from Craig Hockenberry of Iconfactory.
When developing an iOS app, it's common to want to open the preferences or data files of that app for inspection or editing. Just run:
opensim <app name>
Download the version I modified slightly so it works with recent SDKs.
Like this post? Follow me @hboon on Twitter.
Related
Apr 13, 2017
iOS Dev Nugget 235 Testing Localization Using Launch Arguments (III)Nov 25, 2015
iOS Dev Nugget 163 Testing Localization Using Launch Arguments (II)Sep 15, 2015
iOS Dev Nugget 153 Shortcut to Open Log in SimulatorMay 13, 2015
iOS Dev Nugget 135 CAShapeLayer, Animated Views and XCPShowView()Mar 06, 2015
iOS Dev Nugget 125 View Debugging in XcodeFeb 13, 2015
iOS Dev Nugget 122 Importing Many Test Photos into iOS Simulator IIOct 17, 2014
iOS Dev Nugget 105 Try FLEXOct 03, 2014
iOS Dev Nugget 103 Testing Localization Using Launch ArgumentsJun 13, 2014
iOS Dev Nugget 87 What's New in iOS 8Mar 28, 2014
iOS Dev Nugget 76 Importing Many Test Photos into iOS SimulatorMay 04, 2013
iOS Dev Nugget 30 Shortcut key to toggle slow animations in the iOS simulator (part II)Apr 27, 2013
iOS Dev Nugget 29 Simulating a Custom LocationApr 12, 2013
iOS Dev Nugget 27 Two-finger touch in SimulatorMar 31, 2013
iOS Dev Nugget 25 Watch out for hotspot and in-call status bar heightMar 22, 2013
iOS Dev Nugget 24 Take Screenshots in the SimulatorJan 05, 2013
iOS Dev Nugget 14 Charles Web Debugging ProxyDec 28, 2012
iOS Dev Nugget 13 Simulating a slow cellular network with Network Link ConditionerNov 23, 2012
iOS Dev Nugget 8 Copy and paste from/to the iOS Simulator
Nov 03, 2012 by Hwee-Boon Yar
Since Objective C doesn't support namespaces, it is good to use prefixes for category methods like this:
@interface UIViewController (MOUIViewControllerAdditions)
- (void)moSomeFunction1();
- (void)moSomeFunction2();
@end
Notice that the category name has the same prefix (“mo”). It is especially important to give a prefix to your category methods because good function names can easily clash with an existing method of the same class either in the existing SDK or in a future version and be hard to detect.
It's a good habit to do the same thing for class names if you want to package them into libraries:
@interface MOMyClass : NSObject
@end
Use any prefix — one that is an abbreviation of your name or your company's name is good — as long as it isn't used by Apple or in popular open source libraries, e.g. stay away from the NS and UI prefixes as they are used by Apple.
Like this post? Follow me @hboon on Twitter.
Oct 26, 2012 by Hwee-Boon Yar
Use accessors everywhere, as much as possible.
Use them in -init and -initWithFrame:. If you provide an implementation for your own setter function, you'll need to synthesize it so you can access the private variable directly. The @synthesize statement also helps as a documentation cue to indicate you are accessing the private variable somewhere.
Define a property like:
@property (nonatomic,strong) NSString username;
and use self.username everywhere, except in the -(void)setUsername: function. And if you implement -setUsername: you'll also need to do a:
@synthesize username;
This makes it easy to control access to data, implementing caching and lazy initialization, as well as trigger related updates or process. I implement setters often in UIViewController subclasses to kick start a network fetch request for the data to be displayed in a view controller. For example, -setUsername: with a non empty string can begin fetching a user's profile.
Like this post? Follow me @hboon on Twitter.
Oct 19, 2012 by Hwee-Boon Yar
There's a few modern features of Objective C you should be using in new code, if not existing code. They make code easier to write and improve readability.
- Forward function declarations for "private" functions aren't needed anymore.
-
Use container and NSNumber literals:
NSNumber num = @{1.2};
NSArray a1 = @[@"one", @"two"];
NSMutableArray a2 = [NSMutableArray arrayWithArray:@[@"one", @"two"]];
NSDictionary d1 = @{@"key1": @"value1", @"key2": @"value2"};
NSMutableDictionary* d2 = [NSMutableDictionary dictionaryWithDictionary:d1];
-
Use container subscripting:
NSArray a1 = @"[@"one", @"two"];
NSString one = a1[0];
NSDictionary d1 = @{@"key1": @"value1", @"key2": @"value2"};
NSString val = d1[@"key2"];
In Xcode, you can use Edit > Convert > To Modern Objective-C Syntax to help you update existing code.
Like this post? Follow me @hboon on Twitter.
Oct 12, 2012 by Hwee-Boon Yar
This nugget is no longer applicable for current versions of Xcode and iOS:
Pressing the shift key three times toggles slow animations in the iOS simulator.
Like this post? Follow me @hboon on Twitter.
Oct 06, 2012 by Hwee-Boon Yar
Have many NSLog() calls, most of which is for printing out values or objects which you compose? Yes?
One of the most important tool in my iOS utility tool belt is LOG_EXPR(). It's written by Vincent Gable. Call LOG_EXPR() with a single value/object and it'll do the right thing.
int i = 3+4; //do something to get i
LOG_EXPR(i); //prints i = 7
CGRect rect = CGRectMake(10, 20, 30, 40);
LOG_EXPR(rect); //prints rect = {{10, 20}, {30, 40}}
It'll work with most built-in classes and objects.
You can get the whole git repository or just the 2 header and implementation files.
Like this post? Follow me @hboon on Twitter.
Related
Aug 15, 2018
iOS Dev Nugget 305 Declaring Distinct Types from General TypesJul 24, 2018
iOS Dev Nugget 302 RealmJun 09, 2018
iOS Dev Nugget 295 SwifterSwiftMay 23, 2018
iOS Dev Nugget 293 iOSSnapshotTestCase (was FBSnapshotTestCase)Mar 15, 2018
iOS Dev Nugget 283 Eureka for FormsFeb 28, 2018
iOS Dev Nugget 281 Use R.swift for Static References to Resources Like ImagesFeb 21, 2018
iOS Dev Nugget 280 Using Custom Fonts Without Updating Info.plist ManuallyDec 06, 2017
iOS Dev Nugget 269 Including Finger Touches in App Preview VideosJul 11, 2017
iOS Dev Nugget 248 In-app Native RoutingMar 01, 2017
iOS Dev Nugget 229 PromisesFeb 22, 2017
iOS Dev Nugget 228 Recording and Playing Back Network CallsOct 23, 2016
iOS Dev Nugget 210 PMAlertControllerJun 03, 2016
iOS Dev Nugget 190 Quick Look Plug-in for Mobile Provisioning FilesMay 20, 2016
iOS Dev Nugget 188 SwiftLintApr 20, 2016
iOS Dev Nugget 184 Async LibraryAug 31, 2015
iOS Dev Nugget 151 More Wrappers for Keychain AccessAug 17, 2015
iOS Dev Nugget 149 Timepiece, a Swift Library for Handling DatesJul 27, 2015
iOS Dev Nugget 146 UIStackView and TZStackViewJul 21, 2015
iOS Dev Nugget 145 Listing Available FontsJul 05, 2015
iOS Dev Nugget 143 Don't Forget SQLiteJun 09, 2015
iOS Dev Nugget 139 Custom Build Configurations and Xcode SubprojectsMay 19, 2015
iOS Dev Nugget 136 Auto Layout with CartographyApr 29, 2015
iOS Dev Nugget 133 Dollar.swiftFeb 06, 2015
iOS Dev Nugget 121 InflectorKitDec 26, 2014
iOS Dev Nugget 115 Displaying Information in Settings AppDec 19, 2014
iOS Dev Nugget 114 Preview an Image for DebuggingDec 12, 2014
iOS Dev Nugget 113 GPUImage, a GPU-based Image and Video Processing FrameworkMay 30, 2014
iOS Dev Nugget 85 A More Customizable Button For Different StatesMay 02, 2014
iOS Dev Nugget 81 TMCache For In-Memory and Disk-backed CachingApr 18, 2014
iOS Dev Nugget 79 TweetBot Photo Flicking EffectMar 07, 2014
iOS Dev Nugget 73 Open Source Date Picker from SquareFeb 22, 2014
iOS Dev Nugget 71 TapJan 31, 2014
iOS Dev Nugget 68 Custom URL Schemes DirectoryDec 20, 2013
iOS Dev Nugget 62 Using PDF Instead of PNG Files for Resizable AssetsSep 20, 2013
iOS Dev Nugget 49 Wrapper to Get UIColor ComponentsMay 17, 2013
iOS Dev Nugget 32 FMDB: Thin Objective C Wrapper Around SQLite